

toybiz
-
Posts
361 -
Joined
-
Last visited
-
Days Won
2
Content Type
Profiles
Forums
Gallery
Articles
Everything posted by toybiz
-
The MTK TD end caps were a bit shallow. With quite a bit of flaring at the base of the end caps forced to cut fairly high on the cap to get a straight side. 20 mm seemed to be the standard TD end cap width, in order to have a flat side end cap, I had to trim it down to 15 mm. Would this prevent me from any approval above basic 501st? Same with the drop boxes. They were flared quite a bit as you can see here. To get a decent straight side I had to cut above the flare. This left me with about 18 mm width on the drop boxes. I read on one recent Expert application that there isn't a standard on the drop box thickness as there were some movie set ones fairly slim.
-
Next, trimming some of the accessory parts. Shoulder straps, Knee pack, Belt, and Ab buttons This should cover the 1 1/2" wide white shoulder elastic straps nicely.
-
Well, got to start somewhere, so I choose to start by penciling the cut lines on the bicep and forearms as there was no harm in that right? First cut away! The forearm wrist openings don't have return edges so easy to start here. Just used the Exacto to score and snap. It left a slightly ragged edge but nothing some sanding couldn't fix. Time to the first cut? Two hours per the TK wrist watch. The first scissor cut surface wasn't very smooth as I found out using a pair of Fiskars plastic scissors. After some further research, it found out I would have had better results using a pair of Lexan scissors. So if you don't have a pair...GET ONE! They come in both curved and straight variety. Expect about $10-$30. I bought mine from eBay. A lot less sanding if you use some of these Lexan scissors.
-
Thank you Glen, Steve, and Paul. Many thanks for all that you three contribute here. I have seen so much of your contributions for the rank and file. Sometimes the info is painful to hear and a difficult pill for some to swallow but it gets the job done right? Well onto the next steps. I didn't have plans to make this a full step-by-step tutorial, as there are plenty of those. If my posts seem to jump ahead, no need to repeat every step. Just remember If I could find and learn from the early trail blazers, so can everyone else! After carefully cutting open the box, this was waiting inside. Now since this is my first set of armor, I wasn't sure what to expect, but looking at some of the other builds, there are makers that ship the kit wrapped in foam sheets. I thought that was how mine would but then again, nothing was broken. Although there were some handling wear from parts rubbing against each other everything was in order. I guess rub marks make for character, but if perfect shiny is your thing, get ready for some polishing. As you can see, the MTK is fairly complete. Even the basic helmet hardware, like washers, screws and rivets are included. Depending on your theme, the proper decals are included saving you some time but you will still need to pick up paint for the frown and ears. Autographed by Mike himself Obligatory armor laid out on the ground shot. The TK helmet piggy bank from Disneyland is watching over the parts and providing inspiration.
-
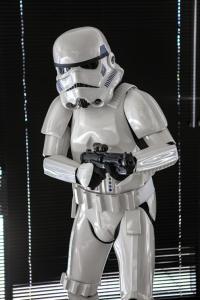
Hi everyone and first let me thank TK-3942 for steering me initially to FISD to get my start. I was like most others, started looking on eBay, Amazon and Google. I was tempted to purchase my first armor set on eBay, Rubies, or Star Fortress TK-3942 simply said to do my research here which eventually lead me to my armor consideration. A set of TM would have been my first choice, however getting authorization to spend the Imperial Credits from the Empire Financial Administration was not going to happen. While not on the vetted list, I choose MTK. This armor has received some good feedback, a few members were able to build theirs to Centurion levels. Plus I had to factor how often I would wear the armor (hopefully more than a few times a year) to justify the additional expense of the TM. This tread is actually post build, as I am about 95% completed but took some photos of areas of the build that I thought would be of value to others. Since I finally had some free time from the approx. 100+ hours I already spent I wanted to get started on the tread. For those of you getting started, yes it is tempting to give into desire and become impatient. But it is so true to do your research, learn from those who went before you and the mistakes (some costly) from those who couldn't wait. I come from the automotive industry and there are countless stories of people buying a car that turned out to be a money pit because they didn't do their research. It is the same in any hobby. OK enough about my "why" and onto the "what" of my build. It has been said many times that after a while you will start to recognize the subtle differences between armors and from which movie. I choose to follow the ESB TK build mainly because it was my favorite of the movies and plus there aren't as many ESB builds. Just to be different but not too different. I asked once and was flamed for asking about fitment from one maker to another but I still feel while any armor can be made to fit, there are still enough differences that should/need to be taken into PERSONAL consideration when choosing the maker. Reason? If all armor can net the same results then why is there so many discussions about the differences between them? Similar is not same. With that said here are some basic info about me so hopefully it could give anyone considering MTK how it would look if you choose to build a set. Height: 5' 8" / 174 cm Weight: 165 lbs / 75 kg Inseam: 30" / 76 cm (pants length) Arms: 32" / 81 cm (top of shoulder to finger tips) Waist: 34" / 86 cm Chest: 39" / 99 cm Neck: 15.5" / 39 cm Hat size: 7 Shoe size: 8.5 It would be a good idea to do some build research here and buy ahead of time some of the building tools to supplement what you many not already have. Here is what I needed: Scissors - something to cut plastic but small enough to turn corners (more on this later) Your choice of adhesive - I bought both CA (super glue) and E6000 Packs of fresh cutting blades - if you already own a box cutter get some fresh new blades, this will make your life easier Exacto knives - I bought fresh blades for the small one and an separate medium sized one just in case Cutting gloves - I found out these could be optional if you are confident with working around sharp tools and cutting Metal ruler - good for drawing straight lines and a cutting guide, I chose an 12" one Drill - to make holes for snaps and helmet rivets. I already owned one Rivet gun - with only 4 rivets needed, I went to Harbor Freight to pick an inexpensive one. Clamps - can't say enough about this. All sizes and shapes would be helpful. Just when you think you have enough, get some more. Rare earth magnets - these come in different sizes, shapes and pull strength. I choose round ones 1/2"h x 3/4"w from Amazon Masking tape - the blue or green stuff works great and don't leave much residue. Sandpaper - a variety of grit would be helpful. 220,440,800,1200 wet/dry type recommended Snaps - I got Dritz heavy duty size 24. They come in packs of 7 so I bought 6 packs. Dritz snap pliers - for 5/8" size or 24 above. This is optional as some snap packs come with an anvil and punch to install snaps with a hammer. Optional but I either owned or purchased: Rotary cutting tool - Dremel type with various sanding drums Hobby iron - to make some return edges Bucket - to hold boiling water to reshape some parts of the armor (more on this later) Important to allow yourself a well lighted work area. I did mine on the kitchen table but if you are going to produce some ABS dust, I would advise to move that part of the build outside or in the garage away from food prep area. With that, let's see what happens next. It took about 3 weeks from the time I inquired about MTK armor and the day this came shipped to my office. Exciting moment for myself and the other Star Wars geeks that I work with. Once I got it home, I took the obligatory brown box photo and then started to wonder where to start? Stay tuned for more.
-
Mike's kit is complete from the standpoint that he includes the following items in addition to the armor: All required helmet decals matching your build. EG ANH or ESB Hovi type mike tips S trim for helmet neck Brow trim Both TK and TD sniper knee plates Ab button decals Ear stripes decals Ear rank stripes decals Hardware such as rivets, nuts, washers, bolts and even split rivets. Aside from boots, gloves, under body suit, neck seal and a holster his kit is fairly complete. It was my first armor and I am nearing completion. It has its quirks like almost every other maker I've read about but if you are patient and willing to do plenty of research it will pay off. The effort required will be the same regardless of your armor choice. Remember its your $$$ and you are building this for you not us. You will get what you pay for in the long run but any armor can be made to look great with enough effort and $$$. Plenty of treads covering that subject. For me total price is a consideration for something that may get worn less than a handful of times a year but if accuracy is high on the importance meter, consider getting a TM. Good luck.
-
Looks great Ian. I really need to share my photos of my build too but hoping to be completed by 4-20 for an Anti-Bullying campaign/skit on May 2nd at my son's elementary school. Hoping to find some other local 501st TK that can spare a few hours for the kids. Keep up the awesome job and a box of band-aids near by! Adam
-
Truly a work of art and inspirational to those of us that have yet to complete our builds, thank you for sharing.
-
Nice recovery on the gap in the cap/back! Keep up the great work!
-
Fantastic newsletter. Filled with plenty of energy and eyes wide open enthusiasm. Can't wait to see what the following months will bring. Thank you all for your contribution! Adam
-
TK-31100 Requesting ANH Stunt Centurion Status [MTK*][113]
toybiz replied to bzb's topic in Request Centurion Status
Looks great! Best of luck on your application! -
Hi Andrew, I'm in the sanding/fitting pieces together stage of my MTK armor, similar in many respects as your ATA. Interesting there are plenty of assembly threads but one has to dig through a lot of builds to find what the owners did to overcome warpage. I am finding as you did, some parts can be "persuaded" with glue and clamps. While other parts, need to be reshaped with some creative application of heat and shaping. Thank you again from one structured individual to another, your careful planning and attention to detail spoke volumes to me. It gave me ideas on how to overcome the left bicep and right forearm shape problems with the MTK armor. I too didn't want to bore/document the cutting, sanding,and gluing parts of the build but been taking photos along the way of any challenges. Thank you, Adam
-
Thank you for sharing! Your journey on your TK build has me inspired to try to bring my build to a much higher level. Many more details on your photobucket account for those want to see even more.
-
Looking great! Keep up the great work & share your build journey with us!
-
Truly impressive both from an ingenuity standpoint and level of creativity. Watching with much anticipation for your final outcome. You are so close.
-
BZB I'm having too have to follow what you are experiencing as well. Perhaps its the ABS of the MTK kit is somewhat more flexible than other kits. Without another maker to compare to would be difficult to say with any certainty. Just keep trimming slowly but surely.
-
James' MTK TK Armor Build
toybiz replied to Jim13csulb's topic in Build Threads Requireing Maintenance
Congrats! You going to submit for EIB? -
Congratulation on your approval!
-
James' MTK TK Armor Build
toybiz replied to Jim13csulb's topic in Build Threads Requireing Maintenance
Best of luck but the armor is looking good. Adam -
Very nice work and thank you for sharing. Going to help when I get to the same places during my build! Adam
-
Impressive, most impressive... Thank you for sharing and the tips. This will help me when I get to the assembly part of my build.
-
James' MTK TK Armor Build
toybiz replied to Jim13csulb's topic in Build Threads Requireing Maintenance
Thank you James on the update. I'm at the penciling in stage on mine. Would you be able to show the reshaped Bicep? I would be interested in seeing how yours came out. Thank you Adam -
James' MTK TK Armor Build
toybiz replied to Jim13csulb's topic in Build Threads Requireing Maintenance
Thank you both for the answer on the 5th tooth. -
James' MTK TK Armor Build
toybiz replied to Jim13csulb's topic in Build Threads Requireing Maintenance
Looking great! Can't wait to see it all finalized. One question. On the helmet frown there are four obvious tooth gaps but on mine the left side has a small ambiguous 5th tooth gap near the end of the frown. Did yours? -
TKBoots back in business
toybiz replied to Griffon King's topic in Boots, Soft Parts, and other Accessories
Yes just received my pair today. Really nice and without actually finding a pair of Chelsea boots and painting them...
