gmrhodes13
-
Posts
31,206 -
Joined
-
Last visited
-
Days Won
1,069
Content Type
Profiles
Forums
Gallery
Articles
Everything posted by gmrhodes13
-
I would suggest heading over to the sith lords forum as Stormtroopers aren't big on lightsabers https://forum.501stsithlords.com/index.php
-
 Appears you already have TK access trooper, you may proceed with your EI application
 -
Hello and welcome aboard, when ever you get stuck and there's no one online to help you can always check our gallery sections, full of references
-
Hello and welcome to the forum, good luck with the research, hope to see a build thread from you soon
-
TK ANH Stunt by CloseTheBlastDoor
gmrhodes13 replied to CloseTheBlastDoor's topic in ANH Build Threads
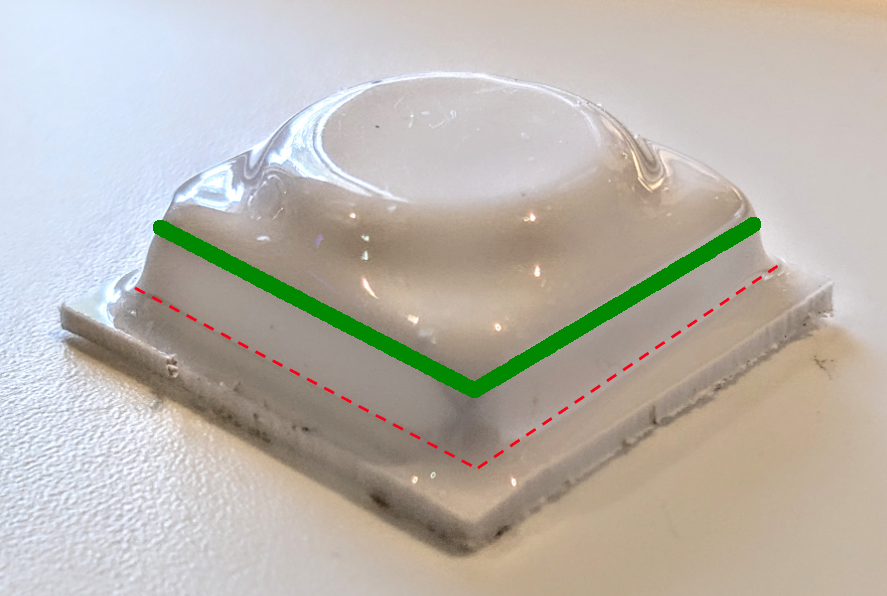
For Level 3, the corners of the plastic ammo belt shall be trimmed at a 45 degree angle that meets the outer edge of the cloth belt. Just trim the ends slightly so the corners meet with the fabric belt, correct position for drop boxes, yes different makes are differently sized, not an issue. Also take note of the first picture posted, notice the rivets on the plastic belt ends aren't right in the middle of that area so you don't have to be mm perfect there is no measurement to abide by Belt button cover reference Only raised area is the circle One thing to also take note of when fitting the belt is once worn it can ride up on the back because of the angle of the kidney, which makes the sides sit little bit of an angle, this can drop the front of the plastic belt.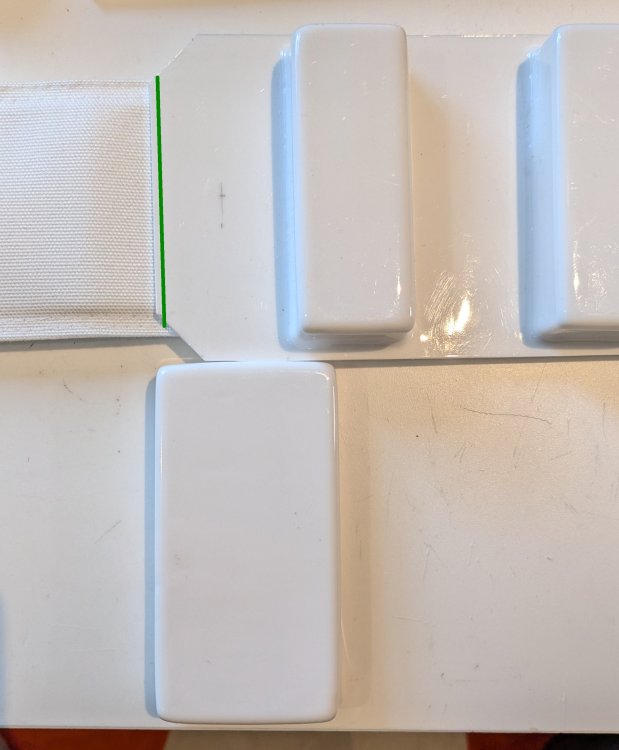
-
Master Armorer Program - 2024 Relaunch
gmrhodes13 replied to themaninthesuitcase's topic in FISD Master Armorer Program
Well done Arthur -
You can also add some white to the mic tip rims and insides L2 and above Correct Aerators/Hovi-MIX tips are present. Screens used shall be of a wide type mesh, with the rim of the mic and the inside white or painted white.
-
Master Armorer Program - 2024 Relaunch
gmrhodes13 replied to themaninthesuitcase's topic in FISD Master Armorer Program
Just enter their TKID number https://www.501st.com/holocron/member/search (login is same as your legion forum) -
TK ANH Stunt by CloseTheBlastDoor
gmrhodes13 replied to CloseTheBlastDoor's topic in ANH Build Threads
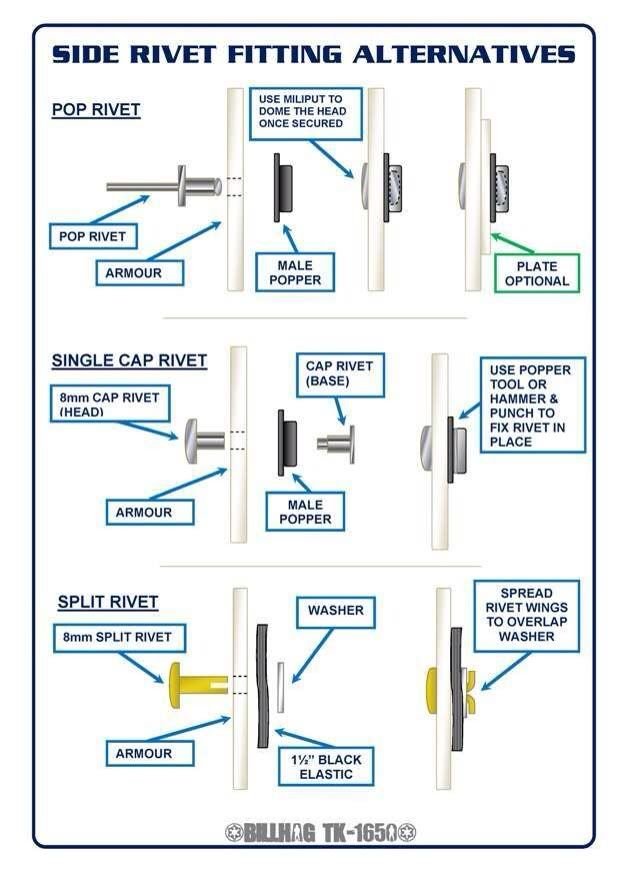
Get ready, info overload The rivets you have are fine to use on the holster, hopefully they are not the short post type. If the posts are long enough you could add male snap on the back of the belt and female on the holster, so you can remove between troops (note 4 rivet placement is only for HERO, don't make that mistake ) Different attachments There are variants on holster placement latest info in this thread Bending the belt helps it to stop springing off when knocked, snaps don't like to be on an angle Bending the ABS Belt by gazmosis, Boba_Skywalker3 Great how to by Tony Belt Assembly by ukswrath If you need to make a fabric belt https://www.whitearmor.net/forum/topic/665-howto-a-guide-to-making-a-canvas-belt/ I use regular snaps behind the button covers to fabric belt, and also from fabric belt to armor Don't take note of the center snap on the abdomen, I thought this would stop it slipping but really didn't need it, I was oh so young and dumb . You can add velcro here if you find it drops at the middle. The top of the ABS belt shall sit at or just above the bottom of the central and vertical ab button panels. A slight overlap is suggested, but not required. The bottom of the canvas belt should ideally sit above the bottom of the kidney plate and not overlap the kidney/posterior plate connection. Belt button cover reference For Level 3, the corners of the plastic ammo belt shall be trimmed at a 45 degree angle that meets the outer edge of the cloth belt. For Level 3, Drop boxes are vertically aligned with the end of the ammo belt with minimal gap between belt and box. For Level 3**, Drop boxes must have full inner drop boxes to close the back. I will highlight a few important details From the CRL: Belt Belt face is made of plastic (TK ammo belt). The soft belt proper is made of canvas, or material with a canvas covering. Size must be 2.75” (70 mm) to 3.25”(83 mm) wide and not wider than the plastic portion of the belt. The color is be white to off-white. The drop boxes dangle from the sides of the front plastic belt (ammo belt) via white straps and are aligned under the plastic tabs of the ammo belt. OPTIONAL Level two certification (if applicable): There shall be three square buttons, one centered in the middle and one on each end of the plastic ammo belt.. OPTIONAL Level three certification (if applicable): Drop boxes must have full inner drop boxes to close the back. Flat covers are not allowed. Drop boxes are vertically aligned with the end of the ammo belt with minimal gap between belt and box. The corners of the plastic ammo belt shall be trimmed at a 45 degree angle that that meets the outer edge of the cloth belt. The top of the ABS ammo belt should sit at or just above the bottom of the central and vertical abdomen button panels. Canvas belt can not contain patches of any sort. Canvas belt must be firm / sturdy in appearance. No creasing or sagging 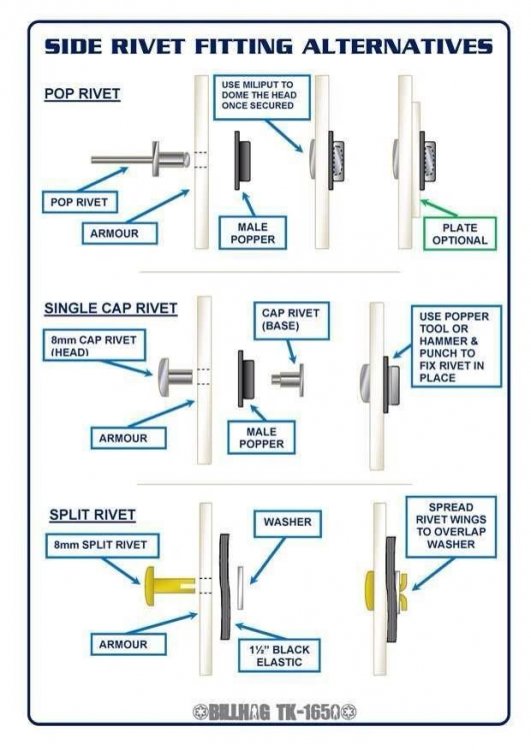
-
TK ANH Stunt by CloseTheBlastDoor
gmrhodes13 replied to CloseTheBlastDoor's topic in ANH Build Threads
Correct a few makers use smaller caps so pipe must be smaller too (WTF, ATA and I think AP), it does make them look a little off with length and gaps, but normally no issues having them approved -
TK ANH Stunt by CloseTheBlastDoor
gmrhodes13 replied to CloseTheBlastDoor's topic in ANH Build Threads
Can depend on the hand guard itself or the gloves, I've had to use different types of adhesive in the past, CA glue, Super glue, E6000 and even silicon, using a small test area is best. Hopefully they stay held, then can come off a little with movement of trooping. Your left hand glove looks a little lower than the right, that could be the image though. -
You can trim the tops of the things then nip off the corners of the cover strips, I slip a blade underneath the cover strip then cut the corners Some round off the corners, some cut them on an angle, you see the later more in screen references, both ways approved up to L3
-
Either freeze or leave in a warm salt water bath, it can loosen. You may not even have to remove the coverstrips though, especially if you are trimming the tops of the thighs. Here's some builds you may get some ideas from https://www.whitearmor.net/forum/topic/38416-crickets-rs-stunt-build-for-the-vertically-challenged/ https://www.whitearmor.net/forum/topic/38842-fragarocks-rs-stunt-build-not-to-scale/ https://www.whitearmor.net/forum/topic/42868-sha-shas-wtf-anh-stunt-build-complete/ Also https://www.whitearmor.net/forum/topic/48922-cutting-the-thigh-parts-from-the-bottom-instead-of-the-top/ https://www.whitearmor.net/forum/topic/12972-howto-make-a-return-edge-on-armor-using-a-heat-sealing-iron/
-
Just make sure you shake the cans, again and again while spraying, I may have had some bad batches or long shelf life cans but had several spray dry intermittent, almost came out like sand was mixed. I took them back for replacements but one did just the same, I know only use Rustoleum for cheap props just in case. Others seem to have no issues so don't be afraid of using it just test first.
-
TK ANH Stunt by CloseTheBlastDoor
gmrhodes13 replied to CloseTheBlastDoor's topic in ANH Build Threads
Trimmed and looks good! But I've seen some posts where the line of buttons should face towards the back instead of the top - true? Should face backwards so you can see the O detail Attach elastic to the shoulder straps to hold down the backs of the shoulder bridges. I remade the shoulder straps, and decided to secure the ¼” elastic inside the creases of the 2” white strapping. This worked out pretty well. Overall, the straps are much shorter than before, and seem to fit OK. Then I added the double snaps for the limb attachments, biased towards the front. You may find elastic is better for the straps especially when dressing, some times you need a little stretch, see how you go Figure out how to hold up the thighs. I’ve seen several posts on this. I’ve also seen something about ‘X’-style suspenders, but I’m not sure if those are meant to hold up the thighs, the torso, or both. I ordered a leather belt and fashioned the loops as described in other posts. We’ll see how this holds up. Torso holds up with your shoulder straps, all the body armor will "clamshell" around you. Only need one loop for the thighs I use snaps to attach but here's one that's glued Fit the shoulder bridges. I’m still having trouble with this. I don’t have the right curve yet, and with the armor on, I will need to have a second person help me with fitting and reshaping. I didn’t find a suitable box to fit the chest and back plates over, so with the armor on, I went back and forth between the mirror and the stove on this one. It’s much closer now, but still might need some adjustments. Looks like some twisting is required, too. How flat should they sit on the back side of the armor? They should lay flat, elastic also helps, sometimes they need a twist too Put in the snaps on the cod and butt plate. Done (as posted previously) Put in the “Han” snap on the upper right of the ab plate. I've seen that this should be a male snap. Does it really face inward? I've seen conflicting measurements, too. Some say 20mm in from the left, 20mm down. Others say 10mm in from the left. Yes and approximately. You can compare with some EIB or Centurion applications to see what has been approved. Sometimes referred to as the "Han" snap, for Level 3 a single male snap on the top right corner of the ab plate is present. Note in the photos that it is the bottom of the snap that faces outward and is not painted. This is also sometimes referred to as the "Han" snap. Cover the left side ab-to-kidney rivets on the inside with silicone or something equally smoothing. Done! Make some ABS paste and clean up the back bottom of the right thigh. Having trouble finding such a small amount of acetone, since they sell them in quarts/liters at my hardware store. Going with Sugru. Nail varnish remover can work (we don't have it as strong down here) Paint tops of all rivets. Turns out that the paint I ordered, even though labeled Testors 1145TT gloss white, was in fact silver! Needing to re-order. Testors seems harder and harder to find since Rust-oleum seems to have purchased the company. I use spray enamel paint, spray some in the cap and let to thicken, as long as it's close to the white of the armor -
Hello and welcome aboard, this can be a very helpful thread
-
For as long as I can remember most have advised to go one size up with Keep Trooping (previously known as Imperial boots). You will find some links in this thread in regard to sizing which help.
-
SublimeBW's Armor Master's (AM) ANH Stunt Kit - Build Thread
gmrhodes13 replied to SublimeBW's topic in ANH Build Threads
Looking forward to seeing you approved very soon -
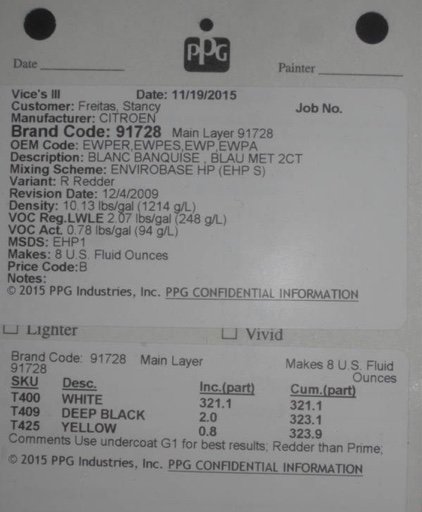
I have both fiberglass and plastic, I do find the fiberglass a little heavy at times but I do have neck issues. One big problem with the fiberglass helmets was cracking around the neck, for transport they bolted down the helmet to the polystyrene foam with a cross of wood, this put some pressure on the neck and could cause cracks in transport with any movement, many finding this when opening their boxes. You can also crack just by holding around the neck area for too long as they are a little thin there, this was common for the earlier pre production helmets. It's advisable to add fans just to clear your lens, it can get pretty sweaty in there. Should be no issues getting the helmet approved. One thing to take in account is Jim's kit will need painting so you will have to try to find a paint which closely matches the color of the helmet. Many opted for automotive paint and this code was a close match. I was lucky, a local automotive paint supplier had a base white in spray can which was acrylic, quick drying and could be sanded and polished if needed, that matched the helmet nicely. Another paint some used was Rust-Oleum 2X Painter's Touch Gloss White a cheaper alternative to automotive paint.
-
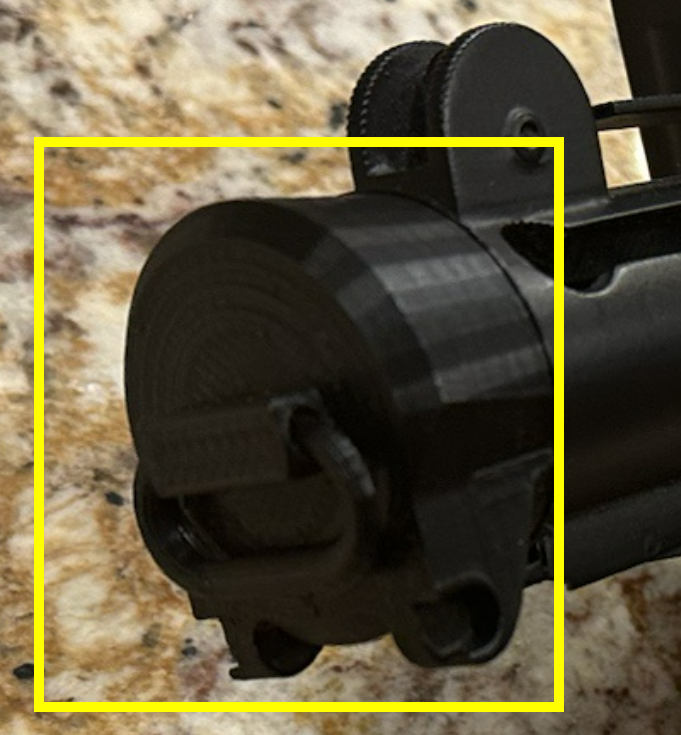
While making those changes you may want to do a little work on the endcap and D ring, appears to be 3D printed with not prep work, sanding or paint, can see ridges on the curved areas and print lines on the back and D ring mount. OPTIONAL Level two certification (if applicable): 3D printed blasters can not contain visible print lines and must be sanded smooth for a more realistic appearance.
-
Traps, tears, tube stripes are all painted on, references here https://www.whitearmor.net/forum/topic/43220-rebels-stormtrooper-reference-pics/ Hovi's are very simple compared to regular TK Don't forget to post your build in the Rebels Stormtrooper build area https://www.whitearmor.net/forum/forum/198-rebels-tk-build-threads/
-
WIP 3D print PLA TLJ Phasma Build!
gmrhodes13 replied to MikeWazowski's topic in Captain Phasma Build Threads
What nozzle do you have, I have used alcad with a 0.5 nozzle (same for aluminuster) and had no issues. I did find it sprayed better with a lower air flow. You can adjust the flow on the rear of the brush on most models. -
For everything stormtrooper you can't go past this thread Good luck with your pilot build
-
Hello and welcome aboard some great info on the ROTK here Good luck and hope to see a build from you soon
-
TK-15317 Reporting for Duty!
gmrhodes13 replied to Orrin15317's topic in Newly Approved Members - Sound Off!
Congratulations trooper and welcome to the ranks