


gmrhodes13
-
Posts
31,230 -
Joined
-
Last visited
-
Days Won
1,071
Content Type
Profiles
Forums
Gallery
Articles
Everything posted by gmrhodes13
-

Jakob's RWA ANH stunt build (aiming for centurion)
gmrhodes13 replied to Yacorp's topic in ANH Build Threads
The mic tip backs being thin is a common problem, personally I don't use ABS paste as it is really thin there and the paste may disform when drying. I use a washer on each one, I place the washer over a socket then hammer a punch in the middle, this curves the washer which then fits nicely over the back of the thin area, I just add a little E6000 to hold. I've seen others use various different glues, fiberglass resin, sugru, what ever works. I normally add a few magnets to hold together the sides while trimming the ears, once added the screws in the ears will pull everything together. Normally the only place you will need ABS paste is any gaps in the lower ridges of thighs and some who have to add shims in the sides of the ab/kidney use it to fill the join seam, apart from that I don't use it. Obviously it can be used for other things like any mistakes, teeth cut out too far, holes drilled in wrong place. -
Definitely have your shins and wear the boots to get a true idea of sizing and how much extra material you'll need to add.
-
Hello and welcome aboard, there is not a lot of difference between ANH Stunt / Hero and ESB, with a few things swapped out you could do all 3 versions, which many have. Many purchase RS and are happy with them. Hope to see BBB photos from you in the not too distant future Good luck
-
Is there something weird with the vocoder or is it just lighting, appears angled halfway through
-
Good morning Troopers.. Steps to my passion.
gmrhodes13 replied to Harder's topic in New Member Introductions
Every piece adds up in the end -
I usually use the "direct link" if using computer or "copy image link" on mobile, or they won't show ie: Looking good, gets exciting the more pieces go on the body. You will find wearing boots will bring the shins up you have room at the top of the thighs to come up so that will not only reduce the gap there but also give you a little more room at the knees. You may find you might have to bring the ab/cod down a little too if you still have too much gap between the cod and thighs.
-
Thanks Andrew. All the velcro inside is dry so fitted the fan and foam, also made a template for the lenses, marked and cut out, I use a little hot glue just to hold them in place than apply some black silicon around the edges, I like the darker look inside. And fitted. Don't be too concerned if you have small gaps, does help with air flow Time to add the decals, yes I'm going to cheat and not paint, my hands are no longer up to painting fine lines after 2 finger operations and arthritis in a few knuckles. Dave M decals, a little expensive with shipping but a must if you can't paint and want to go L3. Make sure you have the correct tubes stripes on the right side (or left ) You want the tube stripes falling forward at the front. If you look at the image bellow you can see the front leans forward ie: front \\\\\\\\\\\ back Should be a pencil width from the cheek. As I guide I like to use a piece of masking tape the same size as a pencil Trim to size and apply I like to pull away from the decal as I find it doesn't pull the decals off while removing the top sheet. Repeat on the opposite side. On to the tears and traps, I find it easier to trim the decals down to size and test fit, adding a little tape in places is a good guide. The decals don't fit all helmets perfectly so you may need to trim down slightly, using a permanent marker is a good way to restore any missing black lines you may have to trim off. Any air bubbles just a very impolite person with a pin and push the air out. No this is not how the brow trim looks finished, it was pulled down to apply the decal And helmet is done for the time being, I'll apply some light battle damage/weathering once the armor is complete, I like to do it all at the same time so you get a consistent look.
-
Nice work trooper, good luck with approval
-
DarthBiscuit's R1TK Build (Jimmiroquai kit)
gmrhodes13 replied to DarthBiscuit's topic in Rogue One Build Threads
-
Have you thought about using an online image host, many are free, some of us use Imgur, once uploaded you can just copy and paste the "direct link" into your posts, could be an option
-
Cricket's RS Stunt Build (for the Vertically Challenged)
gmrhodes13 replied to Cricket's topic in ANH Build Threads
Dirty dirty girl, looks great -
Can't wait for larger resin printers to become available (and cheap)
-
Seems you have covered pretty much everything, RS are normally pretty good, recently they where contacted about adjusting a few details so they meet L2 and L3 standards. Looking forward to seeing the BBB photos.
-
ANH Stunt - AP Trimmed - First TK Build
gmrhodes13 replied to MightyAtom's topic in ANH Build Threads
You will normally find the cod is just snug enough under you undercarriage so it doesn't cut off circulation -
ANH Stunt - AP Trimmed - First TK Build
gmrhodes13 replied to MightyAtom's topic in ANH Build Threads
Looking good, you may find once you have your thighs on that the ab/cod may need to come up a little. Nice work. -
Ok this one was a little easier, cut wood to size needed Heat plastic and push down Trim to match curve of ab and molded area Happy with how it's looking Next glue then add the ABS paste Did someone say TFU upgrade kits
-
Thought I'd tackle the smaller ab button plate as there needs to be 5 buttons not 4 like most other versions of armor. So first work out the length of plate, then button spacing and drill Drill wood with larger holes than needed Make a plate identical to the first plate, this will house the rivets (which happen to be the right size). Added a washer behind to help hold them out a little more. Test the two pieces fit Heat up your ABS sheet Align and press together Let cool down then separate Trim to size Check for fit 5th button is now one button higher than larger ab button plate. Next to fill the area behind, may do the same method, use blocks of wood the same size as the original molded area, heat some ABS, mold then trim to match and add some ABS paste to fill any seams then sand and polish.
-
Price isn't awesome though, going to be $700 AUD here going on one shops pricing
-
Hello and welcome aboard
-
Back to cold wet weather again so not much more achieved. Had some old yellowed hand plates so applied some screen printing ink, have used before and it works well, just need to put in the over around 60C for a short time to help set the ink I put pieces of cardboard inside so the gloves lay flat, applied black silicon as I find that works best and is easy to peel any excess away. Basic fan setup, elastic looped and velcro added to hold battery box, velcro added to blower fan so you can adjust direction, also added some screen mesh on the open fan side, nothing worse than getting a goatee hair stuck in the fan, on/off switch bracket made, will just E6000 in place when I add the internal velcro. I'm cheap with helmet padding, just use soft yellow foam, round thin piece for the top of the head and 2 blocks of foam which go either side of the head, adding velcro allows you to remove them for cleaning.
-
Jakob's RWA ANH stunt build (aiming for centurion)
gmrhodes13 replied to Yacorp's topic in ANH Build Threads
Height of the brow looks good, with regards to the sides you want to try to have the same distance on both sides, I find looking at the front corner of the trap's and corner of the eye's is the easiest way to compare. You also want to take note of how the ears will sit, ideally the angle of the ears should resemble the references below -
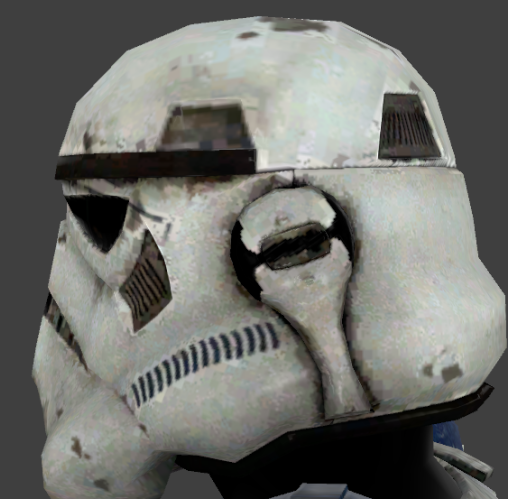
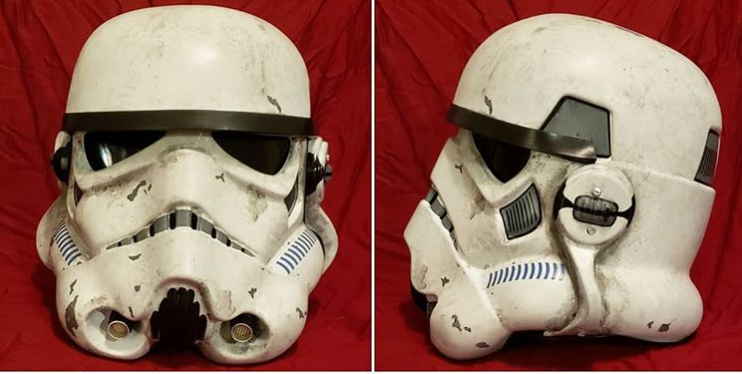
Hi Lee congrats on your purchase, I would suggest starting a build thread yourself, I've only recently started looking into the CRL and comparing the armor with references and there are a few things you may want to address. Shoulder bells have rounded corners and straight sided, the reference shoulder bells are curved on the sides but do not have rounded corners. I would also trim the excess cover strips which are overhanging the biceps. Brow trim should be brought up, at the moment it has a "hero" appearance and should look more "stunt" (higher brow) with an area of white showing between the brow trim and eyes. Also brow trim should be longer and meet with the corner of the trap. The 5th button on the smaller ab plate is lower than the larger ab plate, should be same as TKC : The left vertical row of ab plate buttons contain five buttons (fifth button must align one button higher than the top button of the larger button plate). There are dark areas in the corner of the inset plate on the back, as well as a small grey screw/detail in the middle of the bottom of the inset plate, you could either paint or apply a small round decal. The belt appears to be a different color and has a center rivet hole Thigh cover strips should stop above the lower ridge. Detonator clips should align with the endcaps, also length of cylinder should be: The total length is approximately 7.50" (190.5mm, Shoulder straps should lay flat on the back plate with some dark weathering around the edges. Detonator also appears a different color. Coverstrip is not centered on the right shin at the back You could also contact Andrew @Sly11 our DL in regards to becoming the CRL model.
-
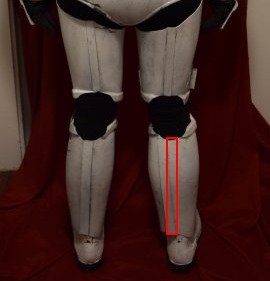
Nice work trooper, a couple of things you may want to address before the DO's get to work. Your butt plate is overlapping your kidney and belt, belt boxes are not aligned with the end of the belt, ab plate is also overlapping your kidney plate You may want to drop your thighs a little as they are hitting on the rear. Your backplate is also overlapping the kidney. You may have a small amount of paint on your gums which you might want to remove. Using a toothpick is an easy way of removing excess paint. You don't seem to have much gap between the caps and control plate. Caps should be @3/4" (19mm) Ab plates should not have rounded corners Ideally your thigh ammo strip top edge should align with the top of the lower ridge and does not have a rounded top corners Good luck with approval
-
As Mike has now sold the armor used for the initial TFU Stormtrooper CRL I will start a new thread so we can carry on, thank you once again Mike "SolidScrafty" TK80494 for starting the CRL and good luck with your future projects. Updates from the TKC have been brought over as well as a few things moved for basic approval, as the TFU Stormtrooper is lightly scuffed / battle worn which is a major difference between it and a OTTK it should be requirement for basic approval. Assembly can be either overlap or butt/join/coverstip as per TKC CRL Google drive CRL images https://drive.google.com/drive/folders/16RvrDvfdKSEtVPmMp1FMWih2e3Z-ZqUX?usp=sharing Build thread here https://www.whitearmor.net/forum/topic/50096-tfu-tk-build-85421/ Previous CRL in progress is here https://databank.501st.com/databank/Costuming:TK_TFU Description: Stormtrooper - The Force Unleashed (TFU) Prefix: TK Detachment: First Imperial Stormtrooper Detachment Context: The Force Unleashed Stormtroopers fanatically loyal to the Empire and impossible to sway from the Imperial cause, they wear imposing white armor offering a wide range of survival equipment and temperature controls that allow the soldiers to survive in almost any environment. Stormtrooper, The Force Unleashed Model TK-85421, Photo by Glen Rhodes General Construction Notes Assembly can be either overlap or butt/join/cover strip methods. All Armor parts are weathered, lightly scuffed, battle damaged. Weathering must match visual references. See Stormtrooper: TFU Weathering for more information. Images to be added to the weathering section. Required Costume Components The following costume components are present and appear as described below. Helmet Traps (trapezoids on dome of helmet) and tears (area beneath the corners of eye lenses) are grey with a black outline. Rear traps and tears have vertical black lines. Lenses are flat material, green in color, sufficiently dark enough to obscure the costumer's eyes. The “ear” bars have three or four bumps and are grey or painted grey, with a black outline. Painting the bumps with rank stripes (highlighted) in black is optional. Ears shall have a black horizontal anchor-like detail on each side of the ear bar. Frown is painted grey and does not leave the teeth area. Eight total teeth on the frown are cut out. Tube stripes are medium blue, numbering between 9 and 16 per side with the curve bends extending backwards. Vocoder (vertically ribbed chin detail) is painted black. Aerators/Hovi-MIX tips (cylinders on either side of the vocoder) are black or painted black. Tears, traps, and tube stripes may be hand painted, decals, or decals that replicate hand painted. Mesh may be used behind the frown to obscure the face of the wearer. Note: The helmet is accurate in detail and proportion to official references. - Many commercially available helmets or those considered disproportionate in size or shape are ineligible. OPTIONAL Level two certification (if applicable): Ears shall have three screws per side, one above and one below the ear bar and one at the base of the helmet. Ear bars have four bumps only, not three. Traps/tears and tube stripes shall have the correct ANH TK details Correct Aerators/Hovi-MIX tips are present. Screens used shall be of a wide type mesh, with the rim of the mic and the inside white or painted white. OPTIONAL Level three certification (if applicable): Ear bars shall have only one bump painted in black (rank stripes). Neck trim shall be of an s-type profile rather than a u-type profile. S-trim join is on the rear of the helmet Tears/traps shall be hand painted or use decals that emulate hand painted (with correct ANH TK details). Ear screws shall be slotted, flat topped, countersunk and painted white. The vocoder must be integrated into the helmet, and not a separate piece. Neck Seal Black with horizontal ribs, fitted to the wearer, and extending from the base of the neck to conceal the entire neck. Undersuit Black non-textured material, either one-piece or two-piece construction with no visible zippers or logos/designs. Shoulder Straps These shall be securely mounted in front and may free float in back. OPTIONAL Level two certification (if applicable): No visible rivets are allowed. Shoulder straps shall not have large flat tabs on the ends, they shall be ribbed 100%. OPTIONAL Level three certification (if applicable): Shoulder straps have dark weathering on both front and rear of the straps. Shoulder Armor One on each shoulder. The shoulder bells are considered effectively symmetrical; they may be worn interchangeably on the left and right shoulders. OPTIONAL Level two certification (if applicable): Shoulder bells have a slight outward curve with square corners not rounded. No lower elastic straps across the biceps. OPTIONAL Level three certification (if applicable): Upper Arm Armor Biceps are fully closed. OPTIONAL Level two certification (if applicable): OPTIONAL Level three certification (if applicable): Forearm Armor Forearms are fully closed. OPTIONAL Level two certification (if applicable): No return edge on the inside of the front of the forearm is allowed.: OPTIONAL Level three certification (if applicable): Gloves Black in color, made of either rubber, nomex, leather, or leather-like material, with no visible straps or logos/designs. The fingers are enclosed, non-textured. OPTIONAL Level two certification (if applicable): Gloves shall be rubber or rubber like chemical gloves in black. OPTIONAL Level three certification (if applicable): Hand Plates Roughly pentagonal in shape, the hand plates are mounted securely over the back of the glove. As an alternative to plastic, these may be made out of latex or latex-like material. OPTIONAL Level two certification (if applicable): Hand guards shall be latex or latex-like, painted white, affixed to rubber gloves: OPTIONAL Level three certification (if applicable): Chest Armor Chest plate overlaps the abdominal plate. A white flexible U shaped gasket or molded lip shall be present around all edges. OPTIONAL Level two certification (if applicable): Fabric or elastic strip connecting chest to back shall be either black or not present. OPTIONAL Level three certification (if applicable): Back Armor Back plate contains a "O II" design. A white flexible U shaped gasket or molded lip shall be present around all edges. OPTIONAL Level two certification (if applicable): Inner recessed plate corners have black detail/weathering. There is a small silver screw (can be painted or decal) in the middle bottom of the inner recessed plate. OPTIONAL Level three certification (if applicable): Back plate shall have no, or minimal overlap of the kidney plate. Abdomen Armor Ab plate buttons shall be all black. Ab plate button detail shall be inverted compared to ANH/ESB. The left vertical row of ab plate buttons contain five buttons (fifth button must align one button higher than the top button of the larger button plate). A white flexible U shaped gasket or molded lip shall be present around all edges. OPTIONAL Level two certification (if applicable): There shall be no split rivet or brad visible on the crotch tab of the ab plate. OPTIONAL Level three certification (if applicable): All buttons on the ab plate are the same size and color and are visible (not covered by the belt). There are 2 rivets on either side of the ab, approximately 5/16"(8mm) diameter which are lined up with the ones on the kidney. Approximate placement of the rivets is: 25mm from the top edge and the bottom is 25mm above the top of the fabric belt and 20mm from the side seam, painted white. Kidney & Posterior Armor A separate kidney/butt plate is not allowed - the kidney and butt plate shall be combined/fused to a single plate/one piece. A white flexible U shaped gasket or molded lip shall be present around all edges. The crotch tab of the butt plate area may or may not have visible snaps. OPTIONAL Level two certification (if applicable): There shall be no visible snaps, rivets or brads on the crotch tab of the butt plate tab. OPTIONAL Level three certification (if applicable): There are 2 rivets on either side of the kidney, approximately 5/16"(8mm) diameter, these are lined up with the ones on the ab, approximate placement of the rivets is: 25mm from the top edge and the bottom is 25mm above the top of the fabric belt and 20mm from the side seam, all painted white. Belt Belt face is made of plastic (TK ammo belt). The soft belt proper is tightly woven nylon/cordura like/style material or material with a tightly woven nylon/cordura like/style covering. Size is 2.25" (57mm) to 2.5" (64mm) wide. The color is white to off-white. The drop boxes are white and dangle from the sides of the plastic front belt (ammo belt) via white straps and are aligned with the end of the ammo belt. The belt may be longer than standard ANH/ROTJ with square buttons positioned close to the end of the belt. OPTIONAL Level two certification (if applicable): Leather and vinyl are not accurate. There are two square buttons, one on each end of the plastic ammo belt. There should be no center square button or rivet, it is not accurate. OPTIONAL Level three certification (if applicable): The corners of the plastic ammo belt shall be trimmed at a 45 degree angle. Square buttons are positioned approximately 5-10mm from the end of the belt Drop boxes are closed in the back. The belt proper shall have (eight total) white rivets. Two rivets close to each side of the thermal detonator, and two rivets approximately an inch away from the edge of the ammo belt (The rivets form a rectangular pattern) and are painted white. Game ROTJ https://databank.501st.com/databank/File:TK_rotj_detonator.png Thermal Detonator (A.K.A. O2 canister) attaches to the center back of the belt. Detonator consists of an all grey cylinder, without silver stickers or silver paint. The cylinder is between 2” (50mm) and 2.68"(68mm) in diameter with white end caps on each end. The white control panel pad faces upwards, with the controls/round washer style detail closest to the right end cap. The total length is approximately 7.50" (190.5mm). The thermal detonator is attached via metal or metallic-appearing clips, approximately @1" (25mm) wide. The thermal detonator may be either ROTJ or the "game style" version. The ANH/ESB style is not allowed. OPTIONAL Level two certification (if applicable): Thermal detonator belt clips are positioned with little to no gap between the clips and the end caps. OPTIONAL Level three certification (if applicable): Only "game style" thermal detonator can be used. Thigh Armor Thigh armor shall be closed in the back. The ammo belt shall be installed on the bottom of the right thigh. OPTIONAL Level two certification (if applicable): The thigh ammo belt is not rounded off like ANH OPTIONAL Level three certification (if applicable): The thigh ammo belt shall be positioned on top of the lower ridge as seen in official references. The thigh ammo is glued and has no rivets. Lower Leg Armor Greaves close in the back. The trapezoid knee plate (sniper knee plate) is affixed to the left greave and may have two visible brads or rivets securing it to the greave. OPTIONAL Level two certification (if applicable): The sniper knee plate is glued and has no rivets. OPTIONAL Level three certification (if applicable): Boots Boots are above ankle height and made of white leather or leather-like material. Small U-shaped elastic sections on both sides of the ankle. Flat sole with a short heel. No buckles or laces. Jodhpur/ Chelsea-type boots or an equivalent style is acceptable. Elvis or Mariachi boots are not allowed. OPTIONAL Level two certification (if applicable): There is no seam present on the front of the boot. OPTIONAL Level three certification (if applicable): Optional Accessories E-11 Blaster (ESB) Based on a real or replica Sterling sub-machine gun, scratch-built, or a modified commercial toy Stormtrooper blaster. OPTIONAL Level two certification (if applicable): Folding stock is placed in the closed position. No ammo counter shall be present. D-ring mounted on the rear. Sterling based blasters have the correct M-38 or M-19 style scope. The M-19 scope is preferred. No power cylinders on the magazine housing. Scratch-built, resin cast, Hyperfirm rubber cast blasters shall have a total of 6 T-tracks on blaster (leaving the lowest row on the magazine housing side uncovered). If using the Hasbro E11 toy blaster, it is modified to have the correct number of T-tracks (6 total), with a lower row of open vent holes on the magazine housing side. This is accomplished by covering the pre-existing rows of holes with T-tracks, then grinding off the lower integrated T-track on the magazine housing side, and drilling a new row of holes in its place. OPTIONAL Level three certification (if applicable): Hasbro / Rubies blasters are not allowed, even conversions. The blaster may have minor weathering or base metal exposure however, T-tracks and grips shall have the appearance of black plastic. E-11 Blaster (ROTJ) Based on a real or replica Sterling sub-machine gun, scratch-built, or a modified commercial toy Stormtrooper blaster. OPTIONAL Level two certification (if applicable): Folding stock is placed in the closed position. No ammo counter shall be present. D-ring mounted on the rear. Correct style scope. No power cylinders on the magazine housing. Scratch-built, resin cast, Hyperfirm rubber cast blasters shall have a total of 7 U shaped channels on blaster (all holes on barrel shall be covered). If using the popular commercially available Stormtrooper blasters, you shall grind off the T-tracks and replace them with U shaped channels and cover the open rows of holes (total of 7 U shaped channels in all). Correct greeblies on the left rear area shall be present (door catch and two "hammers"). OPTIONAL Level three certification (if applicable): Folding stock shall be in the extended position. Hasbro / Rubies blasters are not allowed, even conversions. The blaster may have minor weathering or base metal exposure however, T-tracks and grips shall have the appearance of black plastic. SE-14R Blaster The SE-14R blaster may be carried. It shall have a correct scope if carried in lieu of the E-11 for informal events. OPTIONAL Level two certification (if applicable): OPTIONAL Level three certification (if applicable): Lightsaber (The Force Unleashed) The hilt is Graflex style or has the characteristics of the Graflex, (reference Luke Skywalker's lightsaber from ANH and ESB). If the lightsaber has a blade, it may be one of the color blades used in the video game, The Force Unleashed. The choice of blade colors are: Black, Blue, Green, Gold, Purple, Red and Yellow. Note: Double blades, small Yoda style lightsaber, or inexpensive non-FX Hasbro Lightsaber toys are not allowed. OPTIONAL Level two certification (if applicable): The hilt shall be made to reference Starkiller's lightsaber (as seen in The Force Unleashed). OPTIONAL Level three certification (if applicable): If the lightsaber has a blade, it may be one of the color blades used in the video game, The Force Unleashed. The choice of blade colors are: Black, Blue, Green, Gold, Purple, Red and Yellow.
-
CLOSED - CRL for Force Unleashed Stormtrooper
gmrhodes13 replied to mikedwelle94's topic in The Force Unleashed Stormtrooper
Just going through comparison from TKC to TFU and we allow both overlap and butt/join/coverstrip for TKC so I'll add both versions to TFU I will also lock this thread as Mike has sold the armor, new CRL thread is here:
