gmrhodes13
-
Posts
31,191 -
Joined
-
Last visited
-
Days Won
1,067
Content Type
Profiles
Forums
Gallery
Articles
Everything posted by gmrhodes13
-
File Name: Another Stormtrooper Helmet Lightbox Designer: atz78 Last Update: 07/01/2026 File: https://makerworld.com/en/models/2205511-light-box-star-wars-stormtrooper?from=search#profileId-2396841 Description: LIGHT BOX - Star Wars - Stormtrooper SIZE 200x200 mm (20x20CM) 2 COLORS – WHITE AND BLACK Images:
-
Before I started trooping I made my detonator a carry container, I had thought of carrying keys and credit card, shortly after I heard stories of TK's having their detonators pinched, probably pesky Jawa's.
-
These are only a guide, you can use what ever strapping you wish inside as long as it is not seen from the outside. Reference material Chest to backplate Snap upper right corner \ Snaps posterior plate Rivets For Level 3, three domed head bifurcated (split) rivets approximately 5/16" (8mm) in diameter are present on the left side of the abdomen and kidney and are equally spaced along the depth of the armor and are painted white. Note that the measurements are from the center of the rivet. Rivets on both kidney and ab should line up horizontally. Interior pic showing split (bifurcated) rivets For Level 3, a single split rivet is present on the lower tab of the abdomen armor (cod) This can have a brass or chrome finish, but cannot be painted. For Level 2, The thigh ammo belt is attached with one solid head rivet on each side, painted white, and located in the upper corner fastened to the lower thigh ridge. Rivets shall be cap or split style rivets. No pop rivets are allowed. Rivets should be approximately 5/16ths (8mm) in diameter (exterior).
-

TK-15401 Requesting ANH EIB Status (WTF) (1094)
gmrhodes13 replied to larryebaum's topic in Request Expert Infantry Status
A couple of things you may want to address before the DO's get here. Looks like you may need to add a base/border to the large ab plate, yours has been trimmed off. You cold also trim a bit more off the smaller ab plate A fix is to glue a plate on the base of the ab plate then fill any seam with ABS paste (prior to seam fill) Your detonator screws are a little on the large side, clips are a little narrow. Also check the gap between the control plate and end caps Good luck with approval
-
A few pieces on SDS armor is not correct, members have made modifications so it will pass L3 Centurion, you don't get much better than @Helotechbuild Hi pre approval thread with some info Another pre approval SDS Personally I think the price is reasonable with a HWT backpack but photos would give a better idea of condition
-
Some great build for those of a skinnier stature. Most of us use compression sports wear, you may be able to find them local to you in a sporting store. https://www.whitearmor.net/forum/topic/38416-crickets-rs-stunt-build-for-the-vertically-challenged/ https://www.whitearmor.net/forum/topic/38842-fragarocks-rs-stunt-build-not-to-scale/ https://www.whitearmor.net/forum/topic/42868-sha-shas-wtf-anh-stunt-build-complete/ Be careful with boots and make sure the ankle section is quite high or they will come out from under your shins when moving. Also make sure there is no extra stitching on the boots, references here You can find boots from https://keeptrooping.com/ https://keeptrooping.com/product/421-classic-white/ They also do undersuits and gloves https://keeptrooping.com/product/imperial-undersuit/ https://keeptrooping.com/product/ottk-gloves-anh/ Rubber gloves I can find at my local supermarket You can also find some things on Trooperbay https://trooperbay.com/product-category/headgear-neck-seals-undersuits/ This thread may also be of help with other information
-
Nice work
-
Some additional info: Ideally at Level 2 tube stripes are approximately 1 cm (5/16ths) away from the cheek, and should also lean toward the front. The thickness may vary, but the number of stripes must be between 9 and 16. These may be hand painted or decals for all levels, but should not extend under the ear. For Level 2 and above correct Hovi Mic tips are required. "Correct" is defined as: 1. Hovi tip rims and insides must be white or painted white on the insides. 2. Screen must be a wide mesh. 3. Screen should be attached toward the tip and not recessed. Note: These are also known as Hovi-mic tips. That name derives from the originals, which had Hovi Mix PA2 embossed on them.
-
They are vinyl, the top coating is to help apply, once applied to the helmet slowly lift a corner and pull gently, if any come loose use a small knife to help move. Some info Ideally at Level 2 tube stripes are approximately 1 cm (5/16ths) away from the cheek, and should also lean toward the front. The thickness may vary, but the number of stripes must be between 9 and 16. These may be hand painted or decals for all levels, but should not extend under the ear. These are stencils but just added for reference of gap and direction of fall
-
Vacformed plastic is very difficult to heat without warping, especially with pieces that have details or corners/angles, that being said I've had success with other troopers armor by using blocks of wood either side of a distorted area, gently heat the area then clamp the wood together (I use MDF as it's smooth and doesn't leave grain marks. Not something you want to attempt without a lot of practice, luckily you won't have to with the DO's allowing it. Sounds like you have space to trim that piece off, but if you don't want to remove that piece next to the han snap you could always remove the snap, glue a piece of plastic behind the hole then fill the hole with ABS paste, sand and polish then drill a new hole. V Tab info With a heat gun you bend strips of ABS plastic into the shape of a V, only glue one side and the other remains free to allow movement when you bend. Just helps stop the butt plate from pushing back from the back plate. A couple of builds with V tabs
-
ChrisThePropGuy NEW ERA/R1 TK
gmrhodes13 replied to ChrisThePropGuy's topic in The Foundry - Armor and Prop Making
Very nice, looking forward to seeing more -
Expert and/or Centurion undersuit..
gmrhodes13 replied to TerribleBen's topic in Rogue One Build Threads
Also Add holster as an option Detonator end cap no paint option Pauldron options and correct assembly Belt cut outs (thighs hit on shorter troopers) Trimmed in line of the corner of the second belt box Tube stripes incorrect wording Option of a T-21 blaster DONE Option of E-22 Blaster Option Spacepack?


-
Expert and/or Centurion undersuit..
gmrhodes13 replied to TerribleBen's topic in Rogue One Build Threads
Most up to date list in the staff section CRL todo list, I can't recall if some of these have been addressed, brain only holds so much information these days. That's where they have stopped, there has been no conversations about wording that I know to date so a discussion will need to take place. ROTK Amount of teeth update https://www.whitearmor.net/forum/topic/57588-rotk-and-artillery-trooper-crl-teeth-update/ Overlap construction (all TK's) - direction of coverstrip overlap, outside over inside https://www.whitearmor.net/forum/topic/55810-overlap-construction/ also here https://www.whitearmor.net/forum/topic/57633-rotk-overlap-direction/ Correct overlap incorrect overlap (approved at L2) Never seen the same direction though until a recent shoretrooper application came in, once again the direction is not covered in that CRL Ribbed hips undersuit & holster https://www.whitearmor.net/forum/topic/57778-rotk-crl-inclusion/ Backplate details https://www.whitearmor.net/forum/topic/57704-new-details-found-on-r1-back-plate/ Possible name change https://www.whitearmor.net/forum/topic/57129-r1-stormtrooper-crl-name-change/ ATTK (ROTK based) Artillery trooper model photo updates, inaccuracies in current photos https://www.whitearmor.net/forum/topic/57655-artillery-stormtrooper-crl-model-replacement/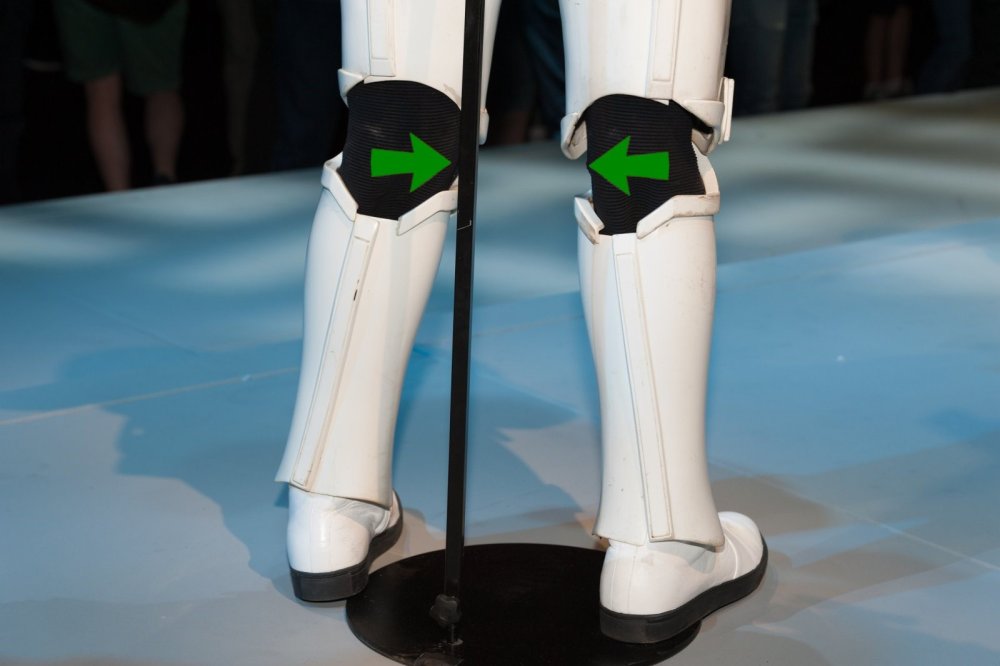
-
File Name: Holiday Reindeer Stormtrooper Helmet Designer: Toothlesscreator3d Last Update: 25/12/2025 File: https://makerworld.com/en/models/2153918-holiday-reindeer-stormtrooper-helmet?from=search#profileId-2334669 Description: Holiday Reindeer Stormtrooper Helmet – 3D Printed Remix ⭐ Bring festive cheer to your Star Wars collection with this custom Holiday Reindeer Stormtrooper Helmet! Inspired by the latest Black Series Star Wars Holiday Stormtrooper figure, this remix reimagines the classic ANH Stormtrooper helmet (based on the original model by (KeepTheBox) with a fun and whimsical holiday twist. Features: Fully 3D printable design, built to be printed in standard FDM formats. Reimagined with reindeer antlers and festive detailing, giving the iconic Stormtrooper helmet a seasonal makeover. Inspired by the cheerful aesthetic of the Black Series Holiday Stormtrooper, bringing that character’s spirit into a wearable 3D print. Clean lines and well-optimized geometry for a smooth print and easy post-processing. Perfect for cosplay, display, or as a standout holiday decoration. Whether you’re celebrating the galaxy’s most beloved season or just want a creative twist on a classic piece of Star Wars gear, this helmet brings festive fun right to your print bed. May your holidays be merry—and your prints be flawless! Update - I forgot to put the Mic tips on in my images but they are also included in the files. Images:
-
- 2
-

-

-
MFX ANH Stunt armor kit + RS Helmet build (beginner)
gmrhodes13 replied to Andor_FX's topic in ANH Build Threads
The elastic is very tight, you have to slip and wiggle the shoulder strap through the elastic carefully. If you put the elastic around the back plate it will hold a little better. Note the right side the elastic not on completely on one corner. -
MFX ANH Stunt armor kit + RS Helmet build (beginner)
gmrhodes13 replied to Andor_FX's topic in ANH Build Threads
It just looked a little weird, I run a piece the whole inner length of the shoulder strap so it looks part of it. Your elastic may not be tight enough, mine hold my straps down nicely, although a bugger to get the elastic over the strap at the start. -
File Name: Gingerbread R2D2 Kit Card Designer: NikkoIndustries Last Update: 23/12/2025 File: https://thangs.com/designer/NikkoIndustries/3d-model/Gingerbread R2D2 Kit Card-1483099 Description: NA Images:
-
- 1
-
-
MFX ANH Stunt armor kit + RS Helmet build (beginner)
gmrhodes13 replied to Andor_FX's topic in ANH Build Threads
Sounds like a plan, if you can try to use a contrasting background your GML/GWL will thank you for it, makes editing images easier. Look forward to seeing your preapproval thread soon -
File Name: Brick-Style Stormtrooper Cookie Cutter Designer: GreyCanadianWizard Last Update: 21/12/2025 File: https://makerworld.com/en/models/2138912-brick-style-stormtrooper-cookie-cutter-star-wars?from=search#profileId-2316874 Description: This Brick-Style Stormtrooper Cookie Cutter brings the iconic armor of the Galactic Empire into a fun, block-figure inspired design that prints cleanly and performs beautifully in the kitchen. With bold helmet details and a strong silhouette, this cutter creates crisp cookies with instantly recognizable Stormtrooper features. The model is designed with a sharp outer cutting edge and raised inner embossing so details transfer directly into dough without extra tools. It’s easy to print, easy to clean, and makes a perfect addition to any Star Wars-themed baking project or MakerWorld collection. Features Clean outer edge for sharp cookie cuts Raised inner details for helmet and armor features Single-piece, durable design Suitable for cookies, fondant, play dough, and clay Printing Notes Recommended layer height: 0.2 mm No supports required Prints well in PLA, PETG, or similar filaments Scale uniformly to adjust final cookie size Images:
-
- 1
-
-
TK-25097Requesting ESB EIB Status RS Props
gmrhodes13 replied to Daveybobs's topic in Request Expert Infantry Status
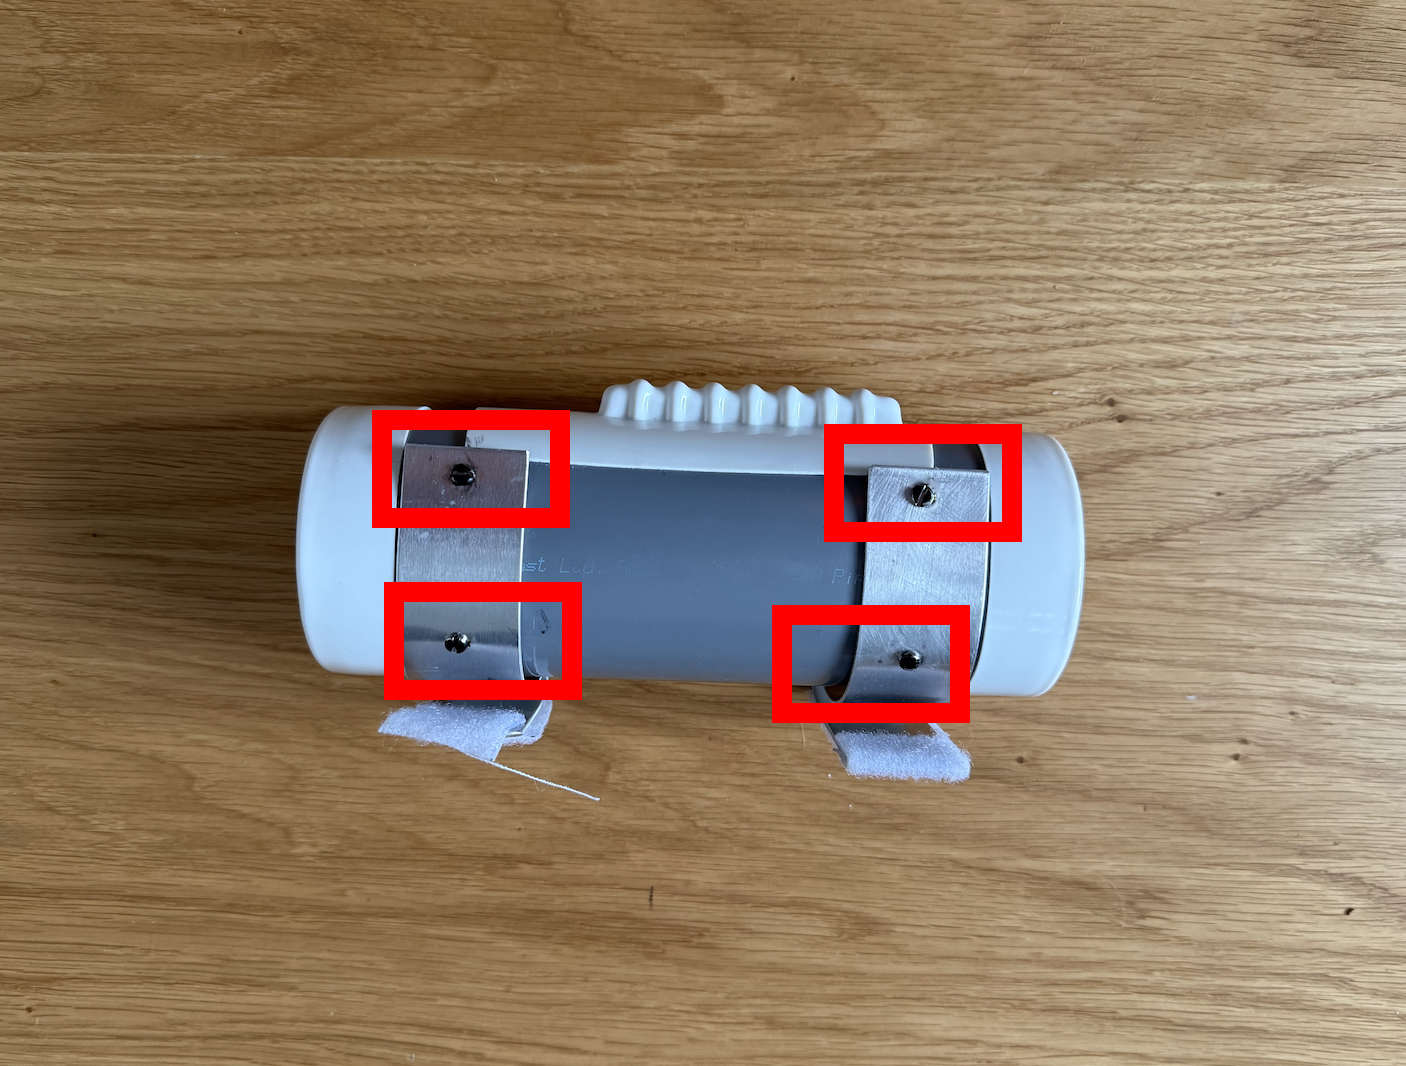
You may want to try to round off your detonator clips, they appear to be sticking up on the ends, also a gap between the clips and the body at the rear.
-
MFX ANH Stunt armor kit + RS Helmet build (beginner)
gmrhodes13 replied to Andor_FX's topic in ANH Build Threads
With the shoulder straps I would not secure at the back, usually the elastic will keep them in place OPTIONAL Level three certification (if applicable): These shall free float in back. These shall be glued in front. You appear to have something under the front of the shoulder strap, front is normally glued to the amor -
These images may also help, note the larger curve on the outsides
-
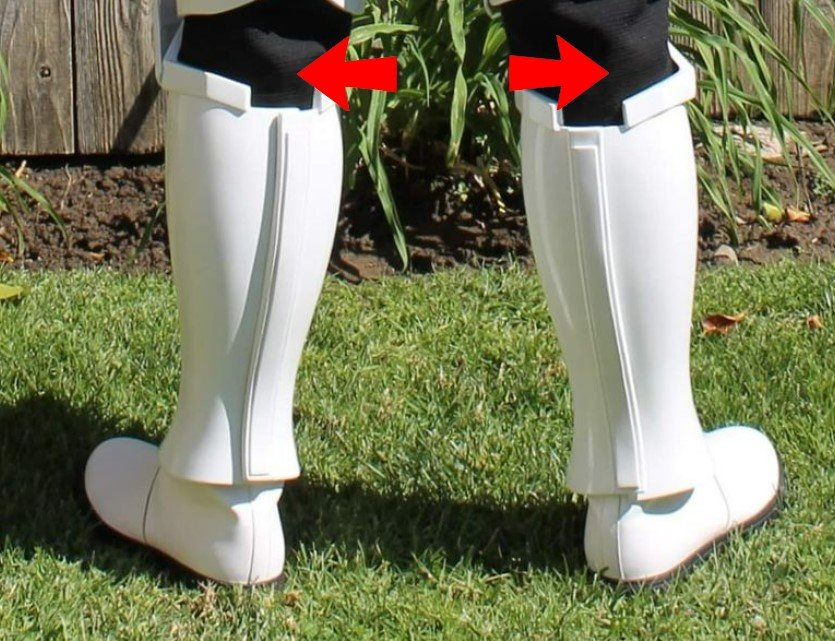
Conversation in this thread about which parts mate with which Sha Sha also has some information in her build thread Christine also mentions the WTF shins in her build thread
-
Excited to be here finally!
gmrhodes13 replied to Ladon's topic in Newly Approved Members - Sound Off!
Congratulations trooper and welcome to the ranks (at long last ) Great read and gave me a chuckle, a needed one. In case you didn't know we have a trooper missions award system you may like to record your attendance Info here Apply for specific milestones here You can also request a letter of commendation at those milestones Hope to see you at and about soon -
Really depends on your build, couple of examples. Lukes was almost touching the large ab plate, Han's is about 4 fingers width. Standard @ 3 fingers width Most are the same gap I actually use adjusters for the chest so I can resize when elastic stretches One of my commission builds