

Thalizar
-
Posts
327 -
Joined
-
Last visited
Content Type
Profiles
Forums
Gallery
Articles
Everything posted by Thalizar
-
My AP armor build [*AP]
Thalizar replied to AbrahamLINC0LN's topic in Build Threads Requireing Maintenance
You are so right Ingrid, it seems like I'm always looking at my build and seeing how I could improve or add to it... Everytime I wear it I think I can trim this or that adjust this strap and on and on... Now I have my lightsaber being crafter hoping thats the last thing I need so I can move on to my next build.... lol Just take your time, measure twice and cut one time. Ask questions and check out others WIP threads, I learned so much just reading others builds. -
Get in touch with Soldermaster, his RT-Mod build is awesome. Awesome guy, he's really helped me get my build together.
-
Did not see it listed on the CRL about rivits on the ab plate. Any conformation on this would be welcome. What I did for the control panel was use the same thickness ABS that I used for my cover strips. I cut out the desired size I wanted for my control panel then using a heat gun slowly shaped it around my canister. In the reference shot it looks like there are strips that run around the back of the canister that connect the top edge to the bottom edge on both sides. What I did there was cut two strips and heat shaped them on place. I then filled the seam sanded it smooth and painted and blended it in. A bit of work but I had really secured the caps on and was afraid to force them of without destroying them.
-
So on the road to Centurion I made some modifications to reflect the updated CRL. Set of side rivits on the kidney plate, belt rivits now white, and detonator to reflect the game version.
-
Looking at the new CRL requirements for Centurion I added the needed modifications to my armor. Two rivits on each side of the kidney belt, and now my rivits on the belt are white. Also changed my thermal detonator to resemble the game version, my Starkiller saber will be done in two weeks, it's currently being crafted by Nocturne Armory. The last pic was at a local Walmart that I was trooping near.
-
TK-8455 Requesting [ANH] Stunt EIB Status [211][AP]
Thalizar replied to Griffin-X's topic in Request Expert Infantry Status
Looks great Jim! Congrats! -
Spring is here and TK-3967 ready for patrol
Thalizar replied to Thalizar's topic in Stormtrooper Commander
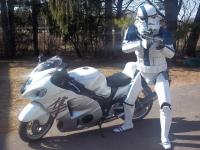
Thats Awesome Jim. Been looking at a V-Rod lately. Will keep the Hayabusa though can't get rid of that. -
Spring is here and TK-3967 ready for patrol
Thalizar replied to Thalizar's topic in Stormtrooper Commander
What is your ride? Need to get it on the road to get the cobwebs out. It has been in the 70s here in Wisconsin. -
Spring is here and TK-3967 ready for patrol
Thalizar replied to Thalizar's topic in Stormtrooper Commander
I would be lying if I said I was not tempted.. -
Bringing my two loves together.
-
Aren't you a little short to be a stormtrooper?
Thalizar replied to nai-retep's topic in Getting Started - Read this First!
Welcome Ian, your height and build will have nothing to do with being approved. We all can't be in that sweet spot for a screen TK being 5'8"-5'10" and the correct weight. As long as you do your research and take your time to assemble your build to meet the CRL standards you will have nothing to worry about. It's about having fun and being as accurate as you can be that counts, not how your built. Check the forums there are some nice threads about modifying armor for a smaller build. -
Making AM fit a skinnier person.
Thalizar replied to Yoma_mafat's topic in Hard Armor (General Discussion)
What everyone above stated is true. The AM kit on you would be quite loose and the amount of trimming and Modding to make it fit your body type would take a lot of work, more work then you may think. It will require you to trim all aspects of the armor not just a few pieces, your going to want to have a different bucket as the AM bucket is not accurate. I've seen a garrison mate's AM kit next to my ATA kit and there is a huge difference in size. You would be better of with ATA, AP, TM you'll find that trimming a kit is not to bad compared to modifying one that is to large for your build. Also you may want to consider if you want to achieve EI or Centurion you may have to replace some of the AM parts for other more accurate pieces. Contact your local garrison I'm sure they would be more then happy to help with the build. -
Rego's Incinerator (pic heavy)
Thalizar replied to Rego's topic in Build Threads Requireing Maintenance
Your build looks great. Love the red,it really looks striking. I know what you mean about pressing that spray nozzle for the first time, hoping your doing the right thing. Again great build can't wait to see your rifle. -
Not sure what kind of paint you used. Not sure how well this will work, I would definetly try this on some scrap ABS before using it on your armor. You can find it at Wal-mart or other sporting goods store. It's called Hoppys I believe is the name for it, it's used to clean grime off of firearms, can be found in cleaning kits or bottles. I've used it to remove old stuck on Testors paint of of metal. Never used it on plastic so I would test it first. put some on and let it sit for a bit to see what happens.
-
I used a Xacto knife and sanded it. Just take your time with the ears. Take a small bit off at a time and test fit then rinse and repeat until you get the fit you desire. Shave small amounts off is key, don't take to much in one cut.
-
Congrats to Dashrazor our New Detachment Leader
Thalizar replied to Darth Aloha's topic in Announcements
Congratulations! -
Thank you for all the support you have given to everyone here. Now go take that vacation!
-
Looking good! Great pic. Love seeing TKCs, they really stand out.
-
TK-3967 Requesting TKC EI status[202][ATA]
Thalizar replied to Thalizar's topic in Request Expert Infantry Status
Thank you everyone, Feels great to be part of a great group of people. I don't think we are ever done with our builds, we always can look at our build and want to improve something or tweek something. Now just getting it ready for Centurion. Hoping to finish my detonator this weekend and get my Saber ordered. I just want to see us acheive the goal of having 300 EI members, As a TK we are iconic to young and old alike and we should hold ourselves to a high standard of costuming and strive for excellence. -
I would paint the two halves before placing them together, mask off your LEDs before painting paint the area with the holes. when together mask of the holes again and spray the rest of the gun. Quick fix for your broken scope eye piece is use a empty plastic roller from a scotch tape dispenser, perfect fit.
-
So looking at sabers and ran across the one Vern posted as a link. The maker is Vavatron Sabers running around $250 will this saber pass for Centurion?
-
TK3796 requesting EIB status ANH Stunt[204][LA]
Thalizar replied to FunkyTrigger's topic in Request Expert Infantry Status
Congrats! Nice build. -
Advice requested on mild weathering a TK
Thalizar replied to Sparrow's topic in Assembly, Mods, and Painting
The way I weathered my TKC was using acrylic paint thinned with water to about a consistency of milk. I used a nice soft cloth or kitchen paper towel make sure it's the softer brand not the cheap shop towel style. Use one towel to rub the watered down paint onto the armor then using another towel to soke up the paint, don't wipe it in one direction, this will leave streaks in one direction and will make it look forced and not natural. After applying the paint I dabbed and gently wiped the paint in swirling pattern making sure to not leave large streak marks. By doing this you can go over areas multiple times to make an area darker to your tastes. Let some of the paint pool in the recesses this will emulaite grime building up in there. I added all the chip marks on the white armor parts by hand painting every chip mark. I started with a dark gray then went up to a lighter shade of gray then a small area of steel. I did this to show that the armor was made out of several layers. I would test this on some scrap plastic so you can get the right consistency of your paint and your wiping technique down. Play around with the paint consistency you may like it a bit thicker or thinner. Hope this helps. -
TK-5587 requesting ANH Stunt EIB status[203][TM]
Thalizar replied to KarinOlava's topic in Request Expert Infantry Status
Congratulations!! -
TK-3967 Requesting TKC EI status[202][ATA]
Thalizar replied to Thalizar's topic in Request Expert Infantry Status
Thank you! This is a great honor, never would have gotten here without the help of everyone here and a special thanks goes out to the Wisconsin Garrison for all their great help.