gazmosis
-
Posts
4,043 -
Joined
-
Last visited
-
Days Won
23
Content Type
Profiles
Forums
Gallery
Articles
Everything posted by gazmosis
-
 Words well spoken! Your efforts makes everyone look better. Not to kill the moment or anything........but please make sure to get me that action shot with your blaster that has the power cylinders on it. Troop on, young man!!
 -
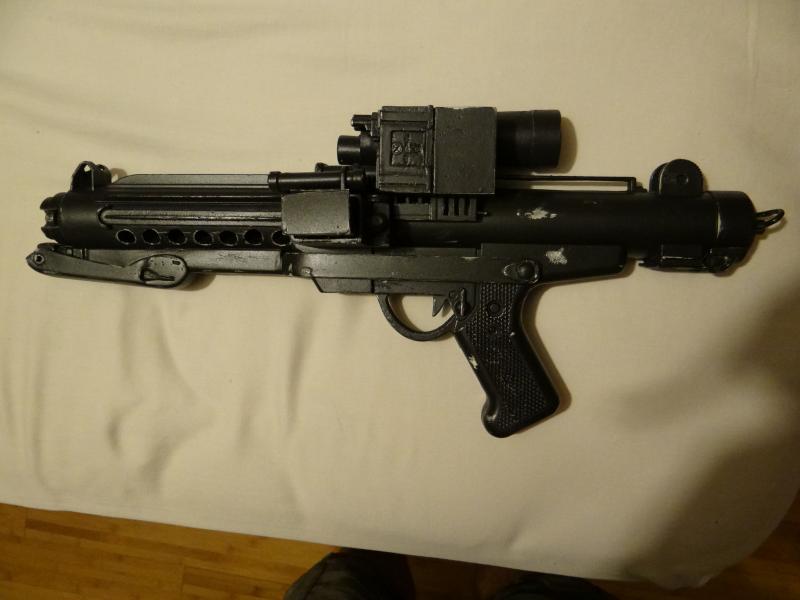
Hello Juan!! I am glad you finally decided to apply!! Thank you for your application to Expert infantry! Let's take a look at your armor! CRL and EIB Application Requirements: This was obviously a project long developed and well thought out. I appreciate your desire to build yourself and film replica suit. I hope that program can be developed. But thank you for supporting the basic requirements. And support it fantastically you did! You have provided all required photos and few extra . Your armor contains all necessary elements for Expert Infantry. With that, I would like to welcome you to EIB! I will put your badge through. Your blaster has all the correct elements as well however, your action shot is pictured with a blaster that doesn't have power cylinders. Please take/submit a new pic with this so we can ad your suit to the archives! Other-Armor Fit/Assembly: I am super jealous of the troopers capable or wearing this suit. You deserve it and it looks fantastic. This section is usually used for comment towards improving armor sets, but there really isn't a whole bunch to say here. Well done!! There was a concern with multiple helmets listed. At close review, only one helmet was ever worn for armor shots. The other helmet was just shared and is wicked cool! Thanks for doing that! Your blaster weathering took an incredible amount of talent. It is very innovative and unique. I am glad you went back and glossed up the grip. The only thing I would suggest is to hit all your bracket screws with some white paint. Centurion Suggestions: All aspects of your armor should be reflecting Centurion quality items. For this reason, please make sure that any picture you have of your blaster has those power cylinders on it. There should be no visible gaps between your kidney and ab. For your application, breathe out, suck it in and tighten that belt to make those sides all come together. Great overall work!! Thank you!
-
TK-55239 Requesting ANH Stunt EIB Status [NE][432]
gazmosis replied to Pencap510's topic in Request Expert Infantry Status
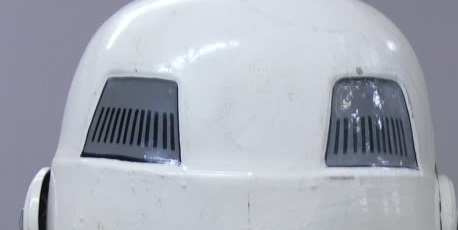
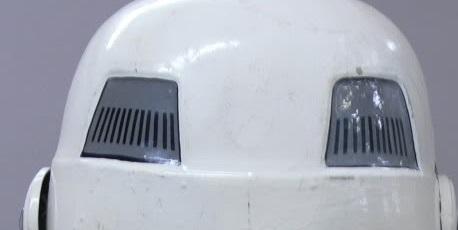
Hey there Ty!! Thank you for your application to EIB. It is a pleasure to look at your armor. You have a solid build and great details! Let's take a look at it!!! CRL and EIB Application Requirements: All required submission photos have been posted. Although your armor contains all required elements, sadly, your blaster does not. Both a Hengstler counter and power cylinders on the mag housing are required. You have the Hengstler but not the cylinders. Pop a set of those on your blaster, post a new pic and the badge is yours! Other-Armor Fit/Assembly: We have some very good eyes here in this Detachment. I am proud of you guys! All this help is making the FISD look better and better. This section is to summarize the observations of your fellow troopers and to add mine all towards improving the overall look of your armor. Keep in mind that unless specifically stated, these suggestions will not affect any application. There was some mention to the broad look of your shoulder bells. ALthough I am a fan of the beefy trooper, it is possible to leave a bit too much on the bells making the suit look out of balance. Although you can leave it as is, I did several side by side comparisons with screen grabs. These comparisons show that you have just a little too much left at the top. The original shoulder bells were not trimmed along a straight line in the front. The were shaped to more follow the contour of the chest. In these shots, you can clearly see the top and bottom edges, but the center is hidden by the raised edge of the chest: Now, take a look at what I have drawn up as a possible cut line if you choose to do it.: If you decided to do this, the strap at the shoulder bridge would need to be shortened but I think this would make things look more balanced. I agree that your thighs should be worn a bit higher but hey, kids will be kids! Gotta love them!! I am sure you wear them properly under normal circumstances. You can dab a little black paint or marker on your thermal detonator screws if you want. Although not required, it does step up the accuracy. You have nice details painted on your helmet. The frown were often seen stopping at then continuing just past the 5th tooth indent. Your ends at it. This is also a suggestion. Your rear trap lines look a bit wonky. It was clear that when the originals were painted, a straight edge was used at both the top and bottom to keep these vent lines even. This can easily be touched up with some gray over the parts that extend past a straight line. Centurion Suggestions: With all the work and details you have put into your armor, I would hope to see a Centurion application from you. Your blaster will need those power cylinders. I would like to see the straps between your drop boxes and belt a bit shorter. The last thing is a little trimming on your back plate. You have a LOT of return edge left there under your arm. I marked off a n approximate trim line: A great overall job on your armor. Your Garrison should be proud. Pop on those power cylinders so I can add that badge to your name!!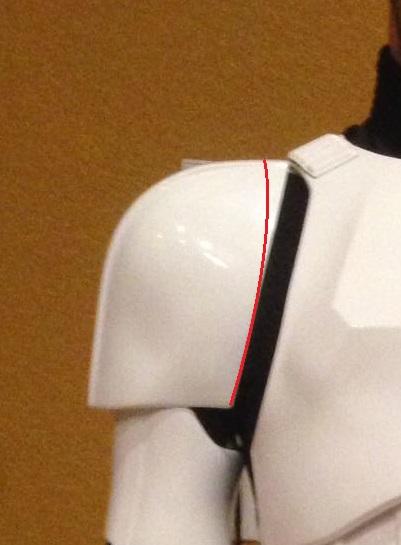

-
That's really cool!! Be proud to show that off!! You are going to need to pick up a new set of mic tips. Those "things" that come with that helmet just don't cut it.
-
TK_11128 Requesting ANH Stunt EIB Status[AP][425]
gazmosis replied to It's_a_troop's topic in Request Expert Infantry Status
Thank you for the quick follow up, Jason!!! All requirements have been met so I would like to congratulate and welcome you to EIB!!!!! Nice work! -
That right there is a STELLAR example of how it can look!!!
-
I wish I was 180lbs!!!!! In regards to acceptance, for basic approval, you can keep it as is. If you plan on applying for any accuracy badges like EIB or Centurion, those gaps will need to be bridged with ABS sheets or Shims as we will call it from now on. You can extend the ab, the kidney, or both but your goal will be to have a single seam between the kidney and the AB. Use a straight edge to trim the existing part and the shim so you have a but joint as perfect as possible. The shim will be sitting flush with the surface of the existing armor. Glue a connecting strip of ABS on the back side to join them. That's the easy part. To eliminate the seam you have created, you will need to fill it with ABS Paste made by mixing acetone with a messload of tiny abs scraps until it forms a past with toothpaste consistency. Spread this carefully and evenly into the seam. Acetone and armor don;t mix very well so make sure you are relatively precise when applying this to your seam. Fill your seam and blend the edges. to make sanding easier. Sand it down smoth. then polish it out with progressively finer grit sandpaper all the way up to 1000 or 1200 grit. Then polish it out with rubbing compound or Novus polish. You may need to go back and spot fill low spots to get it even, but once you are done, the seam will be close to unnoticeable.
-
First throw out your measurements. It is about how it feels and looks ON YOU!!! Get a helper. Put the thigh on and pull it up near your groin. Have your helper get behind you and squeeze the halves together until tight and the halves are overlapped. Then have them loosen the halves until it is comfortable with a little room to spare. Make sure this fit is consistent at the top and at the knee. Once you have the fit that is comfortable on you, have your helper continue to hold the parts in their place and mark a line down the middle of the back of your thigh. Make sure this is someway marked on both halves so you can mark and trim this line when you remove the thigh. Use a straight edge to mark your final lines prior to cutting so you get an even butt joint.
- 1 reply
-
- 1
-

-
TK_11128 Requesting ANH Stunt EIB Status[AP][425]
gazmosis replied to It's_a_troop's topic in Request Expert Infantry Status
There is no rush and we aren't going anywhere. !! Good luck! -
TK_11128 Requesting ANH Stunt EIB Status[AP][425]
gazmosis replied to It's_a_troop's topic in Request Expert Infantry Status
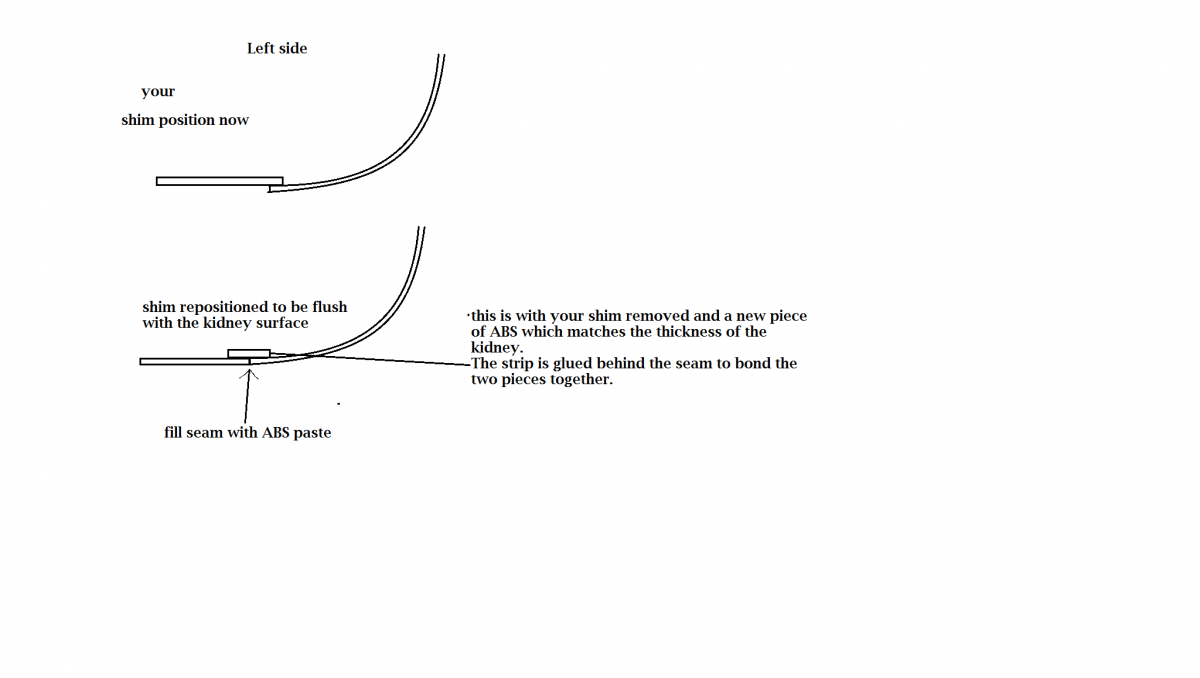
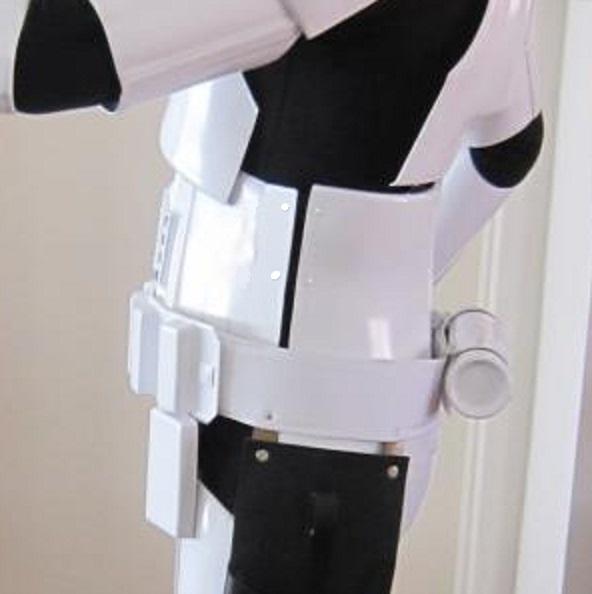
Hey Jason: Thank you for your application for Expert infantry. I have always loved AP armor and you have a really nice overall build. Well done! So let's look at your armor!! CRL and EIB Application Requirements: Again, you have a very nice overall build. Well detailed at fitted. There are a couple points that, unfortunately that do not pertain to your armor, that need to be addressed before we can move forward with your EIB badge. First off as a couple missing pics. The first one is necessary for the EIB archives. It was brought up that although not required for basic approval, a weapon IS required for accuracy badges here. As a result, your action shot needs to have you holding a weapon if it is going to be added to the archives. As you retake that shot, take and post an additional close-up shot of your hovi tips. The other point has to do with your Hasbro blaster. Although you have the conversion kit in place and added the extra "T" tracks as required, it is also required to remove the lowest "T" track from the magazine side of the blaster to look like you see here: Other-Armor Fit/Assembly: Any suggestions made in this section go towards improving the overall appearance of your armor. Unless specifically stated, these will not affect any application. I really have nothing to add here. Like I said, you have a very nice, detailed build. If I was forced to say anything it would be that the outline on your left side ear rank area is a little thick. You NAILED the right side. Lastly, a couple strategically placed drops of superglue can help keep your mouth screen in place more securely than blue tape. Centurion Suggestions: If there is a Centurion application in your future, there are a couple things that need to be upgraded before that can happen. First is the need to upgrade your blaster to a Sterling based pipe build, or Doopy full Kit. Thank you for posting the pic showing the proper position of your drop boxes. IF you do apply, make sure your full body shots represent your drop boxes positioned with the outer edge aligning with the outer edge of the belt. Next are your shoulder bells. They do look a lot better where they are on your latest pictures rather than the earlier ones where they are being pushed up. But in those top pics, it shows that the straps connecting your bells are really long. The shoulder bells should be very close if not touching the ribbed shoulder bridges. A little adjustment to the length of these straps and you are there. Lastly are your side shims. AP is definitely armor for the exceptionally thin trooper so many who choose AP need to install side shims. I see two things that need repair. Although I can't clearly see your left side, the right side shows that your shim was glued to the inside of the kidney. To greatly improve the look of this, your shim should be trimmed to create a nice butt joint seam with the surface of the kidney then glued from the back so the surface of both the kidney and shim are the same. See this diagram: Once the shim is in it's proper place, the seam can be filled with ABS paste, sanded and polished smooth. The next thing are your left side split rivet locations. You have the rivets on your kidney mounted to the original ab location and not on the shim making the rivets way too far apart. See the before and after pics; Before: After: Please contact me should you have any questions. With your talents, that blaster repair should take you 30 minutes and with the added pics we can move on to your badge!!!

-
TK-11409 Requesting ANH Stunt EIB Status[MTK][424]
gazmosis replied to I'm Batman's topic in Request Expert Infantry Status
Well this has been an interesting ride! I need to commend you and all the troopers that have been making themselves more aware of details that make applications look both proper and awesome all at the same time. This is why I usually wait a couple days to do reviews. I am really glad you chose to add your Doopy blaster and a fine one it is! When it comes down to it, a great application starts with a great set of armor.....something else we have here!! Let's take a look!!! CRL and EIB Apllication Requirements: Just to clarify, bucket off pics are only required for basic armor approval with GML's. We don;t need bucket off pics because we already know we are the sexiest looking of all the detachments!! Let's not rub that in, guys! ANYWAY!!!!!! I am just taking room here because this exceptional build has little to discuss!! You have submitted all required photos and you armor has all elements to qualify for EIB. With that, I would like to congratulate and welcome you to Expert Infantry!!! Other-Armor Fit/Assembly: Any suggestions in this section are made towards an overall improvement to the trooper's armor and, unless specifically stated, will not affect any application. There isn't a lot to discuss here. You have made an example of what the MTK armor should look like. Your paintwork is well done. It's all about the details and you nailed it. There were some mention of a misalignment of your side. That's not going to affect anything. I am glad I don;t have more to discuss. Centurion Suggestions: I assume that we will be seeing this application from you. Tim had brought up something regarding your kidney notch. Perhaps it's just the camera angle that makes your appear a little small, but if you look here:The notch actually goes in a little deeper than you have yours. This one here goes back to just beyond the rivet depth. I think if you just sent in a could more millimeters, it would look a little bigger. I know the MTK kidney doesn't go as far below the ab as the original one did but you work with what you have. A Note: Ian had originally applied with a Hasbro blaster with the Doopy upgrades. It was lacking a couple "T" tracks and a little debate over the directions the CRL provided regarding this ensued. Since then, the CRL has been updated to clarify the requirements for the Hasbro mods. Ian then switched his pics to have the full Doopy E-11 kit. -
Chest Mount for the Aker
gazmosis replied to themacalu's topic in Electronics for Helmets / Blasters
Just giving Marc a little guff. Troop on, Marc!!!!! -
Well done getting the info before cutting!!!
-
Where to start building my armor?
gazmosis replied to scifinerd25's topic in Getting Started - Read this First!
That's how it usually starts, young man! But Tim speaks wise words regarding your research. The proper armor for your body type will make the process go much better. This type of investment is definitely something where you want to have have a solid plan of attach and NOT figure it out as you go. -
Chest Mount for the Aker
gazmosis replied to themacalu's topic in Electronics for Helmets / Blasters
Great idea!! Now glue those shoulder bridges down!!! -
RS PVC Kit / ANH TK Stunt Build / Bulldog44
gazmosis replied to Bulldog44's topic in Build Threads Requireing Maintenance
With all RS builds I gave done, the shoulder bells have been identified by their overall shape. When trimmed on the mold lines, edge facing the chest piece has always been curved to follow the curvature of the side of the chest. The back of the bell was more vertical. That's just how I identified them and it seemed to work. Bravo on your paint work!!! Your skills and training overtook your nerves. Well done! You will have no problems with your approval -
DVH Pipe Build with Extras
gazmosis replied to I'm Batman's topic in Build Threads Requireing Maintenance
How far do those pins go into the receiver tube? Were you able to grind those down? Might have an issue sliding the blot in with little nubs sticking out. Wicked cool,build so,far! -
3 peice helmet vs. 2 piece...
gazmosis replied to justjoseph63's topic in Hard Armor (General Discussion)
TM (troopermaster) only offers longer shin pieces. All other molds are the same. -
3 peice helmet vs. 2 piece...
gazmosis replied to justjoseph63's topic in Hard Armor (General Discussion)
If it was a problem with ANY level of approval, it wouldn't be recommended from here. But for your information, none of the helmets made for the original films were three piece designs. A couple of armor makers have incorporated a three piece helmet into their designs and have hid the seams well so it appears NOT to be. -
The old FX kits are really not available outside of Ebay. I would watch over there as I have seen them pop up there from time to time
-
TT8s AM Armor Build
gazmosis replied to TriumphTrooper8's topic in Build Threads Requireing Maintenance
Congrats bud!!!! -
Just my opinion, but why not sell it back on Ebay and buy proper armor from here. Why build it twice only to be unhappy with it once??
-
That is correct. There are a couple different "S" trims that are currently being used. Some are bigger than others but they all work.
-
DarthMel's ANH Stunt ATA Build
gazmosis replied to DarthMel's topic in Build Threads Requireing Maintenance
Stop at home depot and get your chemical gloves. Brush up on your painting skills or order the Dave M decals from trooperbay for your helmet. You can get all the paints you need from Trooperbay as well. The humbrols have a very long dry time so if you want to speed that up, you can buy Testors paints from your local hobby store. You will need 1138 gloss gray for your traps, tears, ab buttons and Thermal det. pipe, gloss black for outlines and details, matte black for the Hovi tips and vocoder. Regardless of the dry time, I would still get the Humbrol french blue for the ab buttons. This is also the color of the tube stripes if you want to tackle that. We will be watching!!!! -
My ATA helmet build.....what do you guys think?
gazmosis replied to hon143's topic in ANH (Stunt and Hero)
Looks outstanding!! Nice clean construction. If I was to comment on anything, it would be the angular paint lines on your teeth. The paint should be a smooth line following the curve of the top of the tooth into the gap between teeth. Nice work over all!