gazmosis
-
Posts
4,043 -
Joined
-
Last visited
-
Days Won
23
Content Type
Profiles
Forums
Gallery
Articles
Everything posted by gazmosis
-

EJGreen's RT-MOD (Stunt) Build Thread[*RT]
gazmosis replied to EJGreen's topic in Build Threads Requireing Maintenance
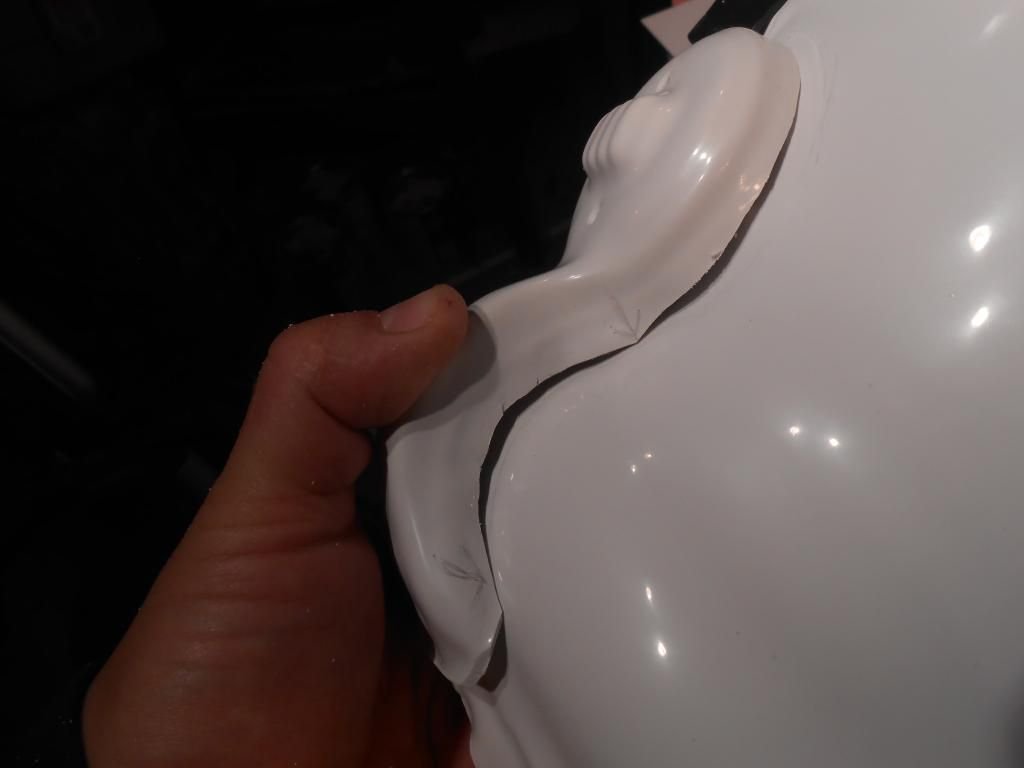
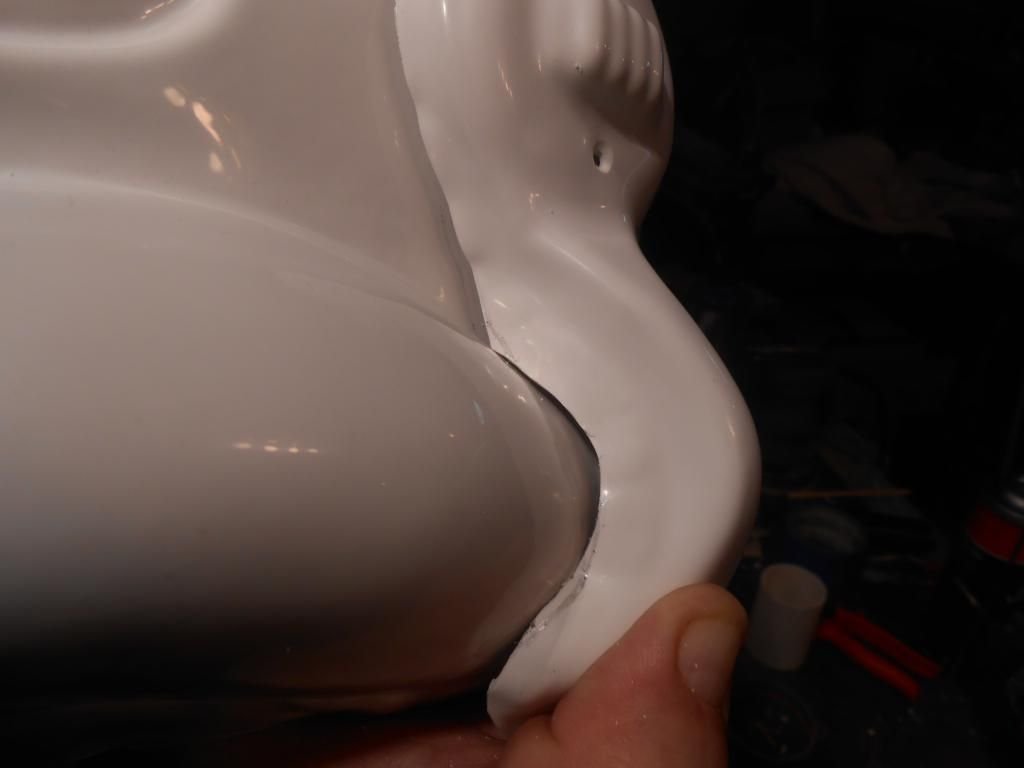
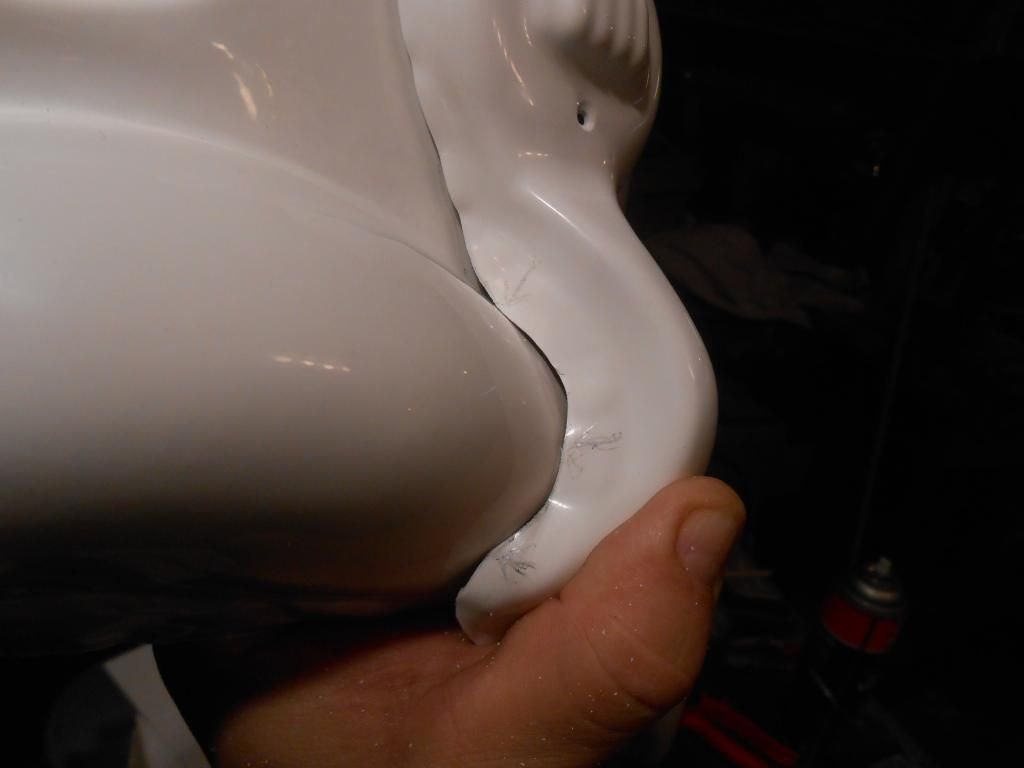
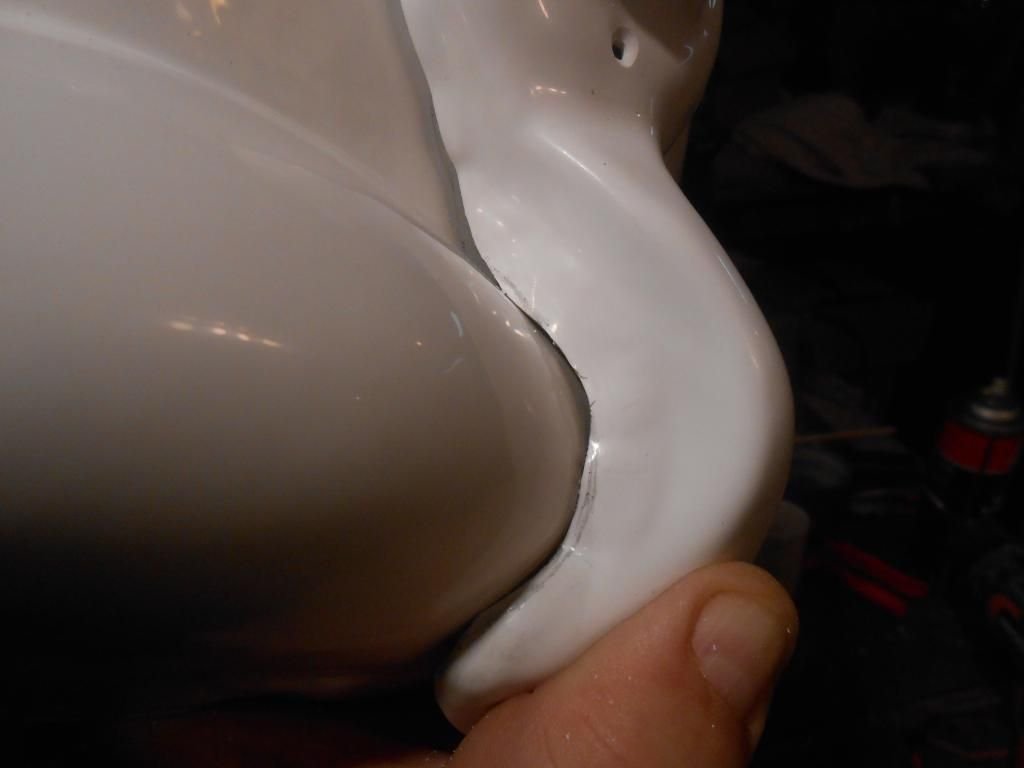
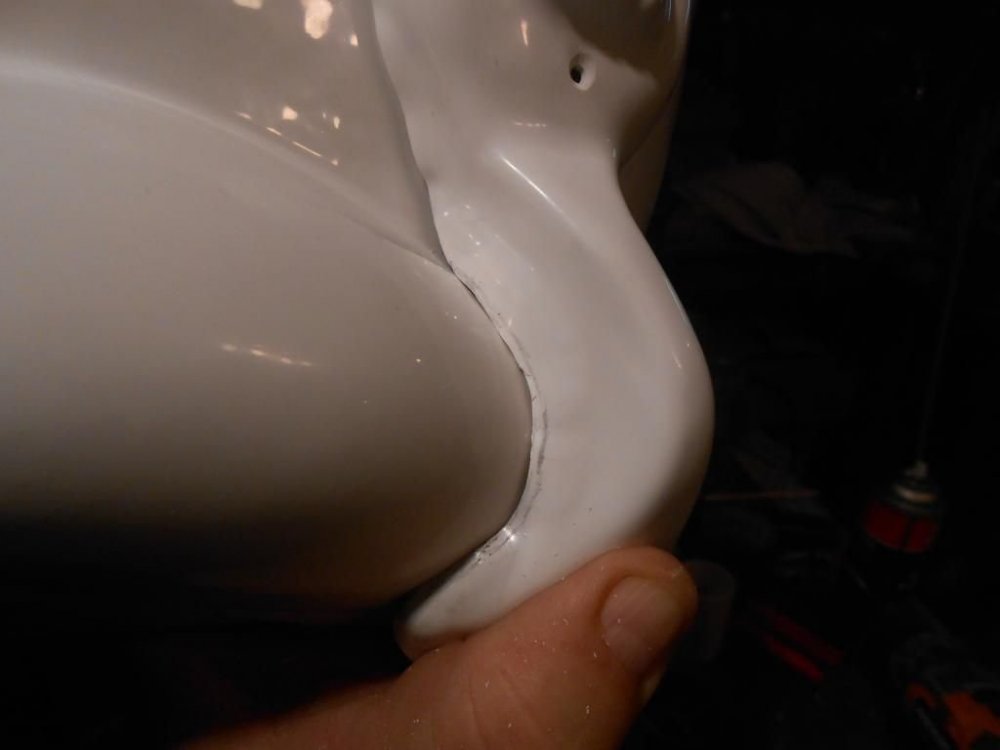
Don't overthink that bicep!! It looked great after your initial effort!!! Now that you have the sealing iron, you have all sorts of new weapons in your arsenal to tweek and hone return edges, curves and uneven joints. Just make sure you don;t set it too high. You don;t want it to melt the surface on contact, you want it to heat the plastic through until you can bend it. -
TK-27667 Requesting ANH Stunt EIB Status [NE][423]
gazmosis replied to N8dog's topic in Request Expert Infantry Status
Normally, I wait a little while for your fellow troopers to have a chance to look over your armor a bit, but there isn't too much to look over here except an awesome set of NE armor!! We all really enjoyed following along with this build and the fact that you and your son were doing this together is heartwarming!! Thank you for sharing your moments together with us. Now that the tissues are put away........Let's look at your armor!!! CRL and EIB Application Requirements: Outstanding application!! Well organized and complete. Thank you. As for your armor, it contains all the required elements for Expert Infantry. With that, I would like to congratulate and welcome you to EIB!!! Other-Armor Fit/Assembly: In this section, myself and your fellow troopers provide suggestions that go toward the overall final look of your armor. Unless specifically noted, these are suggestions and will not affect the outcome of any application. I think it was a good choice to go with the ATA helmet. I think it pairs up very nice with the NE armor. The ATA just has that classic shape I love. Great build on it by the way. If you were to hold a gun to my head and MAKE me say anything regarding your build, it would be about the frown. ALthough I won;t require a change, the ANH frowns often stopped then continued past the indent for the fifth tooth as seen here: Some may look and ask if your shoulder bells can be brought up a bit to touch the ribbed shoulder bells. After looking over your armor, you have no bicep hooks that are pulling them down and all attachment positions are proper so I think this was just an oversight when the pic was taken. If you apply for Centurion (which I hope you do) I would make sure these are positioned against the shoulder bridges for that pristine front shot!! Since we are discussing things that can be brought up[, your waist belt has a bit of a droop in the front. Your waist belt assembly should be resting against or slightly overlapping the bottom portion of the button plate. Disregard the red circle...it was there to make a point for a different trooper I am just bringing up this next point as an observation that puzzles me a bit. The thigh pack on the lower portion of the right thigh should be attached at the rear most corners of the ridge that runs along the bottom of the thigh. On YOURS, the pack is attached at the correct spot on the outer portion, but just doesn;t seem to be long enough to attach at that corner on the inner portion. It must be a combination of the pack not being long enough and the thighs being bigger in diameter. Again, this was just an observation. Since we are discussing the lower half of your body, your sniper plate concerns me that it's gonna be hung up on something at some time. You have left quite a bit of extra material along the upper ridge that can be removed. I tried to mark this in red. I need to mention this, There was an observation by Germain regarding the location of your outer rivet covers and the shape of your center button plate. These are a case of "should be's". This is not something that I find terrific fault with and will NOT require to be fixed. Centurion Requirements: As I stated before, I hope to see a Centurion application in your future. You are so close that a couple small changes will secure a spot for you. First off, as menbtioned, you will need to change out your gloves and hand plates for the rubber chemical gloves and flexible/latex hand plates. Next, you are REALLY close here, but the return edge on your forearms needs to be finished to include the end of the square indent ridge. I circled the portion I am referring to. Please make sure that the outer edge of your drop boxes align with the outer most edge of your waist belt. Also, please raise that belt assembly to its proper position. Lastly, you have a noticeable bit of overlap on your calf closures especially at the top. If you want the overlap for the velcro security, that is ok because it can't bee seen under the seam. However, at the top, this should be trimmed back to suggest a butt joint here. Congratulations again!!!


-

-
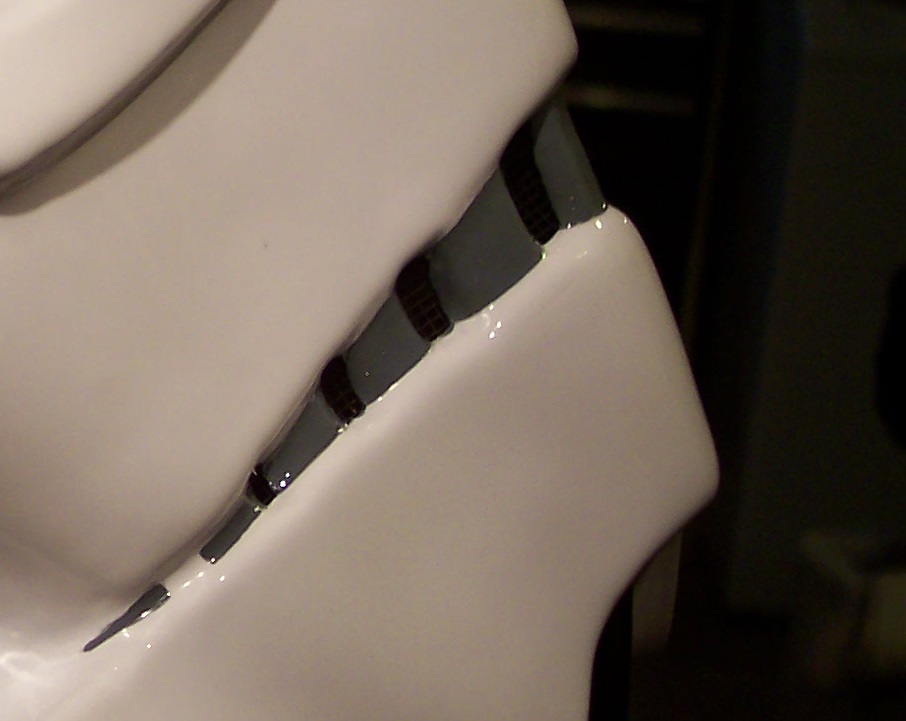
It's the fabric waist belt that connects there. Those snaps are what hold up the belt so it doesn't fall in the front
-
It's a new opportunity to be a Stormtrooper. Not enough total suit views but cool so far
-
TK-31501 Requesting ANH Stunt EIB status [AP][422]
gazmosis replied to CRISTONAMO's topic in Request Expert Infantry Status
Christian!! Thank you for your hard work!! Those forearms are a huge improvement and everything else checks out!! Congratulations and welcome to Expert Infantry!!! -
Flocking? The inside of a helmet?
gazmosis replied to TriumphTrooper8's topic in Hard Armor (General Discussion)
I know I ate too flocking much food today. -
The correct diameter PVC is not readily available in the US. Ordering it from overseas can be expensive. You might want to consider acrylic tubing
-
EJGreen's RT-MOD (Stunt) Build Thread[*RT]
gazmosis replied to EJGreen's topic in Build Threads Requireing Maintenance
You can just glue the strap inside the forearm and bicep. Tack it in position with a couple drops of superglue then top coat it with E6000 to make it smooth -
I can make you a set for the price of shipping if you can't use that tutorial. PM me if I can help
-
MTK Build - ANH Stunt
gazmosis replied to I'm Batman's topic in Build Threads Requireing Maintenance
I am sorry that you needed to go through that delay. The thigh deal is something I have never heard of nor will I ever again. Welcome to being official, Trooper! -
EJGreen's RT-MOD (Stunt) Build Thread[*RT]
gazmosis replied to EJGreen's topic in Build Threads Requireing Maintenance
By trimming that 1/2 inch off the front of your forearm, it won't affect your fit. That looks great! -
TK-12177 Requesting ANH Stunt EIB Status [AM][421]
gazmosis replied to Starfox2010's topic in Request Expert Infantry Status
Hey There, Ricardo! Thank you for your application for EIB!! Let's take a look at your armor!!! CRL and EIB Application Requirements: All required submission photos have been posted. Nice, easy to follow application. Well done! As for your armor, your suit represents all the required elements for Expert Infantry. With that, I would like to welcome you to EIB!!! Other-Armor Fit/Assembly: This is the section where myself and your fellow troopers make suggestions to improve the overall look of your armor. These suggestions, unless specifically stated, will not affect any application. What can I say???? It is nice when it is this easy! You have a great build and for a taller trooper, I really expected to see more black showing but this suit is a perfect fit for you. Well done all around on both armor and blaster! I would watch your biceps as they seem to have a tendency to spin on you. The molded ridge on the bicep should match the molded ridge on the shoulder bell. Centurion Suggestions: This is not your first rodeo. You have been around long enough so none of the following things should be a real surprise. Although this is a stellar build, There are certain aspects of the Armor Master set that need to be replaced in order to be eligible for Centurion. The main parts being the chest and back, but on your specific armor, you will also need to change out the ab button plates to the ones with the buttons molded into the plates. Why the other ones are even included at this point I don't know? Hopefully you didn't throw those away. Separate buttons are not allowed for Centurion applications as they were never used in the films. You will also need to obtain a set of the flexible/latex handplates. I LOVE those extra shots!!! Awesome! Congrats again, Ricardo!!!! -
BatNinja's AM 2.0 EIB ANH Stunt Build Thread
gazmosis replied to batninja's topic in Build Threads Requireing Maintenance
Good advice on those ears guys! Those are totally save able. Not that they were bad to begin with. Anyway, you asked earlier regarding your waist belt. Why there are so many useless pieces included with the AM kit baffles me. Use the belt you have pictured on the left. The rivet covers, which it looks like you have two sets of, should be trimmed out yo be 1 inch square. One will go in the center, one on each end. However, the really should not be centered as the dimple on each end suggests. After trimming out the rivet cover, stage it on the end so that it is centered top to bottom but is sitting about 1/8 inch off the edge. Then Mark the rivet cover's location so you know where to install your rivet. -
Sanding to a gloss should be a progression. Jumping from 400- novus is a huge step. There are so many more progressive grits before the novus that will get you a better gloss
-
Really surprised you didn't just get a real folding stock
-
There is no set width. Use what is comfortable
-
If you are referring to the ones that appear next to your profile, you will receive the badge once you apply and your armor is approved.
-
If you think there is too much scuffing, clean them or touch them up. Just have a balance between your armor and boots.
-
trooper12's RT-Mod ABS ANH Stunt Build
gazmosis replied to trooper12's topic in Build Threads Requireing Maintenance
Get yourself a hobby iron if this bothering you. They are usually around $20 and are miracle workers. -
You drink no caffeine do you?
-
If it's anything the other Rubies stuff, I'd pass
-
Thanks guys
-
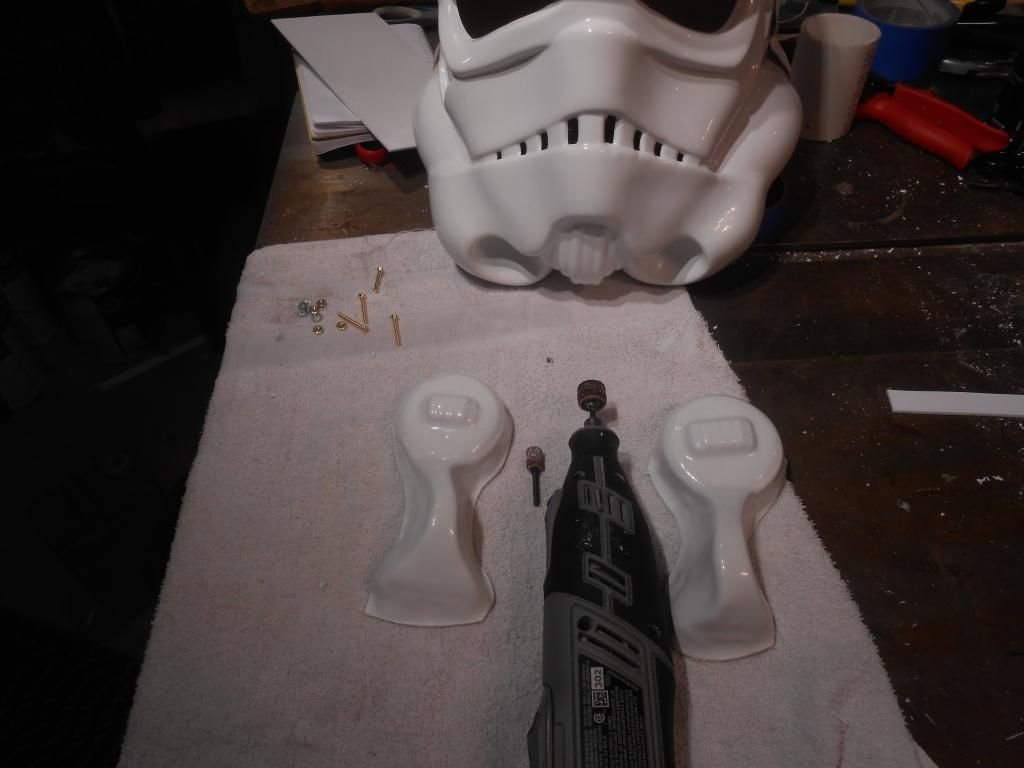
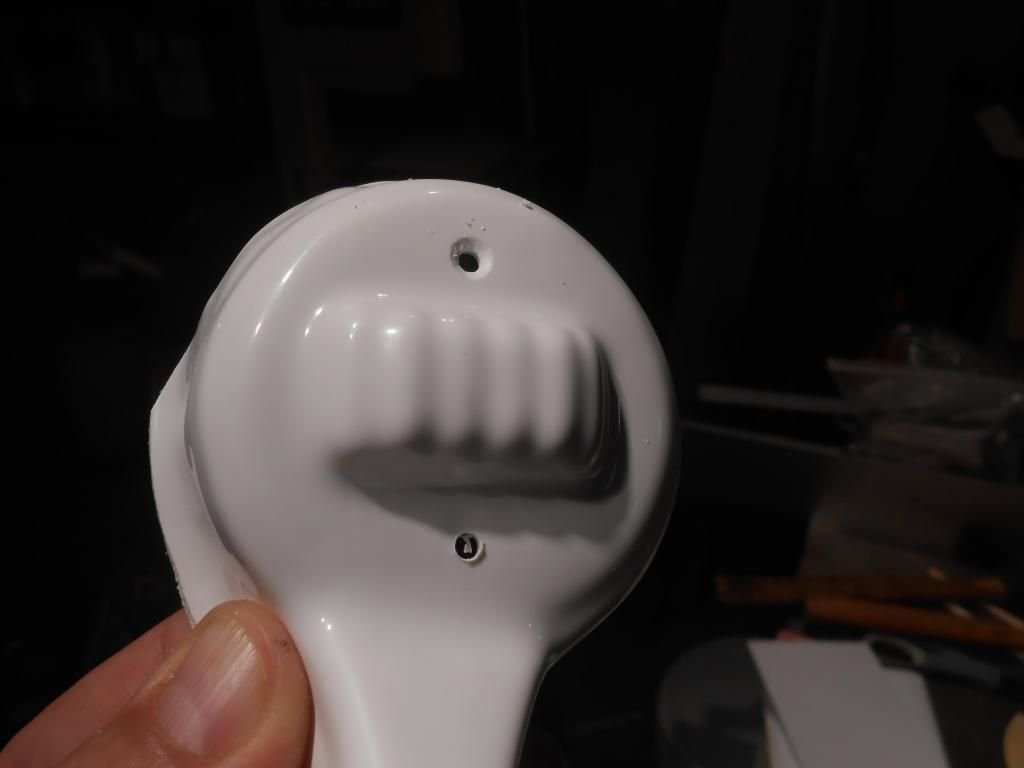
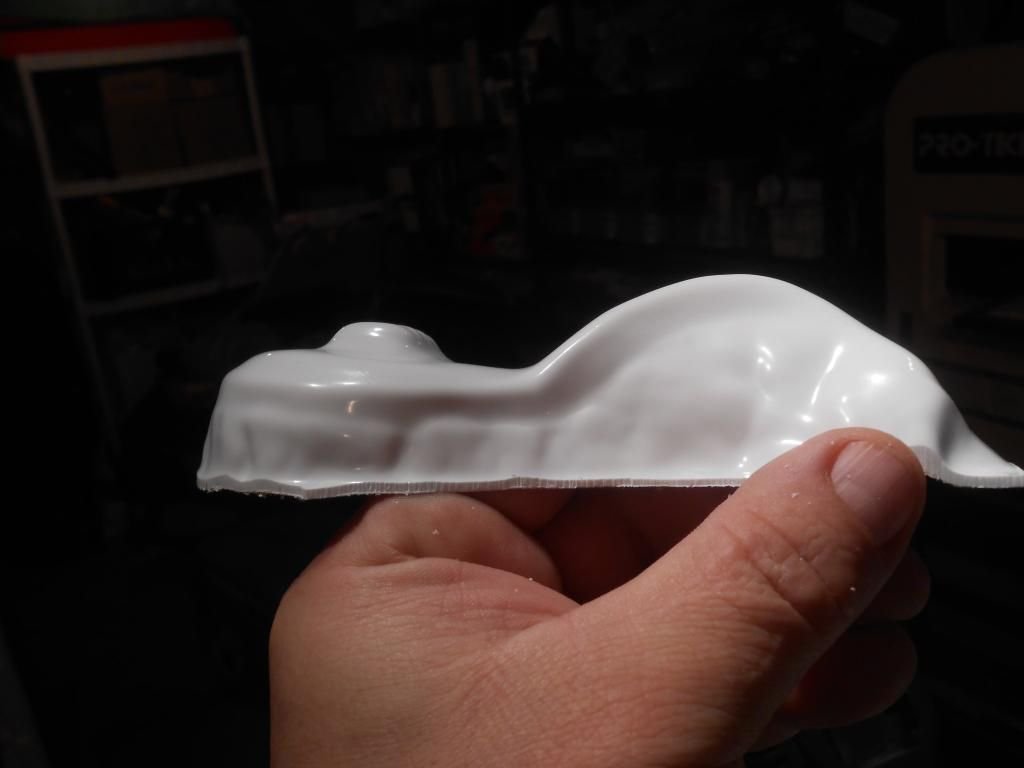
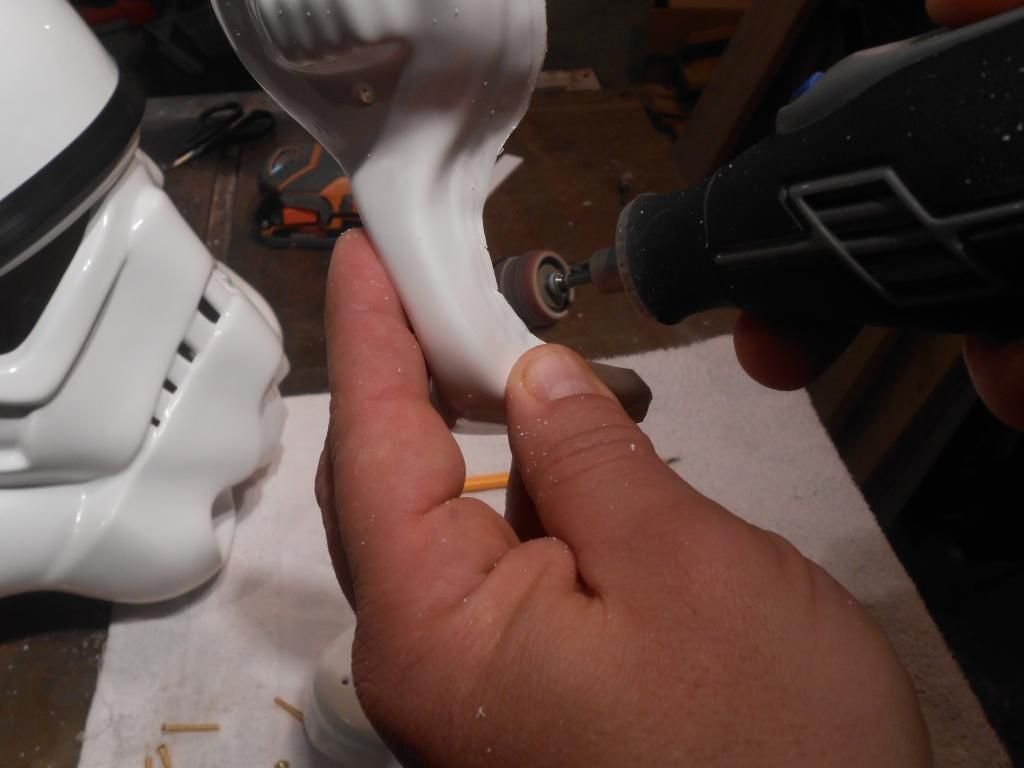
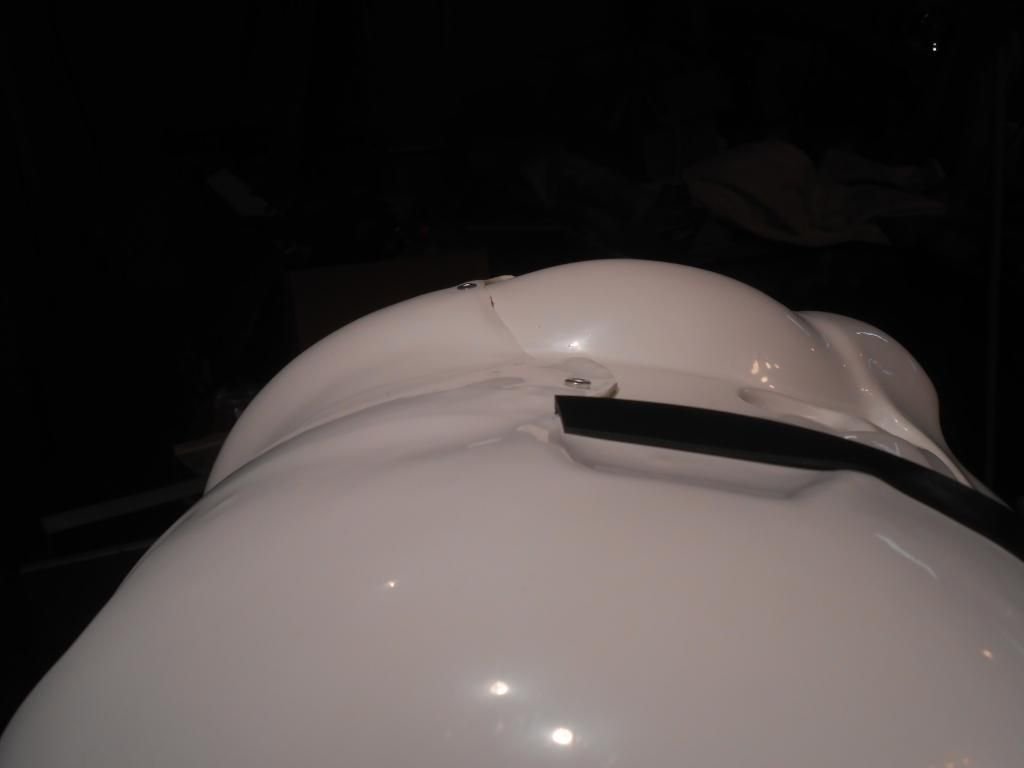
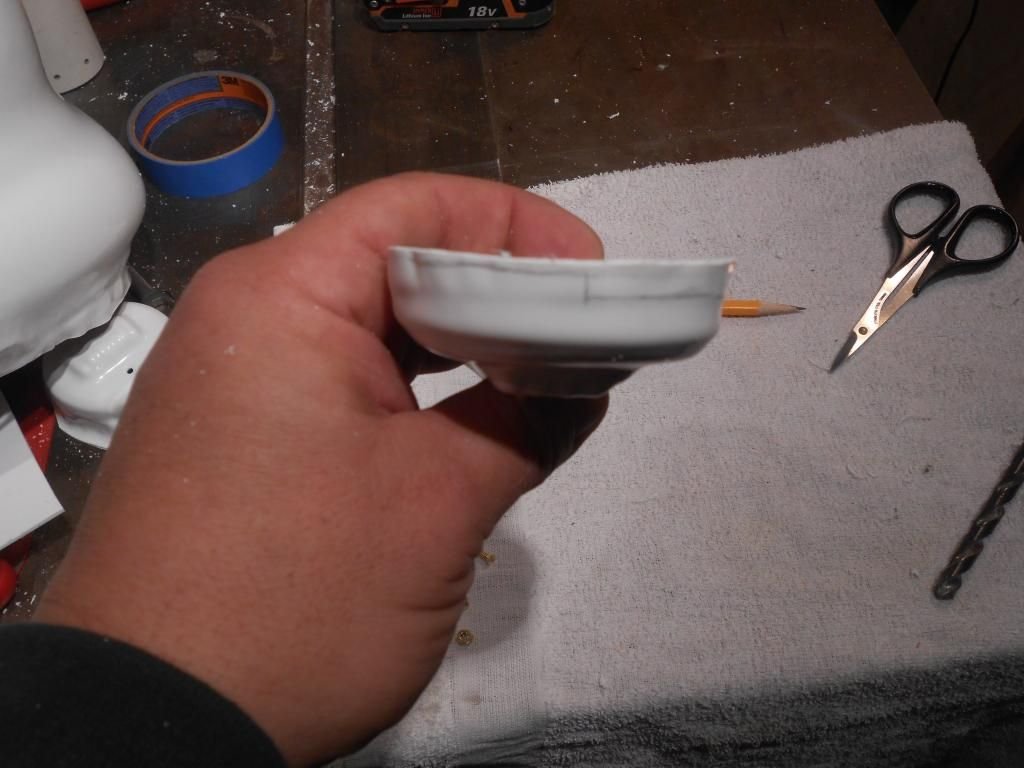
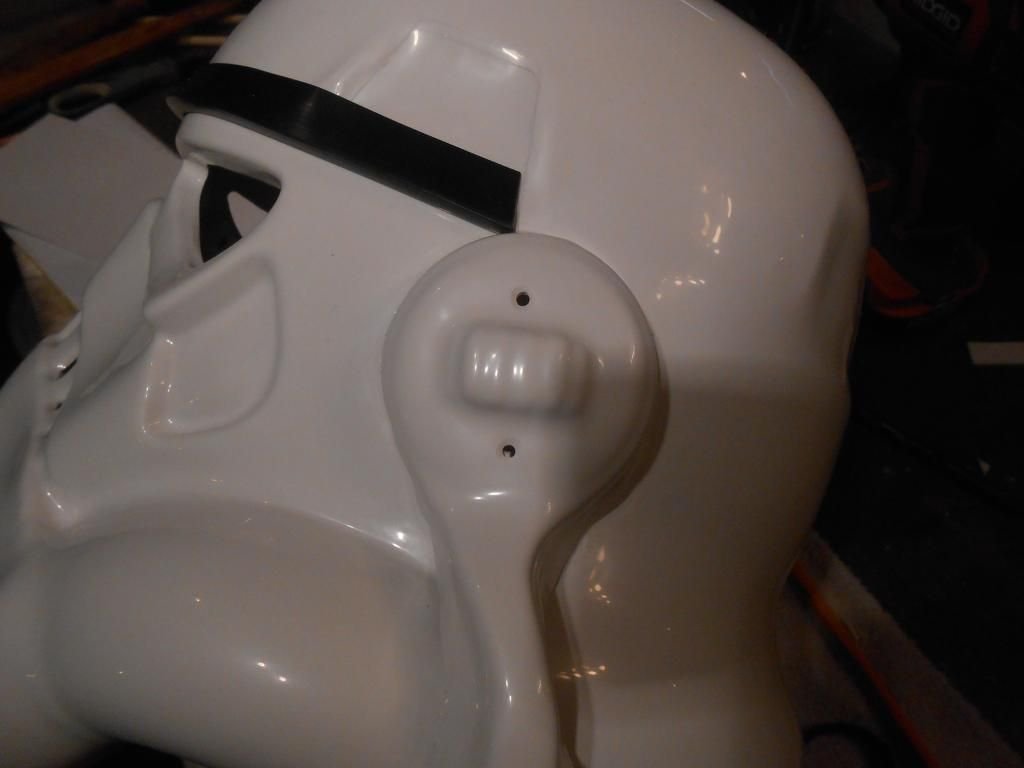
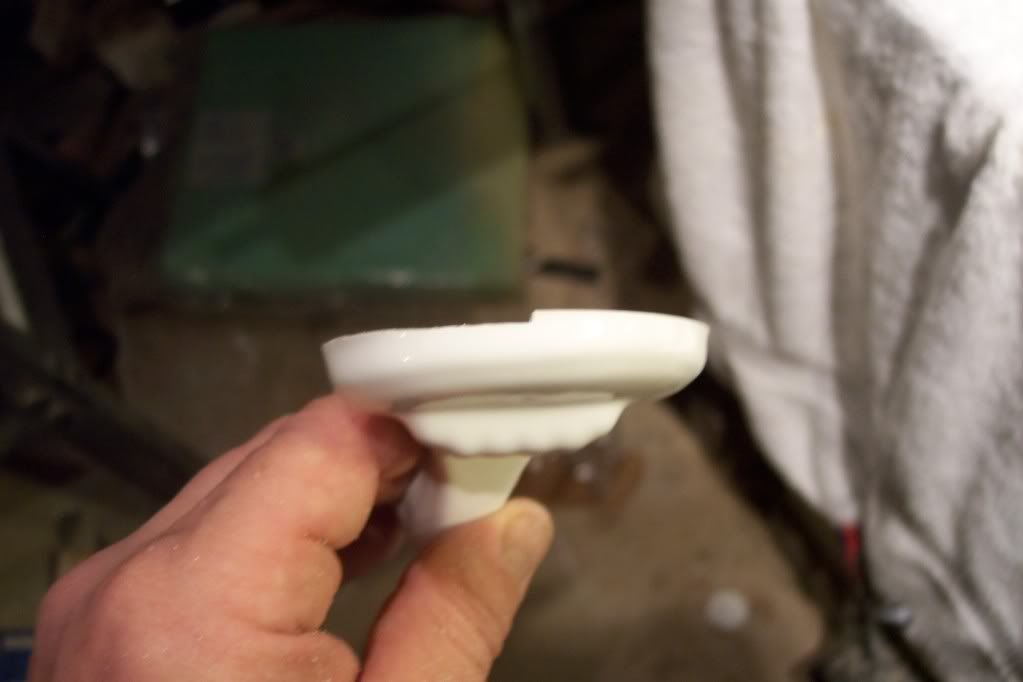
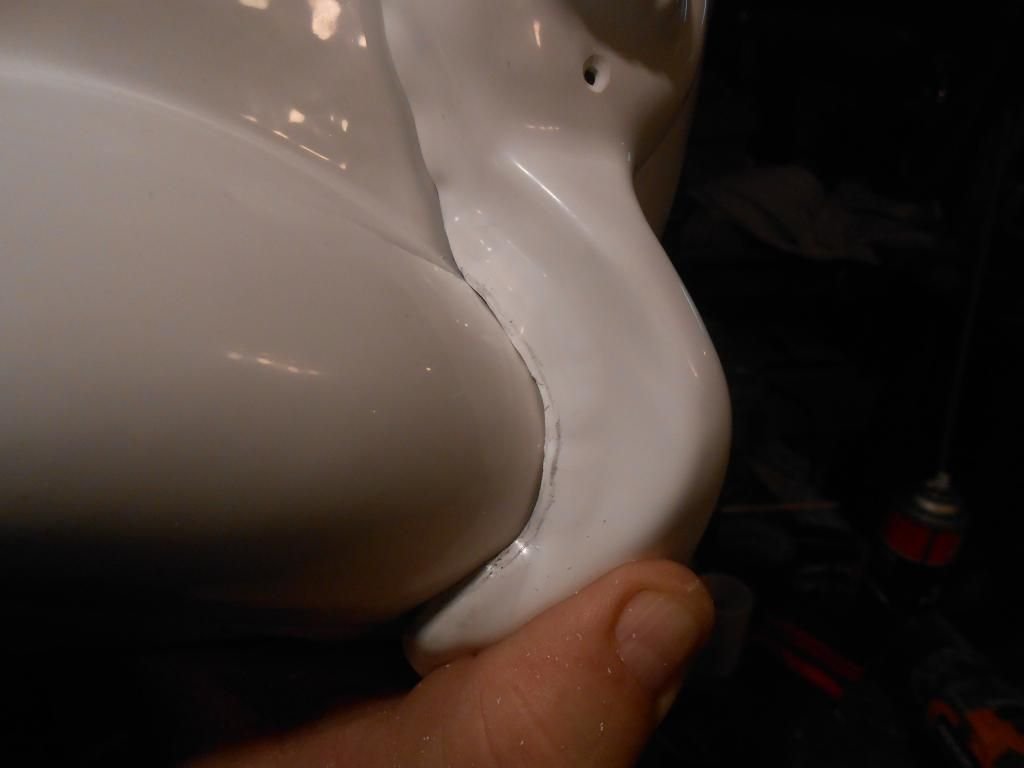
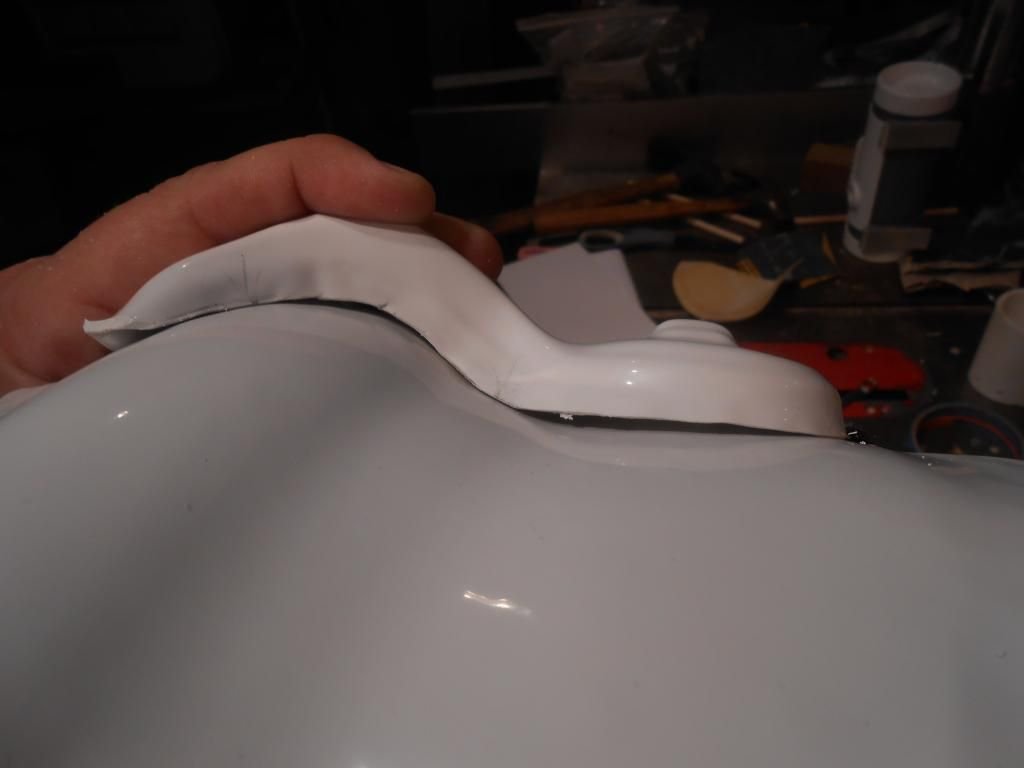
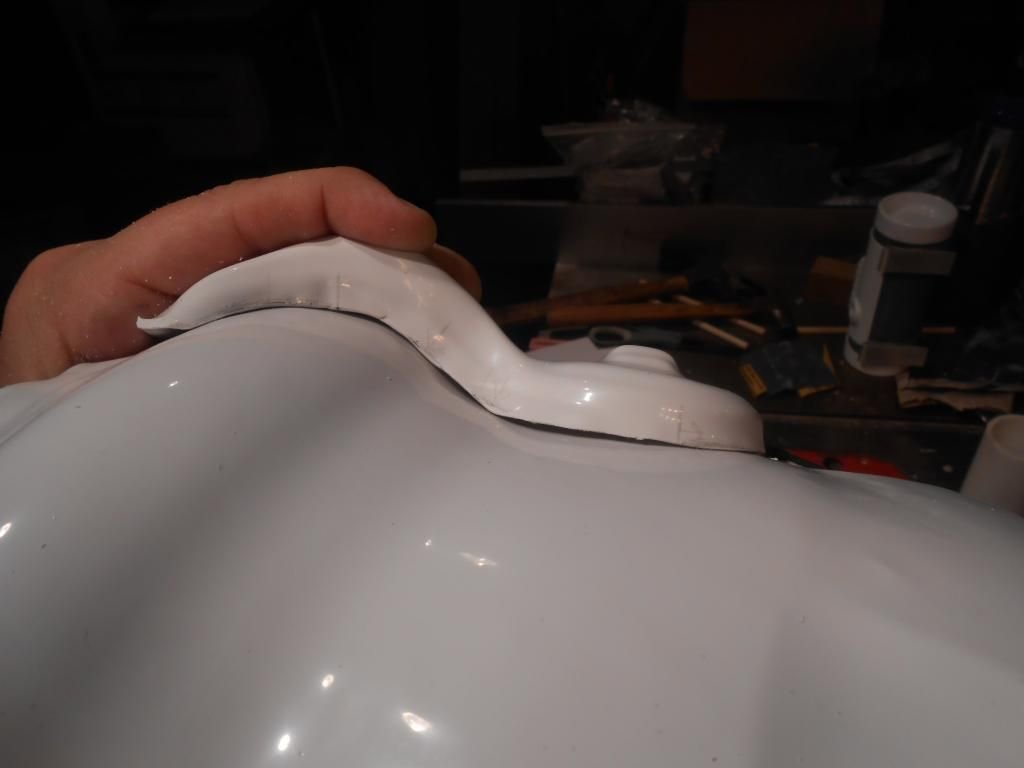
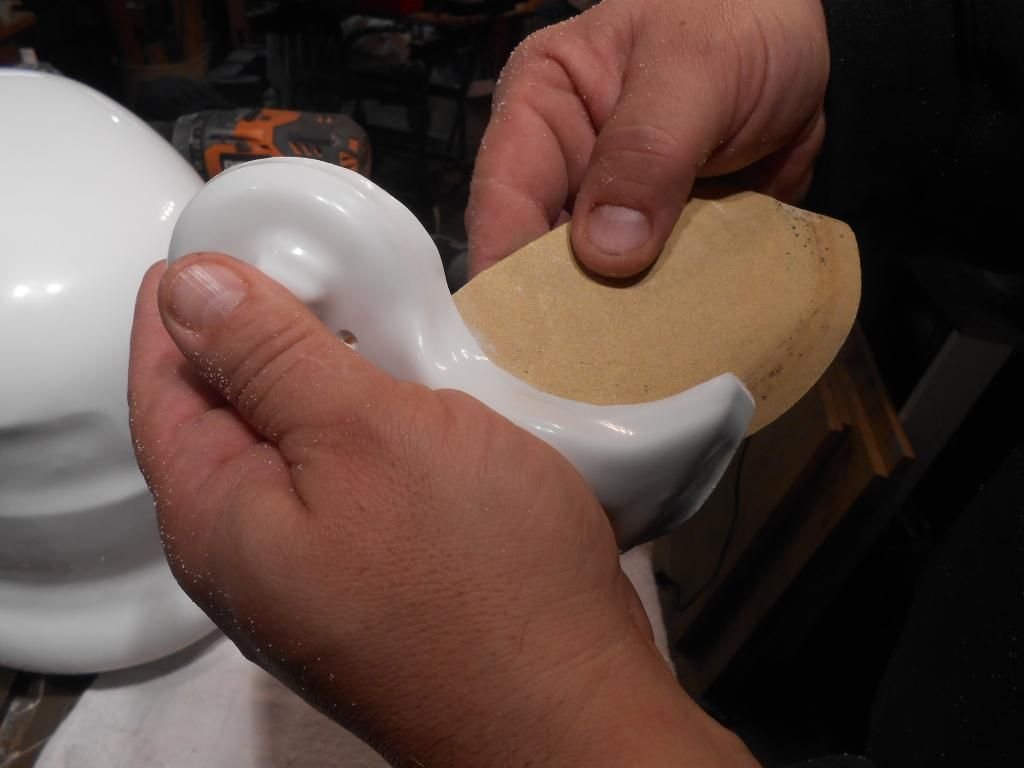
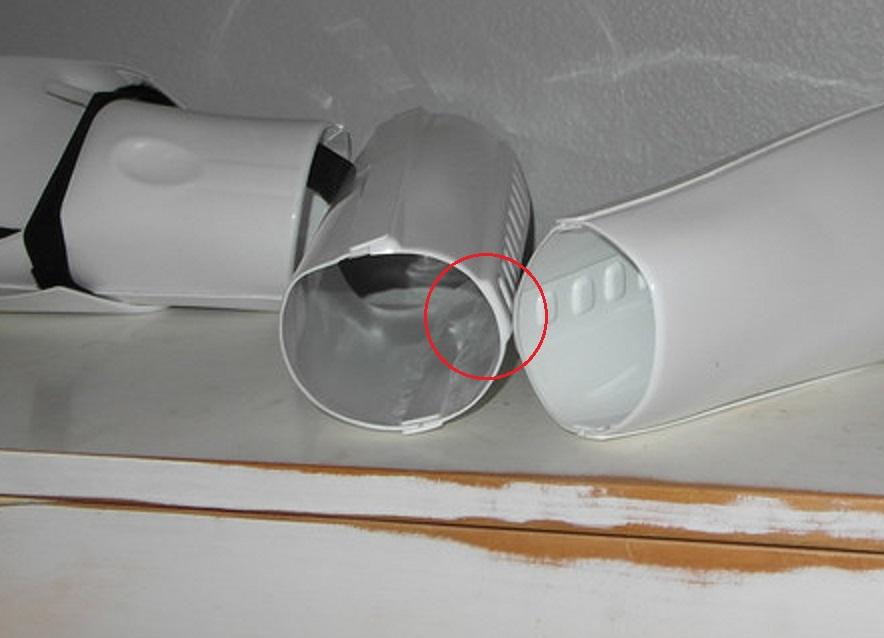
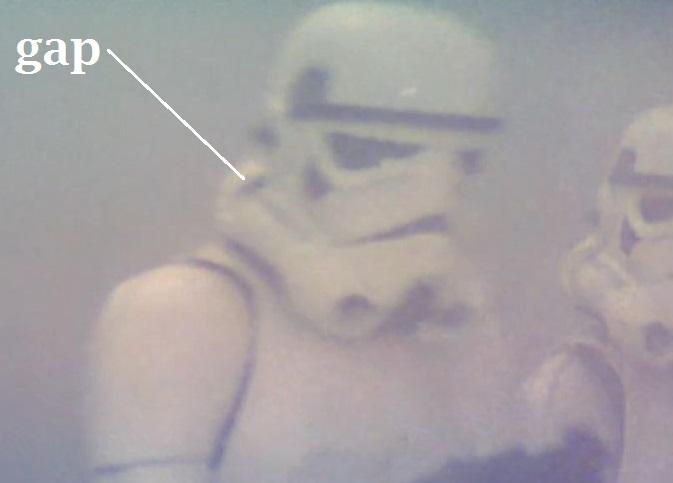
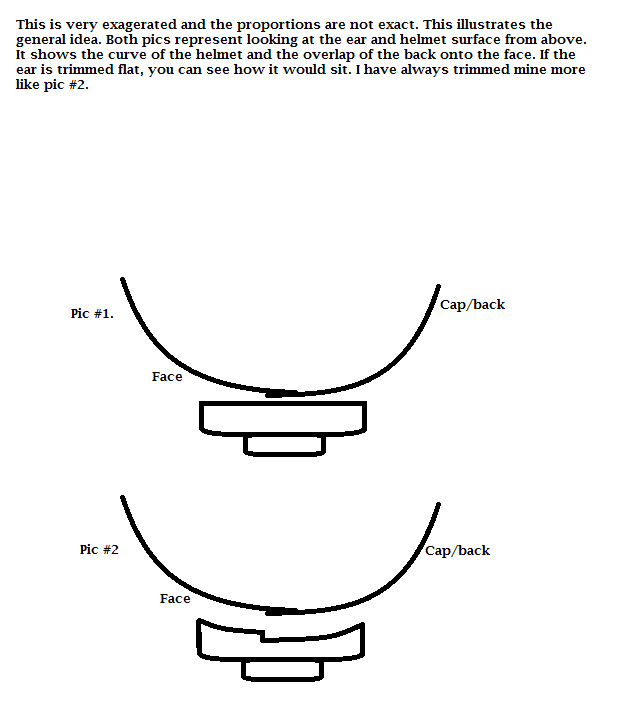
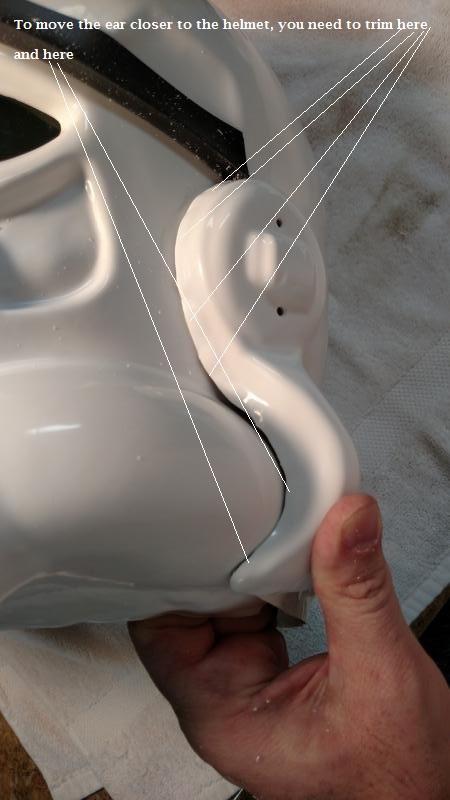
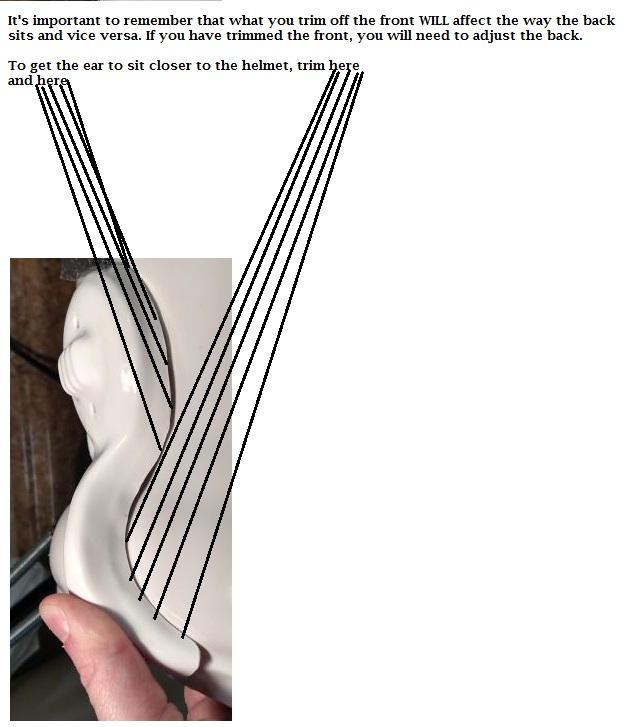
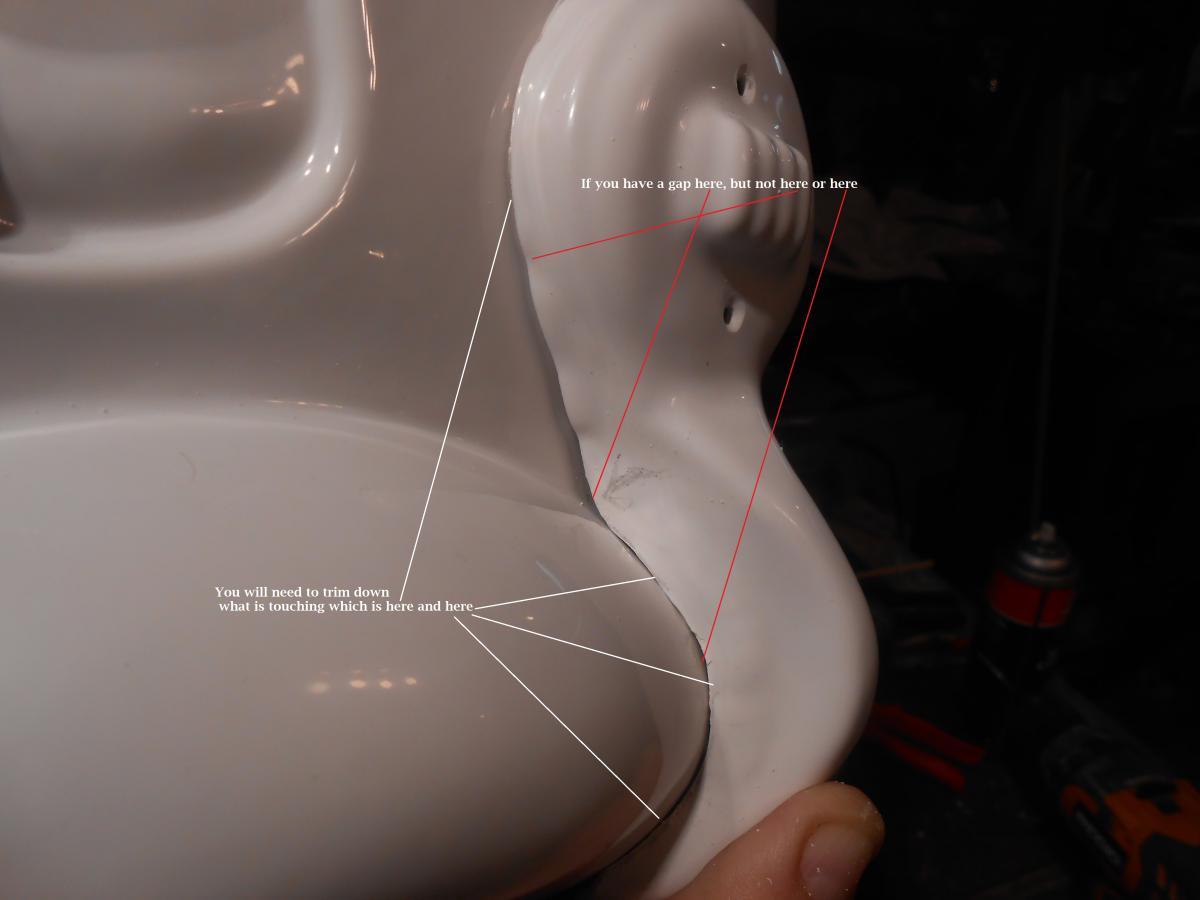
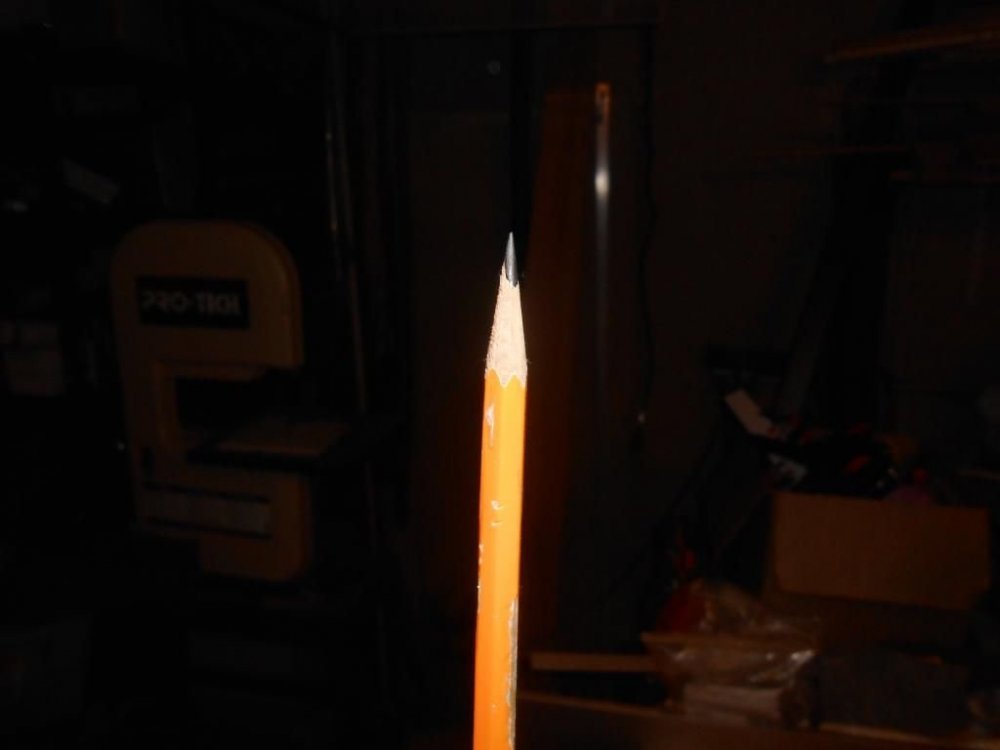
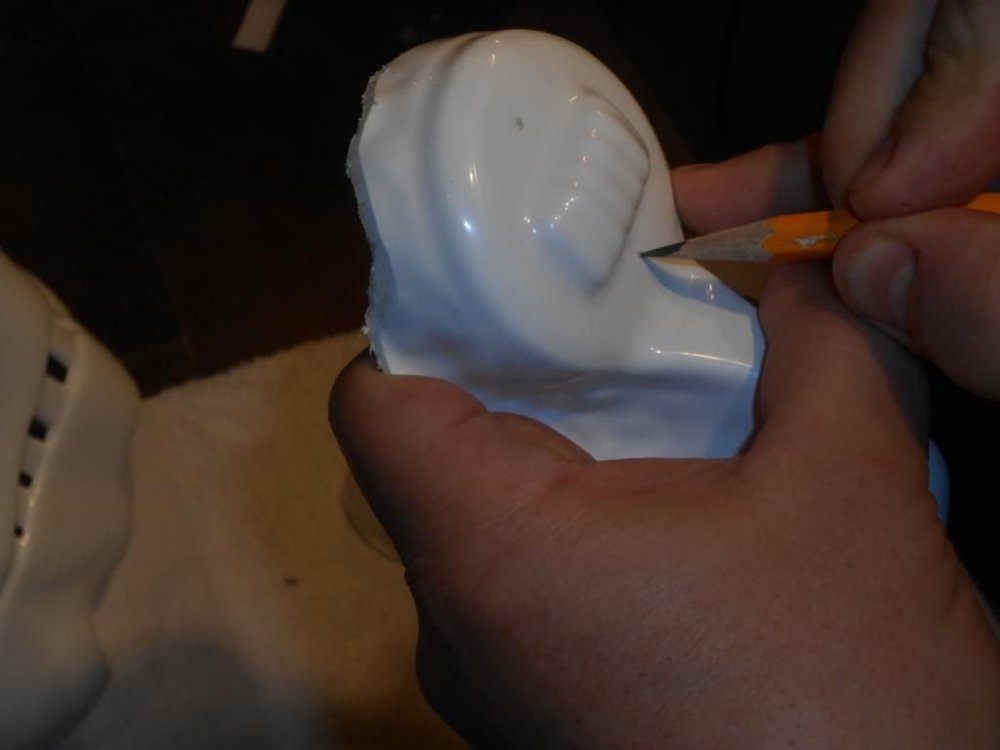
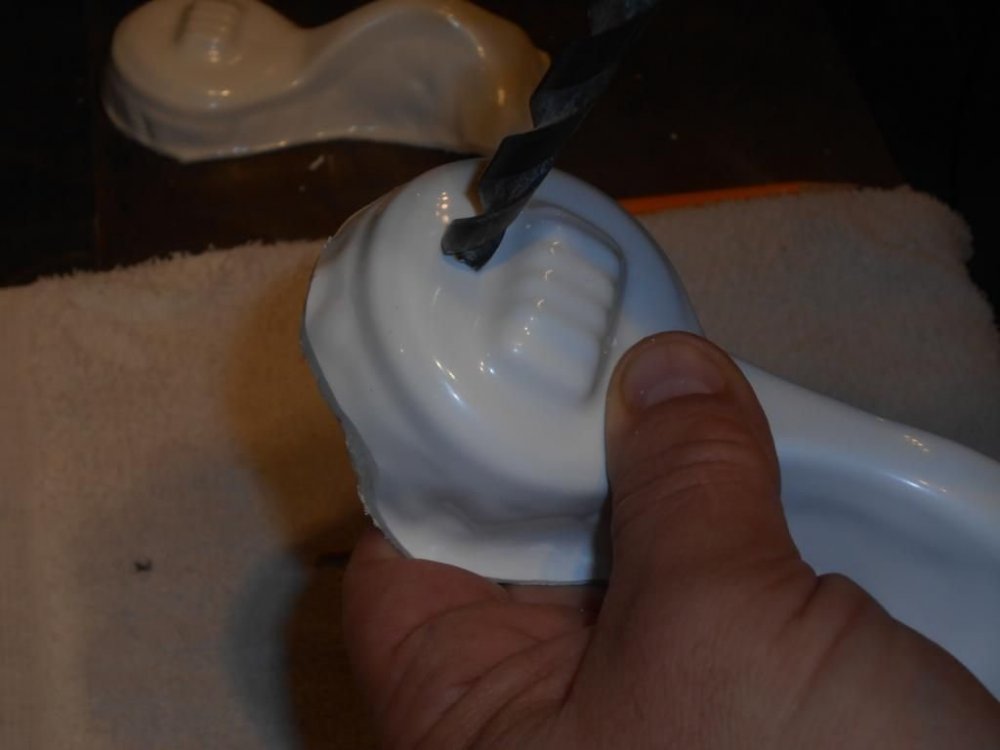
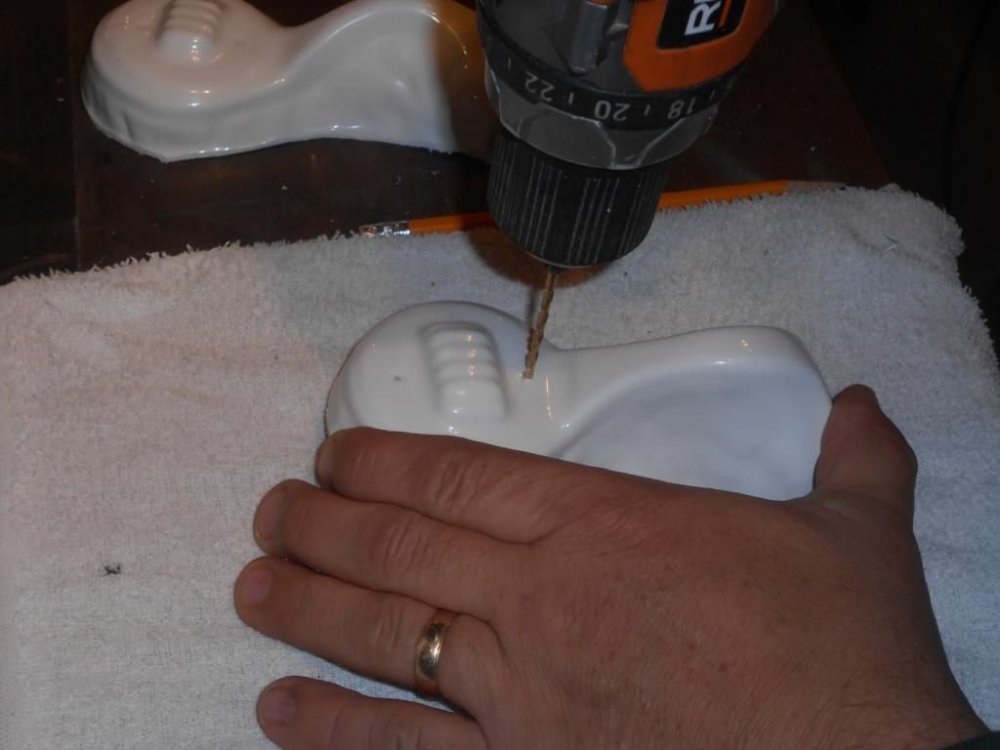
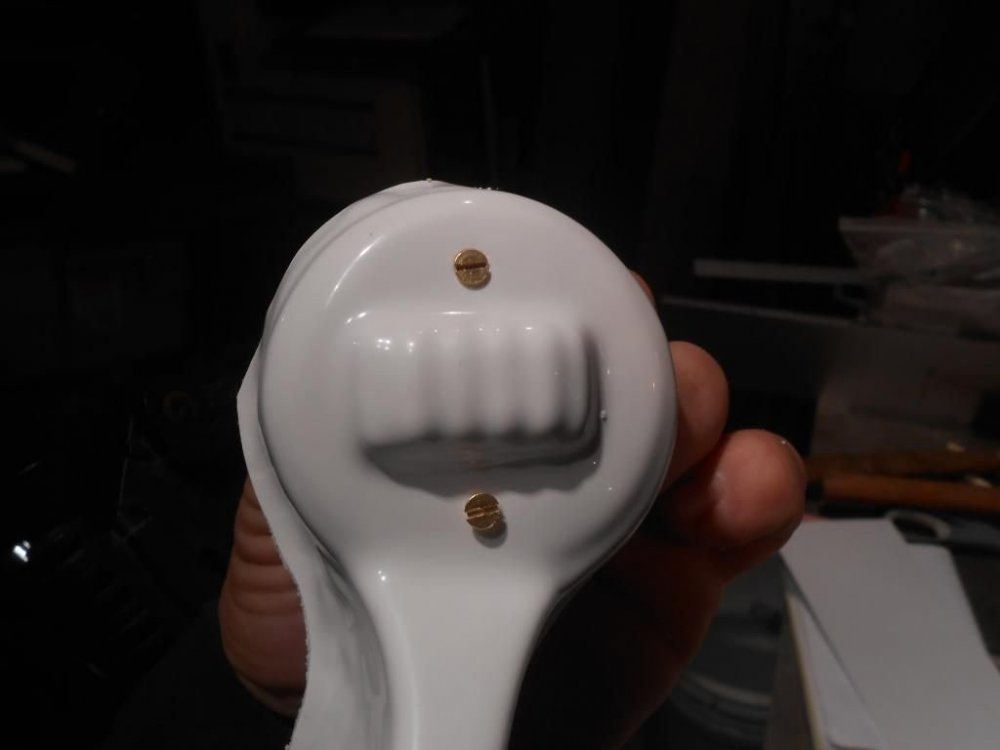
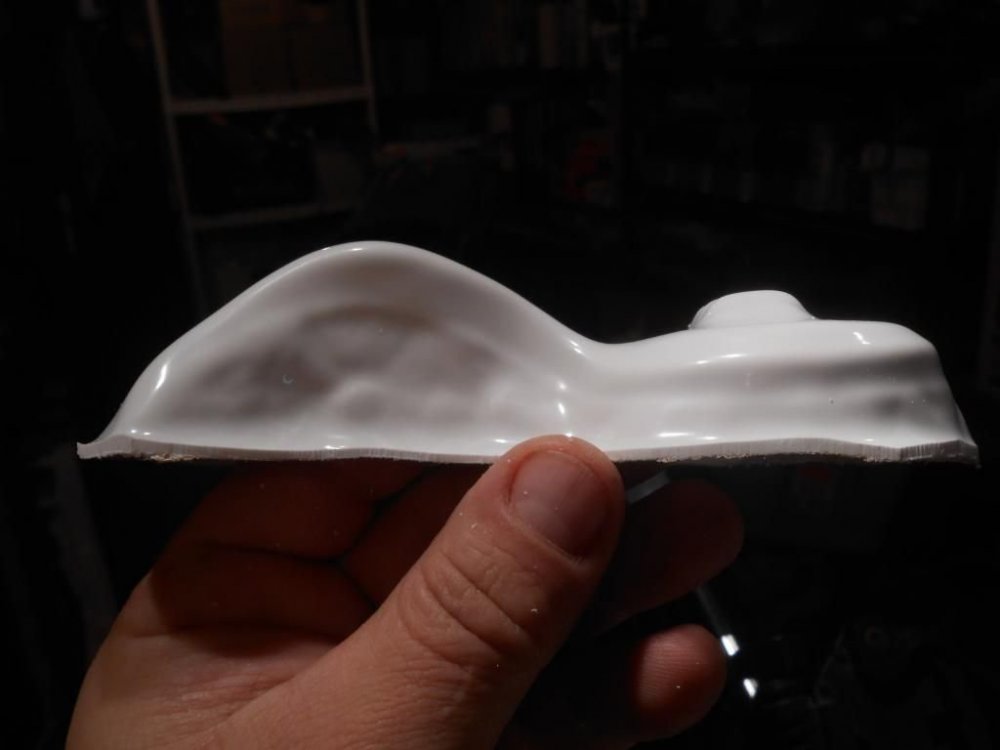
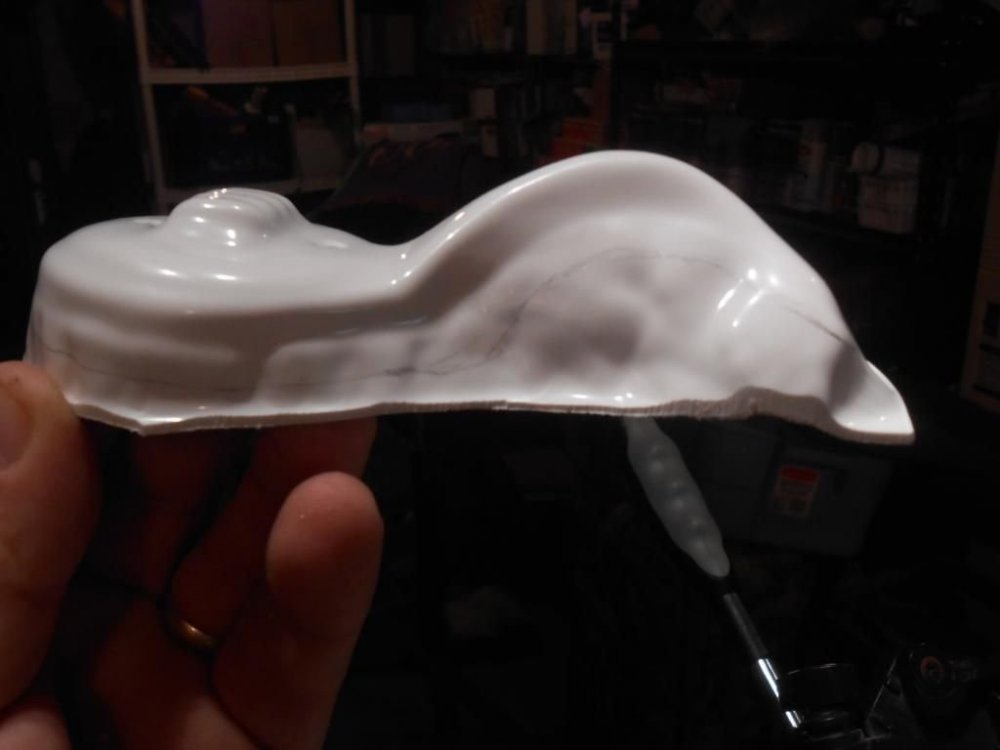
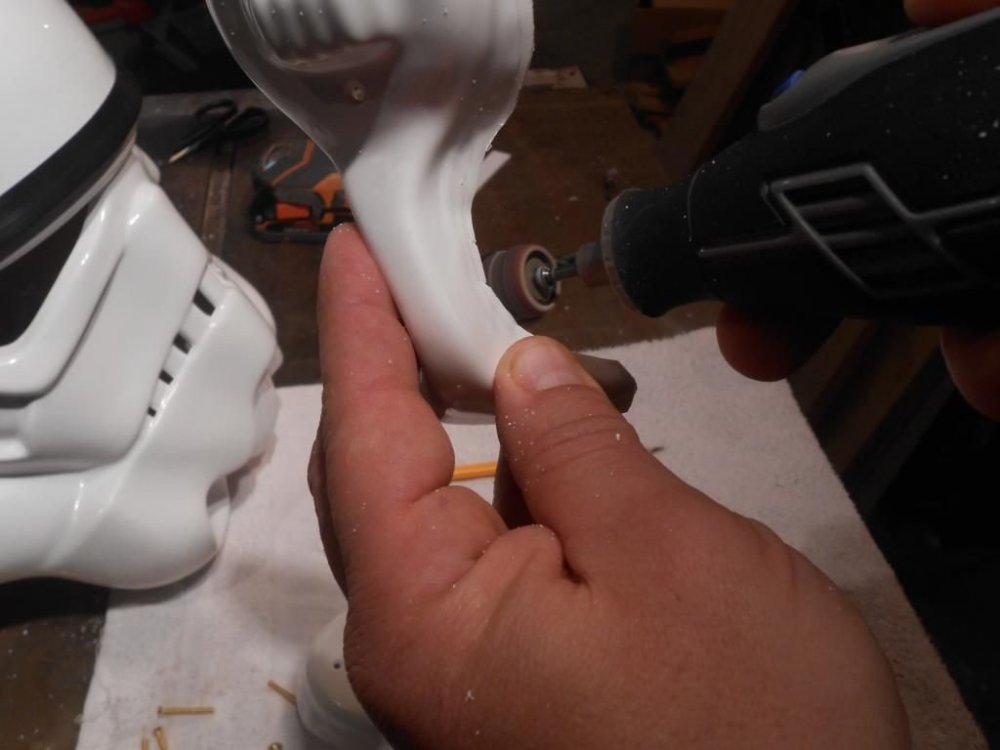
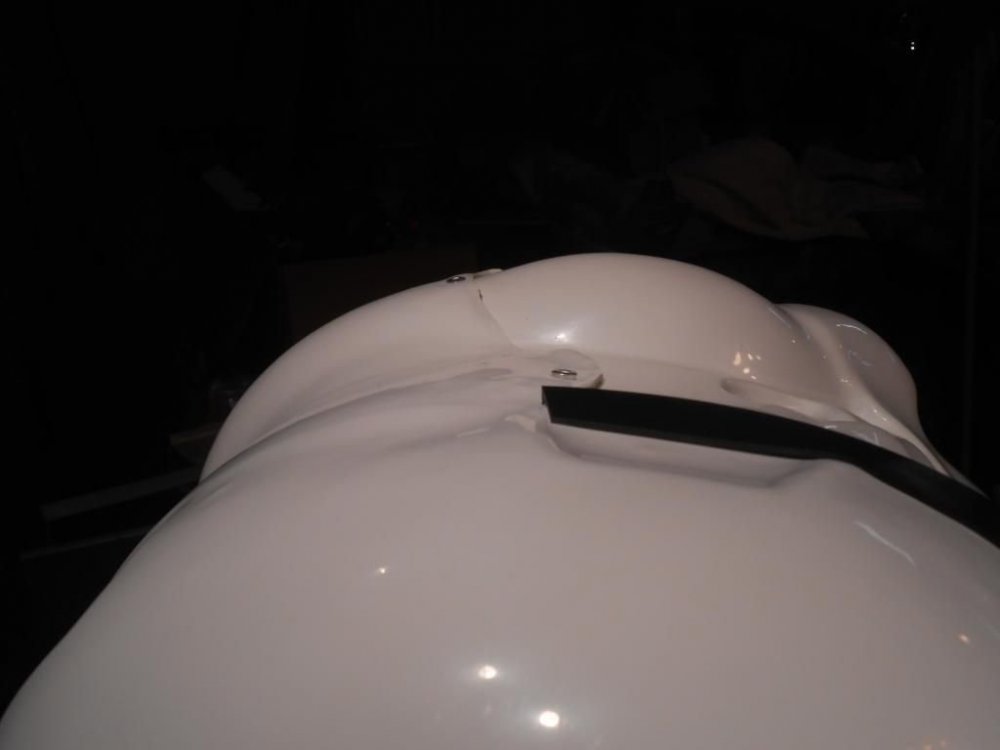
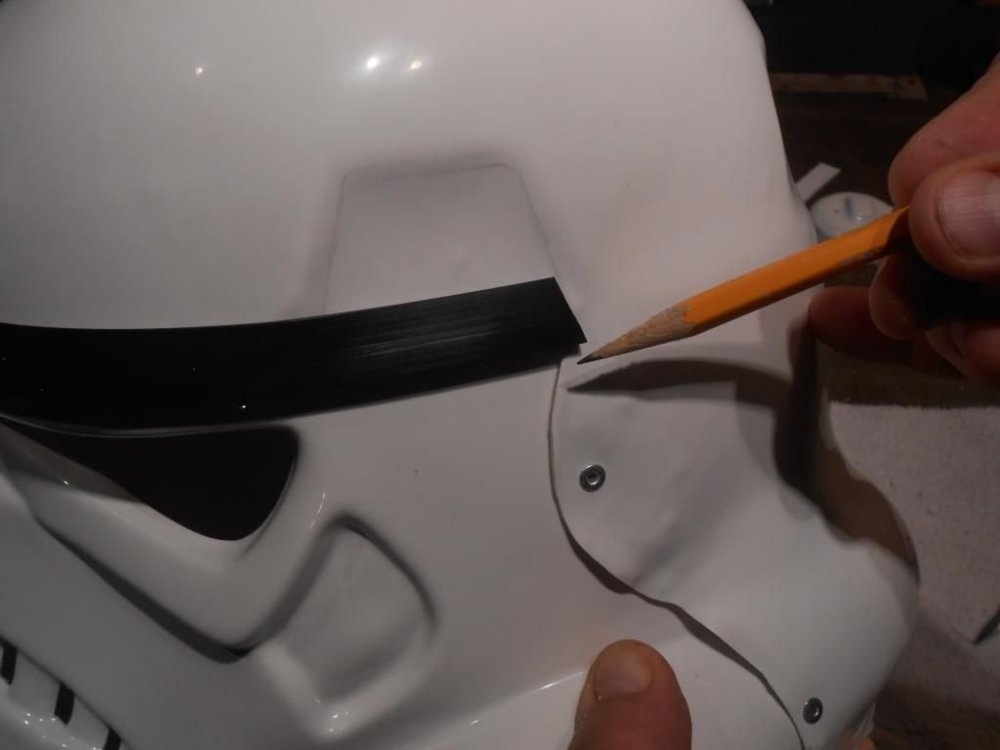
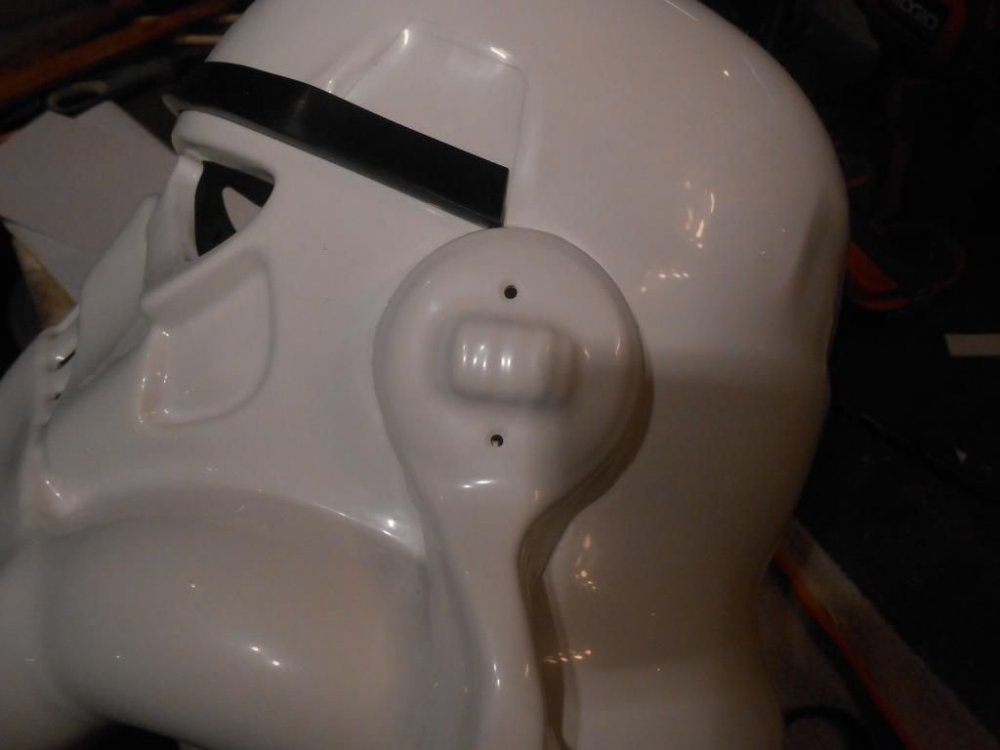
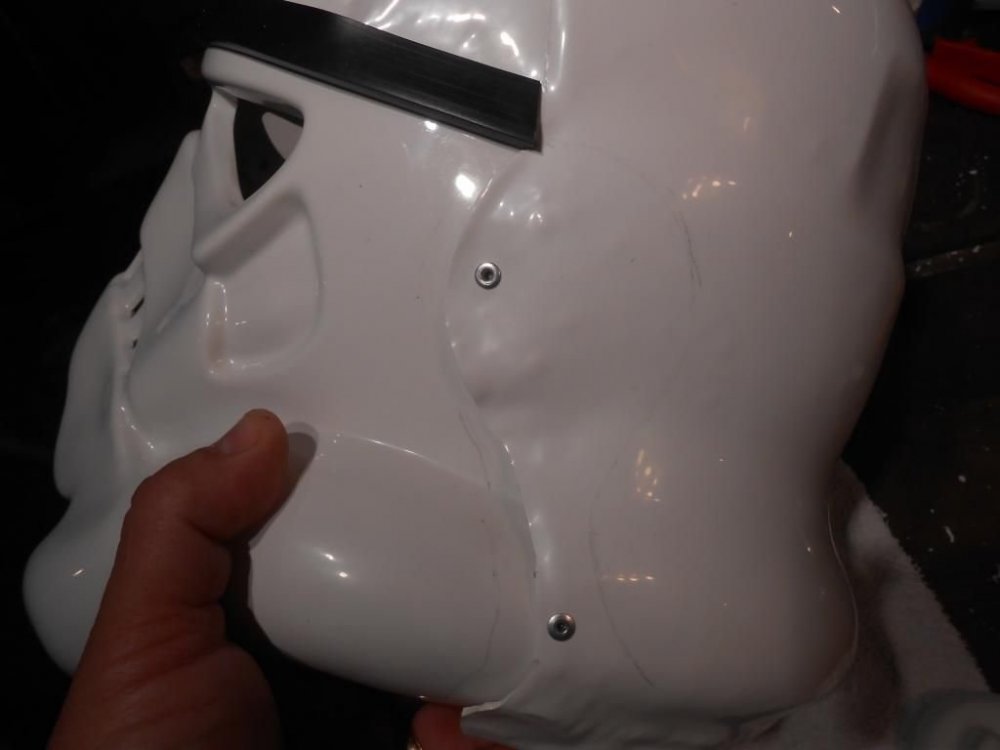
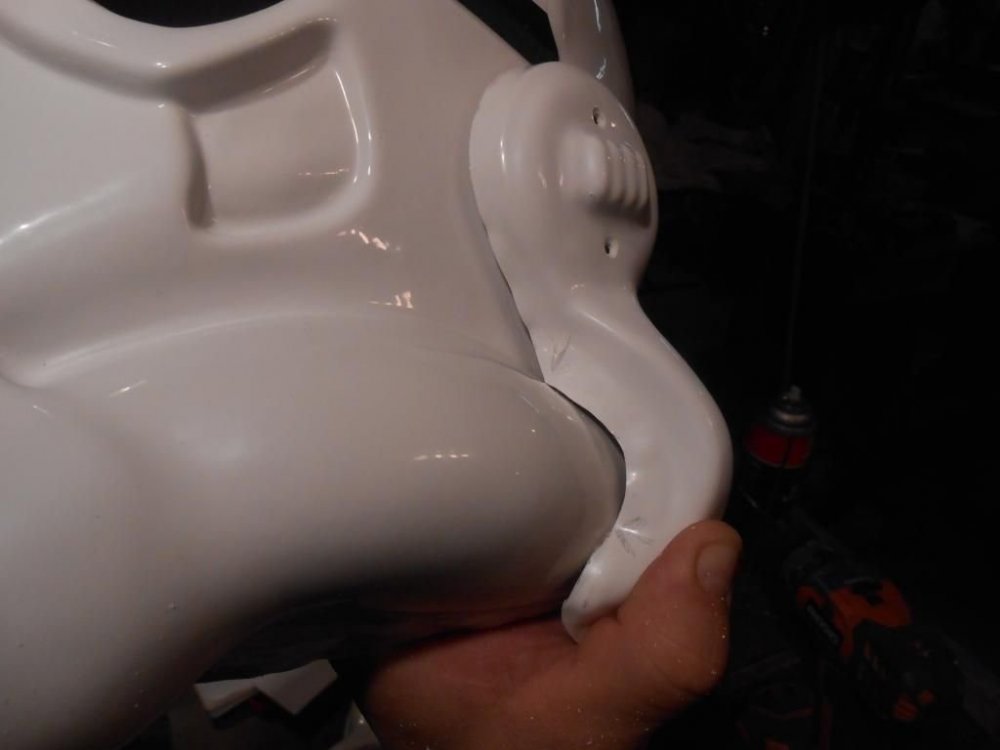
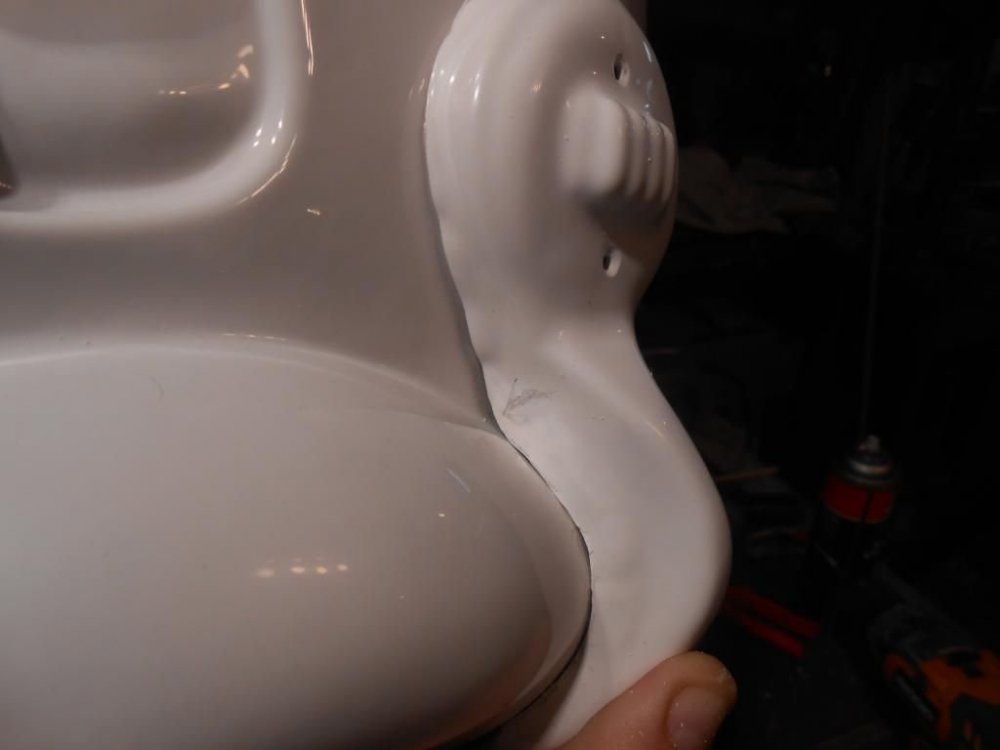
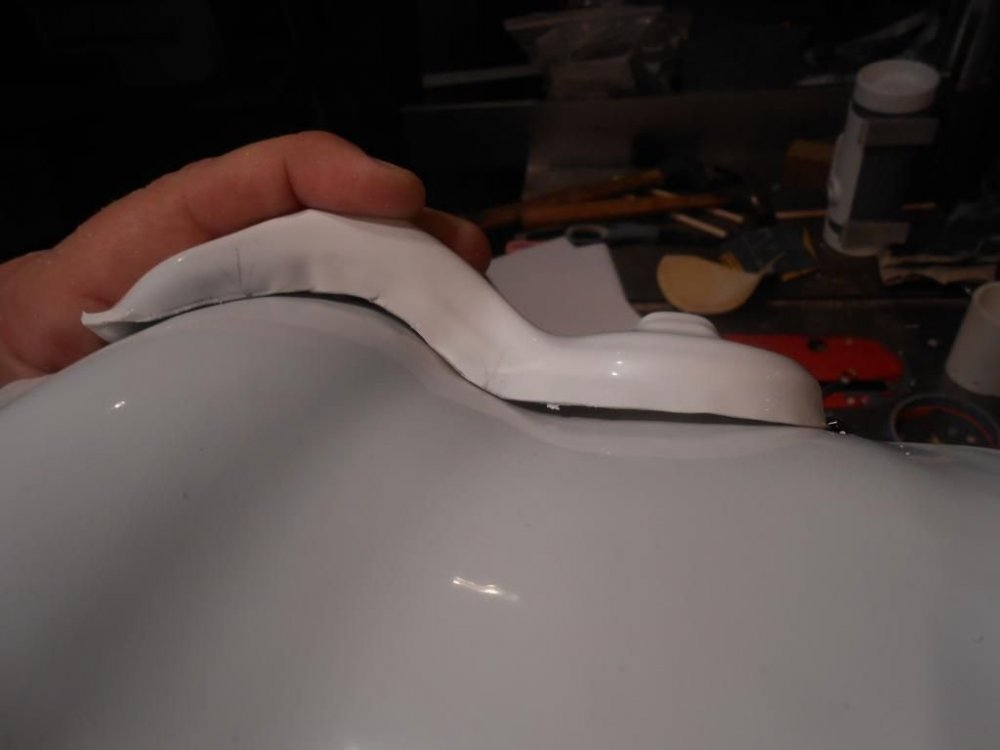
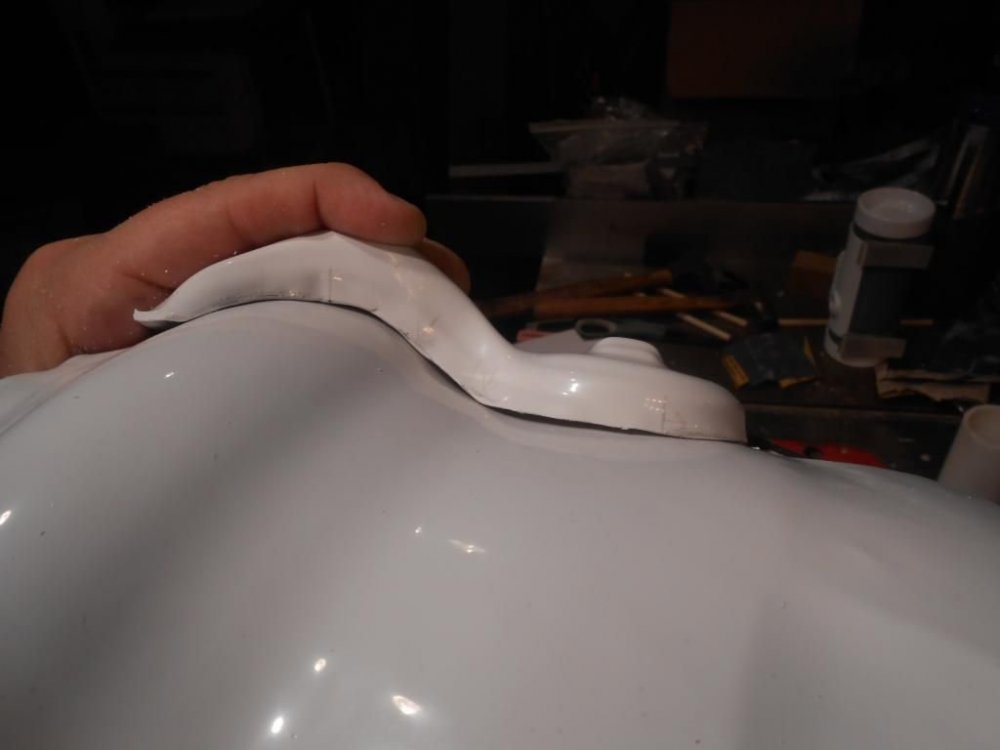
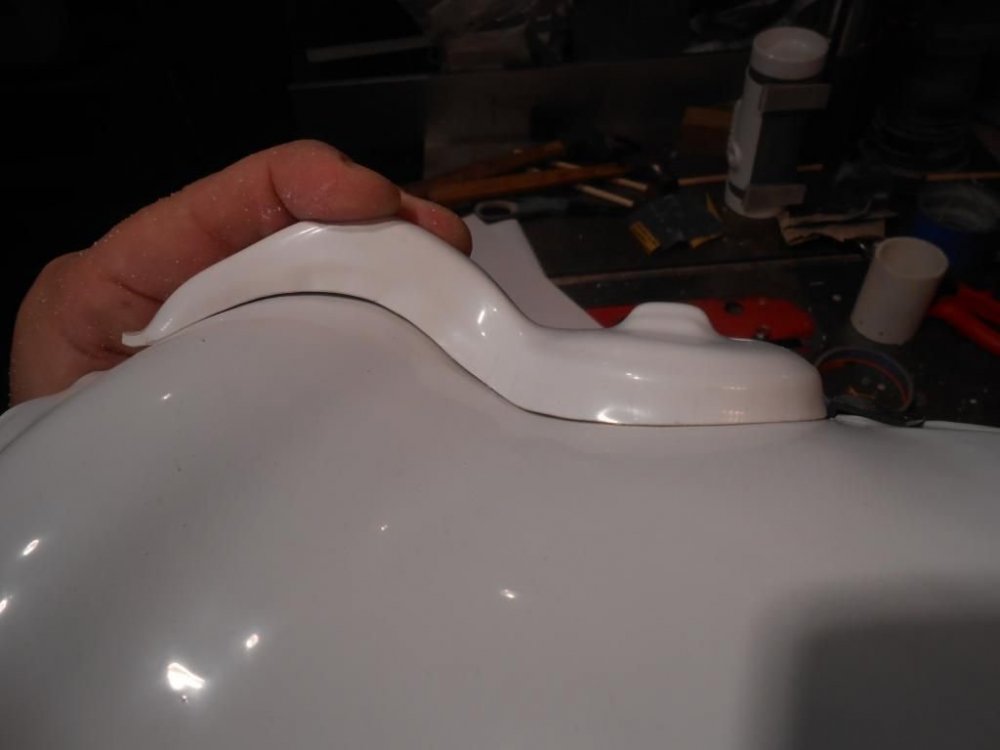
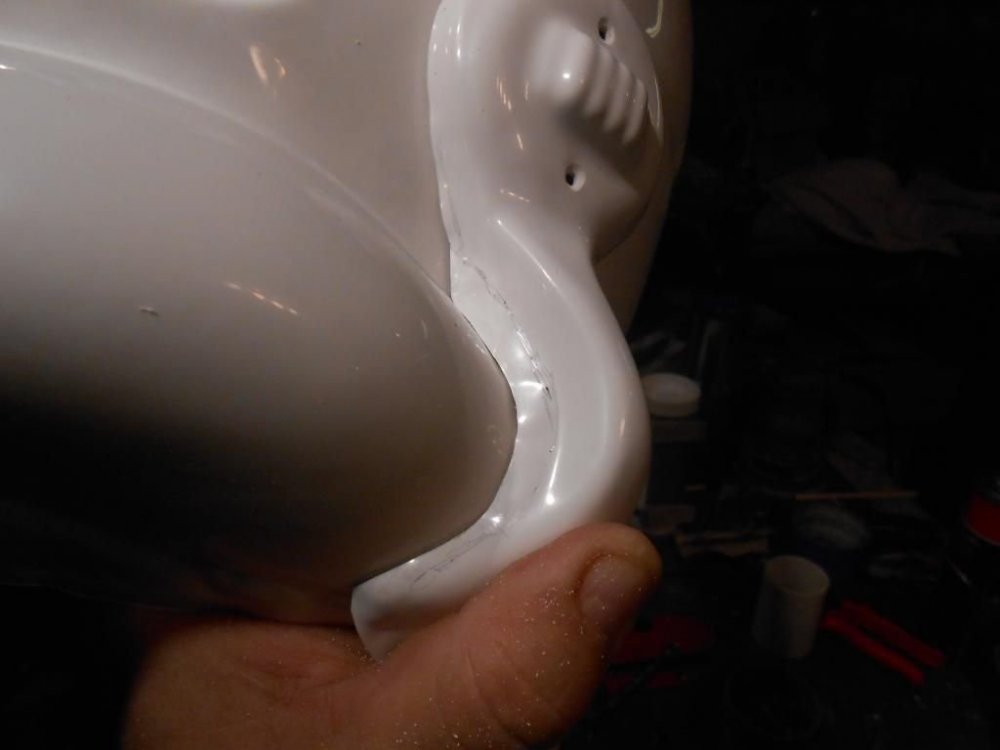
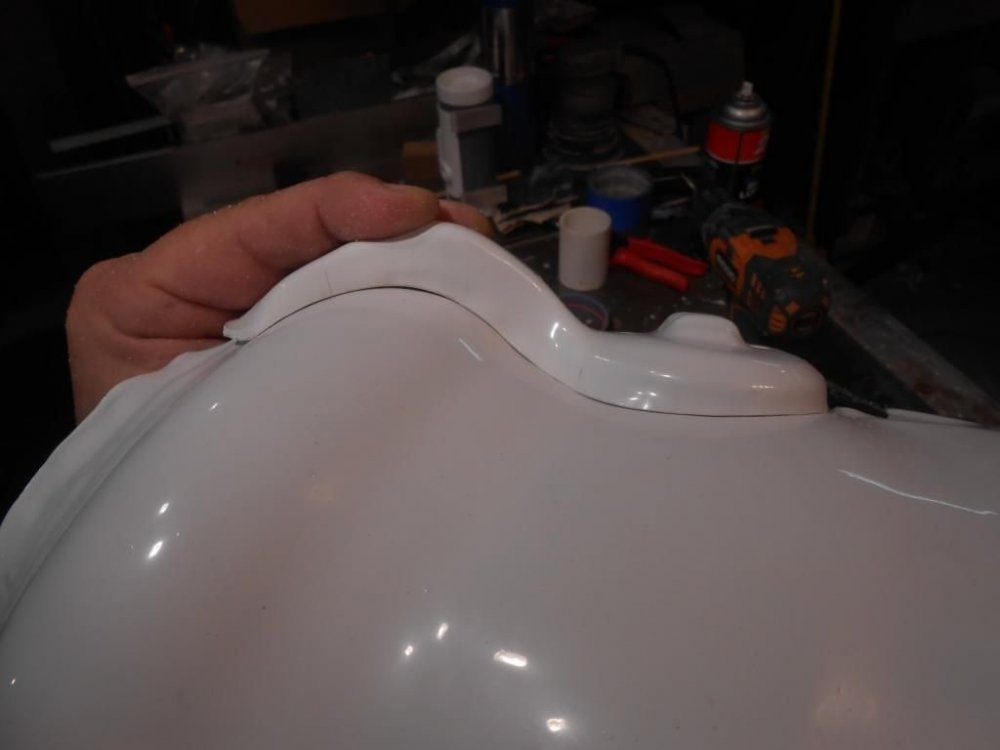
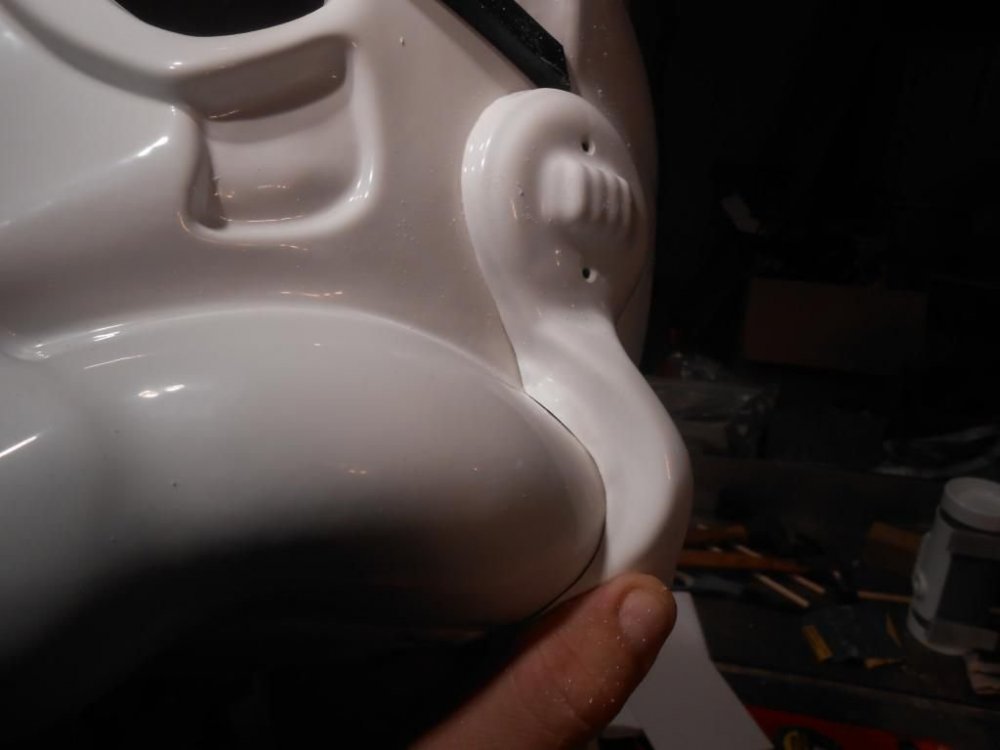
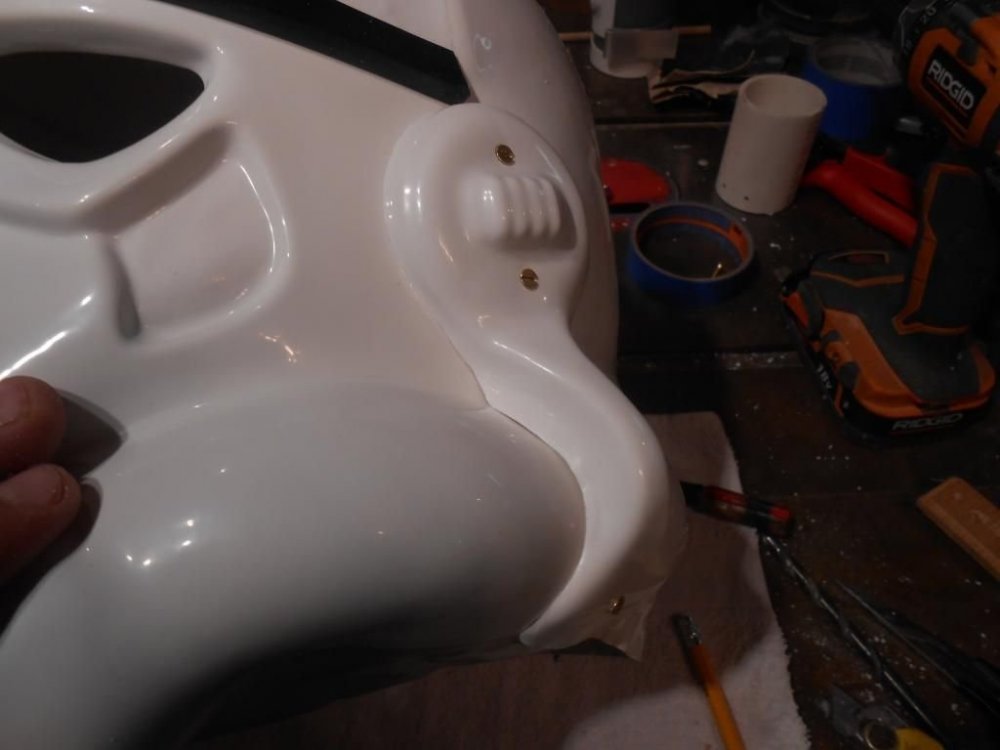
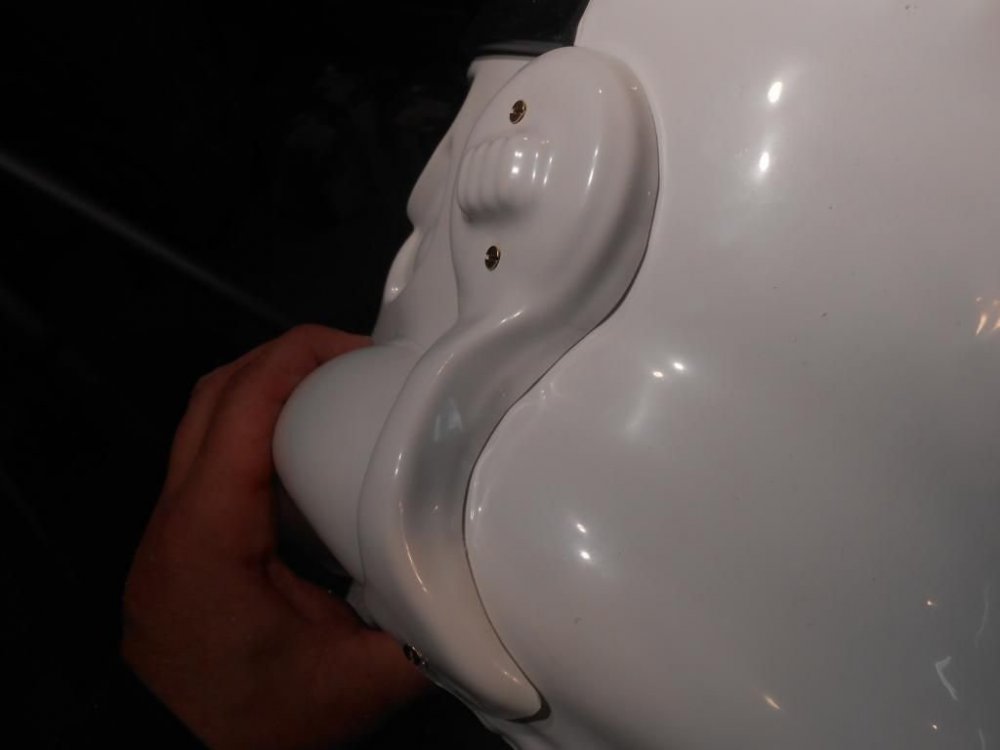
Hey there troopers!! Unless you have your armor maker build your helmet for you, every other armor build will have a helmet and every helmet will have ears to trim out. THE EARS!!!! GAHHHH!!!!! These words have struck fear deep in the butt plate of troopers all over the world. First and most important thing to remember is the the ears on the original helmets were FAR from perfect.For this reason alone, you really shouldn't be so hung up on making your ears sit so flush that there isn't even the slightest gap. However, there are some of you that are perfectionists and there is nothing wrong with that. In either case, whichever result you plan on achieving, having a basic understanding of your approach will help you to avoid making that embarrassing call to the armor maker asking for another set of ears.(Unless you were lucky enough to buy ATA that supplies two sets!! WAY TO GO Terrell!!!!) Keep in mind that there are both things to do and NOT to do. Your equipment can make this more of an art project than a worrisome task. These are my weapons: With a light, controlled touch, you can shave 1/2 millimeters at a time in a specific area or along a line edge. Along with removing the material is knowing what and how much material to remove. NEVER JUST EYEBALL IT!!! To properly monitor this, you will need one of these: Lastly, you will need patience. I know you want to see your lid done!!! After this, you are some paint and a few decals from struttin' your stuff!!! BREATHE!!!!! Let's get to it! will need patience. I know you want to see your lid done!!! After this, you are some paint and a few decals from struttin' your stuff!!! BREATHE!!!!! Let's get to it! The helmet has been riveted at the ears and along the cheeks so nothing moves. I have removed the vast majority of flashing from the portion that was on the vacuum table. I will first drill out the screw holes. Although the indents are there, shadows can play tricks on your eyes, so I mark them so no mistakes are made. I will slightly wiggle the bit to EVER SO SLIGHTLY increase the hole so the screw moves freely but is still well fit. Once the holes are drilled, it is time to countersink them so the screwhead sits flush. IMPORTANT!! Do not use anything but your hand for this step!!! NO DRILLS OR DRILL PRESSES!!! If the bit grabs the hole, it will go right through and there will be nothing you can do to stop it! Just spin it in your fingers and you will have precise control. You can see the difference in the two holes. As well as the difference in the way the screw rests within the holes. Note the shadow coming from the non-countersunk screw. Although there is still a slight shadow on top, this will all but disappear when the ear is tightened down. Now comes the fun! First thing to note is the original mold lines. These are ATA so the mold lines from the original helmet are here. Other armor makers may not have these. Consult the dozens of helmet reference pics we have here if that is the case. But if you have these lines, it is important to remember that these are from the helmet that these were off of....NOT YOUR HELMET!!!! The position you have your cap on your face to make the brow line higher or lower will affect the way the ears sit on the sides. For this reason, the ears must be trimmed to YOUR HELMET. The only kit I know of that the mold lines on the ears comes close to the final helmet without a huge degree of trimming is AP. As long as you use the dimples they suggest, the ears will sit correctly following the mold lines he provides. Anyway, back to these! It is important to note that your ears should look like seam covers and NOT 1978 headphones!! Note how thin the ears are on Han's helmet: You can see the mold lines on the back side very clear as well. I will start bu marking off a general line and trim that. I will smooth out the scissor edges and do a test fit to see where to start. I'm sure there are those of you that don't have the mold lines to start with and are wondering what to do. Note that the top of the ears always comes close to the brow trim and the horizontal ridge that runs around the back of the helmet. If you need to take a measurement between the brow and the cheek/tube crease and use that mark so you don;t trim too much off in that corner, do that. You can always trim more but you can't replace it if you think you trimmed too much. It doesn't need to be perfect, but there shouldn't be so much space that birds will want to nest in there!!! Here is the basic understanding of your approach: You will see this re-stated in the next pic but I can;t say it enough: What you trim away on the front can/will affect how the ear sits on the back. Don't work too long and remove too much without checking the other side from time to time.: Another thing to consider for those of you interested in a really clean fit, is that the helmet surface where the ears are is NOT FLAT! That's right!!! It's curved. Keep this in mind when trimming the round portion. This here is another area to consider if you want that super close fit. There are halves that overlap each other. If you want to, you can notch this out once you have decided the final resting spot for your ear. This is exaggerated, but it just shows what I mean. So here is my first fit. I know.....pretty horrible. It will get better. But first, and I believe this is where a lot of issues happen, I will determine my ear location: and mark it lightly with a pencil. This makes sure that my alignment and the trimming I do will all stay the same. If you ear moves around and you trim it willy nilly, things will be off.......I promise!! Now once you have a basic understanding of what will be affected if you trim certain areas, then you can proceed. TAKE YOUR TIME!!! Note what is touching and what is not. Trim what is touching the cheek to close any gaps that are not touching. My picture failed of the notch that I put in the top most portion of the ear so this one is from another build: Take note that this shows the right ear. I am working on the left so far. Anyway, You can see here, that the arrows point out what is touching and preventing the gaps from closing. Here are the spots on the back. Since you never want to eyeball a cut, I mark off what I will trim. After trimming that, you can see what is touching now (arrows) Noting what is touching, I mark what is to be cut. Now although the fit is tight around the cheek tube, I have a gap in the corner. The arrow points it out. In order to move the round portion closer to the surface, I need to take more out from around the cheek. There is a lot here so I can afford it. I will mark it anyway. After that trim, you can see I have a good general fit. Still needs a bit of honing, but a good fit. What have we NOT done?? The back! So let's go there for a bit. Without wordy describing, you can see the gaps, what is touching and my marks of what is touching so I know where to trim: Sometimes I like to even hit the INSIDE edge of the ear wall so that I am assured that the oter edge of the wall is the only thing touching the helmet surface. I do this with sandpaper so nothing gets out of control and too thin. So now we have a really nice fit in the back. Now is when I notice an issue after I got back to looking at the front. I traced out the original mold lines seen here: In my opinion, the ear is too thick around the curved portion. Using the same methods I used to get to this point, I reduced the curve by another few millimeters or so all the way around including the round portion. So after some additional tweaking and final sanding, the back side fits clean as does the front. I marked, drilled and installed the screws around the rank bar. I never pre-drill the lower location until the ear is fit. As you can see, I needed to drill it at an angle so the screw penetrated the face portion. When tightened, this drew the face up nicely to the curved section of the ear. and the result...(dramatic music please!) It's about as close as I am going to reasonably get it. Note how nice and flush the screws are in the recesses! The same will be done with the other side, but the same principles apply. I want to note that there have been other great ways to accomplish this either through a tracing wire or a toothpick attached to a pencil as a guide that rests on the helmet surface. This is just how I do it. To me, planning, staying constant, slow and steady yields good results. I hope this helps someone.


- 22 replies
-
- 13
-

-
People carry their weight different. You need to first decide which TK you are shooting for. Like Germain said, it is foolish to try to make an ANH/ESB suit look like ROTJ when ROTJ armor already exists and vice versa. Scott nailed it when it comes to AP requiring a thin framed person. A measurement around the fullest part of you ( your belly button) will determine if this will fit properly. AP really fits well up to roughly a 34 inch measurement. Beyond that you will either need shimming or move to a different armor that allows a 36 like TM, RS, ATA, MTK,