

SolderMaster
-
Posts
686 -
Joined
-
Last visited
-
Days Won
1
Content Type
Profiles
Forums
Gallery
Articles
Everything posted by SolderMaster
-
You need foam for a helmet? I can provide you some self adhesive...there's a post somewhere.... can't find the original post but look here------------ I have the padding/foam in the first pic from Vern. If that's something you want, PM me. I have some going out to another trooper this week, I could send some your way.
-
Question about reinforcing lower left leg
SolderMaster replied to Sentry02's topic in Build Threads Requireing Maintenance
I don't see a problem at all using a rivet under the sniper plate. I really don't see a benefit either, tho. I also used scrap strips on the back of the butt joint(TK5270's AP). Tho I did use finishing strips over the top as in ANH. Not sure if there are nice shiney for sale signs out there for this, but maybe there are..? As for glueing your sniper plate...be sure to use E6000 for most of the securing of the plate. You could tack the sniper plate down with CA glue to hold in place, then use E6000 generously to provide the best holding power. E6000 has some give to it allowing the plate to be bumped or even "leaned on" lightly for a short period of time without having the plate pop or snap off. I would email some of the armor makers asking for a quote on the finishing strips. If you're gonna do it, do it right. The look will improve greatly if you use the proper strips. IMHO Enjoy the build.....and......Where's all your pictures???? -
No, It was just the way the pic came out. That "hole" in the corner is just a shadow...thank goodness... I had to go look at the helmet just to make sure!
-
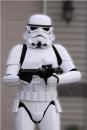
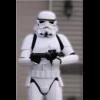
Here is Teri's "Action" shot. If the pic isn't good enough, we can take a shot during the day to replace it.
-
Yup ROM/FX. I would suggest to shorten the time it takes for the static burst to play after you guys stop talking.....just my opinion.
-
Teri, we forgot a nice action shot for your EIB Profile pic. We should do that Thursday while we are adding snaps to your belt and whatnot...I'm changing out the D-Ring now....THANKS Karin!!!
-
TK5270 is my cousin Teri. I helped her with her build and I have all of the pics we took on my pc. I'll have her post in here tonight to verify.
-
Here are the photos for TK5270 Armor and helmet = AP E-11 = Hyperfirm Boots = TKBoots Canvas belt = TKittle Hand Plates by Karin non latex Rom/FX with AKER amp Neck Seal = TK409 Holster = TK8280 Let us know if anything needs anything!
-
I used 2 inch elastic belting from JoAnn Fabrics...part number 28605-1 . I glued velcro on one end of the straps and installed a single snap which connects to the ab. I put two strips of velcro on the kidney plate which allows me to adjust the straps quite nicely... -------- In this shot you can see the suspender snap in the lower right corner. ------- Hope that helps!
-
SolderMaster's RT-MOD Build[*RT]
SolderMaster replied to SolderMaster's topic in Build Threads Requireing Maintenance
Here you go. Let me know if you need different shots. Here I replaced the decal for a painted Vocoder...thanks Teri! Again, if you need more or different shots let me know. -
Way to go, Teri! Glad I could help and had fun doing it! It's troopin' time!
-
SolderMaster's RT-MOD Build[*RT]
SolderMaster replied to SolderMaster's topic in Build Threads Requireing Maintenance
Here's some pics how I glued some strapping, got tired of snaps popping while trooping... The snaps in the middle are no longer used No more popping snaps, glued 4 pieces of elastic. Next few are of Teri's AP to help a fellow trooper... Left Thigh butt joined with 20mm finishing strip Right thigh Right shin Inside shin...used scraps for the inside. Hope that helps! -
Best amp hands down!!
-
Cause this is the place for all things shiney and white!
-
Applied for new job...at Intergalactic Headquarters
SolderMaster replied to tigger68's topic in Off Topic
Tiffanie, We would be honored to have you in the Wisconsin Garrison! Ya, I'm not the one who designed our logo...not too crazy about the barn either...lol But, good luck with your application! -
Hi folks! Here is an AP lid in the making. This is my cousin's (Teri on the boards) lid in which I have been given the task of assembling. A few things first... Like many of you, I used the "factory" trims lines which will give me fits...gaps...I know the eyes need to be filed a bit more and 2 more teeth need to be opened up. Just need to hear from my fellow troopers on how it looks so far and any assembly tips you can muster Here it is... Ok...what do you think?...and don't candy coat it!!
-
How did you fix your knee plate on your AP kit
SolderMaster replied to Bigturc's topic in Hard Armor (General Discussion)
They were glued on. I would try CA glue to get it to stay, then use E6000 generously where the plastic is in contact with the shin, mainly on the back. Use some clamps to hold it in place. -
Everything went according to plan. The kit comes pretrimmed which is really nice. The helmet is also pre-assembled. Just take your time and have a blast. if you get stuck, we're all here to help!
-
Understood and agreed, Paul. I was merely suggesting it, not like a "right now" type of thing. I would be more than happy to offer my services to help clean things up a bit. Organize threads and topics, delete resolved matters, etc. Just a thought.
-
Tasadek's Zombie Trooper Build
SolderMaster replied to tasadek's topic in Build Threads Requireing Maintenance
I have a pair of RT forearms that might help!! PM me -
Just curious on if the FISD ever tried to incorporate a chat option on the site. I think it would get used quite a bit for real-time help on projects or to just say hi to your fellow troopers.
-
HA Nice one, Vern!
-
YouTube...do a search for Dave's Garage. Good stuff when building!
-
SWEET! Drooling... is that a HF DLT-19? The all black one?
-
Enjoy your build, Alex! I savored mine. Rob is an outstanding guy in every manner possible. Congrats on going with RT-MOD!