

SolderMaster
-
Posts
686 -
Joined
-
Last visited
-
Days Won
1
Content Type
Profiles
Forums
Gallery
Articles
Everything posted by SolderMaster
-
TK-5569 Requesting EIB Status[116][RT]
SolderMaster replied to SolderMaster's topic in Request Expert Infantry Status
AWESOME! Thanks Terrell! -
TK-5569 Requesting EIB Status[116][RT]
SolderMaster replied to SolderMaster's topic in Request Expert Infantry Status
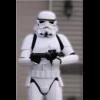
Here's another set of pics, taken outside, which should hopefully get me there. Let me know if you need any other pics taken. -
TK-5569 Requesting EIB Status[116][RT]
SolderMaster replied to SolderMaster's topic in Request Expert Infantry Status
Yeah, Rob? Some really awesome trooper made that for me. His skills in belt-making are overwhelming. Now....if I could just remember his name.... Thanks Rob!! -
TK-5569 Requesting EIB Status[116][RT]
SolderMaster replied to SolderMaster's topic in Request Expert Infantry Status
That mean I need to raise up the belt a bit as to see the separate ab and butt plates? Will do. I'll edit post tomorrow! Thanks guys! -
Great work, Terry! You have helped me also during my build. Much appreciated Trooper!
-
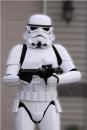
TK-5569 Requesting EIB Status[116][RT]
SolderMaster posted a topic in Request Expert Infantry Status
Here is my app for EIB. Other than my knee plate sliding under my thigh, I think I'm ready. Let me know if I need to retake that pic. RT-MOD armor and Helmet. Holster from Anrev Belt from TKittle Boots from TK Boots E-11 from Lewis aka slavefive Non-latex hand plates from Karin Green Welders Shield Testors Paint used on Ab buttons. Blue Angel Blue and 1138 grey -
Speaker in chest plate
SolderMaster replied to SolderMaster's topic in Electronics for Helmets / Blasters
The way the amp and receiver fit in the armor is VERY secure. I flipped it upside-down and shook the crapola out of it and it stayed put. I used E6000 for the glue. Very sturdy. Now...I just need my ROM/FX to show up and I'll be set! Take your time, John...ok not really...but ya..take your time! heh -
Im looking to upgrade my fans. Advice?
SolderMaster replied to HAWK's topic in Electronics for Helmets / Blasters
Jason, I got both fans seen here... -------- I have the micro one mounted to the right of my lens blowing across. And the other one in the lower left just left of the left hovi. Here's a pic. ---------- I used a little foam on the micro lens fan to give it room to draw in air. Works great. Hope that helps! -
Speaker in chest plate
SolderMaster replied to SolderMaster's topic in Electronics for Helmets / Blasters
Thanks. I'm sure it's been done before but... I might as well show the rest...---------- -
Speaker in chest plate
SolderMaster replied to SolderMaster's topic in Electronics for Helmets / Blasters
Thanks Lou! Yes, that's basically what I did. Only I used some foam as a shelf for the items to sit on. I'll take some pics tonight of what I did to give you an idea. Here's a couple pics...---------- Looks like it's going to work fine. I added a little bit of foam to the amp to eliminate any chance of sound vibration when speaking. -
Speaker in chest plate
SolderMaster replied to SolderMaster's topic in Electronics for Helmets / Blasters
Great Stuff. I'm going to try using a strip of sticky-back sound insulation (got from work), and some elastic. Aker amp owners know that it has a belt clip, I used the foam for the "base" so the items won't fall out. Then glued a piece of 1 1/2" elastic fitted to size. I'm waiting for the E-6000 to set before I try inserting the receiver and amp. If it works, I'll post a HOWTO. Thanks for the ideas, Troopers! -
Lots of it! Preferably 10's and 20's.
-
I'm looking for ideas on how to mount the Aker amp and wireless receiver into my chest plate. Post pics if you have any.
-
Ahhh YET is the key word. I'm waiting on some ab buttons from VaderDave and then I'll be applying. I need to take all the needed pics again with the little mods I've done the past couple days. Soon to be the first WG EIB Trooper!
-
I'm out of it for a little while, everyone gets...well, you know
SolderMaster replied to vicsouders's topic in Off Topic
I love this site! How's it going Vic? Have you heard? I'm TK5569 now! Everyone here is great. Very helpful and a riot! -
Would help if I could READ! Sorry fellas!
-
I'm trying to upload a pic for my avatar but when I browse for it and select it, I don't see an upload button. I click "save changes" and nothing happens. Just tells me what the size reqs are. The pic is 5 MB and 87 X 130 pixels.
-
Not sure if we have to be off of probation or not, but I was looking at the EIB troopers and went to look for EIBs in the Wisconsin Garrison but it hasn't been added to the list. I see there is only one in the Midwest Garrison. Once I get some new pics taken, I could be the first EIB in WI!
-
SolderMaster's RT-MOD Build[*RT]
SolderMaster replied to SolderMaster's topic in Build Threads Requireing Maintenance
Thanks guys! I just found out via Facebook that I have been approved by my GML and my app has been sent to the big wigs of the 501st for final approval. I should have my Legion ID soon!! I can't wait! -
SolderMaster's RT-MOD Build[*RT]
SolderMaster replied to SolderMaster's topic in Build Threads Requireing Maintenance
BUMP.... What do you think of the pics in the last post? -
I had my wife paint mine! I was too shakey. She did a fine job!
-
DONE! Catching MEPD - can we do it? Yes we did :)
SolderMaster replied to Daetrin's topic in Off Topic
I should be finishing up my RT-MOD this weekend. I will be applying for EIB once I get issued my TK number/Legion ID#. A few updated pics of me wearing it in my build thread. Here's the link http://forum.whitearmor.net/index.php?showtopic=10006&st=60 -
SolderMaster's RT-MOD Build[*RT]
SolderMaster replied to SolderMaster's topic in Build Threads Requireing Maintenance
Here's a few shots from last night. My cousin is home from Iraq and wanted to take a few pics to take back with her. She's a Chinook Crew Chief for the US Army. I gave her an Imperial Cog decal which she says she's gonna put it on the nose of one of her choppers. -
SolderMaster's RT-MOD Build[*RT]
SolderMaster replied to SolderMaster's topic in Build Threads Requireing Maintenance
Things I know I need: * Find another way to keep my thighs up. I have an elastic garter...I think I'll make a new one that is NOT elastic. They both slip down as you will see in the pics. DONE * Add drop boxes to belt...easy one. DONE * Add holster to left side using 2 rivets, snaps, or Chicago screws...more than likely rivets. DONE * Helmet needs the bottom screw on both ears for ANH....the RT lid comes with 2 screws and a rivet under the seal. I will have to drill a hole in the lower part of each ear and use one of those screws for a light switch cover and paint white if needed. * Helmet needs the frown painted. RT lid comes with all decals. I also want to paint the chin, but may get some help with that... * Trim the thighs on the top for a smoothe look. * I MAY end up using a double snap system. Most of my parts are single snapped...meaning one snap per end of strapping...so 4 snap straps hold the cod and ab together 2 front 2 back...but you knew what I meant...lol * Left thigh bottom needs a little trim. * Sew the gloves so NO skin shows. * Sharpe the logos on the diveskin undersuit. * Add padding to forearms and shins so they dont moved around. DONE * Paint rivets on ab white * Paint ab buttons....DONE I hear there's an armor party Saturday. I'll try getting the rest squared away and take some pics. -
Well said TK4510! I mean come on people, if you don't want to wait, make them yourself! Family and work always comes first. If you don't have a job or a family...then you should have other priorities then buying decals anyways.