Leaderboard


Popular Content
Showing content with the highest reputation on 04/15/2026 in all areas
-
Yes, especially with the RS Kit since we trimmed it more accurate with my current body weight. The WTF kit was fine but since I had trimmed it in 2016, it’s not reliable enough with my current size, especially the thigh and abdomen parts. But surely will post my journey building this kits 🙏 Thanks for the support kind Sir
 2 points
 -
I agree - looking really positive and you definitely have an eye for it. Keep it up, we need more good New Gen armor options!2 points
-
You must have all your photos showing correct positioning, not just an action photo. Hovi's, I posted the information directly from the CRL All inside is white and also the rim If you like wait until the DO's ask you to change it.
 2 points
 -
This is looking amazing! I love the attention to detail on the back plate/armor, as so few modelers seem to tackle this to the fullest. Keep up the awesome work, excited to see this get printed in the future.2 points
-
A while back i have always wanted to make a stormtrooper costume in a r1tk style but now I have finally come around to it. I have the soft parts and the boots from ImperialBoots I bought like 4 years ago. I plan to model all the armor pieces in blender with references from what I could gather on the internet pulled into PureRef and the Sideshow figure if i could afford it i would buy a 3d scanner and scan it from there. Photogrammetry would be hard with it being so shiny so ima just eyeball it. The only model that's the most accurate as others have found is DesertFareCosplays helmet on Etsy so I'll be using that with some of my own modifications to make it ever so more accurate. I anticipate this will be a several months long process so there's no need to rush it and hopefully then after some hard work i'll have a good costume.1 point
-
Hi everyone, I’m new here and excited to be part of the FISD community. I’ve always admired the level of detail and craftsmanship that goes into building a proper TK, and I’m looking forward to learning from all of you. I’m based in Indonesia with Garuda Garrison, and I have a WTF TK ANH Stunt armor that I originally picked up back in 2016. I only recently managed to get around to building it this year, and it’s been a really fun process finally bringing it together. I’m also currently working on an RS TK ANH Hero build that I hope to submit for approval soon. Still plenty to learn and refine, so I’m glad to be in the right place. Thanks for having me! Jonathan1 point
-
There is another detail you can add to the inside of the cog on the backplate. In the bottom left quarter in the base of the cod there is a depression as seen on the R1 screen asset photo. I think there are few more closer shots I'll see of I can dig up for you1 point
-
Hello Jonathan and welcome to the FISD! Feel free to ask any question you have here! We are looking forward to see your progress and finally your approval!!! 🫡1 point
-
Hello Jonathan! Welcome to FISD! Excited to see your TK! Are you going for the higher levels as well after basic approval?1 point
-
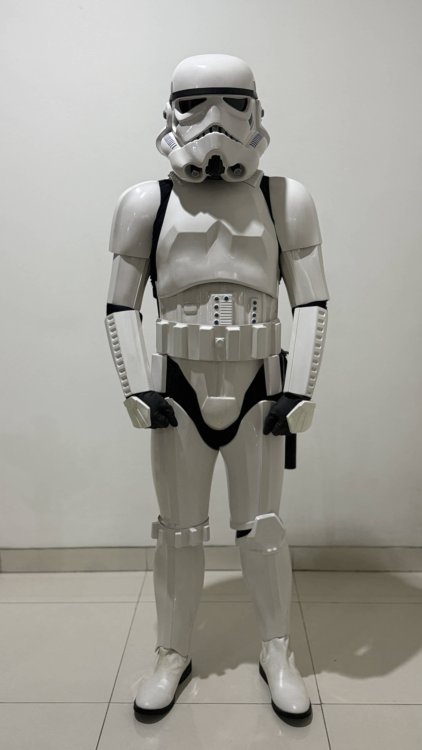
I picked up an Authentic Props pre-trimmed ANH stunt kit a while ago now and after starting to glue the arm and leg pieces, I got distracted by other things so it got put away. I've recently pulled the kit back out and have been working away to get it completed. My goal is to get it approved to level 3 so I have been making efforts along the way so I hopefully won't have to fix much to get there. Unfortunately I decided late in the game to start this build thread so I don't have many pictures of the first part of the build process. I've done most of the assembly with E6000 which has been working well, especially when I've had to pull things apart to fix or re-align. I used 1" webbing and a single snap glued to the inside with E6000 for each connection point and connected those with 1" elastic with the socket snap. The kit came with enough split rivets to attach the belt but I decide to go with snaps so that it could be removed. I may change this in the future but I'll see how I like this for now. I had the elastic strap on the bottom of the shoulder bells but removed it because I found that It was causing the bell to ride up because of the strap being pushed up by the bicep. I took some liberties with the shins because I found they were curling in to the point where I wasn't happy with how velcro would have held them. I ended up using cut offs from the trim and made a guide that stops them from curling in on itself and makes a nice clean closure on the back. The inside is secured with velcro at the top and a 1" elastic strap at the bottom to allow for some movement while walking. I'll have to see how this holds up once I try them with boots or fully suited. I'm sure someone else has done it this way already, but I found that clamping the shoulder straps to a pot and slowly pouring water from a kettle over them helped to make the perfect curve for my shoulders. I had the shoulder straps on but wasn't happy with the position so they have been pulled off and I'll have another go at it. I've been putting off the left knee so I may try and attempt to tackle once the shoulder straps are back on.1 point
-
Welcome Jonathan, I look forward to seeing your progress with your two kits! Be sure to ask any questions you have.1 point
-
Welcome to FISD Jonathan!1 point
-
Welcome to the FISD, Jonathan!1 point
-
Welcome to the FISD!1 point
-
Welcome aboard, Jonathan!1 point
-
Chest plate & Back plate Made in Blender The thing I like and find aesthetically pleasing about the R1TK is the nice bulbous protrusion of the front of the chest plate. Back plate The back greeblies. This is the hardest part of the plate that took me along time to reference since i couldn't find any reference images showing this angle. This is how it looked like according to the sideshow figure. * update * There is a small dimple in the bottom left of the left greeblie I forgot to add. Here it is.1 point
-
Hello Jonathan and welcome.1 point
-
I've used Retr0bright on a few occasions and has worked well, only issue is the yellowing does come back overtime and you have to reapply, link: https://www.retr0bright.com/make.html1 point