Leaderboard


Popular Content
Showing content with the highest reputation on 11/10/2025 in all areas
-
Hey there, fellow Troopers! Last week I finally started my ANH Stunt build – and wow, what a ride already! Current mission status: I’m assembling a pre-loved MFX kit with freshly redone strapping right now. The helmet is an RS Stunt kit (mission accomplished ✅). I’ve quickly learned that there’s a lot more to this than just “snap it together, but my awesome Trooper mates keep me motivated to get this armor up to approvable standards. One step closer to joining the ranks of shiny white! 💪✨ This is a very early preview, all parts are holding together with tape: There are also some parts missiing on the pic, but I have them allready on my working desk. Please don't be too hard on me yet.1 point
-
Over my time coveting, building and then being a TK I've built up a large collection of 'Billgrams'. I keep getting asked for where they come from (anywhere I saw them, a couple direct from him on my WIP). So to save people the hunting I present to thee my collection. I'll try keep it updated as I find them. In a few cases there's multiple version, in these cases I will only have the most up to date version to save on confusion. I'm also providing the click through links to flickr so you can get at the original files as I have (some will be 3rd or 4th hand I am sure!) Finally, some of these have exact measurements on them. Don't blindly follow them, check them on your armour brand, ensure it looks right. If in doubt ask. To quote the man himself: Paint colours (though see this thread for a more up to date one I did: http://www.whitearmor.net/forum/topic/39650-anh-paint-colour-guide/) Helmet - Colours Helmet - ANH vs ESB Helmet - Padding Helmet - Frown_Mesh Strapping suggestions Snap positions - Front Snap positions - Rear Snap positions - Limbs Snap positions - Arm Arm - Strapping Armour Ab - Kidney Rivets Single Snap Thigh - Single cap rivets Thigh - Ammo Pack Bicep - Adjustment Armour - repair Belt Belt- Trim dimensions Belt - holster position Belt - drop boxes Belt - snap mounts Belt - Popper holster mount Belt - which side Belt - corners Belt-Popper Locations Drop Box - Dimensions Misc Ab Plate - Dimensions TD sizes1 point
-
File Name: Levitating Jedi Training Droid Designer: user_2711942270 Last Update: 10/11/2025 File: https://makerworld.com/en/models/1979189-levitating-jedi-training-droid?from=search#profileId-2128845 Description: I wanted a levitating Jedi Training Droid. I did not find one in Bambu and the ones I found in other places were complicated with lots of pieces to glue together, so I decided to make my own super simple version. The profile has both a plain single color version you have to hand paint and a multicolor AMS version. Due to the color bleed with using red (see pic), I actually prefer the hand painted one. Or you will need to increase the purge significantly. The only supports are at the very bottom where it sits on the floating disc. It is sized to just sit on top of the default floating disc that comes with the kit if you order from Bambu Labs. Magnetic Levitation DIY Kit: https://store.bambulab.com/products/magnetic-levitation-diy-kit?id=43043288711304&modelId=1979189 Images:1 point
-
This post has left me speechless. I am so grateful for all the great and practical tips, thank you!1 point
-
Welcome aboard Trooper!1 point
-
Welcome to the FISD Andreas1 point
-
Welcome to FISD Andreas. We are here to help.1 point
-
Welcome Andreas! Happy to soon having another TK in Hamburg1 point
-
Hi Andreas, I'm curious to see how it turns out. It's great to have you at the TKs too.1 point
-
Hello Andreas! You look amazing already!1 point
-
Hi Andreas and welcome to the FISD. For your WIP thread I would start in the ANH Build Threads section.1 point
-
I will do so. I will also prepare alternatives as needed.1 point
-
Hello and welcome to the forum, you may find this thread helpful for your build Looking forward to seeing your progress1 point
-
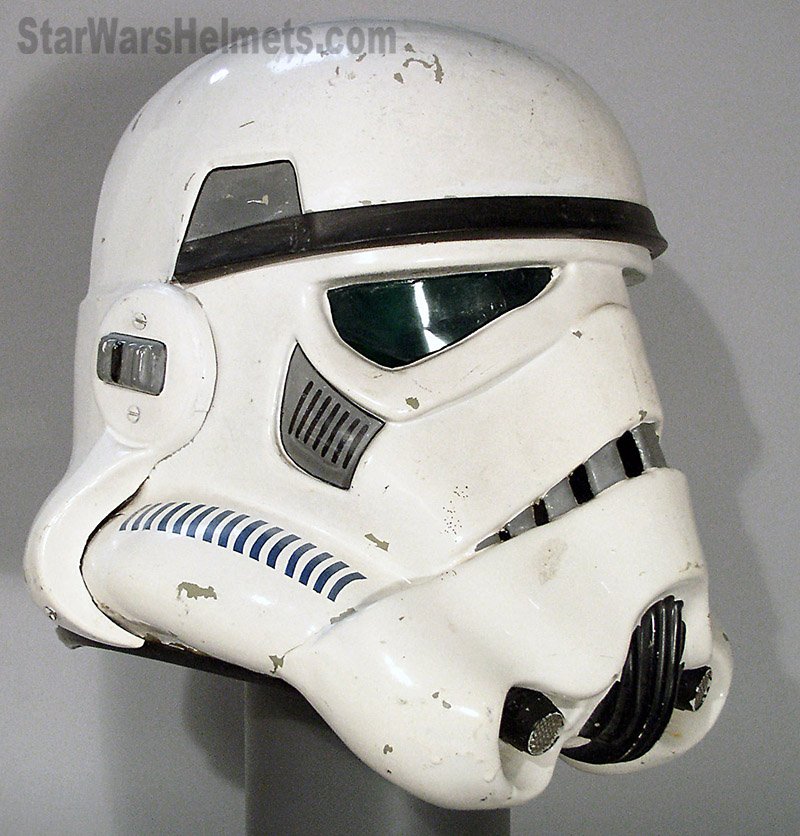
I would reach out to your GML (garrison membership liaison) for comment before you begin, the 3D files are very crisp on some of the edges, like teeth and traps, we see this more on the ROKT helmets, being based on a vac formed production they should be more rounded. Examples
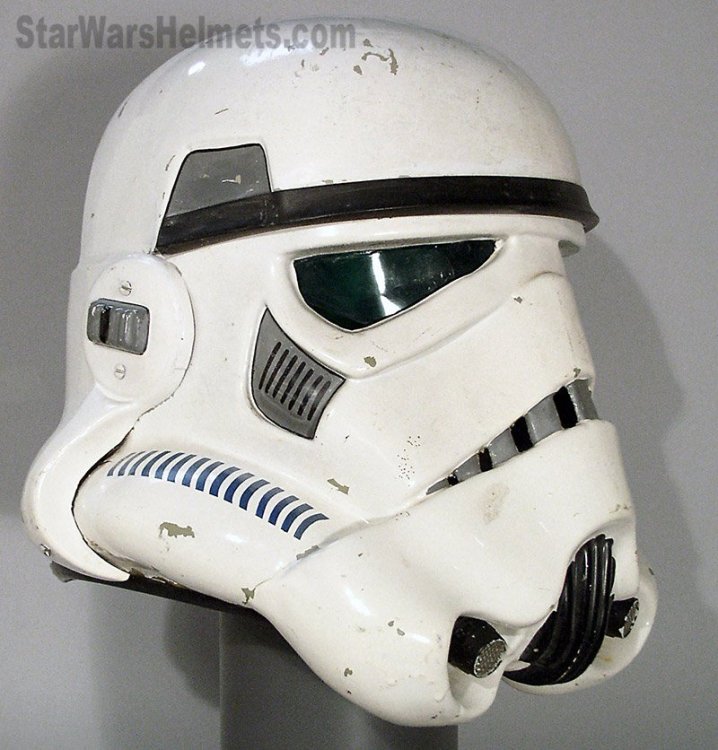
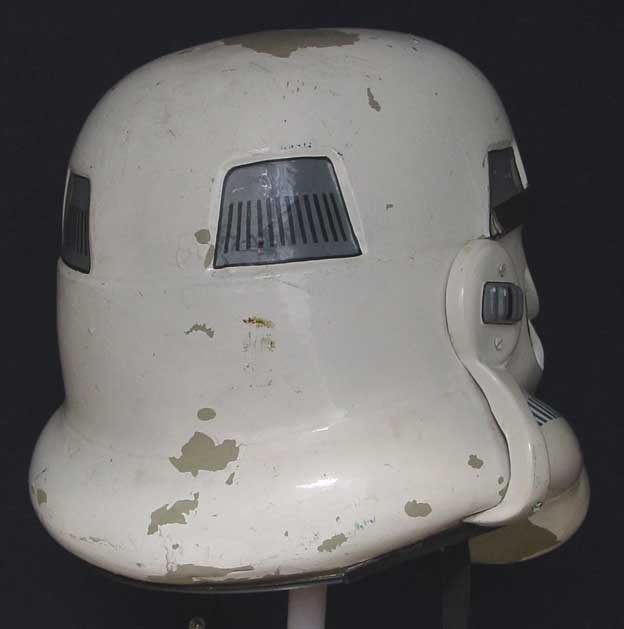
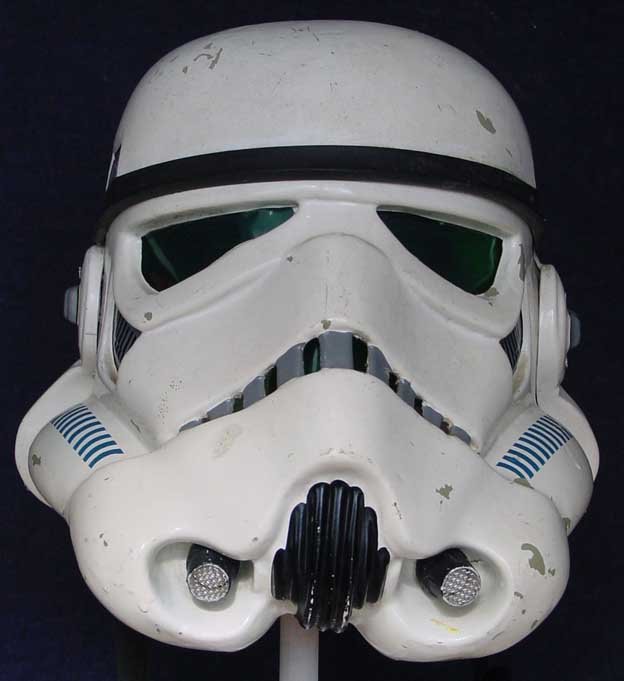 1 point
 -
WARNING: The following content may be controversial! DISCLAIMER: These are my opinions from years of experience, pure and simple. Over the years I have noticed many future Troopers doing an OT (Original Trilogy) TK ask about return edges before, during (and after) their build... If this is a subject that you are curious about, grab a cup of coffee or a tall glass of frosty blue milk (this is a long post, lol) and read on.... QUESTION: "What are they, what do they do, and should I leave them, trim them down some or remove them"? ANSWER: Return edges are part of the molding process and provide strength in certain areas on the edges of your armor. They also provide a heftier look to some pieces. To help you decide whether or not to keep them is why I started this thread. Here I will attempt to go into a few details about them. Know in advance that as mentioned I personally am NOT a fan of them in many areas for several reasons (listed below). Some people love them and some may disagree with my opinions... many of you may trooped for years with no problems which is AWESOME, but many folks have had issues and questions. 1. In most areas they are not screen accurate- In looking at the screen caps and film used armor photos below you will notice their scarcity. 2. They can (and in many cases will) get very uncomfortable- Many folks like the "thicker" look it gives their armor, but they can cut into you, especially in the area where your arm bends ("armor bite") and the groin area (chafing). As Troopers we do a lot of walking and arm bending carrying a weapon, so keep this in mind. 3. If aiming for higher levels they can cause fitting issues- Examples: A. If you leave them on your forearm openings and glue on the cover strips, they will need to be completely removed at the wrists for Centurion level, making the opening too wide. This can lead to you having to remove the cover strips, reduce the sides of the forearms and re-attach the strips. Quite a pain in the posterior plate to say the least. *** See EXAMPLE 1 below. B. If they are overly thick on the bottoms of your shoulder bells, they can prevent them from lying snug against the biceps. 4. They can cause splits/cracks- Especially on some armor areas. ABS is designed to flex, and in some cases a small amount of return edge is fine, but too much can cause stress on those areas. *** See EXAMPLE 2 below Over time that stress will take it's toll somewhere, and that is usually the return edge. Anovos armor is especially prone to this on the sides of the chest/back plates and neck openings. I suggest shimming these on the rear with ABS strips and E-6000 to prevent it. Let's start with the chest plate: Note how the ones below (including the back plate) have either no or minimal edges with no cracks or splits. Now here is a screen used one with a pretty prominent edge, Notice the stress crack. Now, onto the ab/kidney/back plate: To keep them in line and prevent them from overlapping, it is suggested that you LEAVE a fair amount of the edges on the top/bottoms of the kidney and bottom of the back plate, especially if using the "classic" strapping method. Yes, these can split/crack as well but not normally. Shoulder Bells Trimming off the entire edge on the bottoms is not only screen accurate (first two photos), it allows them to rest close to the bicep (bottom photo). Third photo shows "suggested" trim lines (red) of an untrimmed bicep. My recommendation is the blue line. Biceps/forearms For sheer comfort and a sleeker look, I recommend removing ALL of the top and bottom edges before fitting/gluing them. First, no one sees the tops (covered by the shoulder bell) and the bottoms can cut into your arms (armor bite). Suggested cut lines in red. Again, if you do get armor bite you will have to take them both completely apart, remove the edge and re-fit. Better to think ahead. Some (myself included) like to leave a bit of the return edge on the outside of the top of the forearm for a thicker look. However, I highly suggest removing all from the inside part (the "scoop") where your arm bends. Again, an armor bite issue. This should also be done BEFORE final fitting. Here are some screen used examples: For level 3 (Centurion) all of the return edge on the wrist opening must be removed, including the area inside the "hump" as seen below: Posterior (butt) plate: Again, it is suggested that you leave some of the return edge on the top (and bottom in most cases) to keep it from riding under/over the kidney. Now, the BOTTOM of the posterior plate is where we often find splitting issues. Should you leave some return edge? Sure! BUT(T), when trimming the corners, (see below) be SURE not to give it a sharp angle... this is where the trouble usually starts. Instead, give it a slightly rounded angle (as shown in green). Thigh tops The tops of the thighs are where we see a lot of questions. I recommend removing all the return edges from the entire upper parts, and here is why: As mentioned above, you will be doing a lot of walking. If you have the edges (or at least a large portion of them) intact, the friction and inside facing angles can really chafe the heck out of you, especially on the inside of the groin area. (Ouch). If there are sharp edges/points on the tops (below) these will poke into you. When trimming these, just follow the existing line. Also, if you do your final fitting, glue everything together and find this out afterward, you will have to take the entire thing apart, remove the return edges, trim down the sides and then re-build/glue them back together. The reason is that afterward the opening will be entirely too large and you will have a giant gap all the way around. Not a good look. Easier to do it beforehand, trust me. As seen below, there were no return edges (or at least minimal ones) used in the films. Sniper knee plate The bottom of this piece is an area often not trimmed enough. To allow it to sit flat (or very close to flat) against the top of the calf enough for the glue to adhere properly I suggest removing most if not all of the bottom edge. Note how in the first and third photos how the sniper knee is parallel to the front of the calf. Last up, a photo that best illustrates my point about return edges and how they were not really present in many places on ANH armor. *** Example 1. of what happens when you have to reduce the return edge(s) after attaching cover strips. NOTE: For the example below I am using an ATA bicep (first 3 photos). Be aware that ATA makes the "suggested" cut line on their return edges pretty slim (a GREAT thing in my opinion). As seen on the armor in the 4th photo, if followed, the "suggested" cut line makes the return edges much wider (red line). Top view Bottom view For the purposes of this tutorial, we will assume that the ATA has those wider suggested return edges. Okay, let's say you really like the thicker look the return edges give your armor, so you left them pretty wide during fitting and then glued on the cover strips. Enough to get your arm through with a little extra room. Should be good to go, correct? BUT, you find that after having your arm bent for a while they cut into you (armor bite), so you find you have to reduce or remove most or all of it. No biggie, right? Just break out the Lexan scissors or Dremel and cut away, leaving the cover strips attached. Easy! So you remove it and then you run into the fact that the opening is now enormous. This is not a good look, and can result in the piece(s) jangling around and not being approvable at higher levels (or even Basic depending on your GML). What I am getting at with the above info. is that if you decide to remove them, it's better to do it before final fitting/gluing. Side note: Many biceps have an unusual shape at the tops (in red, below) normally located on the inside. This can be completely removed. Doing this will not affect approval at any level, and is screen accurate. It sits under the shoulder bell so no one sees it anyway! Screen used bicep USELESS TRIVIA: Many have asked about the "thumbprint" that many armorers have on the left bicep (screen used example below). Some think it is so you can tell them apart, but I was speaking with Brian Muir a few years ago (he sculpted the original armor used in ANH) and asked him about it: "To be honest, I have no idea... it was not in my original sculpt, and must have been a mistake in casting". There you have it. *** EXAMPLE 2: What causes cracks/splits: ABS bends pretty well, just as it's designed to. BUT, when there are return edges involved that changes the game. For the below example I used a 2 inch wide strip of ABS with a 1/2 inch "return edge". Looks pretty solid, right? That's because the edge provides stability. Now I am bending it up/in to simulate use over time. (More than it normally gets bent in many cases, but only to prove a point). That stress has got to go somewhere, and it's the return edge that takes it all and gives way, again causing cracks/splits. The red arrow shows a weak area where the stress in concentrated and cracks can form. Even if trimmed off afterward that area will be prone to splitting, so a small shim behind it is suggested. To sum it up, return edges are not meant to bend a lot. I suggest inspecting your armor occasionally to spot any existing/potential cracks/splits so that you can catch them before they get worse. I hope this helps answer any basic questions you may have, and always feel free to ask more detailed ones here or offer differing opinions.1 point
-
I decided to work out a complete, comprehensive list for those about to start an OT TK armor build (ANH Stunt, Hero, etc,) to help get everything in place for when "Big Brown Box" day arrives! This list does not include soft parts, (neck seal, boots, etc.) but focuses on the hardware and supplies for building the armor itself. However, a list of soft parts can be found HERE I believe I have covered most items, but would appreciate additional suggestions/corrections to add, and will keep it updated as such. Yes, it looks a bit daunting, but some of the items you will already have, and the rest can be purchased at major home improvement stores, online, or borrowed from a TK friend! Plus, it gives you something to do while you "hurry up and wait" for your kit! This list is includes items used for the EIB and Centurion programs, (marked with double red asterisks)**. These items are not required for initial TK approval, but I encourage everyone to consider them as an option. Hope this helps, and best of luck on your build! PLEASE NOTE: Some kits come with all the hardware you will need to build to Centurion level, i.e. split rivets, ear screws, TD screws, etc., however, not all armorers supply the correct ones. If you are (hopefully) planning on aiming for level 3, please check with your armorer to see if they provide these. You can also reference the photos below to see if they are accurate. These supplies are based on using the snap method for connecting the armor. Example photos are shown at the bottom for many of the items, but not all. (Everyone knows what a hammer looks like). Items with photos have a notation. 1. E-6000 glue- Great for almost everything, and removable if necessary. Highly recommended. (Pick up some wooden tongue depressors as well, makes spreading it easier)! (Photo 1) (Please see updated information on E-6000 below, after #50 before purchasing). 2. Binder or notebook- To keep notes on your research. 3. Dremel or rotary tool- A "must have". (Photo 2). Be sure to get the sanding drum attachment and extra sanding drums (Photo 3). I suggest the 180 grit type. 4. Small plastic containers- Keeps everything organized. 5. Lexan scissors- Curved and straight, for cutting ABS. (Photo 4) 6. Small spring clamps- For holding things in place while gluing. You can't have too many! (Photo 5) 7. Line 24 snaps- For strapping. You will need at least 30, and do NOT "cheap-out" on these, but purchase quality ones. (Steer clear of Wal-Mart snaps). Tandy is recommended. Tutorial located here: https://www.whitearmor.net/forum/topic/44617-snap-setting-101/ (Photo 6) 8. Snap setting tools- There are 2 types to choose from- One is a two piece set (requires a hammer) (Photo 7) and the other is the pliers style (Photo 8) 9. Hammer- For setting snaps if you use the 2 piece style of snap setter. 10. Pliers/vise grips- 11. Screwdriver- Slotted head. 12. Rivets-** 5/16 (8mm). (Photo 9) Round head bifurcated/split rivets with washers. You will need 9. (3 for the kidney, 3 for the ab, one for the cod piece, 2 for the thigh ammo pack). You will also need 3 speed (Chicago") rivets to attach your ABS belt to your canvas one. These are attached by hand and not to be confused with the aluminum ones listed below (#19). Some like to use the screen accurate single cap rivets (Photo 10) to attach the ammo thigh pack but these are not a requirement. 13. Elastic- 1 inch wide black for shoulder bells, etc. (4 ft.) 2 inch wide white for ab/back plate shoulder connection (1 ft.), 1 inch wide white for drop boxes, (1 ft.) 1/4 inch wide white** (1 ft.) for shoulder straps. 14. Nylon strapping- 1 inch wide black, at least 6 to 8 ft. long. 2 inch wide black (48 inches) for high tension areas if you are using the double snap method. (NP) 15. Exacto knife/extra blades- For cutting, trimming, cutting nylon strapping. (Photo 11) 16. Heavy duty razor knife/extra blades- For cutting cover strips and scoring around pieces that will be removed. (Photo 12) 17. Heavy duty scissors/tin snips- For (carefully) cutting large sections of ABS. (Photo 13) 18. Metal ruler or straight edge- (At least 18 inches long). For use as a cutting guide, especially cover strips. 19. Hand Rivet gun/aluminum open end blind rivets- For putting your helmet together. Available for about $10-$12.00, EASY to use! (Photo 14) 20. Metric Ruler- 21. 2 x 2 or larger piece of carpet- Protects work surface, keeps dust down, and stops small parts from rolling away. 22. Rags/paper towels- And plenty of them. 23. Blue painter's tape- 1 inch and 2 inch widths. For keeping glued parts in place and dry-fitting your armor. 24. China marker/pencil- For marking cut lines. 25. Sandpaper- I highly recommend Sandblaster Pro Flexible silicone sanding sheets from 3M, 220 grit. You will never use anything else, I promise. They last forever! 26. Sanding block- The sponge type, 120 grit. 27. Band Aids- You will need these. Might as well keep them handy. 28. Rare earth magnets- (10 minimum) SUPER strong! I use the 20 mm x 3 mm round ones. Cover them in blue tape to prevent scratching your armor. You cannot have too many!!! Tutorial located here: https://www.whitearmor.net/forum/topic/44619-magnets-101/ (Photo 15) 29. Butane Lighter- For sealing the ends of nylon strapping. (see # 44 below for a better option) 30. Large "half-round" file- For smoothing out edges before sanding. I used this a LOT, especially in the curved areas. (Photo 16) 31. Small "Needle file" set- Very inexpensive, comes in 6 different shapes, and is perfect for the teeth and eye openings on your helmet. (Photo 17) 32. Foam padding- 1 inch thick. Great for helmet and armor padding. Available at craft or fabric stores. 33. Velcro- 2 inch wide black (various uses) and 1 inch wide white, for calf closures (about 36 inches). Go for the "Industrial Strength" kind. 34. PAINT: Satin Black: Humbrol # 85 or Testors # 1747 for vocoder, trap/ tear drop/ear bar outlines/stripe(s), ROTJ and ESB frown, TD screw heads. Gray: Humbrol # 5 or Testors # 1138 for trap/tear drop/ear bar background, ANH frown and ab-buttons. French Blue: Humbrol # 14 or Testors # 2715 ForTube stripes/ab buttons. Mediterranean Blue Humbrol (Tube stripes alternative color) Testors: No exact match Gloss white for all rivet heads (excluding cod rivet). Mineral spirits for brush cleaning 35. Goo Gone- Citrus based solvent that will remove latex and enamel paint and NOT harm your armor. (Photo 18). 36. Small paint brushes- Assorted sizes. Try to buy quality ones.. Cheap brushes =cheap looking results. I suggest picking up a "filbert" (Photo 19) style brush (photo 5) as well, as it's rounded tip works great for painting the ab plate buttons and vocoder. Another GREAT way to get clean, crisp lines on the ab buttons is to use Testors Micro-Sponge brushes (Photo 20). 37. Wire or fiberglass mesh- (Window screen). For inside the "frown" of your helmet. A piece 3 x 8 inches will work fine, and you can trim it as needed. 38. Safety Glasses- It never hurts to be too careful, especially when using a Dremel type tool. For your Thermal Detonator, (TD) clips: (Note: There are some GREAT pre-made TD clips you can buy on this site, and some kits include them, but you can use the following 5 items to make your own. 39. Aluminum strip- 1 inch wide 40. Screws- Size #6 pan-head slotted screws **, 1/2 inch long, You will need 4. (Photo 21). NOTE: The CRLs have been updated and round head screws are permitted, but they must be the slotted (not philips) style. 41. Hacksaw- For cutting the aluminum strip. 42. Drill- Electric or battery operated, with various size bits. 43. Vise grip OPTIONAL ITEMS: 44. Heat sealing iron- For making return edges. Not normally needed, but there are some great tutorials on this here on FISD. Try it on a scrap first, though! 45. Soldering Iron- For making holes in nylon strapping and sealing the ends. Pretty inexpensive, and worth the cost! (Photo 22) 46. Plasti-Dip- A black rubberized coating you can spray inside your helmet, (also available in a brush-on). Or, you can use spray paint. Just remember to sand and prime first! 47. Heat gun- Not normally needed. For shaping ABS. Use this CAREFULLY, and practice on scraps first until you get the hang of it. These things can reach 1500 degrees and melt your armor. 48. CA (super) glue- Not recommended for first time builders, as it is PERMANENT, and you can't fix mistakes. Also, if it drips on your armor it is nearly impossible to remove. It can also become brittle over time, causing connections to fail. 49. Acetone- For use ONLY in making ABS paste for filling small gaps, (see tutorials). Do NOT put this directly on your armor, as it will melt it. 50. SUGRU- This is an easy way to attach the lenses in your helmet. Tutorial located here: https://www.whitearmor.net/forum/topic/44593-how-to-attach-lenses-using-sugru/ 51. Respirator- An informative post was made by Clint, (cm325i) concerning the effects of E-6000 glue on some individuals. Definitely worth a read: http://www.whitearmor.net/forum/topic/33347-e6000-warnings-read-them-and-wear-a-respirator/ 52. Cut resistant gloves- Especially helpful if you are prone to cutting yourself. Available online for about $12.00 (Photo 23) E-6000 update: Please note that there are certain online retailers (including those in Europe) that are selling FAKE E-6000 or "knock-offs" like these: The genuine product is clearly marked Made in the USA, and has a batch number on each tube. They do not sell to distributors in Asia, so if you try to save a few bucks by ordering from a seller there it is not the real stuff. If you have any doubts, you can contact the manufacturer at www.eclecticproducts.com, and they will let you know where to get it. The fake stuff is garbage and will not hold up. 1. 2. 3. 4. 5. 6. 7. 8. 9. 10. 11. 12. 13. 14. 15. 16. 17. 18. 19. 20. 21. 22. 23. IMPORTANT UPDATE! To make life easier, Ray (Dieltski) made this into an awesome Google spreadsheet, which you can download to keep track and add notes! Just click here. Thanks, Ray! .1 point
-
Big update here. I ended up actually moving forward with the bucket and now I just need to mount the lenses and electronics. Then I got started by adding my rivets and snaps. So did my an buttons with .ca and got some frosting but it isn't too bad and I should be able to clean it up. Also need to do paint matching as I needed a replacement thigh ammo pack and the color was more orange than red. The color match isn't bad. The belt is a bit orange, the TD is the base color of the rest of the kit and the square is the match paint. Well that is about that for now.1 point