Leaderboard


Popular Content
Showing content with the highest reputation on 02/08/2025 in all areas
-
Updated @gato @AndreasSjodin @LordBob @kreel74 @Steve Ritchardson2 points
-
If you use the link with the file extension ie: .jpg, .jpeg, .png, .gif OR right click copy paste your images should show Good how to here2 points
-
2 points
-
I'm well on my way through constructing my Captain Phasma costume, but I was encouraged to share the planning and building notes I've done so far! So... here we go! I'm going to try to break out each piece into a new post to keep it a little more organized. Notes about me: From Canada, so a lot of vendors are going to be Canadian 182cm tall (just over 6'), but most of my height is in my legs - I have a short torso 93kg (about 205lbs) 1 - References 2 - Materials & Supplies 3 - Prep & Painting 4 - Assembly & Strapping 5 - Cape Build 6 - Transportation 7 - Getting Dressed1 point
-
Hello everyone, I am still "New-ish" to the 501st ( this is my third year) as a Biker Scout TB-32173 and want to ad a TK to my roster. I know I'm a little short for a Stormtrooper at 5'6 and 135 pounds, and at 52 years old don't see that changing, lol. I hope to find helpful info on building a lot for my small stature. I don't have a lot of extra $$ and am really hoping to find a good price on used armor but see that I can't have immediate access to the classifieds. I look forward to my second build1 point
-
As Chris ran uncontested for the 2025 election cycle, he will remain as our Detachment leader for another term. Congratulations, Chris, we look forward to seeing what you have planned for the Det in 2025. As always, you have my full support, and that of a great team of staff ready to continue driving FISD on to new heights. Congratulations once again.1 point
-
yeah, I was confused about needing this, just going strictly by imperial procedure!1 point
-
Having a mirror handy can be a great help, not all photographers know the costume and how it should look Also remember you can reposition parts between photos, in case you move, need any adjustments1 point
-
You already have TK 501st access
 1 point
 -
Here are some of my genius* ways of supporting pieces during painting and drying... Sealed paper towel roll The upside down towel turban Interconnected box tops The rest of the box1 point
-
A couple missed A.C. @NoVATie when you get a chance1 point
-
Please standby, A.C. will be along in due course, he is not on the forum everyday1 point
-
Installed the new TrooperBay decals on the cheeks, above the ears and the rear.1 point
-
Sanding box Interior coating with Plastidip Stupid tiny little pinholes everywhere Drying racks - because you don't want stuff drying onto other stuff1 point
-
hahaha I was just fixing that! 🫣 It's been a while since I've put photos on a forum board!1 point
-
Hi Chris, nice job with your armor sir. I would recommend to wait till you have reinstalled the sniper knee to the L2-L3 required position an see how much is necessary to trim.1 point
-
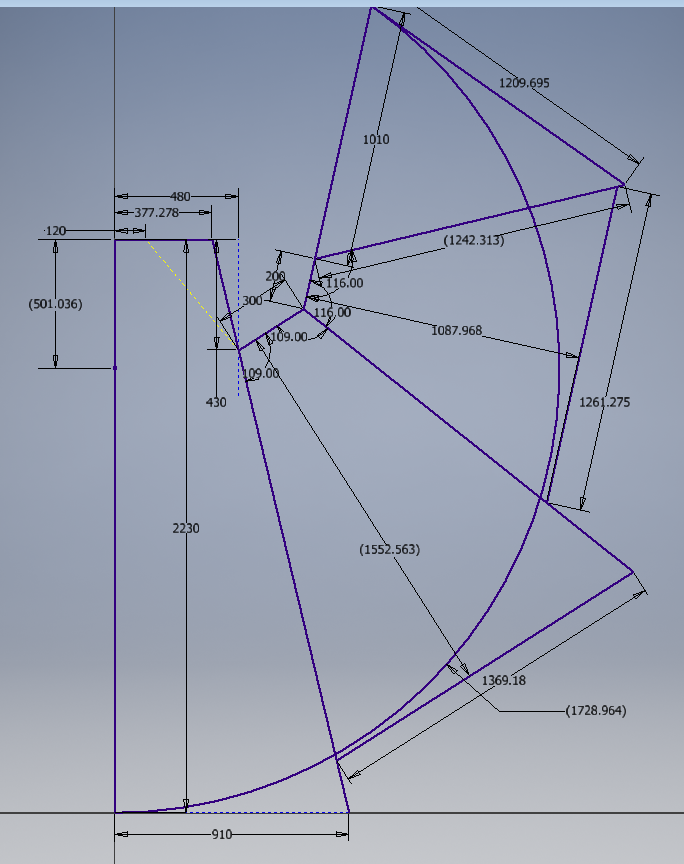
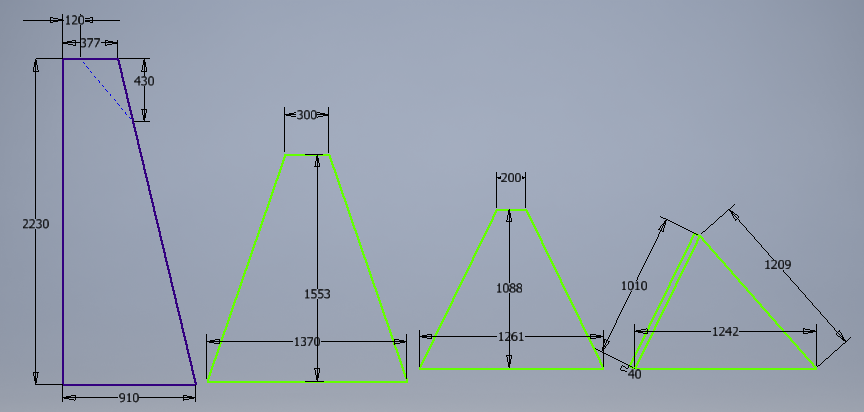
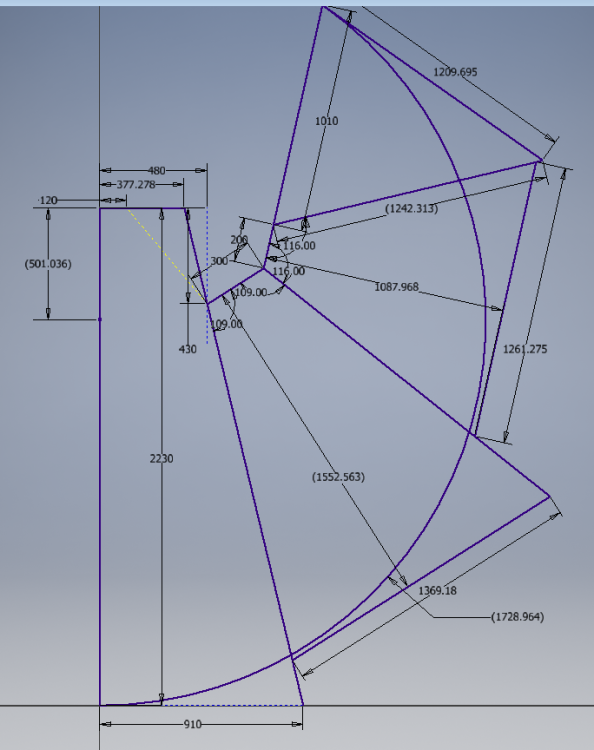
5 - Cape Build Cape build discussion and photos Copy example pattern from Captain Phasma Costumers group Cape Pieces: 4x cape pieces 2x 4.5” x 9” pocket 2x 5.5” x 11.5” pocket 3x 1.5” x 14” leather strap 1x 1.5” x 16” leather strap Cape Materials: 4.5m of black cotton duck cloth 1.5" wide leather strips Amazon Black Leather Strap Strip 1.5 Inch Wide 79 Inch Liquitex Gloss Heavy Gel Medium Michaels Canada Liquitex® Gloss Heavy Gel Medium Tulip Matte Fabric Paint in Red Michaels Canada Tulip Matte Brush-On Fabric Paint Sewing Instructions Add 0.5” to all edges of cape pieces (except leather straps) for seam allowance Sew vertical seams with french seam Sew with wrong sides together at ⅜” Clip seam Press and flip seam so right sides are together Sew at ¼” Sketch bottom hem curved shape & cut (https://imgur.com/bmYZqQu) Hem bottom with double rolled ¼” hem Cut hemming piece for left and right edges Left edge: 1.5” seam, cut piece 2.5” x 230cm (½” seam allowance) Right edge: 1” seam, cut piece 2” x 125cm (½” seam allowance) Sew hemming piece to right edge ½” seam allowance Press hemming piece long edge seam allowance to inside Press to hemming piece to inside and sew with 1” seam allowance Pin leather straps to left edge & stitch into seam allowance The top strap is 1.5” x 16” and the bottom strap is 1.5” x 14” The top strap is located about 1” above the bottom strap “around the left hand area” Sew hemming piece to left edge ½” seam allowance Press to hemming piece to inside and sew with 1.5” seam allowance Pin pockets and 1x 1.5” x 14” leather strap Back left side of the cape starting approximately in the shoulder blade area Pockets in 1, 2, and 1 pattern The top and bottom pockets are approximately 4.5” x 9” 2 middle pockets are approximately 5.5” x 11.5” The bottom pocket has a black leather strap approximately 1.5” x 14” attached horizontally to the bottom left corner Sew on pockets Finish neckline Sew on 1x 1.5” x 14” leather strap at right shoulder Paint external cape surface with Liquitex Gloss Medium except left seam (https://imgur.com/KQAyJ8W) Paint external left seam with red fabric paint (https://imgur.com/MQSiOTG) Close left attachment end Add closure Determine if clip to armor needed to keep cape from choking me
 1 point
 -
4 - Assembly & Strapping Install helmet visor Install helmet frown mesh Install helmet padding Install helmet fans Install chest mesh and gaffer tape Install bicep gaffer tape Install shin gaffer tape Figure out amp mount for chest Attach felt strips along any overlaps on interior to prevent rubbing Shoulder underside Chest overlap Vest overlap Belt box backs Mid-shoe plate Spat bottom Suspenders (Geeky Pink) Suspenders to shoulder gasket by velcro Suspenders to Thighs by buckles Back & Chest Back sides by snaps and black elastic Chest to back by velcro? Magnets? Shoulders by snap straps & shoulder support 11.2mm tall at join between back and shoulder bell Arms Shoulder gasket to Bicep by velcro Bicep to Elbow Gasket by velcro Elbow Gasket to Forearm by velcro Gloves Make elastic loops for each joint piece Attach elastic via hot glue to each piece Slide onto each finger with glove on to find placement Tack elastic on each finger to secure Add hand plates by velcro Kidney Kidney closure Kidney to Butt by snaps Kidney to Cod by snaps Cod to Butt by elastic (styrene plates) Thermal Det by velcro? Belt? Sew buckle to one end Stick weather stripping to rubber Belt boxes attach Chicago screws (2x per box to keep level) Snaps to kidney Leg Holster needs metal plate, screws & bearing Thigh to Knee Gasket by velcro Knee plate to gasket by velcro Knee Gasket to Shin by velcro Shin to calf by velcro Shin clips by velcro Spat to Shin by velcro Shoe plates Toe plate by elastic string (d-ring attach similar to ?) Mid-foot plate velcro to toe plate Mid-foot plate by elastic to Shoe back plate & sole by elastic string1 point
-
The Emperor thinks to the future. Yeah, I meant 2025.1 point
-
Wow, that has turned out awesome!!1 point
-
Looking forward to seeing your EIB application1 point