

Ashari
-
Posts
34 -
Joined
-
Last visited
-
Days Won
1

.thumb.jpg.e4144bc28922e4fdfd28e46201c5a3d3.jpg)

.thumb.jpeg.40a403e8b8de1ab9a8d933dd957a23b0.jpeg)
-

Ashari's TLJ Captain Phasma Build Thread
Ashari replied to Ashari's topic in Captain Phasma Build Threads
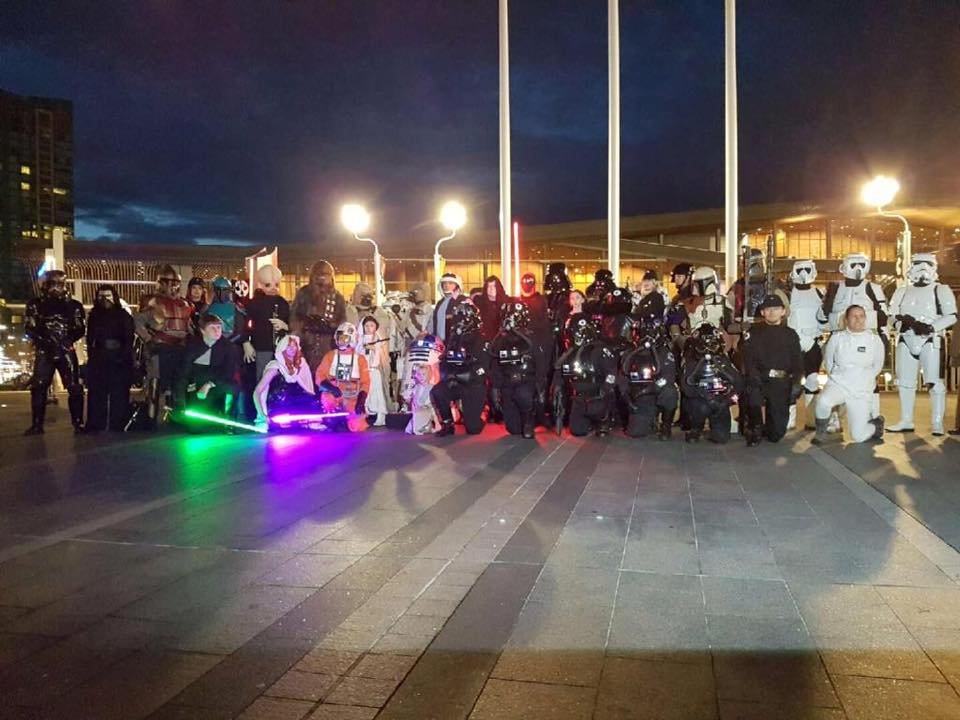
Went dark for a bit because we had our big local convention - and I got to debut Phasma on conditional approval! Full size photos here: Imgur Album A little proof that it was me in the costume edit: double posted the last image -
FISD Forum Fundraiser 2025 - Completed
Ashari replied to themaninthesuitcase's topic in Announcements
Oof. That exchange rate! Transaction ID: 86425644L41592939 -
Ashari's TLJ Captain Phasma Build Thread
Ashari replied to Ashari's topic in Captain Phasma Build Threads
Strapping and Rigging - Gloves, Fingers and Hand Plates One of the unique Phasma things is the finger armour. The TFA version has the finger rings, but the TLJ version has half-finger plates. I haven't really seen much in terms of how others have solved this other than gluing the finger plates to the glove. My concern with glue was that hands flex a lot and that means that it's more likely that the glue will flex and fail. While discussing with one of my Garrison members, he suggested making rings that I could slide on over the gloves. I loved this idea and it was going to be my solution with a little tack of stitching to keep the rings in place (So I didn't have to figure out which plate went where). Ultimately I decided on a half-ring solution. a) Because full rings might cut off circulation b) Because I didn't want much of the elastic to be visible. I'm pretty happy with the results! -
Ashari's TLJ Captain Phasma Build Thread
Ashari replied to Ashari's topic in Captain Phasma Build Threads
Strapping and Rigging - Torso / Kidney For securing the torso (which I've also been calling kidney - sorry for the switching!) I decided to use a slightly different technique than I've seen so far. A lot of the TKs I've helped with gearing up use large velcro panels or other strapping. Part of the thing I've always struggled with is trying to adjust things to close evenly while the velcro keeps sticking to itself. My solution is inspired by corset lacing. This allows for individual adjustment while still giving support at all levels. I started with D Ring hooks for picture frames (OOK Large 2-Hole D-Ring Hangers Value Pack) I tried to get even spacing on both sides and glued them down with E6000. Then I grabbed a pack of reusable cable ties (VELCRO 8 -inch X 1/2 -inch Reusable Ties) as the adjustable strapping. I did have to upgrade to 12 inch ties just to give some extra room during the initial lacing. I did end up covering the D ring attachment points with felt to make sure I wasn't getting scratched or irritated by the metal. -
Ashari's TLJ Captain Phasma Build Thread
Ashari replied to Ashari's topic in Captain Phasma Build Threads
I went to school for costuming which primarily focused on soft costumes, so I learned a lot of really cool techniques for attachments and sewn solutions. That's half the reason it's taken me so long - I can sew for days, but hard armour is scary!! -
Ashari's TLJ Captain Phasma Build Thread
Ashari replied to Ashari's topic in Captain Phasma Build Threads
I really hope so! That was kind of my intention - I found lots of different resources all over the place, but I didn't find a lot of really thorough threads. The FOTK threads are great reference and there's tons of other resources for building and electronics. Just not a lot for weird, Phasma specific things. -
Ashari's TLJ Captain Phasma Build Thread
Ashari replied to Ashari's topic in Captain Phasma Build Threads
Strapping and Rigging - Snap plates A lot of stuff is going to be attached by snaps, so making snap attachments is important. I used an awl to punch holes before using my wood burning tool to open a bigger hole and seal the edges. Any time I was putting a snap in elastic, I added a piece of webbing to make it more stable than going through the elastic by itself. It's a sewing trick using a thin piece of fabric to create a flat join between elastic and another piece of something. https://theseamanmom.com/elastic-join-tip/ Smaller squares with snaps were glued to one side and the webbing with the other side can be snapped to it. -
Ashari's TLJ Captain Phasma Build Thread
Ashari replied to Ashari's topic in Captain Phasma Build Threads
Strapping and Rigging - Boots I started with the shoes, since they're the most done. Since it's gonna be a lot of standing and mostly covered in armour I picked shoes that I think I'll be most comfortable in. Feelgrounds is a barefoot shoe brand which is great for me because they have a wider toe box and are great for taking insoles. Their Chelsea boots are pretty much perfect. Ideally, I'd like to wear these shoes just in general, but I realized later that I'd gotten a size up from normal to fit in some insoles to give me the extra two inches to be Gwendoline's height. I had a bit of a chuckle because this is the first time I've bought items to help hide going up in height as opposed to just wearing heels. Starting with the toe piece, I added a mid-foot elastic with hook and loop on one side Then added a permanently attached smaller elastic at the toe end. I didn't take good pictures for the rest of the assembly. I did a hook and loop attachment from the toe plate to the mid-shoe plate to keep it on top. The attachment from mid-shoe to back is elastic glued to the mid-shoe and hook and looped to the shoe back. -
Ashari's TLJ Captain Phasma Build Thread
Ashari replied to Ashari's topic in Captain Phasma Build Threads
Then it was time for chroming! I watched quite a few youtube videos on various ways to chrome things, different paint types and how to apply them. This was my first time really learning about anything more advanced than a rattle can. What is HVLP? What kind of Spray Paint Gun do you want? What is PSI when you're talking about paint? (I know what it means when filling my tires) What kinds of chroming are available? Should you clear coat chrome? I probably could've researched this for months and still not know everything there is to know. First: There are lots of pretty good chrome paint options on the market right now. The top couple that seem relatively simple to apply are: Alclad Duralumen Revell There are more complex and probably more durable systems, such as Alsa Corp Easy Chrome or Angel Gilding Chrome Starter Kit, but I can't afford $500+ CAD for something that might work. (Turns out I didn't save much in the end by not going with these) There are also a ton of comparison videos out there for different Chrome products in the model builders community. Spray Paint Chrome Showdown Revell Rustoleum Duplicolor Krylon IronLak Review Scale Model How To - hpiguys Workshop Testing Revell Chrome Spray - Is It Worth $35 ?? - Barbatos Rex Testing Different Chrome Spray Paint - Barbatos Rex AK Super Chrome: My First Impressions #akinteractive #superchrome #modelcars #modelcarbuilding - Time Machines Scale Models Comparing Alclad and Duralumen Chrome Paints. - gordontarpley Will Duralumen Paint hold up to handling without a topcoat? - gordontarpley I chose Duralumen because it had lots of good reviews and seemed pretty easy to apply. NOTE: You're going to need more of this than you would of Alclad. I started with two 4oz bottles because I'd read a doc on the Phasma group that said they only used about 6oz of Alclad. I'm currently waiting for my 1 Litre bottle to be delivered. The owner of The Digitial Armory, the North American Duralumen seller on etsy, has been SO responsive and kind every time I've had a question. How to Spray DURALUMEN Chrome Airbrush Paint from The Digital Armory - Prints and Props Ok, so, time to learn about airbrushing and air paint spray guns. I didn't do my reading, so I didn't know what kind of spray gun or airbrush I should use. I ended up getting a VAPER .5 mm Gravity-Feed Touch-Up Paint Spray Gun (Princess Auto) after consulting The Digital Armory for advice. For settings, it's available on the Lumin's Workshop page: Then I watched a ton of videos on how to calibrate a Spray Paint Gun. HVLP Spray Gun Basics- How To setup - Tom Stringham How to Setup your Paint Gun to Spray a Car Guide! - Paint Society How to use a paint spray gun. Vaper HVLP gun in this video - backyardmech And a few more on cleaning an airbrush. How To: Cleaning the Airbrush - The All-In Nerd Hobby Cheating 213 - How to Clean Your Airbrush Fast - Vince Venturella Cleaning Airbrush Between Colors // Quick Tip Airbrushing - Baker Builds I ended up getting some Vallejo Airbrush Cleaner (BC Hobbies) prior to starting the paint. The first coats were on the fingers, shoe plates and butt since either they're small and not going to be noticed as much or will eventually be hidden behind the cape. -
Ashari's TLJ Captain Phasma Build Thread
Ashari replied to Ashari's topic in Captain Phasma Build Threads
Once it was finally time to clear coat, my partner and I had a long discussion about what to do. The 2K clear coat can be really damaging to your health and with it being winter I couldn't exactly work outside. (Note: I live in the lower half of BC, closer to the boarder with the USA, so our winter is actually just very rainy with very little snow. The humidity is more of a problem.) I already had PPE for the early primer work, so it was a matter of making sure there was proper ventilation in our garage. He had already installed a vent and fan system for his resin printer (Elegoo Saturn 4 Ultra for those curious), so we reconfigured it to have a Y join that we could close off from the printer set up to prevent particles from making his setup dirty. -
Ashari's TLJ Captain Phasma Build Thread
Ashari replied to Ashari's topic in Captain Phasma Build Threads
It occurred to me at some point I wasn't sure if this armour I bought way back in 2020 was going to fit any more (thanks Covid & snacks!) so I did a quick test fit with some of my local Garrison members. The good news is it fit! The bad news is that I may need to look into getting new thigh pieces at some point. They are VERY snug. -
Ashari's TLJ Captain Phasma Build Thread
Ashari replied to Ashari's topic in Captain Phasma Build Threads
Thanks so much! I was thinking about making the bag patterns into things other people could download 🤔 I'll have to look into digitizing options! The sanding box made keeping our garage clean so much easier. The only issue was figuring out a table I could put it on so I wasn't sitting weirdly to use it. Thank you so much! -
Ashari's TLJ Captain Phasma Build Thread
Ashari replied to Ashari's topic in Captain Phasma Build Threads
Cape building! Using the cape pattern pieces that were posted in the Captain Phasma Costumers group on facebook, I drew out the pattern pieces on large pieces of paper and added seam allowance. With the vertical seams sewn, I ran out of table space and ended up working on the floor to get the cape hem drawn out. And then moved back to my sewing table to cut the hem out. At this point, I draped it on my dress form to see how it was hanging and if the height looked good. I didn't get a picture of the hem while I was working on it, but the bottom and end hems are done. Once they were finished, I went to painting using Liquitex Gloss Heavy Gel Medium as recommended in the FB group. I chose to do this as one of the last steps because it makes the fabric really stiff and I was worried about my sewing machine handling going through it once the paint dried. Not painting the straps or sealing the pockets closed was a bit of a challenge. I covered the leather straps in painters tape. I painted the pockets, then propped them open with binder clips while I painted the rest of the panel. And one more hang on the dress form to see how it's looking -
Ashari's TLJ Captain Phasma Build Thread
Ashari replied to Ashari's topic in Captain Phasma Build Threads
There are so many pieces to this armor. Continuing my rabbit hole of transportation, I decided to make travel pouches for pieces to prevent rubbing and scraping. Since I'll probably be getting help getting dressed, I wanted to be able to label pieces so anyone could quickly see which was what. I made quick labels out of Twill Tape, some alphabet stamps and a stamp pad. 1x Chest wrap (for both chest vest and chest front) 2x Shoulder wrap 2x Bicep bag 2x Gauntlet bag 1x Glove/hand bag 1x Kidney bag 1x Thermal det bag 1x Belt storage 1x Cod wrap 1x Butt wrap 2x Thigh wrap 2x Knee wrap 2x Shin wrap 1x Boot blanket Plus containers for: Undersuit & neck seal bag Gasket bag Balaclava & shiny shorts bag Shoe bag Emergency kit I found some little premade bags from ikea that I could use to store and organize all the other parts that would've just been floating around. RENSARE Clothes bag, set of 3 -
Ashari's TLJ Captain Phasma Build Thread
Ashari replied to Ashari's topic in Captain Phasma Build Threads
Transporting a fully chromed set of armor is causing me huge amounts of concern, so I fully upgraded a DEWALT Tough Chest 38-inch 238.5L Mobile Tool Box. Materials: DEWALT Tough Chest 38-inch 238.5L Mobile Tool Box (HomeDepot) SunGlo Soft Foam Cushioning 18 X 18 X 3 Inches (Walmart.ca) Foam Camping Mat (this might not be for sale any more) hometrends Plush Velvet Blanket, Queen size (Walmart.ca) Random foam I had around the house from other projects Multi-Tool (RYOBI 18V ONE+ Lithium-Ion Cordless Multi-Tool) Any long bladed cutting tool (Olfa Heavy-Duty L-1 Cutter 18-mm ABS Plastic and Stainless Steel - Yellow) Any ruler or measuring tape So much hot glue Before starting, my partner cut out the vertical hard plastic guides that were there for adding tool boxes inside the bigger bin. He used the multi-tool to make quick work of them. Then it was a lot of cutting and sizing of foam pieces and SO MUCH hot glue. I measured the interior size after adding the foam and sewed a liner. Reminder: I'm Canadian! So measurements might be metric or imperial depending on the day and my mood 😂
