Leaderboard


Popular Content
Showing content with the highest reputation on 10/25/2023 in all areas
-
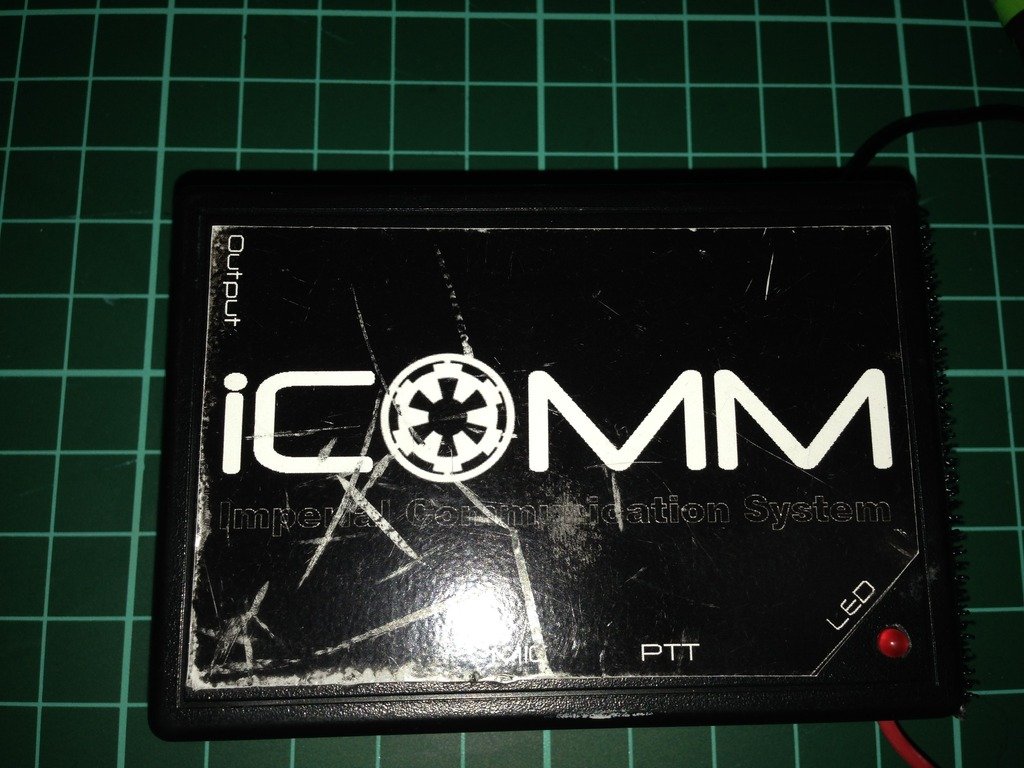
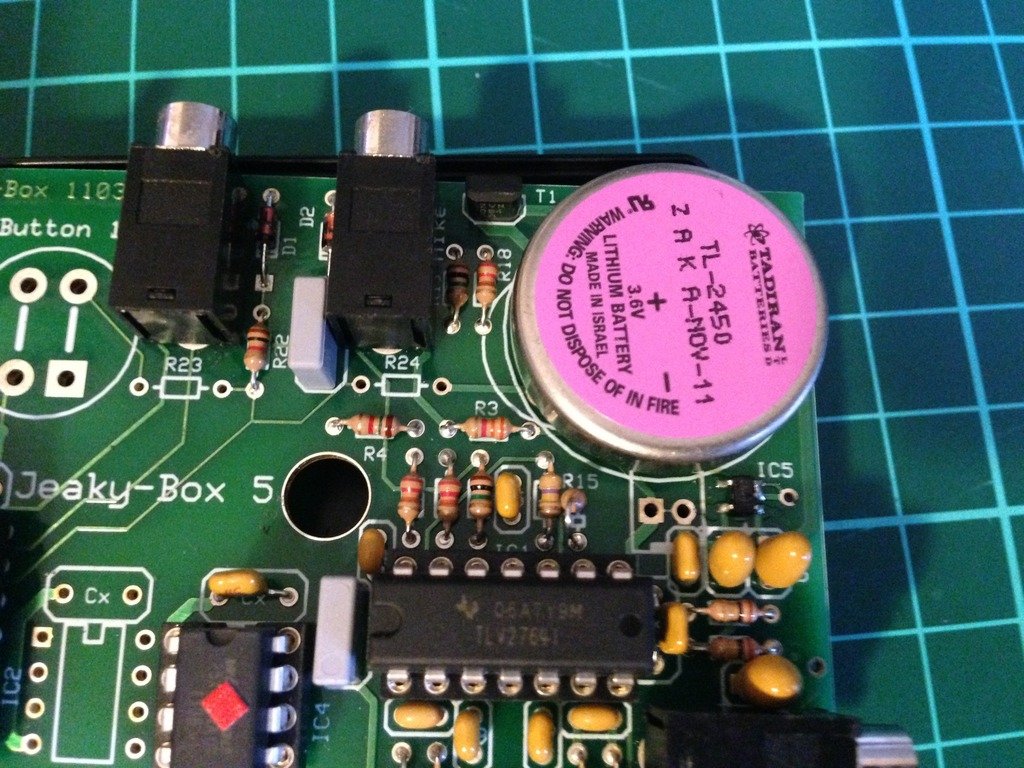
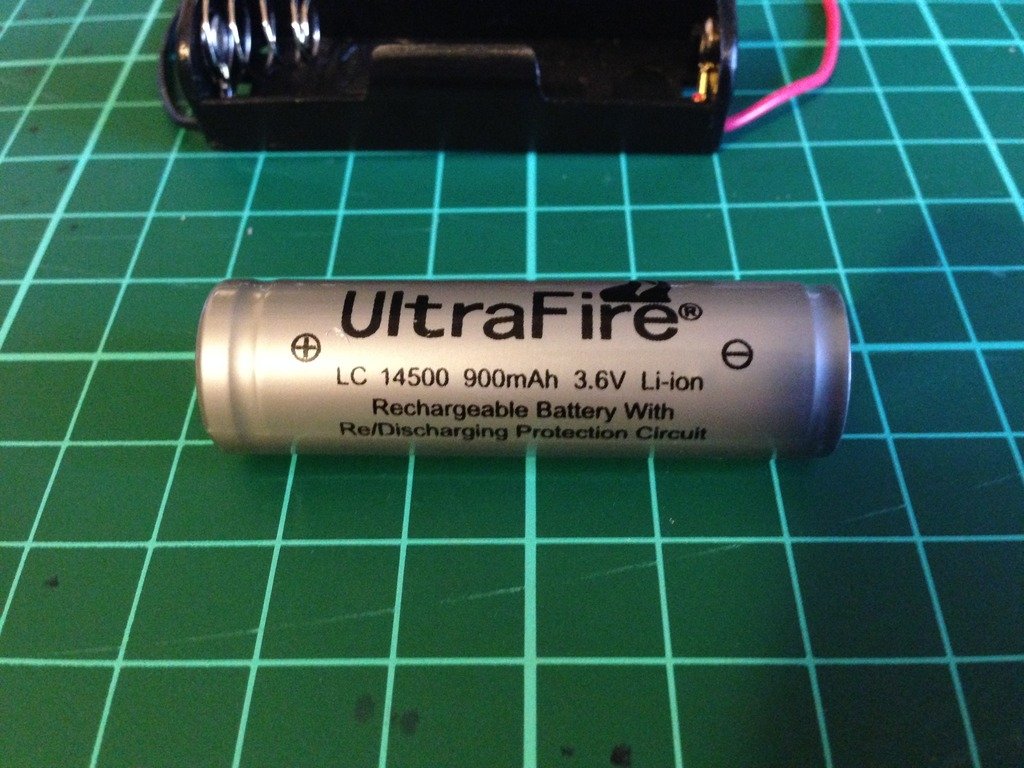
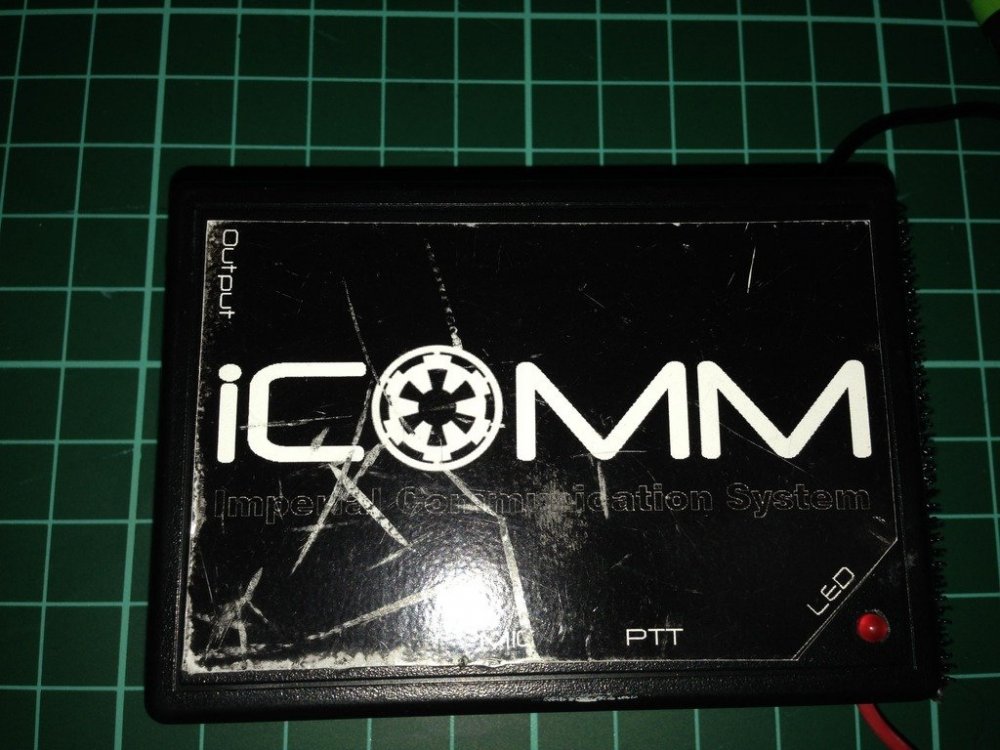
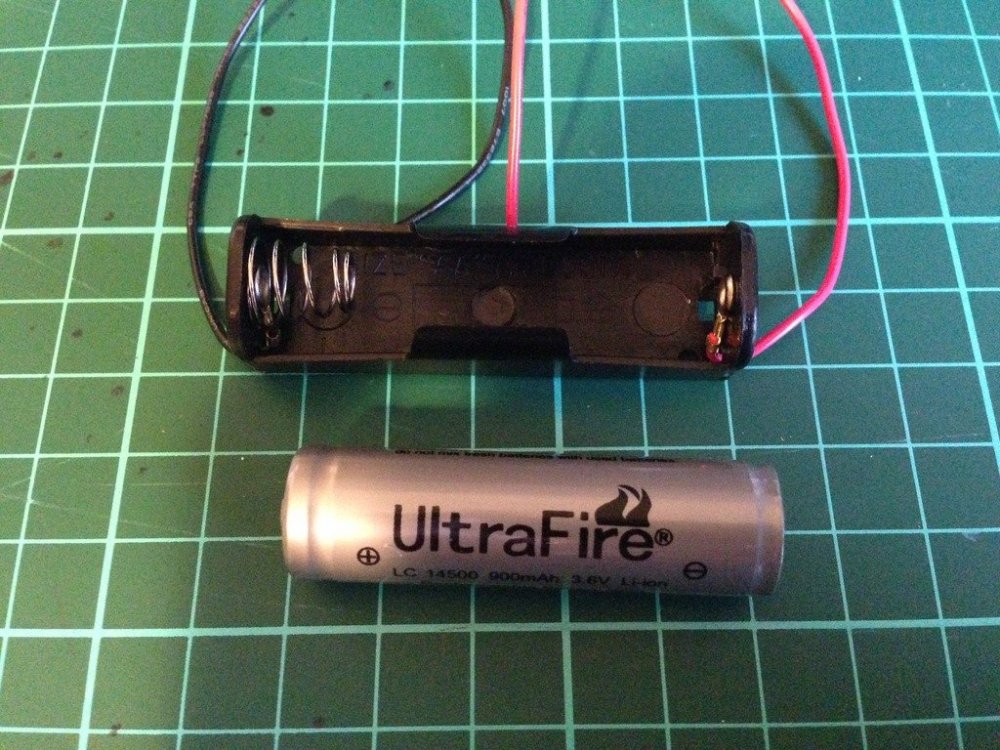
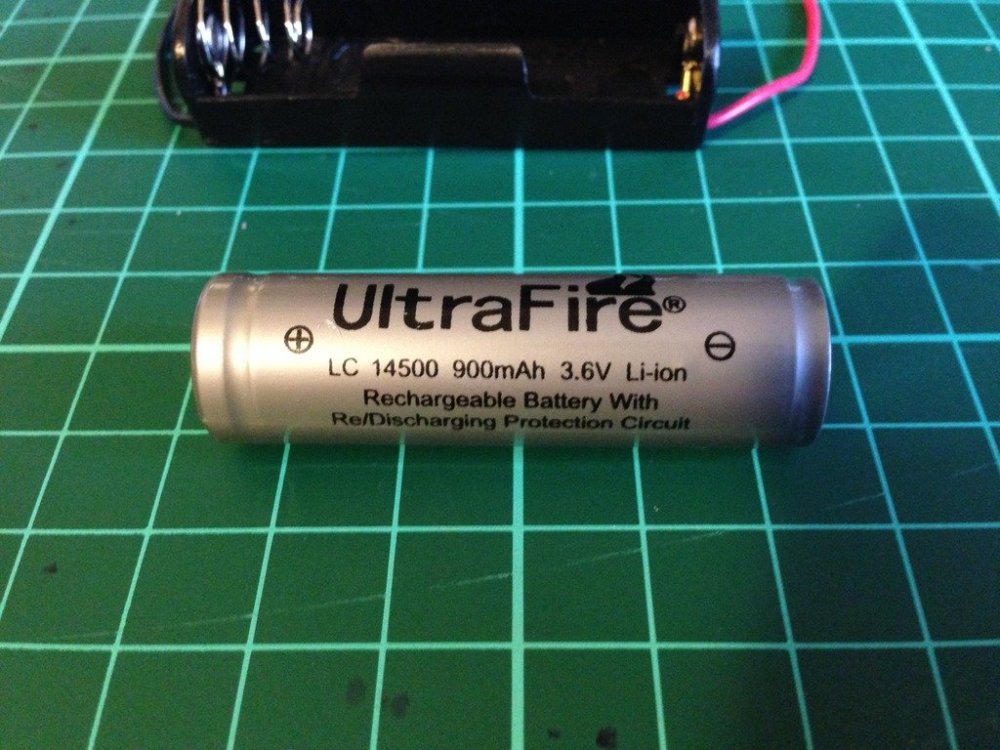
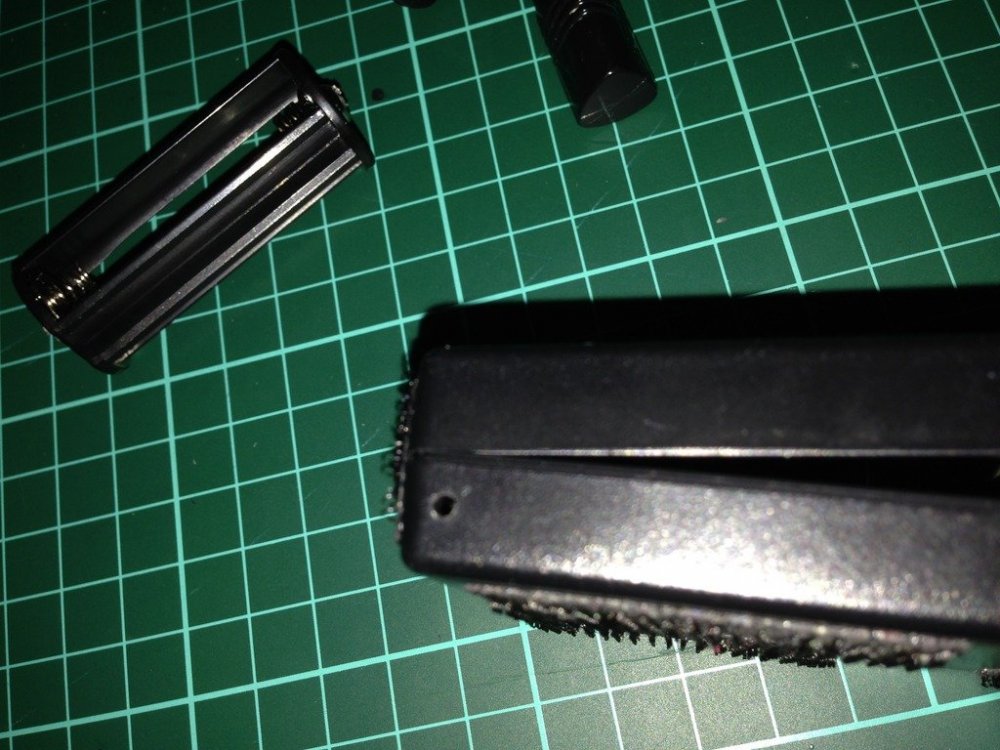
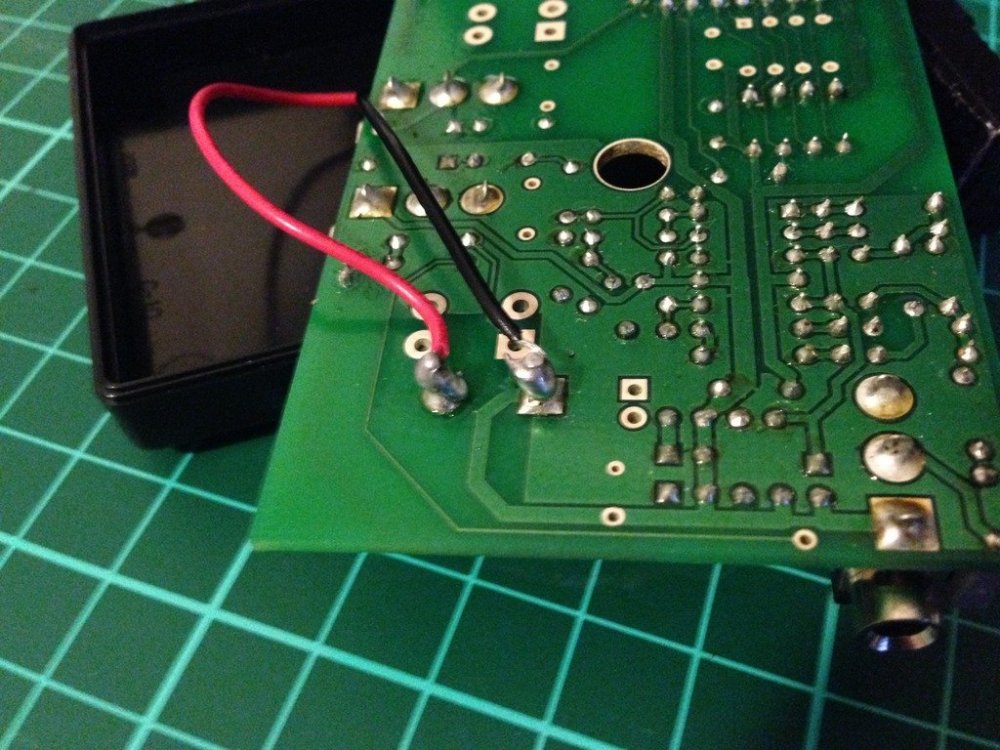
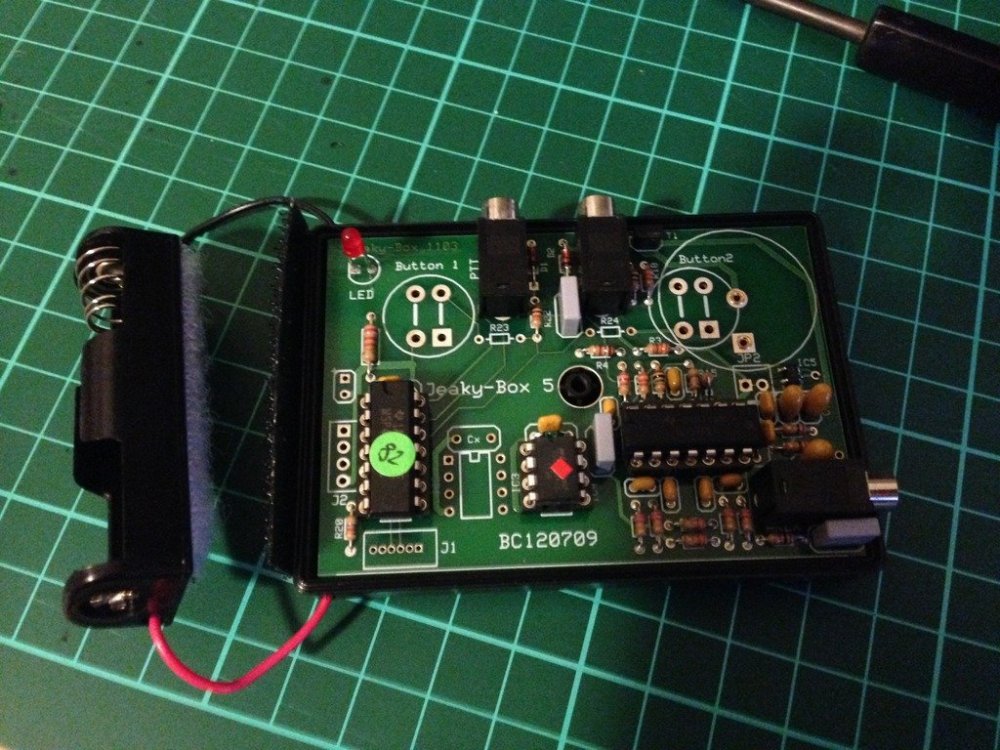
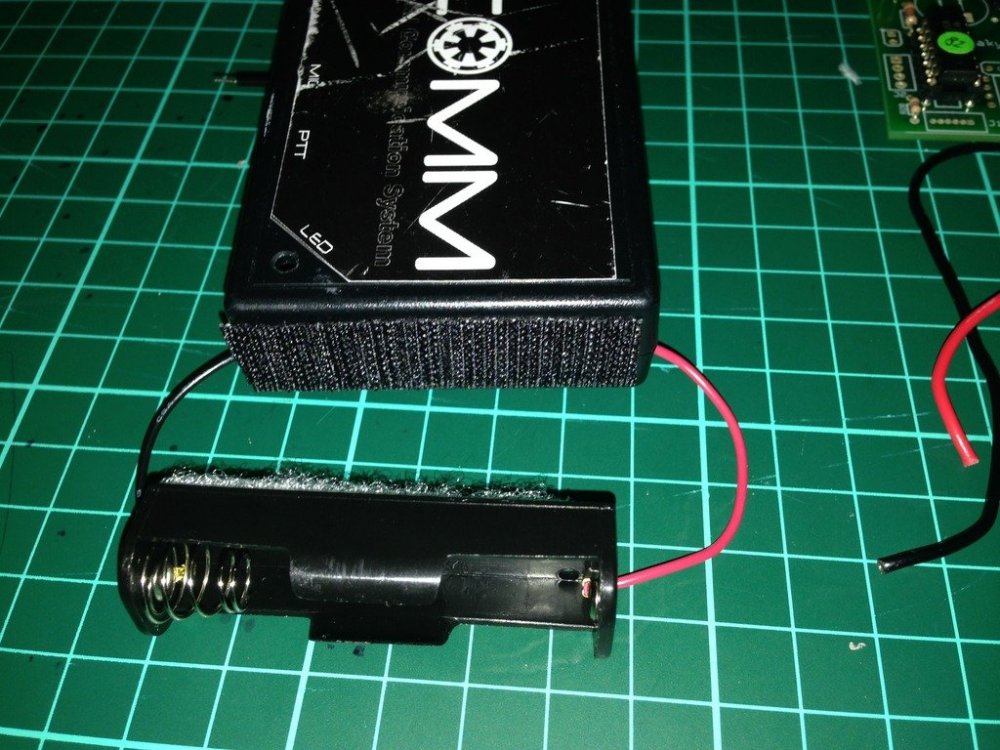
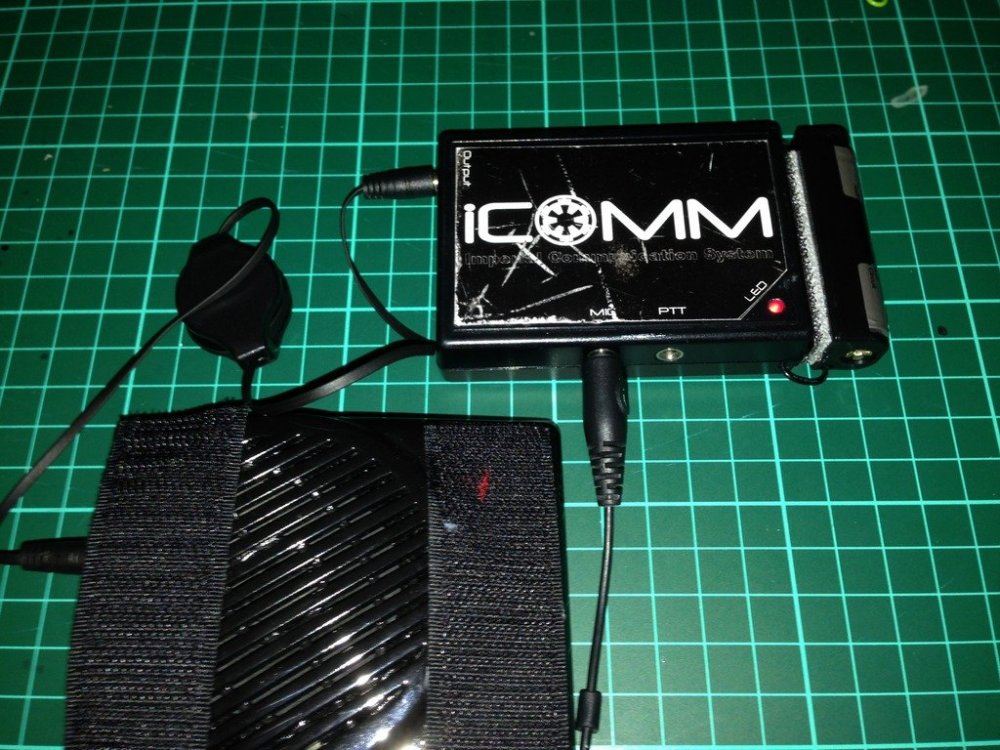
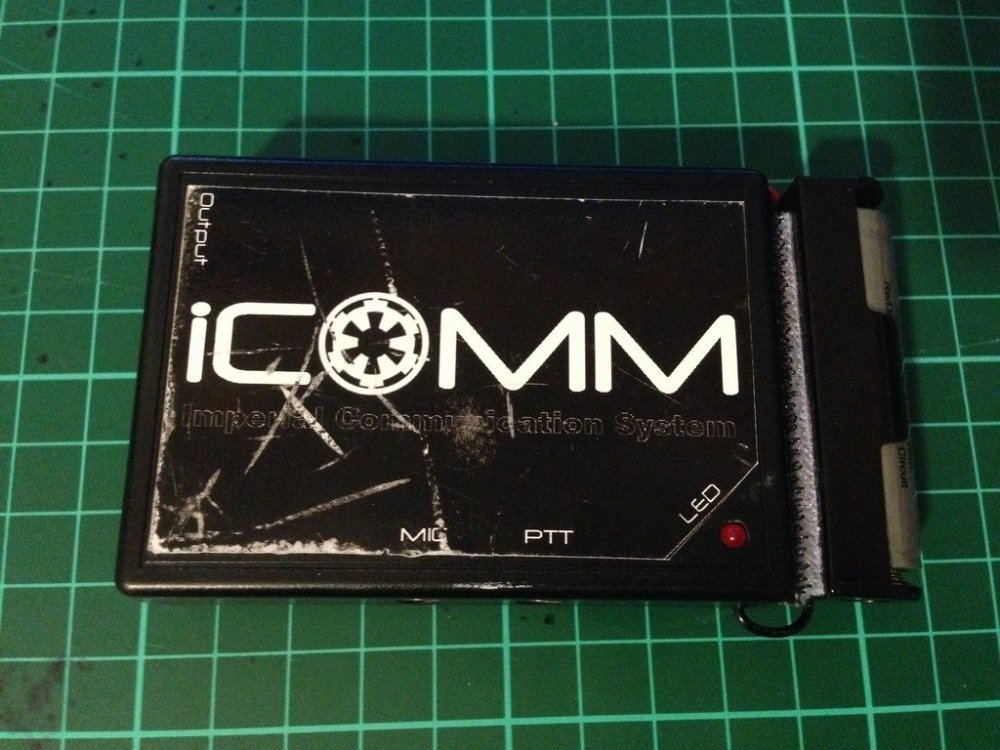
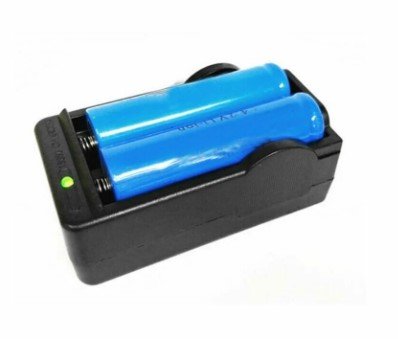
The humble iCOMM, works well while the internal battery is good, but after a year or so..........they stop working. How to tell, its the iCOMM battery. If the little red light no longer comes on and the static burst is not sounding, there is a good chance it is just a flat battery. Image has been scaled down 42% (600x450). Click this bar to view original image (1024x768). Click image to open in new window. Internal iCOMM battery Image has been scaled down 42% (600x450). Click this bar to view original image (1024x768). Click image to open in new window. Freight is expensive to get the very specific battery that is inside. Genuine replacement batt $5 US, freight, $25 US. Whattt!!! $30 US.... for a battery.....at least that's what I said. (approx $38.40 AUS) So I decided to do a little research, and come up with a reasonably simple and inexpensive mod, approx $12-$15 Aus. A simple AA battery holder and a rechargeable Lithium ion battery. Image has been scaled down 42% (600x450). Click this bar to view original image (1024x768). Click image to open in new window. Not just any kind of rechargeable battery can be used. The iCOMM is sensitive to voltage, so a 3.6 volt battery is required. The milliamp hour rating, or how much draw per hour on the battery, is only 560mAh, not bad for its small size, but I have replaced it with a 900mAh, so almost twice the capacity, and rechargeable. Approximate lifespan......Years and years. I chose to go with a battery with an internal protection circuit, as Li-ion batteries are finicky with charging. (have been known to EXPLODE). A digital battery charger, designed to suit 3.6-3.7 volts is perfect. Available on evilbay for as cheap as $5 shipped from China Image has been scaled down 42% (600x450). Click this bar to view original image (1024x768). Click image to open in new window. As I discovered during the research phase, the internal battery is easily removed. Image has been scaled down 42% (600x800). Click this bar to view original image (1024x1365). Click image to open in new window. First I added some adhesive Velcro to the back of the battery holder. Image has been scaled down 42% (600x450). Click this bar to view original image (1024x768). Click image to open in new window. Then I drilled a couple of small holes, one in either side of the bottom half of the iCOMM casing. Image has been scaled down 42% (600x450). Click this bar to view original image (1024x768). Click image to open in new window. Thread the red +, and black - ,wires through the holes of the casing.(From outside through to inside) When you flip the circuit board of the iCOMM over you can solder the wires to the corresponding posts. The outer most post is the positive (+) and the inner post the negative(-). Image has been scaled down 42% (600x450). Click this bar to view original image (1024x768). Click image to open in new window. Flip the circuit board back over and fit back into the case. Please note, you will actually have to fit the circuit board back into the top part of the case as it is the half that has all the plug holes and LED hole. Image has been scaled down 42% (600x450). Click this bar to view original image (1024x768). Click image to open in new window. Place the two halves together, put the screw back in, and add the opposite half of the adhesive Velcro to the end of the iCOMM. Feed the wires in through the holes to keep the excess out of the way. Image has been scaled down 42% (600x450). Click this bar to view original image (1024x768). Click image to open in new window. Tested for success, my iCOMM is again fully operational. Image has been scaled down 42% (600x450). Click this bar to view original image (1024x768). Click image to open in new window. As you can see, the overall size hasn't changed too much. iCOMM 8cm long, iCOMM with external battery adaption, 10cm long. The weight has increased by only 20 grams. Image has been scaled down 42% (600x450). Click this bar to view original image (1024x768). Click image to open in new window. Parts List and cost Battery Holder AA size $1.00 UltraFire Li-ion battery $6.00 (Protected circuit) Digital battery charger $5.00 miscellaneous bits $3.00 Battery holder from Jaycar, all other parts from ebay. Please note: These prices were in Australian $, so would be cheaper again in US$


 1 point
 -
Hello everyone! I just wanted to share this, at one of my troops recently I got 3D scanned, and I'm going to get a 3D printed copy of this very soon that I'm going to paint and have as a statue at home! If I get ahold of the file, maybe I could make it available to everyone if you want to print a screen accurate TK and have at home? Edit: File here Height of model: 180,79cm || 71,1771654 inches1 point
-
I wanted to check and see what everyone is using to play sounds clips via hand remotes ect. while trooping.... I know some people use TRamp, just wanted to explore some other options and see what all is out there. Thanks1 point
-
Qué bien que tu Blaster está pronto a llegar a tus manos!. Mientras tanto y de acuerdo al CRL para nivel básico, "El la pintura del recorte de los dientes no debe sobrepasar esa area" es solo un pequeño sector donde tienes que hacer una reparación rápida con algún mondadientes o herramienta parecida y un solvente sin acetona. Glad to read your blaster is on its way to your hands ! . Meanwhile, we'll need you to make a quick fix . As per the CRL for Basic approval, the paint on the teeth "does not leave the teeth area". Some (non acetone) paint remover and a toothpick will take care of that. References Thanks1 point
-
Big Freds Costumes also has a blaster option now Big Fred's Customs - Facebook: Link Here Patreon Link Here Etsy Link Here1 point
-
Picks from the Blaster Blaster Maker: ArtNeo Left Side Right Side D-Ring Details The Blaster is on it's way to me, so there will only be left the Action Photo.1 point
-
Requesting access TK-77751 https://www.501st.com/members/displaymember.php?userID=36102&costumeID=3601 point
-
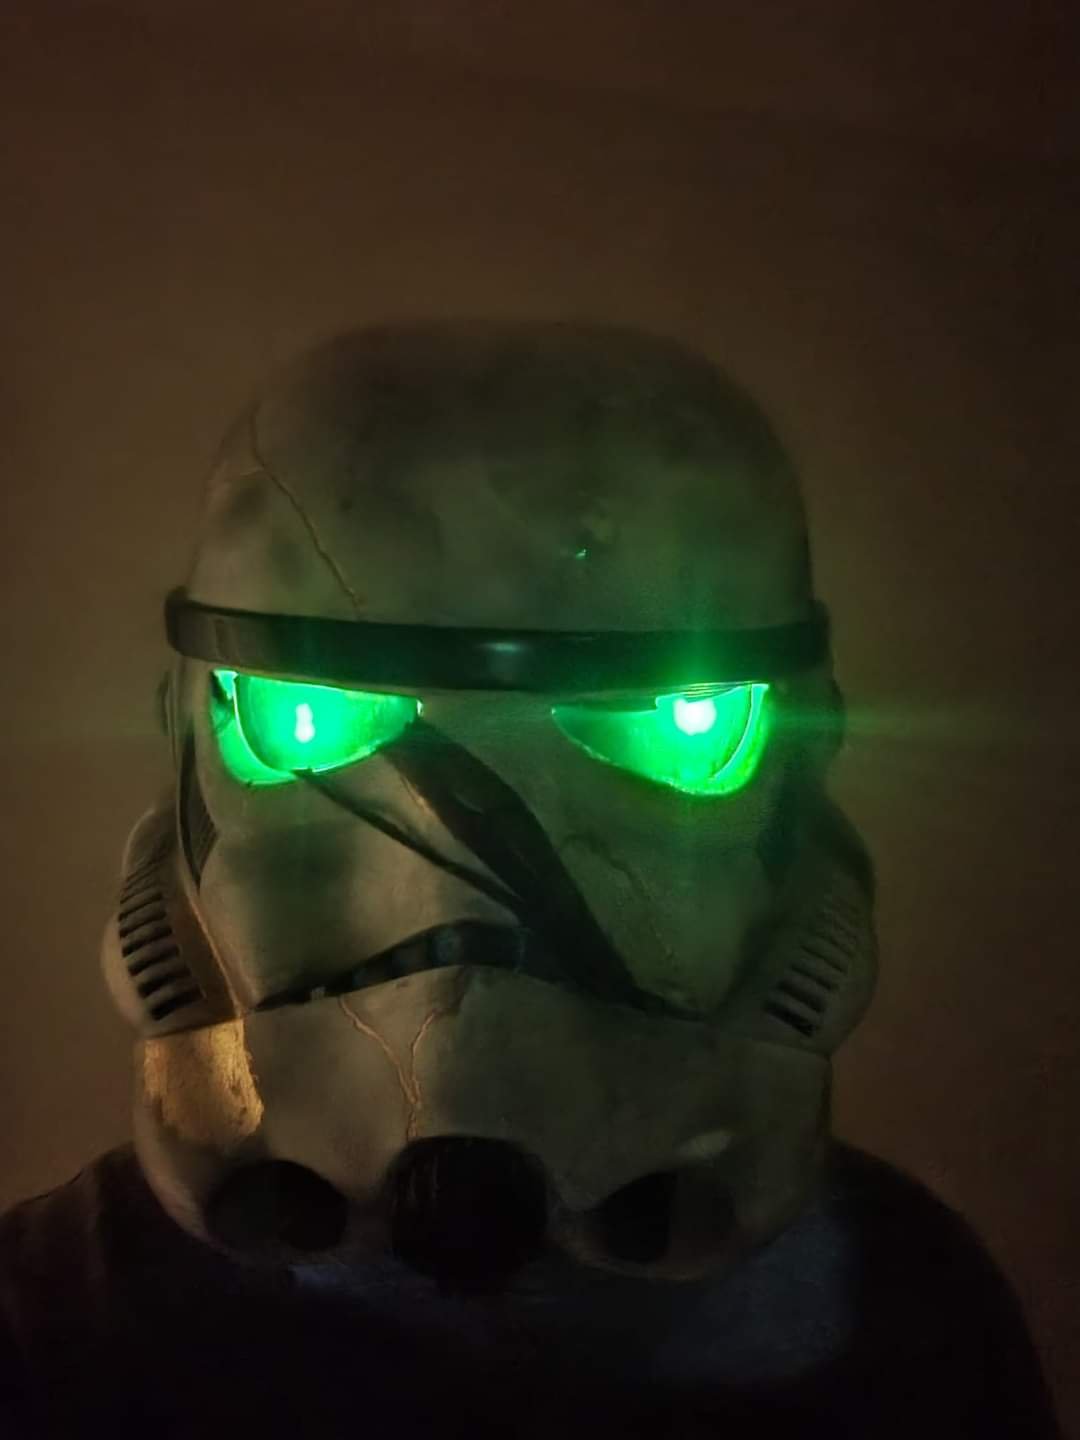
I'm going to call this my Mk 1 lighting system. I'll have to find a way to avoid taping it to my face in the future, but the lights are great!
 1 point
 -
Depending on where you purchase them some come with a charger some don't, I purchase most of my electronics from Aliexpress https://www.aliexpress.com/item/1005003918347212.html?spm=a2g0o.productlist.main.41.2fea6aaauXaVrh&algo_pvid=cdb65934-1856-4eb3-94cf-c0c6c9104cc0&aem_p4p_detail=2023102316281414511821057963460000903333&algo_exp_id=cdb65934-1856-4eb3-94cf-c0c6c9104cc0-20&pdp_npi=4%40dis!AUD!9.92!5.95!!!6.17!!%402101c71a16981036947515305ee413!12000027463280395!sea!AU!178098435!&curPageLogUid=BRvMQqnldwTk&search_p4p_id=2023102316281414511821057963460000903333_21
 1 point
 -
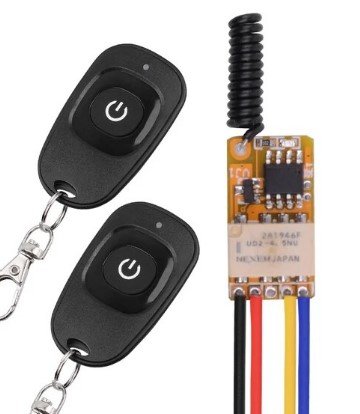
Search and they will be found TK chatter Google Drive link https://drive.google.com/drive/folders/14vAaXe7vzNsBYuzQy8Ro2yc0sjnb5k7S?usp=sharing For my TK I use and Icomm and an Aker amp. For some of my other costumes I use a small mp3 player and an Aker amp gutted so it fits in pouches, I also use 2 relay remotes to activate start/stop and select, once the remote is stripped they are only a little larger than a CR2032 battery they fit nicely into gloves, with a loop of elastic glued to them so they stay on the fingers. Soundboard links: https://www.101soundboards.com/boards/10584-stormtrooper-sounds-star-wars https://www.soundboard.com/sb/stormtrooper_sounds https://www.voicy.network/official-soundboards/movies/stormtrooper
 1 point
 -
Indeed but unfortunately the only one available currently. Without full reference material it will be very difficult for makers to finish models and files, hopefully we get a Black Series or Hot Toys figure in the future.1 point
-
I think the magazine would have made a big impact on how the blaster was holstered initially but as you say not with the SR-14, what came first the chicken or the egg Although I've scoured the interwebs I've still not been able to find a full side Promo trooper image, it's a shame so many of our older threads have lost images I'm sure there was a treasure trove at one time. There are still images I see come to light in some of the prop groups that I've never seen before so there is still a chance an image may come to light one day.1 point
-
Hello all! I've seen a lot of confusion about wetsanding and polishing with the goal of increasing the shine. Lots of people mixing up terms and using the wrong methods/products at the wrong time/place. So I decided to put up a little tutorial to clear (hehe) things up. DISCLAIMER: I am not a professional, I do auto detailing in my spare time and have some experience with paint correction. This will be a pretty long tutorial but stick with me and hopefully we'll learn something 1. What is shine? To be brief: when something is really really flat, it will reflect a lot of light directly into your eyes, making it appear shiny. Below is an illustration of perfect paint reflecting light, this would look like glass: (Illustrations are not to scale, just there to give you an idea). But that's a show-car-130-hours-polishing-lunatic-finish. Most of us use spray cans, and spray cans suck. They spit out paint unevenly and most of it is propellant anyway. And we do it in conditions that are not optimal, so we end up with very uneven paint full of orange peel. For this tutorial i've prepared a plate of ABS plastic which has been painted black (easier to demonstrate) and clear coated. See this pic below? See that wrinkly, orange'y look to it? That's orange peel. Image 1: If we want to go the extra mile to get rid of this, we need to do.. 2. Sanding - Levelling the paint Using sandpaper is ABRASIVE. From Merriam-Webster: abrasive 1: causing damage, wear, or removal of surface material by grinding or rubbing Focus here being "removal of surface material". Every time you swipe that sandpaper it removes some material. What we are trying to achieve here is a flat surface, we are trying to flatten out those "peaks and valleys" by removing/flattening the clear coat. A sandpaper's "grit" determines if it's coarse or fine. A higher number means it's more fine, and will remove less material. A lower number means it's more coarse and will remove more material. You need to have enough clear coat on your piece to be able to do this correction. Or else you might sand into the basecoat or even the primer. Which sucks because that means a re-paint.. Here is a list of my PERSONAL sandpaper grits: 40 - Super coarse for doing an Alderaan on whatever you are working on, I never use this 80 - Very coarse, for removing material quickly. I use this on woodworking projects 120 - Quick removal of material while still being in control 180 - I use this to knock down 3D-print lines and filler 240 - Smoothing filler if i'm feeling a bit scared 320 - This is what I sand my parts with before primer 600 - For wetsanding my primer 800-1000 - Anything from color-coat/clear-coat fixes to wetsanding hard clear coat 1200 - For knocking down tough orange peel 1500 - For knocking down orange peel 2000 - For removing 1500 scratches 3000 - For removing 2000 scratches For this test piece I started with 1500 grit to knock down the orange peel as the clear coat I used is kind of soft. Keep in mind every sanding step in this tutorial is done wet/wetsanding. As you can see here i've flattened out the peel on most of the piece but I missed a spot. I went over it again and made sure the entire surface was equally "dull". After this I went over it with 2000 grit. This is a finer sandpaper and my goal here is to eliminate the scratches from the 1500 job. Notice the sanding marks going the opposite direction this time. This is a good way to gauge if you've successfully sanded away the marks from the previous steps. And finally I went over it with 3000 grit in the opposite direction to remove the 2000 grit marks. At this point you should start seeing some shine My camera really struggled to focus taking these pictures. And we're done with sanding! Dry off your parts and move on to.. 3. Polishing - Levelling the paint again, just very very little From Merriam-Webster: polished; polishing; polishes transitive verb 1 : to make smooth and glossy usually by friction : burnish 2 : to smooth, soften, or refine in manners or condition 3 : to bring to a highly developed, finished, or refined state : perfect This is were it gets confusing. Some people "put polish" on their car, but they really mean wax. Some people "polish in the wax". I mean, it's been used so much in so many different ways I know it seems confusing. For simplicitys sake: Polishing is the last step in paint correction. In the auto detailing world, if you would let's say fix orange peel on a car, you'd go through all the steps above then.. 1. Use a RUBBING COMPOUND with a machine to knock down the 3000 grit scratches, paint should look like ANH Vader at this point 2. Use a POLISH with a machine to further level the paint from the faint marks the COMPOUND may have left, at this point the paint will be as clear as an ESB Vader 3 Apply a WAX/SEALANT/COATING on top of the newly corrected and flawless paint, to protect it (and also add a tiny bit more shine). Wax/sealant/coatings will fill in tiny tiny scratches making the paint appear more shiny, but the effect will diminish as the wax deteriorates. Rubbing compound and Polishes are ABRASIVE, they will REMOVE clear coat, just like sandpaper, only much much finer. Think of them like liquid 30000 grit and 80000 grit sandpaper After drying off my newly 3000 grit sanded piece, I found a foam polishing pad, and primed it with some rubbing compound. Priming is basically just "feeding" the working area of your pad with polish so there are no dry spots. All my compounding/polishing was done by hand. I then applied some more compound to the pad, a pea sized drop and went to town in small, circular motions. Follow the instructions on your product. After finishing I wiped off with a microfibre cloth aaaand... BAM! Shine!! The compound I used was Menzerna FG-400. It's a really good compound, it finishes super fine and you could just leave it as it is right there! You can also use Meguiars M105 for this step. Or any "rubbing compound", as long as it doesn't have fillers/wax in it which will trick you and lie to you. You can also just straight up use a polish, but you might have to work a bit longer to achieve the same effect. Now on to the polishing, for this I did the exact same thing with a finer foam pad and Menzerna SF-3500 (Meguiars equivalent M205). Honestly it didn't make much of a difference since the FG-400 finished out so nicely. If you're using other products you may have to do this step if you see "haze" from the compounding step. I tried my best getting an in focus picture but my camera got so confused because of the shine 4. Wax/Sealant/Coating - Protective Layer A wax is a protective layer, it is NOT abrasive. At this stage you can add wax if you want, it'll protect the paint a bit and also give it a tiny bit more shine. It's the prep-work and COMPOUNDING/POLISHING that really makes it shine. I didn't bother adding wax to my polished test piece as it was already as good as it gets. I did however tape off the piece before polishing, so I had one side which was 3000 grit sanded, and one side that was polished. I tried adding wax to the sanded side: After buffing it off with a microfibre and removing tape: And that's it Hope you learned something! Any questions feel free to post them here and i'll do my best to answer. After closely inspecting the piece I can see some orange peel left, but that's from when I put my color coat on, which is under the clear coat.. oh well.. Spray cans suck!!1 point
-
This is to show a few ways to modify your armor, if you're too slim for the usual size. Trimming Although this may seem like the most obvious solution, unless you're smaller than the average TK (smaller than 175cm) as well, extensive trimming might lead to weird proportions. If you decide to trim your armor, here's a few things you should look out for: For forearm armor, you should trim the back of the armor, as the front might have a raised ridge for your cover strip. Make sure to angle the cut as necessary. Leave enough room to get your hand through the wrist opening comfortably. You might need to reshape the armor with heat afterwards. With the bicep armor make sure to cut equal amounts from front and back, so that the raised armor part/thumb print remains centered. Here you should rather leave some extra space than end up with a too slim bicep as that usually ends up not looking good. Regarding the thighs, you should have the same approach as with the forearms, making sure to only take away extra material in the back. When trimming, make sure to keep the back of both thighs looking similar. The coverstrip should end up pointing at this "corner". You might need to cut off extra material at the top once you align the bottom ridges. The shins should also be trimmed solely from the back, since in the front you have a raised area for the coverstrip. Make sure to test the fit whilst wearing your boots as they might give you extra width to account for. It's better to go slow and trim bit by bit than to rush and take off too much. Although I do NOT recommend trimming the torso, if you feel the need to do so, make sure to trim equal amounts off of all plates to keep the overall balance. Once you get to a point, where any piece of the armor fits you should not trim any other torso pieces. If you've got the notches in your kidney plate, you will either need to reform them after trimming, or you cut away enough material so that you do not have any notches. At the very least for your back and your chestplate you will need to reform the return edge for an authentic look, so make sure to learn that skill beforehand with a separate piece of ABS scrap before reshaping any armor parts. For heatforming a return edge you should either have a piece of smooth wood in the correct shape to bend your armor over whilst forming or you can use a heating iron. Padding Instead of filling out your armor with body mass, you can also add padding. Usually small pads are enough, but you can also fill out your armor pieces across the full length. There are different types of padding you can use. Either store-bought or foam that you cut to the right size. Depending on what you like best and how much flexibility you want to allow your padding you can either use firm or softer padding. Ideally your padding is black to blend into your undersuit. However, should you use different colored padding you can easily use a marker to turn it darker. Should you use a marker, there's no need to color the whole piece, only what is visible by looking into the piece of armor. I prefer to attach my padding with velcro wherever possible, as that allows me to exchange and adjust padding size, thickness, and firmness for each troop. Should you gain or lose weight this will allow for an easy exchange of padding. Additionally this allows you to keep spare padding in case the one you're using rips or otherwise gets damaged. Strapping When you're too thin for your armor, it's easiest to spot the difference in mass between the armor plates, where you can spot the undersuit. Therefore you should aim to have the least amount of undersuit visible. Not only does that get you closer to an authentic look, but the armor hides your actual body mass better than your undersuit. A specific strapping that you can adjust is the shoulder strapping. By moving the chest and back closer together it'll be less likely for another to simply look through any gaps between your armor and your body. You might have to cut away from the neck area a bit more so your armor doesn't cut into your neck. Additionally you might face trouble regarding the ab-kidney connection. If you're fine with your armor overlapping (not acceptable for higher levels), you should make sure that the abplate overlaps the kidney. This way the overlap is less visible to others. Alternatively, you can opt for a rigid strapping for the connection, forcing it into position and shape without the body mass to fill it up. This can look strange when worn if you're a lot skinnier than the armor, but might work out well if it's not that noticeable. Additionally, this qualifies you for higher level approvals. I personally went for a rigid strapping that allows for adjustment. That way I can switch between Centurion level armor and what feels most comfortable to me. As you can see in the picture, the strapping consists of two slots and two ABS pieces that fit them. By making the gap in the slots the exact size as the ABS pieces it mostly stays in position when trooping. Lastly there's the buttplate to consider. Due to it's position, it's easy to see the inside of the buttplate if you're too slim. To avoid that you can either heatform the armor and adjust the curve to the rest of your armor, or you can have an additional snap from one side of your buttplate to the other, going across your body. This keeps the plate flush against your body whilst giving your entire lower torso section a better hold, as this past might slide down without the friction of your body preventing movement. V-tabs can help your buttplate stay in place as well. Paint To avoid people seeing the contrast between your undersuit size and your armor, it might be helpful to color the inside of your armor black to help your undersuit blend in. I personally haven't tried this yet, so I can't guarantee good results. Should I ever attempt this, I'll share my progress and let you know if it works as intended. Trooping You should take some time and a second person to help you adjust your strapping, padding and movements so your armor parts don't lock into each other. Especially the sniperplate can easily end up inside your thigh and cause you problems. Try out different poses that look and feel good for photos or videos. Additionally, make sure to carry some snacks with you if possible, for example by putting a pouch inside your chest plate. Many skinny people do not have many calories to burn or might end up with low blood sugar. Should that happen to you, simply eat a glucose, notify a handler or fellow Trooper and move back to the break room for some proper nutrition and some water. Here I've collected a few things that might be helpful to carry along: If you're too small and too skinny for your armor, you might want to take a look at the following threads for advice on how to downsize your armor: I hope this helped! If you've stumbled across some additional advice, please share it in the comments and I'll link your input here!1 point
-
Continued: I had seen someone posting a FB build group this photo, wondering about why you can maybe see some light coming through the tear/cheek vents in this behind the scenes photo: I guessed that they were likely some kind of mesh fabric. I asked my contact who has intimate knowledge of the helmets, and they confirmed my suspicion. While I cannot share the photos or reveal my source [my source has said I can identify him here on these forums: fellow 501st Legion member Ardeshir Radpour @equuspolo ], they showed me detailed pictures of the inside, including the black breathable fabric that is glued behind these vents (and they are also behind the top vents, but were covered with helmet padding which blocked airflow in this helmet). They also showed me more details of the grey helmet details which confirmed they appear to be a separate piece. So I cut some "frames" to give my inserts something to hold on to, and then used CA glue to attach some mesh fabric (from one of my wife's socks) stretched taught behind it. (According to my source, what my black frames are doing in this build was instead integral to the helmet as a recessed ledge, and painted black, and then the mesh fabric was simply glued to the inside of the helmet over the hole, but the result is the same and looks identical): I cut the backer plates for the other vents and traps as well: Meanwhile, I did a final wet sand at 600 grit to the repairs, and painted the frown teeth and attached ear button with primer grey, and taped them off. I primed the whole helmet with white primer, and then gloss white the next day. I had a few minor rough spots, and sanded those in preparation for a gloss coat. It appears some of my paint, despite warm dry days, did not fully cure. According to Rustoleum, it should have at least 48 hours (not 20) before applying a gloss coat, and it instantly crazed up. Back to sanding... Vocoder tubes: I needed the vocoder to make a harder angle right out of the top holes, without kinking, and I had an idea to insert a piece of rod with a right angle bent into it. It looked like it would work, but the lower end of the rod (2.25" for the long ones) showed a bulge where it ended, so I would need to curve it back and grind it away so there is no hard corner at the end of the rod. The irrigation line can't easily make the 90 degree bend [UPDATE: it was hard to get the irrigation line to make the 90 degree bend, but I used a simple graphite bottle to squirt some graphite down the tube, lubricating the rod so that it more easily could make the bend, eliminating the hammer part which mashed up the tubes. Graphite bottles can be found at any hardware store, and are used to lubricate old locks and things], so I hammer the bend, and then hammer it back to 45 (bent to 90 first to sort of weaken it, making the second time easier), insert the rods over the tubes, and then re-hammer the 90 degree bend. It chews up the end of the tube a little, so this has to be done with the least amount of hammering (thus the pre-weakening of the bend). Using the graphite makes the second hammering not necessary. It might work with lubricating oil too, but that oil may make gluing it more difficult. After waiting two full days, wet sanding with 600 grit and then 1,000 grit, my helmet was ready for painting... again. I warmed my paint in the sun, shook it for over 5 minutes, set up the parts in the shade but on a warm dry morning, and tried again. Success! No need for a gloss clear coat, this white is glossy enough: Next steps over the next few days are assembly...1 point