Leaderboard


Popular Content
Showing content with the highest reputation on 08/25/2022 in Posts
-
-- EDIT 08/31/2022-- Future Jason here, I just wanted to provide this colorful edit to help explain how I'm going to handle additions to this original post. Initially, I was striking out verbiage as it was written, then adding new text, but it was getting messy. I will continue using strike through text whenever I remove something from the existing CRL, but will follow that up with red text indicating the agreed upon change. Of note, I will try not to make any of these changes unless it's captured in this conversation, but I am receiving input from detachment leadership in addition to what's captured here. If anything ever appears in the CRL text below that a person does not recall discussing, please let us know so the discussion can continue. What I absolutely refuse to do is create ambiguous text, or what I refer to as a "moving target CRL." Any edits to my original post will be written in yellow so you can follow the changes easier; I will also date any revision/ edit. So again, CRL changes/ additions in red instructions/ original post edits in yellow. Thanks, TK-51923 Fellow TKs. After several discussions regarding the inclusion of Remnant Stormtroopers, as seen in The Mandalorian seasons 1 and 2 into the Databank, we have decided to move forward with the creation of a CRL. The goal in developing this thread is to create a CRL specific to the heavily weathered Remnants serving Werner Herzog's "The Client" as well as those seen in Season 2 episode 7 The Believer, working in the rhydonium refinery on the planet Morak. For previous discussion on this topic, please see the following thread: https://www.whitearmor.net/forum/topic/48305-new-anthology-tk-crl/ Additionally, for reference, please see the following picture: Additionally, since we have several new references to draw from since the creation of the original Rogue One TK CRL and it's subsequent revision in 2020, this thread will also serve to address revisions to the current ROTK CRL and the potential creation of a separate CRL for the New Generation/ Anthology TK. Discussions are ongoing regarding how to handle this generation of TK armor that has become synonymous with the Anthology films and various Disney+ series. This includes the existing ROTK, which could be renamed, receive additional variations, remain unchanged, or none of the above. However, one item that has been emphasized to me from detachment staff is that we have to clearly show that this is a unique set of armor without stating "it's dirty." Additionally, we have found several instances in which items were either missing, broken, or taped together by the costume department for the respective productions; these discrepancies will not be included in any new CRL or revisions to existing CRLs. The goal of this thread is to identify the unique attributes of the costume that are uniform throughout all of it's appearances in Anthology films and Disney+ productions, not to capture broken or missing items. Things that will not be considered: broken thigh armor, drop boxes tucked into the thighs or missing altogether, missing TDs, and "$#1++y wardrobe dressing or stunt men with gaffer tape." I'm not going to say who's quote that was. With that said, we obviously have an ANH OT bucket resting atop Rogue One style armor. These are on prominent display, but there's other unique characteristics as well. This is our opportunity to post them up and start hashing out the details. Please take a look at the aforementioned thread, but I also intend on posting several of the pictures here. To get started, I will post the verbiage from our current ROTK CRL, and include the wording from the ANH Stunt helmet. I will continue updating everything as we go along and highlight any changes in red. Additionally, even though this isn't a New Generation/ Anthology CRL, we need to capture anything in the New Generation gear that hasn't been covered previously. If there's new things that have been discovered, please post them. Let's get started: Helmet Moderate to heavily weathered 8/24/2022 Traps (trapezoids on dome of helmet) and tears (area beneath the corners of eye lenses) are gray. Rear traps and tears have vertical black lines. Lenses are flat material, green in color, sufficiently dark enough to obscure the costumer's eyes. The “ear” bars have three or four bumps and are gray or painted gray, with a black outline. Painting the bumps with rank stripes (highlighted) in black is optional. Frown is painted gray and does not leave the teeth area. A total of 8 cut outs in the teeth area of the frown are present. Tube stripes are medium blue, numbering between 9 and 16 per side with the curve bends extending backwards. Vocoder (vertically ribbed chin detail) is painted black. Aerators/Hovi-MIX tips (cylinders on either side of the vocoder) are black or painted black. Tears, traps, and tube stripes may be hand painted, decals, or decals that replicate hand painted. Mesh may be used behind the frown to obscure the face of the wearer. Note: The helmet is accurate in detail and proportion to official references. Many commercially available helmets or those considered disproportionate in size or shape are ineligible. OPTIONAL Level two certification (if applicable): Ears shall have three screws per side, one above and one below the ear bar and one at the base of the helmet. Ear bars have four bumps only. Not three. Traps/tears and tube stripes shall have the correct ANH TK details. Ideally, the tube stripes are positioned approximately a pencil width from the side of the cheek. Fall of tube stripe tops ideally lean toward the front. Correct Aerators/Hovi-MIX tips are present. Screens used shall be of a wide type mesh, with the rim of the mic and the inside white or painted white. OPTIONAL Level three certification (if applicable): Ear bars shall have only one bump painted in black (rank stripes). Ideally, placement of ears (and screws) should closely follow the rear angle of the trap above them Neck trim shall be of an s-type profile rather than a u-type profile. Tears/traps shall be hand painted or use decals that emulate hand painted (with correct ANH TK details). Ear screws shall be slotted, flat topped, countersunk and painted white. The vocoder must be integrated into the helmet, and not a separate piece. Neck Seal Moderate to heavily weathered 8/24/2022 Black with horizontal ribs, fitted to the wearer, and extending from the base of the neck to conceal the entire neck Under Suit Moderate to heavily weathered 8/24/2022 Black non-textured material, either one-piece or two-piece construction with no visible zippers or logos/designs. OPTIONAL Level two certification (if applicable): Top, where visible shall be fully ribbed with all horizontal ribbing on the arms, chest, and back. The centre of chest and back may be mesh as long as it is covered by armor. Pants shall be black non-textured material and have horizontal ribbing at the knees only. Knee gaskets are allowed as long as they correctly match top ribbing material, spacing and color. The hip section shall not have ribs. OPTIONAL Level three certification (if applicable): All ribbing on knees, arms, chest, and back must be stitched between each rib in detail and proportion to official references. The armpit area shall have the correct hexagonal mesh detail Shoulder Straps Moderate to heavily weathered 8/24/2022 They may be affixed with Velcro or adhesive. OPTIONAL Level two certification (if applicable): OPTIONAL Level three certification (if applicable): These shall be inserted behind the chest tabs and into slots of the backplate. Shoulder Armor Moderate to heavily weathered 8/24/2022 One on each shoulder. The shoulders are considered effectively symmetrical; they may be worn interchangeably on the left and right shoulders and may have a black elastic strap that wraps around the inside of the bicep. OPTIONAL Level two certification (if applicable): OPTIONAL Level three certification (if applicable): There is no swoop on the shoulder bell raised area. There is no elastic strap that wraps around the inside of the bicep. Upper Arm (Bicep) Armor 8/31/2022 Moderate to heavily weathered 8/24/2022 Both biceps are symmetrical and interchangeable. The front strip is bevelled and approximately 1/8" thick that does not extend beyond the bicep, and has a smaller cover strip layered thereon. OPTIONAL Level two certification (if applicable): OPTIONAL Level three certification (if applicable): Cover strips will cover both the front and back joints. Biceps are loosely held closed in the back with elastic, shock cord (bungee cord) or white Velcro and are designed to remain flexible. The biceps are suspended from the shoulder armor via shock cord (bungee/ framilon cordage) via "J hooks" at the top of the biceps per the screen references. 8/31/2022 A separate piece of white 1" webbing or elastic, extends from the shoulder armor, through a slot in the bicep per the screen references. 8/31/2022 Forearm Armor Moderate to heavily weathered 8/24/2022 The front strip is bevelled and approximately 1/8" thick that does not extend beyond the bicep, and has a smaller cover strip layered thereon. OPTIONAL Level two certification (if applicable): OPTIONAL Level three certification (if applicable): Forearms are loosely held closed in the back with elastic, shock cord (bungee cord) or white Velcro and are designed to remain flexible. Cover strips will cover both the top and bottom joints. Hand Plates Moderate to heavily weathered 8/24/2022 Roughly pentagonal in shape, the hand plates are mounted securely over the back of the glove. As an alternative to plastic, these may be made out of latex or latex-like material. OPTIONAL Level two certification (if applicable): Hand guards shall be made of plastic. OPTIONAL Level three certification (if applicable): Hand guards should follow the correct RO shape, ANH hand guards are not acceptable. A small indent in the front of the hand plate shall be present. Gloves Moderate to heavily weathered 8/24/2022 Black in color, made of either rubber, Nomex, leather, or leather-like material, with no visible straps or logos/designs. The fingers are enclosed, non-textured. OPTIONAL Level two certification (if applicable): Gloves shall not be made of rubber. OPTIONAL Level three certification (if applicable): The base material of the gloves will be a black synthetic material similar to Lycra, Spandex, Elastane, or Nylon. Palms of gloves shall be shiny black fabric or leather or leather-like material. On the index finger shall be a stitched piece of fabric made from the same material as the hand's underside that while stitched to the finger has one cutout towards the end of the finger that reveals the netted material underneath. Gloves shall have the correct leather pattern along the fingers/palm. Chest Armor Moderate to heavily weathered 8/24/2022 Chest plate overlaps the abdominal plate OPTIONAL Level two certification (if applicable): There are raised trapezoids at the top of the shoulder section beneath which the straps insert. The chest and back sides shall be connected by black extensions pieces. OPTIONAL Level three certification (if applicable): Top pectoral out lines swoop correctly outward. Bottom of ribcage flares correctly outward. Back Armor Moderate to heavily weathered 8/24/2022 Back plate contains an "O II" design. There are raised trapezoids at the top of the backplate section beneath which the shoulder straps insert. The backplate continues past these trapezoids towards the top of the shoulder OPTIONAL Level two certification (if applicable): Top of box wall has a trapezoidal indentation. There is a roughly 8mm circular indent near the right top corner of the backplate. OPTIONAL Level three certification (if applicable): Bottom of backplate is curved and extends past abdominal back cover plate. The O cog shall have 16 spines. The 11 bars have 5 horizontal evenly spaced raised bars on the bottom of the face. There is a rectangular tab protruding from the bottom of each of the two raised trapezoids at the top of the backplate. Abdomen Armor Moderate to heavily weathered 8/24/2022 The abdominal armor consists of a one-piece corset design with a vertical opening centred on the back. The back opening is covered by a rectangular cover plate that is worn under the back armor. There are 3 vertical ribs centered on the front of the abdomen and two (one left and one right) ribs further spaced to each side of the center. There are two (one left and one right) angled (approximately 70 degrees) ribs on each side of the abdominal armor. There are two (one left and one right) angled (approximately 70 degrees) recessed ribs on each side of the abdominal armor behind the raised angled ribs that are black Any side shims added are to be added to the white areas of the armor. The center front detail consists of a raised rectangular panel. On the right half of the panel, there is a vertical column of 4 buttons approximately 7/16” (11mm) in diameter. The bottom button is blue while the other three are grey. On the left half of the panel, there is a vertical column of raised evenly spaced horizontal gear teeth with a recessed trapezoid at the top of the column. The rectangular inside bottom of the trapezoid is black. The left front detail consists of a raised rectangular panel with an angled top. There is a vertical column of 4 buttons approximately 7/16” (11mm) in diameter. The bottom button is blue while the other three are grey. The right front detail consists of a primary raised rectangular panel with an additional secondary raised rectangular panel covering the top 1/3 of the primary panel. There is a column of three thin horizontal evenly spaced raised lines across the top ½ of the secondary panel. The abdominal armor is accurate in detail and proportion to official references. OPTIONAL Level two certification (if applicable): The cod armor is separate from the abdominal armour. The right front detail panel is centered between the two outer vertical right ribs. The left front detail panel is centered between the two outer vertical left ribs. OPTIONAL Level three certification (if applicable): The abdomen armor has two horizontal recessed rectangles centred above the center front detail panel and on each side of the center rib. All 8 Button details are recessed and bordered with a thin edge, only the recessed portion is painted. The center front panel column of raised gear teeth has only 9 teeth. There is a recessed edge (approximately 1/8” 3mm wide) along all four sides around the face of the center front panel The right front detail panel is centered between the two outer vertical right ribs. The left front detail panel is centered between the two outer vertical left ribs. There is a recessed edge (approximately 1/8” 3mm wide) along the sides and top around the face of the left front detail pane The abdominal armor back cover plate has two protruding tabs along the bottom that rest inside the back hard belt. Move to "kidney armor" section. Cod Armor Moderate to heavily weathered 8/24/2022 The cod armor consists of a body shape formed triangular plate with a raised center rib and raised lower portion and is accurate in detail and proportion to official references. The cod shall be a separate piece from the abdominal plate 8/31/2022 Removed from Level Two certification. Having this as a level 2 requirement instead of basic may lead people to use OT amor in constructing their kits or create abdominal/ cod pieces that are not accurate to any available references for this costume. OPTIONAL Level two certification (if applicable): The cod shall be a separate piece from the abdominal plate. OPTIONAL Level three certification (if applicable): Kidney Armor Moderate to heavily weathered 8/24/2022 The kidney armor is separated in the back and covered by a rectangular kidney/ trauma plate. 8/31/2022 The rectangular plate is separate from the posterior armor and sits above the rear hard belt. 8/31/2022 OPTIONAL Level two certification (if applicable): The kidney/ trauma plate is large enough to cover the entire gap present in the rear of the abdominal armor and extends up underneath the back armor. 8/31/2022 OPTIONAL Level three certification (if applicable): The kidney armor cover plate has two protruding tabs along the bottom that rest inside the back hard belt. Posterior Armor Moderate to heavily weathered 8/24/2022 The posterior armor shall be a separate piece from the abdominal armor OPTIONAL Level two certification (if applicable): Belt Moderate to heavily weathered 8/24/2022 The Ammunition belt consists of a hard belt made of the same or similar material as the armor in two separate parts front and back (with overlap). The back front belt overlaps the front rear belt on the sides. 8/31/2022 There are 6 ammunition boxes mounted to the belt. There are 2 (one left and one right) drop boxes suspended by black webbing approximately 2" (50mm) wide. Drop boxes must be accurate in detail and proportion to official references. The ammunition belt is accurate in detail and proportion to official references. OPTIONAL Level two certification (if applicable): The only detail visible on the front belt is the mounted ammunition boxes unlike the squares present on ANH belts. The top edge of the front belt has protruding teeth that nest inside gaps between the ribs and detail panels of the abdominal armor. The two center ammunition boxes are thinner than the other mounted ammunition boxes. The second and fifth mounted ammunition boxes are slightly wider than the two center ammunition boxes. The two outermost ammunition boxes are almost square. The two drop boxes are rectangular and as wide as the mounted square boxes. OPTIONAL Level three certification (if applicable): The ammo boxes across the front are all made separately from the main belt and are secured to it The two drop boxes hang no more than 1” 25mm below the front belt and the black strap is visible. The second and fifth mounted ammunition boxes have a trapezoid detail on the top of each ammunition box. The trapezoid detail is a triangular prism that has no rounded edges. 8/31/2022 The front belt protrudes past above all mounted ammunition boxes above and below by approximately 1/8”-1/4” 3-6mm. The front belt protrudes approximately 1/2" below the front 4 ammo boxes in a trapezoidal shape that extends from the center of both medium sized ammo boxes where it tapers to 1/8"-1/4" (3-6mm) below the ammo boxes across the remaining span of the belt per the official references. 8/31/2022 All ammunition boxes, including the drop boxes, have slightly bevelled chamfered edges on the face of each box. 8/31/2022 Thermal Detonator Moderate to heavily weathered 8/24/2022 The thermal detonator consists of a grey tube approximately 3” 76mm in diameter and 8” 203mm long approximately. There are two white endcaps and a white control panel. The white control panel has a horizontal row of white rectangles along the bottom of the control panel and a grey “D” shaped recessed on the left side of the horizontal row. There is an oval greeble that protrudes from the control near the top right side. The thermal detonator is mounted to the rear hard belt and there are no visible screws or clips and is accurate in detail and proportion to official references. OPTIONAL Level two certification (if applicable): The thermal detonator mount should be fully enclosed with solid walls on all four sides. The center of both end caps is gray. OPTIONAL Level three certification (if applicable): The control panel bottom detail is a raised panel with 7 raised rectangles, all are evenly spaced except the right most rectangle. There is a panel line approximately ¼” 6mm from the edge around the control panel. There is a panel line approximately 1/8” 3mm from the edge of each endcap. The inside edge of both endcaps is bevelled. The oval greeble consists of an oval tube protrusion with the top edge slightly extending past the tube wall thickness and is visually similar to the Deathtrooper chin greeble. The thermal detonator is made separate from the mount and secured to it. 8/31/2022 I added this due to the number of instances in which we've seen the TD disconnected from it's mount or missing on screen. Similar to the belt boxes, the TD should be separate, but fixed to the mount appropriately as per the screen references. Thigh Armor Moderate to heavily weathered 8/24/2022 The thigh armor is mirrored for each leg and not interchangeable. The cover strips are bevelled and approximately 1/8" thick that does not extend beyond the thigh and has a smaller cover strip layered thereon. The top edge of the thigh armor is unadorned, and the bottom edge has a raised detail that fallows the bottom edge contour. The small ammo belt consists of 5 evenly spaced rectangle ammunition boxes and is installed on the bottom of the right thigh, there are no visible screws or rivets. OPTIONAL Level two certification (if applicable): Thighs are loosely held closed in the back with elastic, shock cord (bungee cord) or white Velcro and are designed to remain flexible. 8/31/2022 Thigh armor has been seen several times separated (flexible) in the rear, but never worn in the same manner as the arms (bungee cords/ framilon cordage). Cover strips will cover both the front and rear joints. Rear cover strips will close outside over inside, i.e. left over right for the left thigh and Right over Left for the right thigh. 8/31/2022 OPTIONAL Level three certification (if applicable): The bottom outside edges of the small ammunition belt are angled chamfered at approximately 45 degrees. Thigh armor is suspended by a black strap approximately 1” 25mm in width with a plastic side release buckle tri-glide buckle that is covered by black webbing fabric or elastic that runs down the side seam of the leg. 8/31/2022 Lower Leg Armor Moderate to heavily weathered 8/24/2022 The greaves are mirrored for each leg and are not interchangeable. The top edge of the greaves has a raised detail that fallows the top edge contour. The bottom edge of the greaves flairs out to cover the top of the ankle and boots. The cover strips are bevelled and approximately 1/8" thick that does not extend beyond the greave and has a smaller cover strip layered thereon. Greaves are loosely held closed in the back with elastic, shock cord (bungee cord) or white Velcro and are designed to remain flexible. Cover strips will cover both the front and rear joints. The trapezoid knee plate (sniper knee plate) is affixed to the top of the left greave and there are no visible screws or rivets. Sniper knee plate must be aligned with the vertical cover strip and the top raised edge detail on the greave and is accurate in detail and proportion to official reference. OPTIONAL Level two certification (if applicable): The sniper knee plate has raised detail that fallows the top edge contour. The sniper knee plate has 3 trapezoidal lugs on each side and 2 on the center bottom edge (totalling 8) of the knee plate. OPTIONAL Level three certification (if applicable): Boots Moderate to heavily weathered 8/24/2022 Boots are above ankle height and the same style as the First Order TK. Chelsea type boots in the style of OT TK are not acceptable. Boots are all white and made of leather or leather-like material Flat black soles without a heel. Patent leather or high gloss is not permitted. OPTIONAL Level two certification (if applicable): There is no seam present on the front of the boot. The wearer's inner side of the boots have zippers and no side elastic. OPTIONAL Level three certification (if applicable): Optional Accessories Items below are optional costume accessories. These items are not required for approval, but if present appear as described below. If adding in an accessory after initial approval, the item still needs to be submitted to local GML for approval before use. E-11 Blaster Weathering is optional 8/24/2022 Manufactured by BlasTech Industries, the E-11 is standard-issue for many Imperial troops. Light, compact yet powerful, the E-11 blaster is always in high demand throughout the galaxy. "Note, the E-11 holster as seen in the Original Trilogy movies is not an authorized accessory for rogue One armor". Based on a real or replica Sterling Airsoft Gun, Sterling Sub-Machine Gun, scratch-built, or a modified commercial toy Stormtrooper blaster. A small flashlight shall be mounted on the right side of the blaster centred over the T-Tracks. OPTIONAL Level two certification (if applicable): Blaster shall be based on a real or replica S&T Sterling L2A1 AEG Airsoft Gun. (Folding Stock does not need to function) D-Ring shall be present on the rear end cap. Scope shall be a real or replica M.H.R. (Minneapolis Honeywell Regulator Co.) M38 Telescope. 1943 model is preferred. Counter shall be a real or replica Hengstler 400 Series counter. Eagle logo is preferred. Power Cylinders shall be mounted on top of the magazine well. R1 style power cylinders are preferred over ANH style. 6 rows of T-Tracks cover the Sterling receiver holes except for the lower left row with the bayonet lug. Flashlight shall be a real or replica Element M300A Mini Scout Light. 3D printed blasters can not contain visible print lines and must be sanded smooth for a more realistic appearance. OPTIONAL Level three certification (if applicable): Scope shall be a real or replica 1943 M.H.R. Co. M38 Telescope, 1942 model is not allowed. Counter shall be a real or replica Hengstler 400 Series counter with Small eagle logo. Large eagle logo is not allowed. Power Cylinders shall be R1 style, ANH style is not allowed. SE-14r Light Repeating Blaster Weathering is optional 8/24/2022 SE-14r Light Repeating Blaster. The barrel detailing is evident with the cocking lever and slider in place. The ejection port is also evident. The scope mount looks similar to the magazine but smaller in size. OPTIONAL Level two certification (if applicable): E-22 Blaster Weathering is optional 8/24/2022 Based on a real or replica Sterling sub-machine gun, scratch-built, cast, 3D print or a modified commercial toy Stormtrooper blaster. It has a extended stock attached at the rear and a extended front housing with second lower barrel. Tactical flashlight (Surefire scout M300 or replica) mounted on right side of barrel. Magazine is extended length. Power cylinder is larger with 2 outer cylinders and 2 smaller central cylinders Scope is a M38 1943 version Scope rail is fitted onto rail blocks, one inside the rear sight and the other at the front end of the rail. There are 3 swivel studs fitted, one on the rear stock and one each side of the front barrel housing. Sling is 25mm webbing strap that is adjustable using a silver 25mm 3 fixed bar webbing buckle (optional). Sling is fitted with Talon quick release 25mm swivel or replica (optional). Red lights fitted on both sides of the rear housing, Hengstler fitted with a red light for the 3 forward tubes and 2 small red lights fitted into the rear barrel housing under the torch, the lights are permanent and are non flashing or pulsed (optional hero version only). OPTIONAL Level two certification (if applicable): Base is based on S&T Airsoft sterling with closed working parts (no spring) Screws used are M4 x 25mm Allen screw/bolts and sunken Allen screws for power cylinders Sling is fitted with Talon quick release 25mm swivel. Pauldron Rogue One Pauldrons denote rank or mission specialization. The Rogue One Pauldron is specific to Rogue One and differs from the original trilogy in color and stitching. Original trilogy Pauldrons are not an authorized accessory for Rogue One armor. An Orange, white, or black ornament made of leather plastic or leather-like material, worn over the right shoulder. The Orange is specific to Rogue One and a different shade from the original trilogy. A red pauldron as seen in The Mandalorian Chapter 14, may be worn as part of the New Generation TK costume, but not as a Rogue One stormtrooper. 8/31/2022 The colored panel is divided into three sections by color matched stitching to conform to the wearers shoulder and has black piping around the outside edge. The remainder of the Pauldron is black and divided by black stitching into 10 segments. The neck closure is black and has two black snaps visible. There is a black elastic strap that runs from back to front and is worn under the bicep to hold the Pauldron in place. The strap is conned to the Pauldron on top by two black snaps inlayed in black “D” shaped leather or leather-like ends. The underside of the Pauldron is white regardless of top color and is divided with white stitching into 13 segments. The entire outside edge is finished with black piping and the underside of the neck closure is black. OPTIONAL Level two certification (if applicable): OPTIONAL Level three certification (if applicable):3 points
-
Finished! It was difficult to figure out this weathering technique, but it worked in the end. I wanted to replicate the weathering of the troopers in the Kenobi show on Mapuzo, the ones in that truck/transport scene on the mining planet. They had this great dusty-wiped-clean-to-white look. Some were more heavily dusted, and others less (see reference pics). The trick would be to make a permanent paint look. I had some detailed close up pics from a stunt performer on the show, who said I can identify him here on these forums: fellow 501st Legion member Ardeshir Radpour @equuspolo (again, sorry but they are not able to be shared here). The photos showed some of the “dust” effect was beading up, like acrylic from an airbrush would on glossy paint. After a test, my hunch was right. I used some Vallejo acrylic airbrush paint (black and US earth brown), diluted with some Liquitex acrylic airbrush medium. Sprayed from a distance, at 10 PSI, this got the faint dusty look. I tried quickly wiping it with a soft rag with alcohol, but that smeared it. I had to remove a lot of that first coat with rubbing alcohol, which left a patchy residue (but that added to the overall grime texture). Next I tried the same mist. Let it dry a few minutes. This time used water and a coarser rag (a piece of khaki twill pants), and wet the area and scrubbed the acrylic paint off. Acrylic, though dry in a few minutes, on a glossy surface is still sort of removable with water and light scrubbing for a few hours. Using my fingernail behind the wet fabric I could make a line or scrape area. Bit by bit, I hit the high points and any other areas, removing brown. This technique was not easy, a little frustrating, because if you scrub too hard, you remove it all in a patchy way, but you want to just get some of it. It is a fine balance. Finally, some brushed on acrylic black marks on high points here and there like it looks on the references, and a few patches, which is done much like movie clone armor has. To weather the black parts, I used some grey Fuller’s earth dust on the corners of the lenses, in the cracks on the vocoder, and hovi tips to give those black areas some dust in the recesses. Wiped it off with a rag, and because these are going to be hard to contact, they are not permanently bound to the surface (they should just stay like real dust would). Finished! Here are the results, shot in sunlight to compare to the sun-lit scenes on Mapuzo:3 points
-
Like a charm. Here it is after a quick boil bath.3 points
-
I went back to 100, 400, 800, 1500, 2000, and 2500 grit sandpaper on the back left thigh ridges. The result is was a small split along the seam of the shim. As you can see, I’d already taped off where the ABS paste was going to go. I find that when using external (visible) areas where ABS is going to be applied, minimizing the spread of the ABS saves a LOT of time and energy. You can see the extent of the external work I did below. If you look mid left in the photo you’ll see a small ABS line from a fill I did during this process. You can see how contained it is. This makes blending the ABS fill considerably easier and limits the collateral damage from your sanding. In addition to the exterior ABS I did a little shoring up on the inside of the thigh for extra support. It ain’t pretty, but it does the job. I’ll sand away any snags once it’s hardened, but because this is on the interior I really don’t care how it looks. It’s just added thickness and support for the sanded areas. Once the ABS hardened I grabbed by 100 grit and got to work. Once it was sufficiently sanded I grabbed my 400 grit and did another thorough sand. I followed this with lighter touches on the 800, 1500, 2000 and 2500 grits. The result is definitely getting there! Compared to where I started this is night and day. Depending on the light, the ridges can be less or more noticeable so there’s still some work to do. With the bowing of the shim I have in the left thigh, I’ll probably always have a slightly noticeable “bump” there, but it shouldn’t be too bad. I’ll keep at it. Hopefully have some final photos once these are polished up for everyone to see by the weekend.2 points
-
In my case, after the first crack , I had to reinforce that area with a piece of ABS . Since that, I have put on the armor several times with no problems. (always taking care when attaching that section)2 points
-
Ok, almost immediately after posting that, I noticed that in the Remnant picture I included, the trooper is wearing a belt we haven't seen since the Rogue One promo shots. This was removed in pre-production for the film, but has apparently returned.2 points
-
Thanks everyone. And special thanks to Justin. He’s got a talent for this kind of stuff for sure.2 points
-
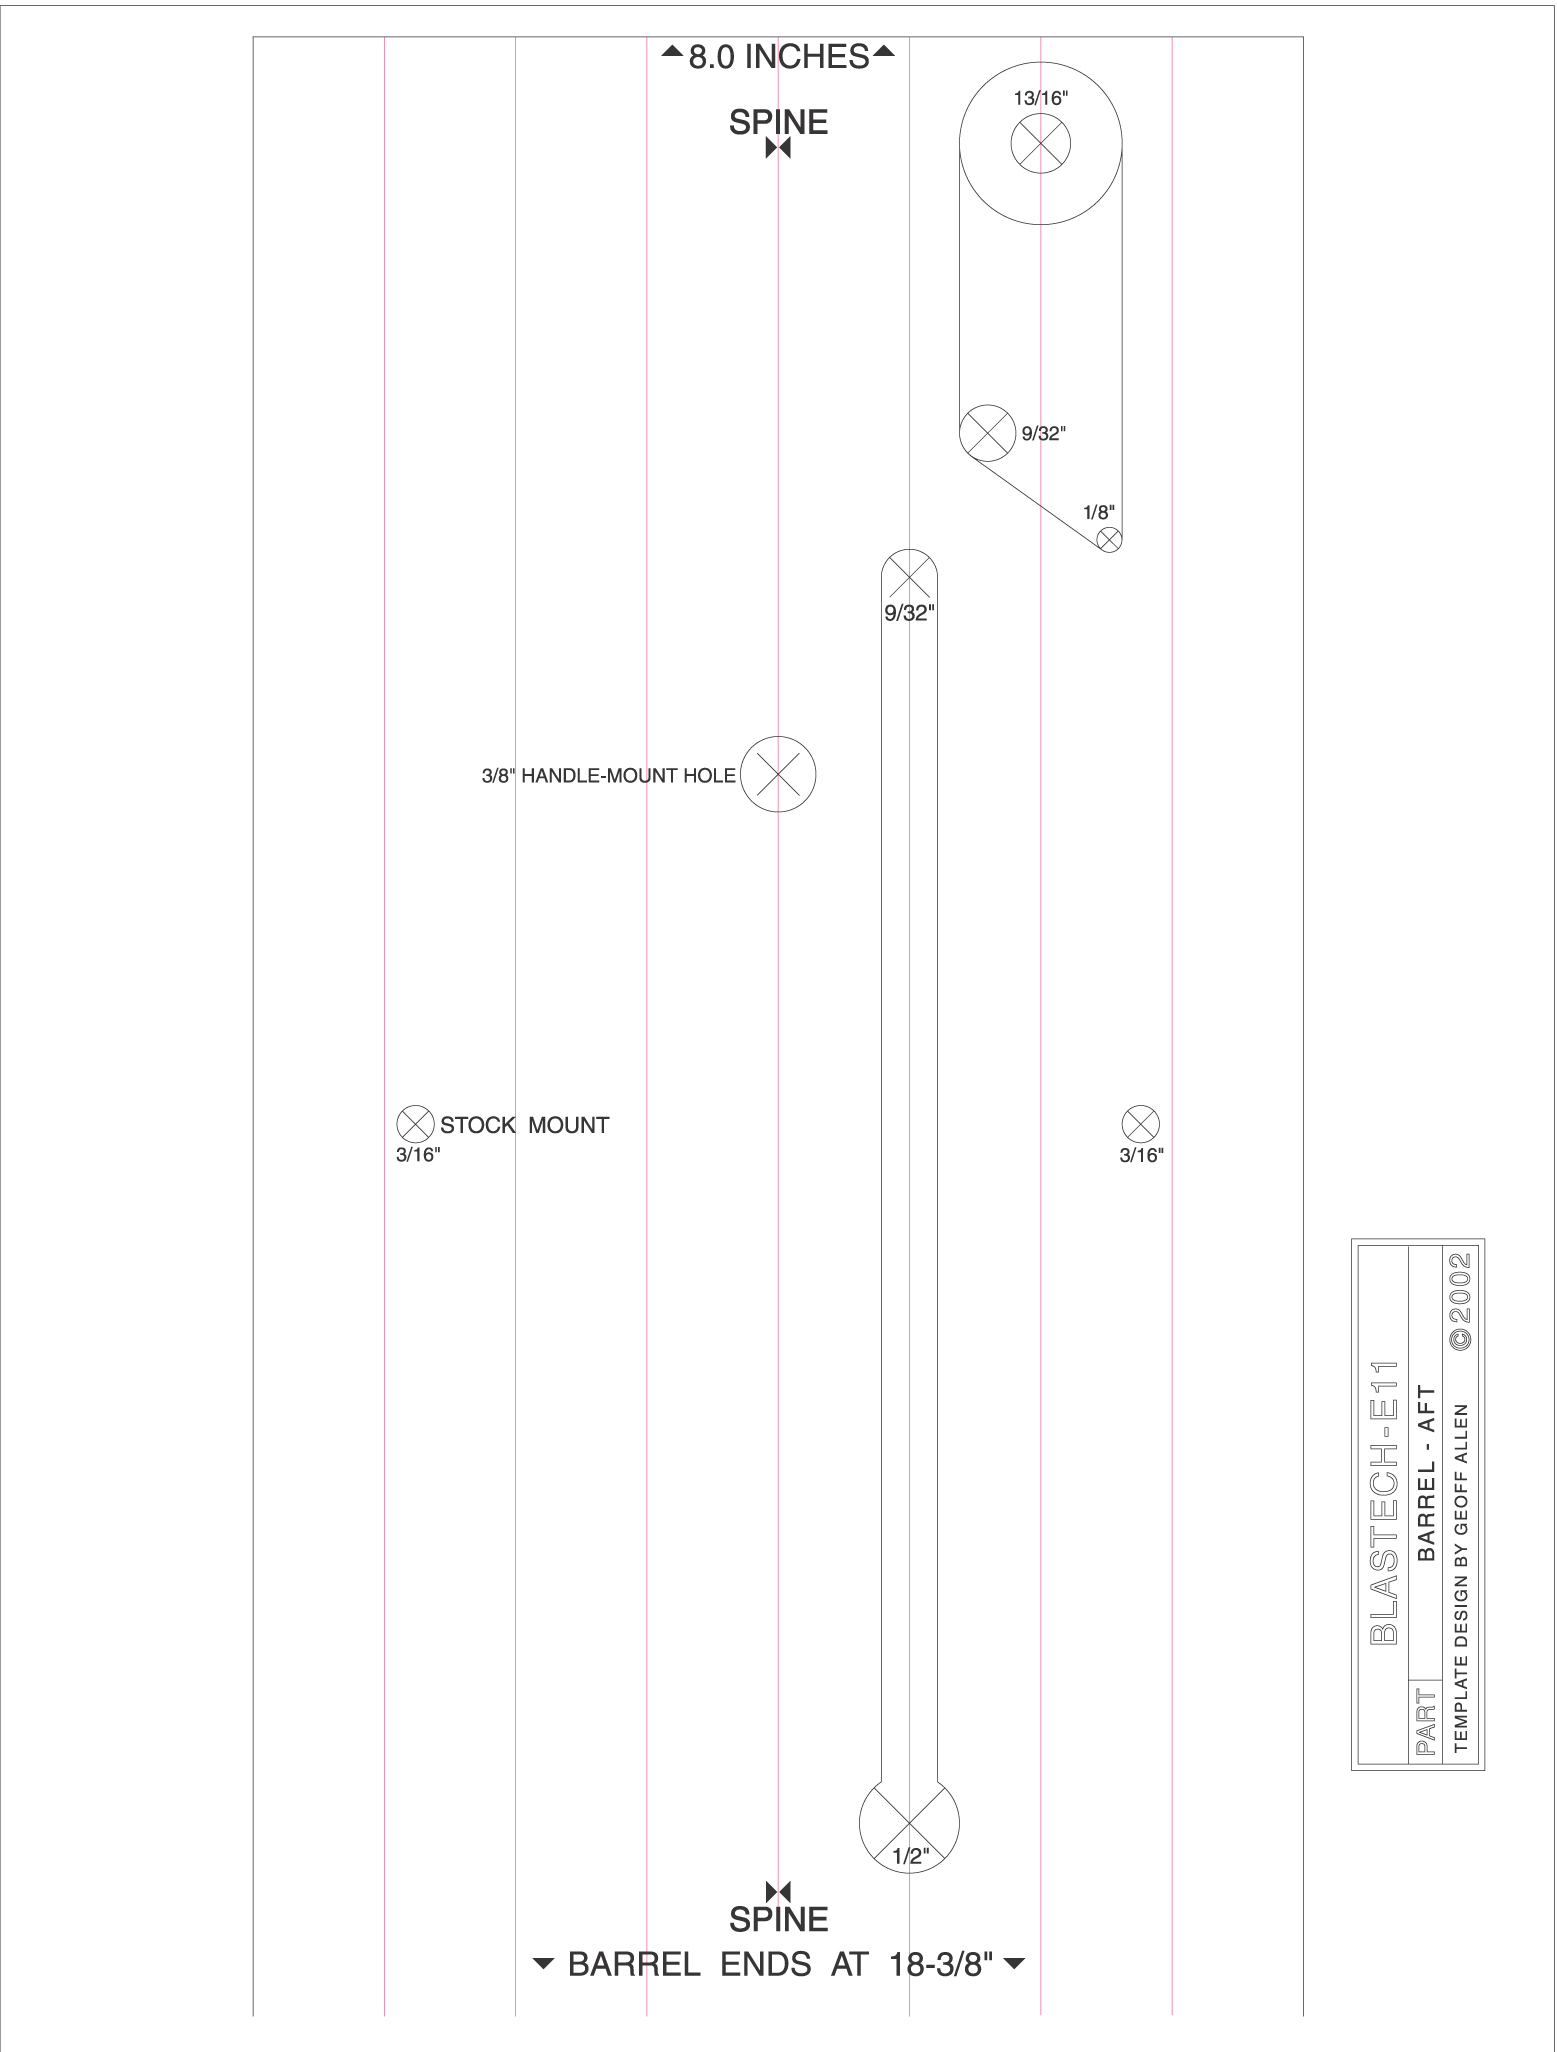
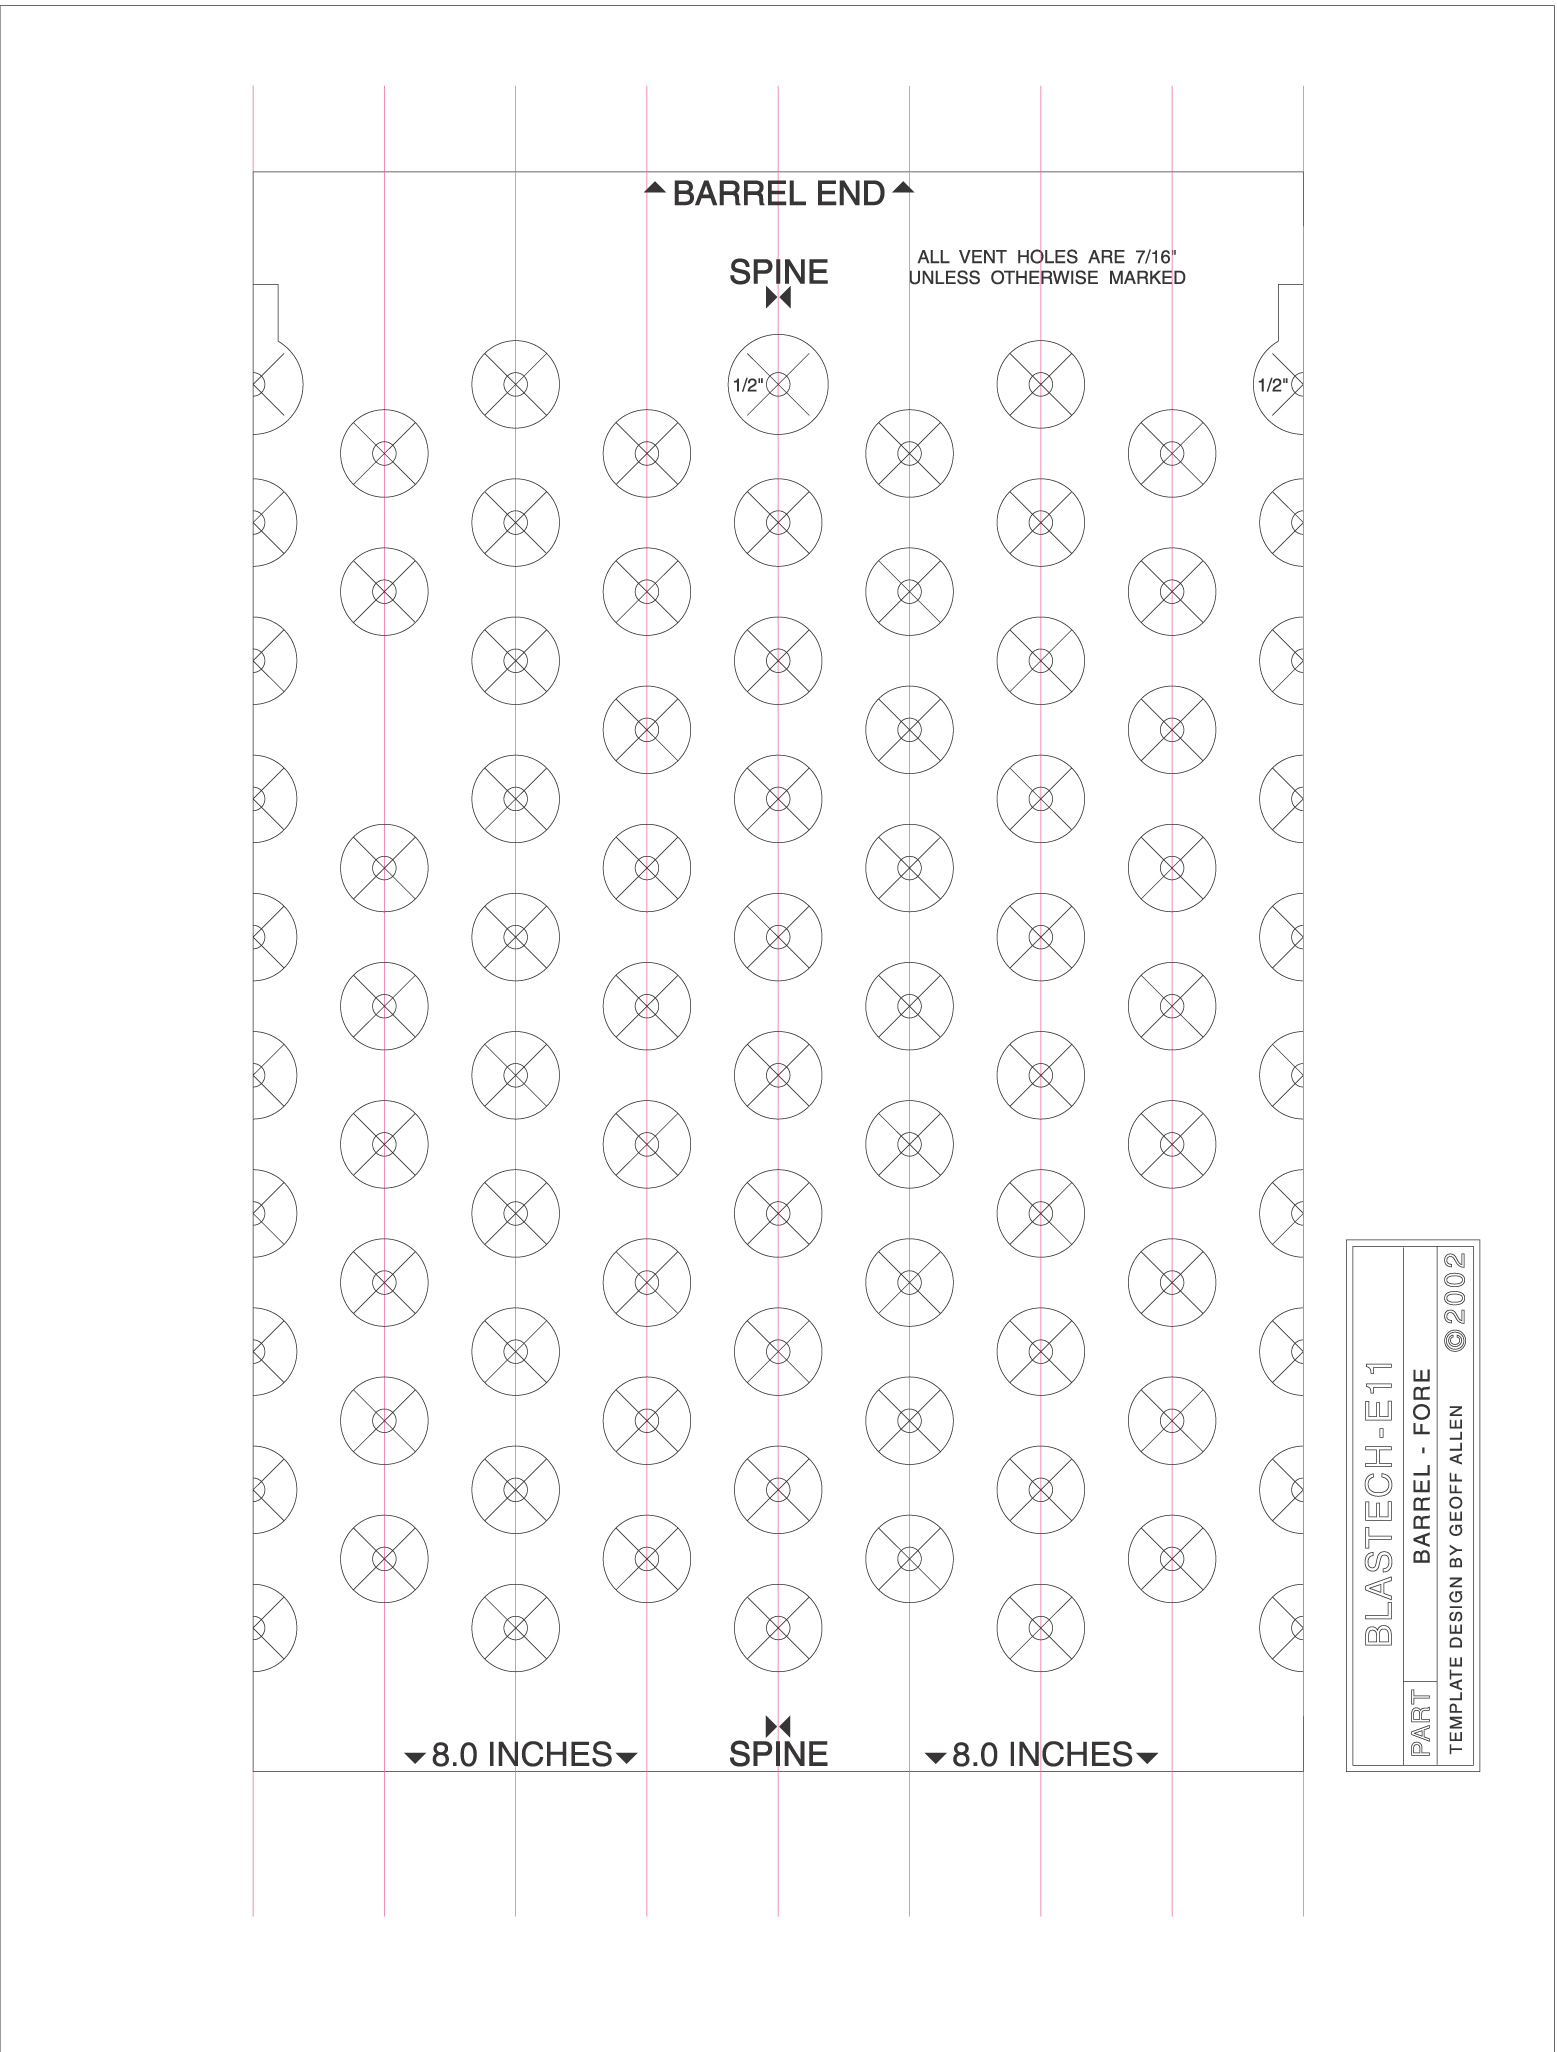
E-11 Pipe Templates E-11 pipe templates are no longer working in many threads and builds, posted here so they are not lost for ever. Letter - Imperial Letter.40mm.TubeTemplate.pdf A4 - Metric A4.40mm.TubeTemplate.pdf

 2 points
 -
Some great references here1 point
-
I added some extra ABS along both the insides, unfortunately it's a part which needs to flex getting it over your arm gaskets it's inevitable cracks will form.1 point
-
Great work trooper1 point
-
Excellent work, really good eye for the details.1 point
-
Awesome work Colin!! If one day, if you decide to sell or modify BS Helmets by commission let me know.1 point
-
No, I already have my ANH TK, and that is what I troop in. This was just a way to make my second yellowing Black Series helmet into something more accurate, and now it is back on display. I loved the challenge, and also have a new-found love for the ROTK details in the helmet. That Vocoder and the tube vents, along with my discovery of the actual vents in the tears and traps, have made me love it all the more.1 point
-
That's a thing of beauty!! Are you gonna do a full suit to go with it?1 point
-
I’ve been going over the pieces and I would say the plastic is fine, as a plastic kit goes it’s not flimsy per say. A good quality kit all in all.1 point
-
Fantastic job on the weathering, Colin.1 point
-
Hi Elijah. Welcome to FISD. Bellow you can find some Building resources for Helmets. Take a read and let us know for any assistance . Helmet Assembly1 point
-
Hi Chris, That is very kind - thank you for the offer. Thankfully, details are not super important with the "LFL Promo Trooper" version. Looking a the photos of the original prop, it is my assumption that the studio made their own Frankenstein version. I assume that they had an original Remix-Favor and made some moulds from it, then just stuck parts together in a fashion that they liked. I think this because the main body/barrel is rotated incorrectly compared with an original Remix. Also, the scope has been filled, as has the muzzle. The area at the back where the stock would attached is also different on the 'Promo' version. This is why I ditched the Thingiverse version - it was based on how a Remix should look (as most appear to be), not how the Promo Trooper version was for the photo shoot. This file from DD has both the original body and the LFL PT version. YAY!! As always with me, I'm aiming for mega-nerd levels of detail... lol1 point
-
A few people recommended filler primer before continuing to sand that actual 3D printed part (so as not to lose detail). I followed this advice and picked up a can of Filler Primer from my local Halfords (car spares and accessories) and started spraying. As below, I kept some of the parts separate to get a decent coverage. *For reference, I did around 3 coats across all of these parts and that used up a single can of paint. After some initial sanding, here’s how it was looking. I then introduced a little wet and dry sanding. Although some lines are still visible, many parts are now feeling very smooth. As always, more to come. :-) Dan1 point
-
Hi Elija Ok so lets start with the standout point first, the frown as it is called. The grey paint shouldn't go past the end of the teeth onto the gums as it has in your photo. Below are multiple screen used helmet examples to help you rectify this area. You can scratch away excess paint using toothpicks dipped in Mineral turpentine, as it is mild enough to use on ABS without melting it. Next the brow trim is slightly crooked, this can be fixed by re aligning the face plate. you may need to relocate some of the screws that hold the back n cap and face plate together to achieve this, unless the rubber U trim is simply not on properly. Here are some various Brow trim images to choose from to set your trim height and level. The Vocoder (black chin section) does indeed need a good clean up, you could use the toothpick and Turps method here first then go over it with a new coat of paint to tidy it and get it looking closer to a screen helmet. Head to our gallery section link below for these and many many more images to use as reference while re building your helmet. https://www.whitearmor.net/forum/gallery/category/39-specific-parts/1 point
-
Ooooo. Excellent timing! I sent funds for my own ROTK armor set earlier today. I'll try to contribute some useful photos to this thread.1 point
-
I certify Justin has served as my armorer and have spent at least 30 minutes providing hands-on help, trimming, building, and/or fitting of my armor. Currently pending EIB approval1 point
-
Very nice Dan, finished product is going to be beautiful I know.1 point
-
FYI you could release some pressure from the ear screws and reduce this gap at the top of the ear by adding a step to the ears1 point
-
Thanks for all the feedback and EIB approval. I will defo be correcting the things listed for Centurion as soon as I can.1 point
-
Welcome to Expert Infantry Michael! Well done!!!1 point
-
Congratulations Michael!!!1 point
-
1 point
-
Great to see Dan, looking forward to seeing your build1 point
-
Looking good, any gap at the wrists will be taken up with our gloves, some us with skinny are add some foam inside so the forearms don't rotate.1 point
-
I HAVE RECEIVED MINE! THE WAIT IS OVER! I don't know what I was expecting, I guess a set more like the troopers at Disney, hence why I ordered the premier kit, but the parts shipped seem flimsier than expected for the smaller pieces. To be fair, I have not even unpacked or begun trimming/assembly, but I did ask DN if they'd shipped the premier parts. Apparently the body parts are the same - the only thing that make a kit premier is the helmet? Is that a Denuo Novo thing, or did the original Anovos order list different body armor material and quality as well as the helmet? (Have not yet received Premier Helmet - TBD on production delivery of those. Luckily, i have a non-premier FO helmet I can use in meantime... assuming I can figure out eh 80-page assembly book. ;-) time to start perusing this site in earnest and stop "lurking"! Again - first time owner & builder of any prop armor, so it could be all good and when I trim, assemble and so forth it will appear more formidable, but for now, it seems flimsier than I would have imagined.
 1 point
 -
At long last…this will be a day long remembered….1 point