Leaderboard


Popular Content
Showing content with the highest reputation on 04/03/2022 in all areas
-
The work done on this is amazing. I have 2 Disney blasters I gutted for the electronics and was thinking to junk the shells but after seeing what Hideya has done I am considering to convert them.2 points
-
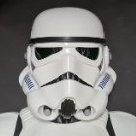
Hi everyone. Here's my modification of the Disney E-11 blaster. After seeing the various Disney blaster builds on FISD and seeing how much fun they were having with this very inexpensive, practical, yet quite accurate (?) blaster , I decided to try it myself. I started the build back in February 2020 and took about a month. Even after all the trooping and transportation and drops, it's still in good condition and is still my trusty side arm! My rules were : 1. Use only the basic tools and material I have. Keep it reasonable. 2. DIY extra parts if necessary. No resin parts, no waiting for any package to come. 3. Scavenge the electronic for another project. No pew pew on this build. 4. E-11 Reference guide and everyone's build was very much studied but accuracy not important so much. 5. Have fun. The blaster was about Japanese Yen 2,500 on the net, which was the original retail price. (approx US$20), They no longer sell it at Disney but they still pop up on the net every now and then so it is still available if patient. At least in Japan where I live. Anyway here's the Disney blaster. Here's the blaster taken apart. Electronics were taken out for another project. Muzzle, magazine well, Hengstler counter sawed off with a rotary tool. This was to start with a clean receiver which I would reattach the parts later. Remaining T-tracks shaved off, holes on the outer barrel manually drilled. The gaping hole where the Hengster and scope was fused together and sawed off were patched up with styrene board/ epoxy putty / normal Tamiya putty. The scope was missing a quarter of the body because it was take apart from the receiver. Same materials and procedure was used to close up the gaping hole as well. After all the patch up work, then lots of shaving with a box cutter, metal file, sand paper and patience cleaned up the surfaces. Henglster in the photo was scrapped and swapped with a DIY one in the end. Inside painted matt black. Here's a close up of the patch up job of the parts. Finally ready for painting. Typical of my project, Tamiya's rattle can was mainly used. Gray Tamiya surfacer, then Tamiya's matt black, then Turner's iron colored texture paint and Tamiya's matt black as final coat. Tamiya's semi gloss clear was sprayed to keep the surface consistent.1 point
-
I fitted and glued the back end and main body of the DLT-19. This is ready for sanding and filler. Also cut and fit a wood dowel to strengthen the barrel. Glued and epoxied the first section of the barrel. Then I set the dowel in E6000. Going to let it dry and cure for 24 hrs. Top pick is a test fit.1 point
-
Completed mic tips. Thanks, M1 point
-
Thanks Glen. For some reason that first pic you sent didn't come through, but those others are great. Thanks, M1 point
-
A few more references1 point
-
Probably a reflection of light, the inside stay white and also the rim, although this was just rubbed off black paint showing the original color underneath
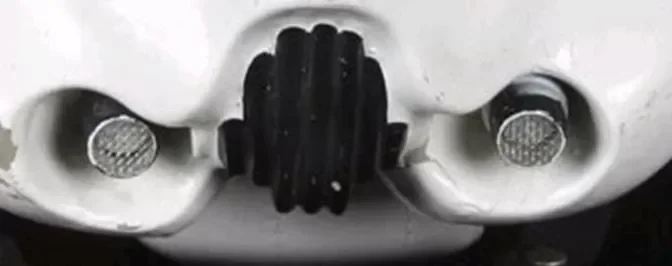 1 point
 -
Even with cut outs we still can't bend our knees fully, makes for an awkward looking crap walk getting up stairs. Nice work on those cut outs1 point
-
2.5cm (1") Between top of holster to bottom of belt Updated versions with variant spacing1 point
-
Thanks! And I will definitely have to remember that for the future! Haha. Don't want to walk around as a half-dressed trooper!!1 point
-
Wow! Looking fantastic Mario! Good luck [emoji106]1 point
-
Nice work on the leg cutouts! Looking sharp. Don't forget about the elastic to help keep the shoulder straps down. I did an event where I forgot to use them and it still haunts me to this day.1 point
-
Some more photos. Muzzle and front sight was replaced with DIY'd one. Here's the original and modified side by side. Yes, I couldn't help myself from buying another clean original Disney Blaster. I'm going to keep this as it is because why not ? Comparison of the right side. Side by side comparison. This build was completed with only the basic tools and material I had. No resin parts, no printed parts. Just styrene plates, epoxy putty, sandpaper and patience. Hoping this may become some reference to anyone looking for a inexpensive reasonable and fun build.1 point
-
Nice work Matt. If I may, since you're building an ANH -S version,, I would suggest to improve the look by raising the brow trim a little to get a more ANH sight look than the Hero one. References Hero helmet keep it up.1 point
-
This is how I applied Turner's texture paint. Photo is actually from another E-11 project of mine but is the identical procedure. Got an old sponge from the kitchen and just kept dabbing a small amount of the paint onto a small area and keep dabbing till it's almost dry. Then repeat the procedure again and again till it covers with entire area. I found this worked the best for me. I recommend testing various amounts and procedure on a scrap material till you find the finish you like. Mine turned out like this. Again this photo is from another project but I think you get the idea.1 point
-
T-Tracks were made by gluing together 1mm thick styrene plates. The tips were heated with a lighter and bent into position in the holes of the outer barrel. There were several T-Tracks which burnt up and shriveled being too close to the light flame. I simply made another and tried again till I got it right. Muzzle was made from layering several sheets of styrene sheet and carefully cutting and sanding to a round shape I wanted. Hex bolt was installed in the muzzle for a realistic look. Hengstler counter was DIY'd from styrene plates entirely. For the numbers in the rear, I scavenged the inner parts from an actual counter from a 100 yen shop and glued it in the newly made counter. Here's the blaster during the primer. Aluminum scope rail is not yet install in the photo. The long slot in the receiver was cut out by repeatedly scribing the surface of the receiver with a ruler and box cutter.1 point