Leaderboard

.thumb.jpg.6d328112c293e966a129e9e62a88b910.jpg)


Popular Content
Showing content with the highest reputation on 11/21/2021 in Posts
-
I started working on my SHA. Because it's nice to be able to hear things outside the helmet... and I kinda can't so much right now. And also because I got some spiffy new headphones! This is a set of cheap Sony headphones. They're not quite over-the-ear like my nice Bose noise cancelling ones. They kinda sit on the ear. For $18 on amazon, they seemed like an inexpensive test of having real headphones in my bucket. I figured they can always be swapped out for ear buds if I can't fit everything inside. They're model MDR-ZX110 if anyone is interested. My original plan was to just hot glue the SHA in these nice little holes I drilled in the helmet 2 years ago and call it good. But grinding from the fans made that an immediate non-option. I tested it with the headphones out of the helmet and the fans running (so I was standing next to the helmet while holding a headphone to my ear) and the fan noise... dang. This is my test fitting of an outside-the-helmet mounting. I made some pencil marks at my approximate ear hole locations and test fitted the ears back on to see how much room there was for the SHA mics. And there was room! Plenty in fact. And the wires allow this sort of mounting! Everything is coming together. Seeing the excellent ideas in this thread, I scoured the garage for some foam to isolate the mics with. I used some high-impact seat foam I had sitting around to make ear-recess sized foam isolators. They're about 32mm by 16mm and wedge into the ears quite nicely. Hollowed out... And mics in place. The mic bottoms out on the canvas backing to help keep the ear packet as slim as possible. Gaffer taped in place for testing. It's not a real TK without gaffer tape, right? No blue foam is visible. That means I got the mic lined up right with the holes. Finished off with some spare packing foam that was rattling around the shop. The idea of this is to give a bit of insulation for the entire ear from the inner helmet. And it works great! I didn't take a pic of the re-assembled helmet yet, but the ears snug down just as they did originally with all the extra stuff inside. It works better than I hoped. Fan noise with the helmet on and SHA running is precisely as loud as it is inside the helmet without the SHA running. So, while I can still hear the fans, the mics aren't picking them up at all. It's just what I hear inside the helmet anyway. And what I hear OUTSIDE the helmet - wow. I had no idea they would be this good and powerful. While tinkering with the helmet in one room, I could clearly hear my wife and daughter talking quietly in the next room. With my bucket on! I could not hear them with the bucket off. Loving this upgrade. I just need to finalize the headphone mounting and my bucket will be packed with tech.2 points
-
Hey Guys! TK19984 of the UKG here. Been pointed in this direction as I am looking to improve my ANH: Stunt TK to hopefully EIB and then Centurion Standard. Hopefully speak to you all properly soon1 point
-
Thanks for all the responses and tips! Much appreciated! I’m going to work through all of them, retake photos and the post again once done. Watch this space! Sent from my iPhone using Tapatalk1 point
-
Thanks - i've set up a thread as suggested: https://www.whitearmor.net/forum/topic/51667-tk19984-requesting-help-for-eib-centurion-pre-approval-points-of-improvement/1 point
-
Perfect, thank you!!!!1 point
-
Hi all, I have ANH hero armour and have been considering building Luke’s ammo belt complete with accessories (I am short for a stormtrooper so may as well embrace this while trooping). So a couple of questions: Does this affect my 501st approval and EIB status. Can anyone point me in the right direction on where I can source materials. Thanks, Tim1 point
-
Bending the ABS Belt by gazmosis, Boba_Skywalker3 Attaching Belt to Abs by GnrlGrievous Holster Placement on Belt by CableGuy Current (2021) Holster Placement by gmrhodes13 (follow-up to previous thread above) [NEW ADDITION] Belt Assembly by ukswrath Belt overlap Removable Holster All in one resources thread, go to for most info1 point
-
Hi Ben, welcome to the FISD !!! You can ask as many questions as you want...Of course, as Glen mentioned in the previous post, you can submit as many pictures as you want too. It will be a pleasure to help you reach EIB and Centurion levels.1 point
-
As you won't have access to the EIB area until you receive full TK access you could post some images in the Pre Approval area, even though you are approved it's a great way to get feedback for EIB and Centurion https://www.whitearmor.net/forum/forum/193-request-tk-pre-approval/ FYI if you are having any issues adding any images most of us use a free online image host Imgur, then copy the image links directly into our threads1 point
-
There is a forum limit to the amount of images a person can post, understandably with the thousands of members here we'd need our own server just for images. Most of us use a free online image host Imgur and copy the links to our threads, here is a great tutorial1 point
-
Hello and welcome aboard, once you have your TK access here you should be able to access the EIB section. Looking forward to seeing your application photos, good luck1 point
-
Hi Ben, welcome to FISD!! Glad to read your going for higher levels. You may want to check this Phot Check list for your submission Looking forward for your EIB App soon.1 point
-
Hi Ben, Great to see this post from you, and was great trooping with you yesterday. Looking forward to seeing your EIB and Centurian threads, and helping if/where I can.1 point
-
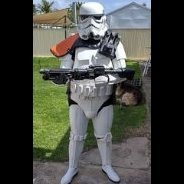
Immediately after receiving the status of TK, I was given the opportunity to participate in quite a large event for my first ever troop. I'm happy to report it went very well and I fit right in with my other TK brothers and sisters. I actually have several more troops lined up over the next month and I am very excited to participate in the full force of the legion. Long live the empire!1 point
-
If you have a set of needle files like these, evening out the insides will be super easy. I know you haven't reached that point yet, but when it comes time to paint be sure to keep the borders within the teeth areas and not let it extend into the gum areas .1 point
-
Glad to know that you found something to bond them with, so they are definitely not silicone. Note that Loctite Plastics Bonder is CA (super) glue and is pretty brittle when it cures. Because the guard and gloved flex when worn, it may be a good idea to keep an eye on the edges down the road in case the bond starts to fail in those areas and it starts to lift off. A little separation on the sides is expected, though. As for painting them, I wouldn't worry about it at this point in time. I believe they do contain at least some amount of latex, though, which naturally yellows with age and exposure to sunlight. This is not a big deal, but if they get too yellow, painting them would certainly be an option (the originals were painted latex).1 point
-
I'd like to thank TK-71384 for inspiring these memes by sharing what it's like to do Homeoffice and would like to credit her for the Stormtrooper Safety Briefing pictures1 point
-
I fitted the fore arms and biceps then glued the cover strips on. Originally I though 60 magnets would be more than enough. I was right if this is all of the gluing I plan to do in one sitting. Lol
 1 point
 -
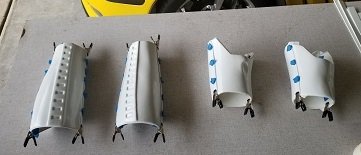
Hello everyone! With the glue tried on my snaps, I started on some strapping today! Regretfully, I didn't take too many photos this time around. I was too caught up in the work! Firstly, I did some test fitting of the chestplate and backplate with painters' tape in preparation for the shoulder straps. I've seen it suggested to reinforce the snaps on the shoulder straps with ABS since they're elastic instead of nylon. So, I first cut out and drilled four 2-by-1" rectangles of ABS.The straps themselves are 2" white elastic from TrooperBay. Then, I installed the female snaps. After another test fit, this time with the shoulder bells, I cut and cauterized straps for the bells and installed female straps in those, as well as male snaps on the underside of the shoulder straps. And the test fit so far! In that photo, there are no straps on my biceps or forearms—they're just sitting freely on my arms. Currently, the next set of snaps are drying inside the bells and biceps. I have a question about the forearms, but I'll come back to that in a moment. Lastly, I prepared my latex-ish handguards for gluing onto the black gloves (all from AP). I stuffed the gloves with plastic bags first to simulate hands. I can't remember which thread I saw this on. Probably several! My reading here on the FISD forums indicated that Loctite Plastics Bonding glue was just about the only glue that would hold these pieces together, so I tracked it down. I ended up finding it on Amazon. And there sit the gloves, curing until tomorrow: And that's where we are for now! As always, I welcome and appreciate your critique and feedback. On to my questions! 1: Does everyone attach their forearms to their biceps with a strap, or do some just let the forearms free-float? Mine are pretty secure on my arms all on their own, and I haven't even added any padding inside yet (which I plan to—a small amount). 2: Next I plan on doing the outer, ABS shoulder straps. The ones come from AP come straight and I expect they'll need to be curved with some heat. What are your suggestions for doing this? I've heard of hot water baths, but I don't know all the steps (how long, etc.). I've also seen a hair dryer suggested, which I could do. I don't have a heat gun, though. 3: Is there a proper amount to cut off of the shoulder straps? Most builds I see trim off the back large rectangle. That's it for now! Thanks everyone. :-)1 point