Leaderboard


Popular Content
Showing content with the highest reputation on 11/08/2021 in Posts
-
Hey guys! I'm not dead! lol 6 months of chemo and some TLC later I'd thought id post an update. So far its looking like I'm in the clear. Had 2 doctors appointments checking in with scans so far and they have come out good. Hair is growing back and I feel like my old self again except now I weigh more D: So before I can get going on my armor again I need to lose the stomach. But I'm still here! Missed out on the Centurion stuff I know...but thats okay. My #1 goal after all was just to get my armor finished and approved! One day it'll happen!3 points
-
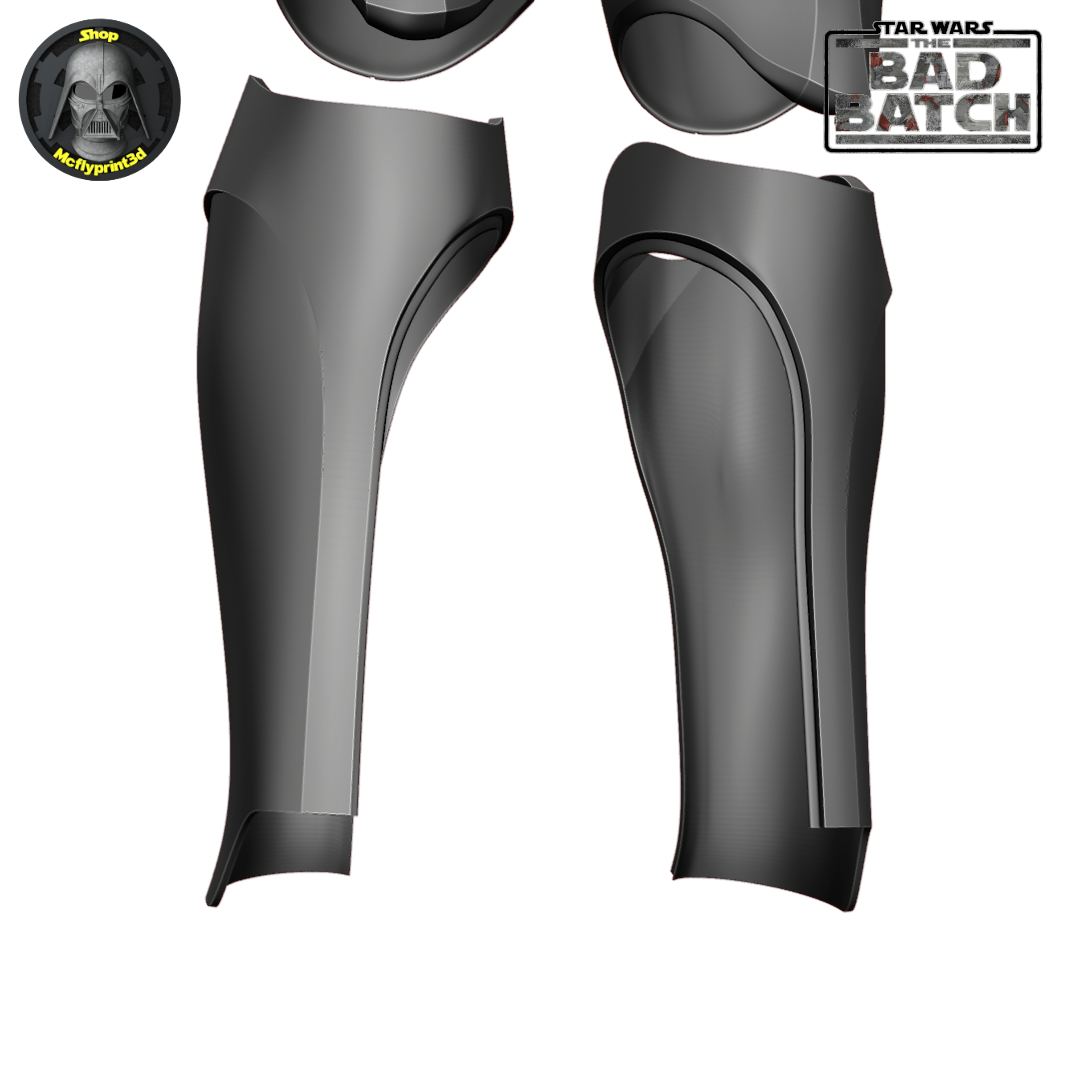
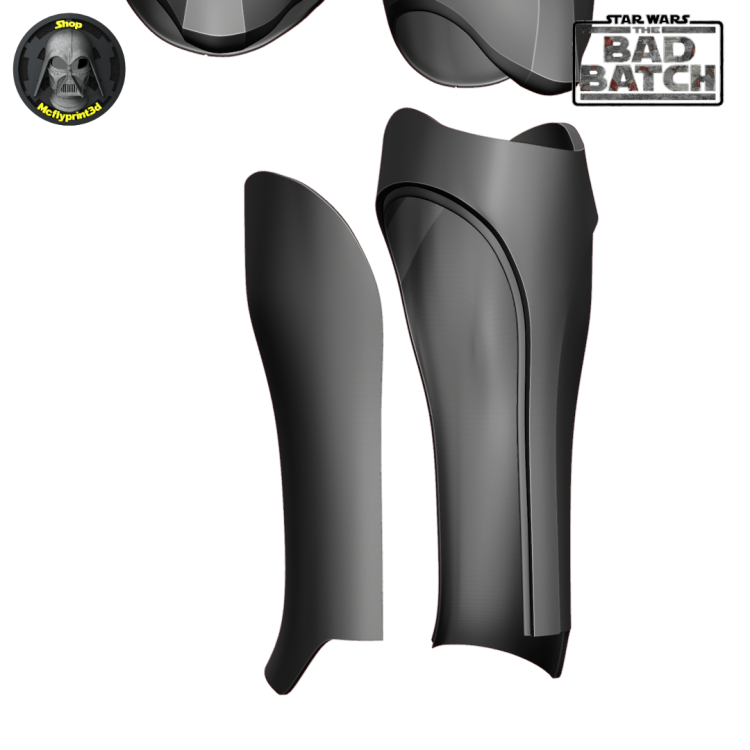
One of the problem areas of this costume was going to be the shins, trying to make them in a a way we don't see join lines, I asked Sebastian if he could make the inside of the shin removable, this would work in the same way as realistic clone shins and do away with any join lines down the front and back. All being well you should be able to get your foot through the rest of the shin, rotate and add the insert, either held with magents or velcro. Clone insert on the rear following recessed lines Bad Batch insert on the inside following the recessed lines. Hopefully there will still be enough recess still left when the insert is fitted, if not that recess will have to be lower. When I showed Sebastian the idea I had the lip on the inserted piece and not the actual shin so it would slip behind but the way he has done it I presume should still work, I guess that leaves you with having to print a test shin Lando
 2 points
 -
Well , I got my 501st approval today , our garrison GML got back to me this afternoon and I had an email shortly after.. Say hello to TK-70921 :-) .... I will be submitting on this forum later today and then start work on some fixes for EIB :-)... A big shout out to all of you for your help and feedback , still more work to do but at least got my basic out of the way!2 points
-
Easy fix , in fact I see @gmrhodes13 mentioned that above as well , I should be able to get that taken care of this evening , good call out and attention to detail. I should have the TD buttoned up this evening as well , can anyone say Armor Party for 1 :-) . Thanks goodness e6000 glue was used , couldn't imagine that headache if another adhesive was used. Does heating up the glue with a heat gun help? I was wondering because I didn't want to deform anything with he ABS.2 points
-
Gotta love all those small details2 points
-
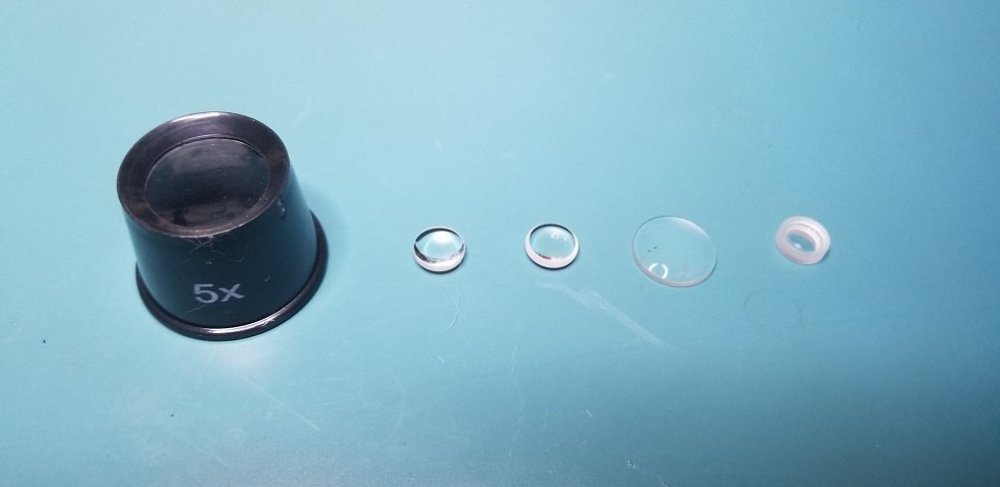
Hi folks! So I've had several questions regarding how I did my helmet lenses and so I thought I'd put a little guide up for anyone that may be interested in the process I used for their own builds. I think it came out rather slick with a neat end look while being solid and easily replaceable. Here is a shot of what this technique looks like when completed from the inside: Materials: Sugru moldable rubber Shade 3 flexible welding visor - https://www.amazon.com/gp/product/B00209I0UG M3x20mm screws and acorn nuts Index cards Pencil Xacto knife Micro ruler Scissors 220 grit sandpaper Drill Dremel and/or belt sander Vise Thin black heat shrink tubing Step 1: Create eye socket templates I don't have a picture of this first step but you see me using mine in later steps. So all you do here is take an index card, ho ld it flush over the eye opening inside the helmet then with a pencil trace the opening from the outside. Make sure it is centered on the index card because you are now going to extend it for overlap margin. With the socket outline traced on the card, using a ruler measure half an inch out from the outline and place a mark, do this many times tracing around the outline so you're basically making the original socket outline half an inch larger on all sides. Then simply draw a new line around this outer outline and cut the template out with a scissor. Make sure you label what eye socket each label pertains to, and store these for future needs even after this project is done in case you want to cut new replacement lenses, switch out colors, etc. Step 2: Shape a rubber mounting surface In this next step you are creating a rubber mounting surface that the lenses will bolt onto and create a flush connection to the eye sockets. Take your Sugru (I used like 5-6 packets per socket) and create a nice think outline around the whole inside of the socket. You'll want to ensure that the rubber around the socket's plastic mold is slightly taller so when you rest a lens onto it is sitting flush on the rubber bed. You have a lot of time to work with the rubber before it starts to set so take your time and get the outline right. Important last step here, after you're happy with the rubber mount take an index card (or two to make it thicker), lay it against the rubber outline and press down lightly to ensure that you have an even surface all around to avoid having an uneven mounting surface outline. Step 3: Cut your mounting bolts I used five bolts per lens, you may want less or more but found that to be a happy place for getting the connection tight. Ok so here you are going to take your M3x20mm (you don't need to use this specific bolt size, can be M4, M2, whatever, just something you're happy with size wise) and cut them so you have a set that will have even height protruding upwards from where you will be mounting them. The gist is you will be adding these bolts to the rubber mold you created in step 2 with more rubber, but first you need to look at where each bolt is going to rest and measure how far over the rubber they are sitting uncut. Since the topography of the helmet here varies, some bolts will be extending quite far, others not so much, and you want an even extension from all bolts. I wanted about 8mm of extension to bolt into so I held a screw in the place it will be mounted, measured how far above the rubber it sticks out to calculate how much I needed to cut (so if it stuck out 13mm I cut 5mm off). Keep track of where these screws are going to be mounted since you measured it for that spot! As I was measuring and cutting, I placed them on my templates at the spot they will be mounted. To cut them down I just put a nut on the screw exposing the amount after the nut equaling how much needed trimmed, then put it on a vise and dremeled that excess off. You may find a cutting solution that works better for you, but I found that easy. Careful handling these little bolts after cutting them, they will be very hot! NOTE: Never cut metal bolts that are already mounted in your helmet, besides making a mess their heat will likely melt the plastic creating a huge problem. Step 4: Mount your bolts Now that you have your rubber mounting surface and your bolts cut for specific locations around the surface, it's time to attach the bolts. Using Sugru again put a nice wad on the bottom of the bolts, then just mold them to the mount at the correct locations where they were measured. Get the attachment between the mount and the bolt nice and tight, use more Sugru liberally and work it in. The one thing to be careful of is to not have any Sugru on the bolt that goes over the height of your mounting rubber from step 2, otherwise the lens will stop bolting in too high and not rest on the flush surface you created. However, being rubber this stuff can very easily be trimmed with a Xacto knife, so you can just snip any excess off to keep your base mount surface flush. After you've finished mounting all your bolts, you may want to double check you didn't get rubber smudges on your helmet and clean it off well, don't worry if you do, it will remove without much effort. Clean your hands thoroughly as well! Now that you have your cool rubber mount with sized bolts, you need to let that rubber set for 24 hours. Step 5: Add mounting points to your templates After you've allowed your rubber to set overnight, you'll be taking your two socket templates and marking where the bolts you mounted relate to it. Simply press the template down onto the bolts to make impressions on the paper where the bolt tips are, then punch through those holes with a pencil. Afterwards, place the paper template into the actual bolts to ensure that all the bolts align right with your template and your template rests nicely into the mounting surface you've created. This is a preview of what your lens will look like when you cut them to the template shape and drill the holes! Step 6: Cut and shape the welding lenses I used a shade 3 welding lens which is flexible and fairly easy to cut, after looking around and trying a few options I found the one linked above in the materials list to be the best for this project. Ok so what you're going to do now is rest your templates onto the lens stock, trace the outline lightly with your Xacto knife (just enough so you can see where you need to cut), then cut out each shape with your scissors. Your cut lens will be a little rough, so curve it more naturally by (carefully) running it down a belt sander or Dremel tool. You just want to make the shape of the lens natural and curve to make the template and avoid any sharp points (your eyes don't like sharp points). After that, take some sandpaper and sand the edges all down nicely so they are nice and smooth. For the last step, place your paper template back onto the cut lens, then with the Xacto knife mark where each hold is going to go. Take your drill and open up each hole, making them plenty big enough for the bolts to go through with some room for flex, but not too large that your acorn nut won't compress down against it. Note that while doing all this, be careful not to scratch the lens surface by a stray cut or tool. Step 7: Mount your lenses Ok almost there! Here you simply need to push the lenses down through the bolts and screw in your acorn nuts to secure the lenses down into place. You may need to bend the lens a bit to get the fit to work, here is where making those holes a little bigger than needed helps. Whatever you do, try to not allow the tops of your bolts to scratch your lens. To hide any excess exposed bolt shaft I cut very small pieces of black heat shrink tube and put them on the bolts then put the acorn nuts back on and screwed down tightly. Conclusion: Ok so this may not be the easiest method of creating and mounting lenses, but the end result is pretty nice (in my opinion), and I like the effect having the acorn bolts gives. You have a well sealed lens over your sockets without any gaps by virtue of the rubber mounting surface and bolts securing them into place. The lenses themselves aren't flimsy and are high quality, plus easily cleaned with mineral spirits if heavily soiled, or just your standard glass wipes. Another plus is you can easily replace them just just unbolting them! I hope this guide helps anyone interested in this type of technique, cheers!1 point
-
Oh that's rad looking! Makes it way easier to get in those. I'll probably go with magnets or at least see how those work1 point
-
Congratulations trooper and welcome to the ranks1 point
-
OOooooooo. Thanks!! I have more magnet boxes to glue on and will try that.1 point
-
Hi Terry Welcome to FISD. You may want to check this useful index . Good luck with your project and looking forward for your advances.1 point
-
Nice Blaster !1 point
-
Congrats and welcome to the gang! Good to see some gusto and enthusiasm for higher levels from the get-go!1 point
-
A small tip when gluing magnets side by side is to add some clear food wrap on the sides that will touch, just in case any glue seeks in between, makes them easier to come apart1 point
-
A set of magnet boxes arrived from Eric @Scimitar as seen in his build. THIS might be a link to the correct post. It's a set of little 3D printed boxes with rare earth magnets embedded inside and separated by a thin sheet of ABS to give them easier opening. Nothing special? Or something very special? I'm super jazzed to have them!!! This was 95% of the work - getting the torso halves aligned to my liking, taped in that correct alignment (on the down side just barely wrapping around to the inside), and the magnet boxes lined up correctly with the seem. Maybe I could have done the boxes separately, but what fun is that? All at once is much more fun. Aligned, glued, and clamped. And there they sat for 3 days. ... well.... 12 hours. I opened them after 12 hours. But I just HAD to see if the boxes and armor aligned nice, the armor opened and closed, and I didn't have to redo it. and then they actually really did sit with the clamps on for 2.5 more days. Really. It was hard to not tinker with things during the long drying time. And I didn't! The alignment was dead on!!! Top, bottom, sides. Just right. A little bit of excess glue seeped between the magnets and needed removal. That was the extent of the extra work. Just perfect. The armor snaps onto my body with a satisfying magnet-click. And it's aligned perfectly. This makes those 2 torso snaps wayyyy easier to find and snap. There's a troop coming next weekend. This armor will get some use soon!!! And then I'll think about EIB cert.1 point
-
Yeah...totally bigger looking. Why I do the test strips for the sections...sonif to small or big I can make the adjustments. Hi, and thanks. Yeah this will be an interesting build. I hope to be able to go for approval once done. Yet, build first then focus on that. Luckily the file make is more than happy to help with future adjustments if needed.1 point
-
Wow, how did I miss this thread. Great work Lando, and also very exciting. Are you hoping to build this and create to a level for potential 501st approval?1 point
-
To me they look a little big but I've never used Armorsmith, printing test fitting strips sounds like a very good idea and would hopefully save a lot of wasted filament. Looking forward to seeing more.1 point
-
It looks OK Matt. Keep it up.1 point
-
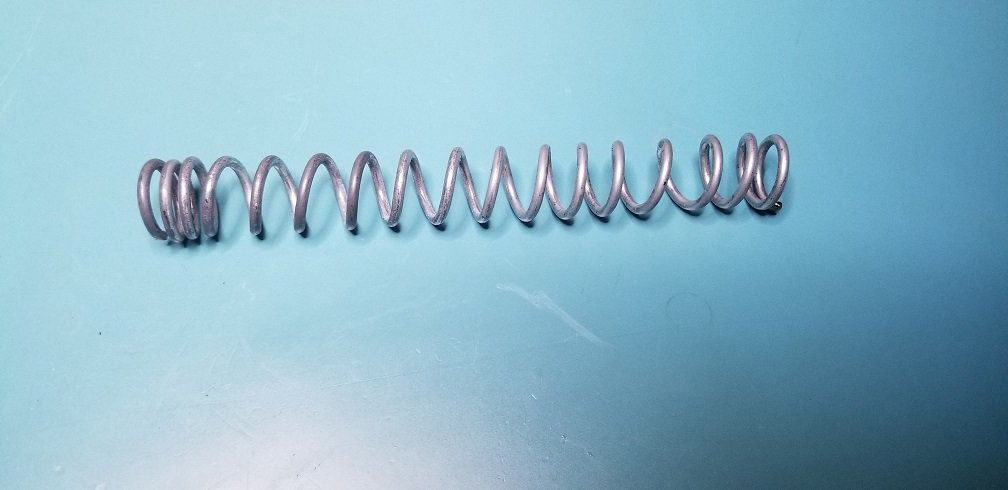
Here is the spring & optics.

 1 point
 -
Thank you for all of the advice. I think I am leaning more to the AP armour. I have gone through many of the build forums and will for sure start my own when the time comes. This bunch of people is amazing1 point
-
Thanks for the suggestions! I'm working on getting that TD to be a bit better. As for me, I'm approved and got a TK number!!!! TK 89400 reporting for duty!! Also, I did some work on my blaster. It's a vintage Hyperfirm B grade, apparently one of the last they sold. It had weathering all over the place. Lots on the grip. Some on the T-tracks. TONS of brass on the scope. So I repainted it completely. I'm a fan of weathering. I like it and tend to weather most of my models. But it needs to be at least realistic and not too obvious. Major wear areas should have weathering visible from a few feet away, but the rest should be very subtle. At least in my opinion. I tried to do that here. I also added an accurate D ring to the blaster. I drilled out the scope a bit and fit a dot of black vinyl with an epoxy dome to give the front a bit more character. Sad black rubber scope was sad... and now it's much happier. And then I printed up a counter sticker and something fun for the scope! I drilled the scope out to a bit over 24 mm and gave it some depth. Then I filled it a tiny bit with resin to give it a flat base. And then I printed a scope sticker on holofoil with an epoxy dome. The design is based on Crosshair's scope in Bad Batch with a little bit of tweaking. Even with being stuck in a shallow well, the holofoil manages to catch light nicely and reflect rainbows as it gets waved around. Super fun. The counter sticker is black and white printed over dark grey vinyl. The design is simple, but overlaid on a hengstler counter photo to get the dimensions right. I'll swap this one out for one with my TK number shortly. The nicer weathering and small personal details have me loving this little E11. Fun to combine my day job with TK tweaks!1 point
-
1 point
-
But once you crossed into the 501st or cosplay territory and learned the details you cannot unsee that. your vision gets recalibrated massively once you end up on forums like this. One year ago stormtroopers were all the same for me, too.1 point
-
Quick update for anyone following/interested in this thread. I came across this awesome alternative to the standard plastic convoluted wire tubing: TechFlex F6 Woven Wrap 5/16" 10' Wiring Split Wire Covering https://www.amazon.com/gp/product/B00C1NZLGC Side by side comparison to your standard tubing which I used initially: The neat thing about this is twofold. First it is a woven wrap so it looks much cleaner and the overlap mechanism on it hides wires much more thoroughly. Second, it's much softer than plastic if it presses against your skin. It is also a little bit more flexible so I ended up easily folding it around my inner padding to downplay the wire runs from the switchbox up to the top even more. Here's the updated inside look with that added:1 point