Leaderboard


Popular Content
Showing content with the highest reputation on 10/20/2021 in Posts
-
Oh wow, amazing memes, Glen! I see you've taken over this thread, haha4 points
-
4 points
-
How to: Apply ABS Paste For those of you that are new and have just clicked on this thread because you're curious, you might be wondering what ABS paste even is and why I would be making a guide on how to apply it. The first thing you need to know is that ABS paste is, well, it's basically what the name suggests. It's a slurry made out of ABS scraps and acetone that you can use to fill in holes, thigh ridge gaps and cracks. Because it's made out of scrap material from your armor build you don't even need to paint it after using it, because it's already exactly the right colour. The most you need to do is sand it down and polish it to match the look of the armor. Simple enough, right? So let's get going! First thing you need to do is make the paste! You can find a good tutorial over here: https://www.whitearmor.net/forum/topic/42866-how-to-make-abs-paste/ Because of something that I noticed with my first batch, I would like to suggest that you wash all of your ABS scraps and your jar before putting it all together so you won't have any debris in your final product. So, I scrapped that one and started a new batch, where I washed every piece of scrap before I cut it and put it in the jar. It's looking much better than the other one, if you ask me. In the next step, once you've got your paste ready to go (it should be the consistency of toothpaste) you're going to prepare your armor for applying the it. This means taking a piece of scrap ABS and putting it behind whatever you want to fill, so you can apply the paste onto that area and just use the paste to fill in the gap/hole/crack. Time to apply! I've taken several pictures of my progress, I hope this might be helpful! A quick reminder: please make sure to work in a properly ventilated area since you're going to be working with acetone. First I gathered my materials - several sizes of wooden sticks, the ABS paste and (of course) the armor (the thighs in this case), where I had a piece of ABS with some tape to hold it in place. This keeps the paste from seeping through to the other side. I actually needed two pieces of ABS due to the shape of the ridge -- one inside the ridge and one on top of that to cover the gap between the ridge and the cover strip. Whether you can reach your goal with only one piece of scrap or with several, make sure you've covered all the gaps that you need to have covered! Time to apply the paste. Now you open that jar with the paste, have your wooden stick ready and preferably some tissue paper to the side for cleaning the stick. You can simply apply the paste by scooping some up and putting it into the gap. I've found that if the ABS just covers the tip of a toothpick, it was easy to get in the gap without smearing it all over or getting too much on there. After ~2-3 layers After applying layer I would press down with a clean toothpick to make sure it lays flat and that there would be no bubbles or gaps. I also used this time to push in any of the paste outside of the gap. Because of the fast drying consistency of the paste, it felt like moving around chewing gum that has been chewed on for a few hours already. Remember: every bit of paste outside of where you want it is going to have to be sanded. So go slow, work carefully and you'll be able to save yourself some time. I repeated this process several times until the paste matched up with the armor. The closer I got to the top edge of the armor, the smaller the drop of paste got. I had to clean my toothpick every now and then to make sure that I could still work cleanly. I also had to add a drop or two of acetone every now and then to my paste in the jar and stir it in with a toothpick, to make sure the consistency stayed roughly the same and that it didn't harden in a layer at the top. Once I got to a point where I was happy with the results, I closed the other gaps as well in the same way. Afterwards I went back to this one and closed up a few spots that weren't as clean as they could be and still had some gaps. Once it dried, I took some scissors and cut away the visible part of the tape that wasn't covered with the paste. Next I had to wait until it dried (about 24 hours) then sand the paste smooth and maybe cut the return edge so it looks smoother. Once I've got it sanded down, I'll see if there are any gaps that I've missed that need another bit of paste, fill them up, sand it down and so on until I'm happy. If you worked carefully enough, you might be able to skip sanding because it's already flat and aligns perfectly with your armor. If that isn't the case, here's a great tutorial on how to get things sanded shiny again: https://www.whitearmor.net/forum/topic/45052-howto-wetsand-polish-for-a-great-shine/ I hope this could help you! At this point a huge thank you to @justjoseph63 who inspired this, proof-read and helped with editing the pictures!3 points
-
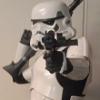
Stormtrooper abdomen armour section completed! Wearing this section is so satisfying especially after all the work that has gone into it. I better make sure I don’t develop Dad-bod CHECK OUT THE LATEST VIDEO HERE > https://youtu.be/9saHuHEMmos2 points
-
Great Tutorial.2 points
-
Update: Still losing weight, a few more pounds to lose around the mid-section. Walt (WTF) is working on a new specific COD, no eta yet.2 points
-
As many of you know Hasbro have released a Black Series version of the The Last Jedi First Order Stormtrooper helmet. On fist pass it looks pretty good. How good? Lets find out. For this comparison I am going to use my own Hasbro helmet ordered from Amazon and delivered in June 2021. I've been meaning to do this since it arrived but it's been a time consuming job. The exemplar will be a real screen used helmet. The images are from a The Prop Store auction that took place in 2018. This is still available for viewing at time of writing https://propstoreauction.com/view-auctions/catalog/id/138/lot/28672 but the images have been saved to the Gallery for safe keeping. The Prop Store usually take very nice photos and this is no different. There is no ruler in shot like with many auctions but they do have dimensions which we can use to at least check ball park numbers. A brief word on the images. The perspective on this is not perfect. It's taken hours to get as close as I have and I've had to settle. The "correct" look will depend a lot on the lens focal length and the angle, matching this has been hard but I've gotten close enough. If I don't call something out specifically assume "close enough" in person. For reference these are all 70mm f/8 on a full frame camera, just in case that means anything to you, angle was as best I could to match the reference but it's trickier than it sounds. All images below link to a higher resolution version. Front View Starting at the front we can see the general shape and line are very good though there are some differences and issues that will need to be addressed: The beak shape is good. There is a gap along the the front edge that looks to be for air flow. For accuracy this should be filled but I think leaving it isn't the biggest crime. The panel gaps aren't the same, a bit tight at the front and a bit loose at the top on the Hasbro. The top is looking like a hard fix but the front could be improved with a little sanding, just to round over the hard edge. The Hasbro has a ring around the vocoder, this is a show stopper. It will need to be cut from the face portion and attached to the lower panel, and and gaps filled and edges cleaned up. The "holder" is fine as is as that is a separate part on the screen used helmet. Hex mesh isn't perfect but is certainly close enough. The side vents are correctly located and sized. The screen used helmet uses a thicker shell so has a slightly different look. The screen used helmet also has these open where the Hasbro has an inner and an outer cover. The Hasbro also has a ramp down into the vents, this is square on the screen used and should be removed (see gallery for a closer image). The rubber brow trim on the Hasbro looks to be a good match for the screen used helmet. The Hasbro comes with accurate bubble lenses. They aren't flawless but are better than some I've seen and gives better peripheral vision than my OT. Left Side View The left side has a really good profile, to the point I was able to almost perfectly align them in photoshop. There is a button on the side of the Hasbro. This will need to be removed and replaced with something, the button is too tall to just glue in and fill the gap. The lower nubbin under the telephone cut out is marginally smaller and taller but nothing major. The trapezoid on the screen used helmet is a decal. The Hasbro has this as a separate part in black plastic. Ideally this would be glued in and the gaps filled and smoothed. The black band around the bottom is also a decal, see img6 in the gallery for a close up on the other side. Again this is black plastic on the Hasbro. The biggest issue with the helmet, in my opinion anyway, is now visible. The false panel line that runs the rear circumference parallel to the black band. This will need to be filed in with care to look good. Rear View The shape is again excellent. The false panel line previously mentioned is more visible here, or more accurately not visible. There are 2 small speaker vents on the Hasbro helmet in the black band, these will need to be filled. Right Side View The right side adds nothing new that's not already been mentioned. Aerator The hasbro aerator is cheap metal, possibly zinc plated. The screen used looks to be either vacuum metalized or some kind of paint process. Size seems good and is a good representation. The ring issue is very visible here. Care will be needed to ensure the cut lines are correct. Clips The clips are okay, but not great. The "lift tab" is is chamfered not round. The clip tip should also be more tapered towards the front. The clip well on the screen used helmet is slightly deeper, in keeping with what we've seen on other areas of the helmet. These clips are a separate part so are easy to replace with a new part once designed. Size The prop store stated the screen used size as 32 cm x 27 cm x 30 cm (12 ¾” x 10 ¾” x 12”). Using some large calipers I found the hasbro helmet to be approximately similar, around 1cm larger in each dimension. It's hard to know exactly how the real helmet was measured but the widest points where all around 1cm more than what prop store stated. This puts the Hasbro at around 3-4% oversized worst case, but depending on your armour that may or may not look better than 100% accurate due to the comparative proportions. Other There are some mould line issues and a few shrink marks on the surface. However these are all reasonably small and nothing that won't be fixed during paint preparation. I've not covered the insides as it's not a visible accuracy issue. Some will wish to refit the supplied liner, others remove it. Whilst the strapping is rubbish the actual inner shell is not bad should you wish to use it. There is also electronics in the helmet, I must admit I have no idea what that do other than they are there and there is a button and some speakers. Given the speaker vents need to be filled you may as well remove the electronics and save some weight. Conclusions The helmet is, on the whole, really good. Yes there are 4 major issues: The front ring, the speakers, button and the false panel line. However there are no big impossible to fix issues. There is a thread already documenting how to break down the helmet and does cover some changes, though I would approach some differently. I think with at least the big items fixed, and preferably some of others you could have a really good helmet once paint matched to your armour. I also can't see any reason why a GML should reject one after the mods.2 points
-
2 points
-
Looks like you have pretty much summed everything up, nice critiquing1 point
-
1 point
-
I'd love to, but I don't think I have space for it together with the TK and other stuff. On the other hand, things might be picking up now that the glue has arrived.... Or not, we shall see Thank you though for the oppurtunity though!1 point
-
Good to know. Thanks Daniel.1 point
-
Excellent job on this, Luca! This will certainly come in handy for those aiming for Centurion, where those gaps need to be filled.1 point
-
Worked on the hand plates Should the indent above the index fingers be cut out or leave “as is” and use a decal? These gloves have no velcro on top so I'll have to sew some patches on each glove.1 point
-
Why not bring your kit to Comic Con and we can give you a hand there I’ll be there Friday and sunday.1 point
-
Trimmed the eyes a bit more! Got my E6000 in the mail today, so glue time soon!1 point
-
Locitus helped me thanks!1 point
-
Excellent review and comparison Chris, thank you for putting this together, it certainly piqued my curiosity as I'm sure it will for our members. I love that you went to the trouble of trying to match the camera angles and set up to keep it so precise, well done.1 point
-
TK 20247 updating access, just had my TFA TK approved https://www.501st.com/members/displaymember.php?userID=30303&costumeID=3261 point
-
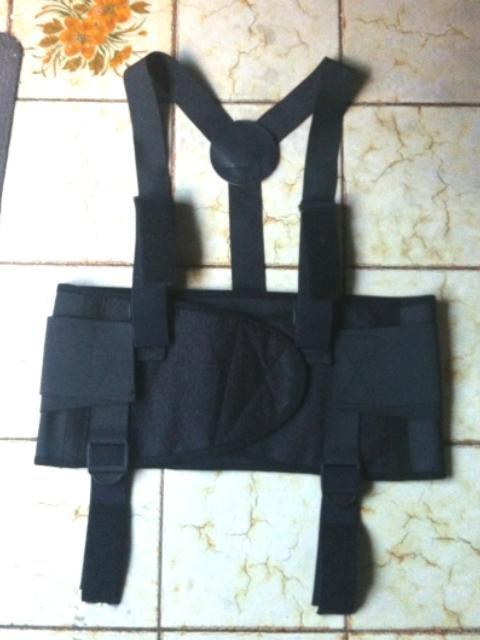
Congratulations trooper and welcome to the TK ranks. You can request higher access here I use a separate harness system, arms are free for most of the kit up, start with legs, shins, spats and boots then work way up, everything attaches to the harness, even at the back, snaps there for the back of the ab and TD. Shoulders, biceps and forearms all get connected last.
 1 point
 -
aaaaand approved! TK-20247 I still have some things to tinker with to make it a bit easier to deal with for suiting up and such. Right now my main issue I think is having the suspension harness attached to the abdomen and slipping into it, or suiting up in the harness first and then attaching the armor with the help of a handler. As it sits right now, I suit up in the shoulder gaskets first, with the biceps attached (myself). Then slip into the abdomen with harness attached, including posterior and cod piece (myself, with handler making sure it's all secure). Then connect the thighs myself, then back/yoke with a handler, chest myself, thermal det myself or handler, forearms myself, shins and spats with handler, then helmet. The problem I keep running into is keeping the harness straight when I slip into it if it's attached to the abdomen. Went for my first troop in it, and I somehow had one of the clasps for the back connected to the front. I still don't understand how I managed to wear it . The suit from Sheev's would solve that, as again it's a shirt with a basic shoulder suspension system that only needs to clasp onto the front and rear of the abdomen and then done. I just need to figure out my issue with getting the biceps to sit right so I can actually move my arms properly. The only think I don't like is that it's not adjustable, so I have to figure out the exact mounting point on the abdomen. Not a big deal, just more to tinker with. I'll post some updates once I get it to a point I'm satisfied.1 point
-
Great work Chris. Not a great deal of work to bring it up to specs, well for a lot of people anyway For anyone interested here is the conversion thread, although not completed1 point
-
SHOULDER BELLS BICEPS FOREARMS ASSEMBLY Reference Image Glued the Biceps and Greeblies Add Snap to the Biceps and lower section of Shoulder Bells And Straps TEST Return to Index1 point
-
The grip is a direct cast, so the internal features are exactly the same as the original. I drill the hole out with enough depth to accommodate the hex bolt and then glue in situe Sent from my SM-G950F using Tapatalk1 point
-
Lol. I suck at Photoshop. So, thanks to those who encouraged me to continue with the build. I guess I was just really frustrated after I saw what I felt was the destruction of my work, but when I reassessed the situation, it was all superficial, which apparently is pretty common. For those who can't read Aurebesh, under my TK ID it says First approved 3D Printed ROTK. My wife told me yesterday that I acted happier about this than when I graduated from college. My reply was, "well Penn State doesn't have racing shirts." To recap this build (again), I had been "trolling" the 501st resources and forums for a while, speaking with members, and just wondering if this could be done to an acceptable standard. I had seen plenty of people start 3D printed builds, but couldn't find any finished projects, with the exception of some awesome helmets. Additionally, I saw plenty of YouTube videos of people building armor, but nothing indicating that they had applied for legion membership, or built their TKs to a reasonable standard. However, with all the awesome clones, Mandalorians, and other various 3D builds I had seen get approved, I thought "let's try it. I'm either going to irritate people with all my questions, or find a great group who's willing to help." Fortunately it was the latter. Thanks again for everything. So, I've spoken to a few people about other projects and I'm mulling over another big 3D build i.e. Shoretrooper, (thanks again @11b30b4 for prodding me over the edge), but honestly the last couple days has felt weird not going into my garage and fighting with plastic and paint. I've got a few things I'm going to tweak on this armor, because as you all saw from the thread, I was trying to build to the centurion standards, though I'm not sure it's attainable with a 3d kit. Regardless, I'll clean up a few items, but I'm fairly certain that I'm done printing big parts for this set. If you see me request an EIB look, that's probably where I'm going to call it until I receive my BBB.* *Previously I mentioned that I'm going to go ahead and order a new kit, likely from Jimi. After that arrives, I'll be posting a whole new build thread. So, while I'm waiting for that to arrive I'll be playing around in the Pathfinders forum. I just started something that I should be able to finish in about a month: This will be a lot of fun, and make for some awesome pictures if I ever get around to visiting my family back in the Redwood National Forrest. Also, this quick project will give me the opportunity to try out a few new techniques, like printing helmets upside down. Rough on top due to the supports, but this gets filled, primered and sanded anyways. The interior of the dome however is smoooooooooth. So, thanks again to everyone. You're all awesome and proof that this is a great community. I'm happy to be aboard!1 point
-
All, Thanks for helping me out through this build. After talking to a few people, I decided to clean up the armor, fill the cracks and broken seams, and try again. I really put a lot of work into this armor and just can't throw it in the corner. I'll let you know how it turns out. Thanks Andrew. On August 14 you asked me what I was doing to reinforce the big pieces, specifically the chest, back and abdominal. My answer at the time was to keep a good infill percentage and only reinforce the parts that flex a lot. Of all those parts, I was only worried about the abdominal, so naturally I really reinforced it with resin and haven't had any issues, What I overlooked was the amount of stress I could put on the armor from basic movements like adjusting my forearms. Additionally, when I was stress testing my chest, I kept testing the lower portion (where the side extenders connect) and it had some flex, so I wasn't worried. Fortunately, the damage seemed to be mostly superficial (paint and filler) and I was able to fix it relatively easy. So, before I pull the trigger and order a new set, I need to game-plan this a little bit. After 1 day of wearing the armor, I really had to go crazy with the rubbing and polishing compounds in order to get all the wear marks out. I'm not using rattle-cans next time, I really feel like the Rustoleum (cans) is too soft and susceptible to wear. Also, since I used an HVLP to spray Mando I got out the jitters and can practice with paints, hardeners, and clears until my BBB arrives. So, until all that happens, I've got that clone helmet sitting in my garage waiting for paint, so I think I'll make it my Guinea Pig. I also really like my helmet, so I may build another one and create a "Trials and Tribulations of Paint/ Learning to Paint" build thread. Finally, members of Garrison Tyranus's Inferno Squad were recently recognized as the "501st Legion Crew of the Quarter." This was due to the work performed, and donations raised for the Make A Wish Foundation during the online convention "Inferno-Con," which ran 2-4 October. On 19 December, Inferno Squad will be holding the "InfernoCon Holiday Special" which will include "Printers and Plastics 2.0." I'm not sure if anyone following this thread turned in last time, but this ended up being a very popular panel and I'll be sitting on it again. I'll post more later. Thanks again!1 point