Leaderboard


Popular Content
Showing content with the highest reputation on 07/16/2021 in Posts
-
Definitely recommend referring to the requirements for EIB and Centurion, even at this stage. With how thorough you're being you're going to be well on the way for the advanced levels, and it's far easier to build with those levels in mind from the start, than to make changes later. With that in mind, I did notice one area that isn't a requirement, but will definitely make your life easier later. RS Propmasters build as per the original suits, which means only having one strap on the right hand side of the torso (from the visible 'Han snap' on the ab section to the kidney plate). This sometimes leaves a gap at the bottom of that seam that the belt can struggle to hold shut on its own. What I've seen in a lot/most builds (including my own) is to have a second strap at the bottom of this seam to help keep the gap closed. At higher levels there is a requirement that this gap is minimal. Here's a pic of my internal strapping and you can see the lower strap. Be aware that the fixings for both ends of this lower strap are hidden and not visible from the outside. Any questions just ask.3 points
-
You are knocking this right out of the park, Joe... SUPER nice job! After Basic approval, I certainly hope to see you submit this armor for Expert Infantry, and then on to Centurion, sir. If I could make a few suggestions for those levels : 1. The paint job on your ab buttons is brilliant (many people have issues with this, but you nailed it). If you want to go the extra mile (and I get the feeling you do) it would be a good idea to reduce the size of the small plate. As seen in the reference photos, it was not quite as large as you have it at present but this is actually easier than you think! If you used E-6000 to attach it, just (caaarefully) use a razor knife to cut through the glue, pop it off, trim it, glue it back and you are golden! This should take all of 10-15 minutes at most (not including time for the glue to dry). Reference images Once you get your 501st approval and official TK#, you should submit for Legion access here in the FISD (link here). This will be required before applying for the higher levels, but it will also give you access to many other areas of our site that are not currently viewable.3 points
-
Thank you very much, Gentlemen..!! I very much appreciate your feedback and suggestions! And to both @gmrhodes13 and @AradunFF, thank you for the tips on the butt plate issue, both great techniques to remedy that problem… I’m hoping to be able to get back to it this weekend, make these minor adjustments and with any luck, suit up and submit for 501st approval in the coming week!!3 points
-
More progress today! Lots of pieces primed and a few sanded! I need to catch up to Scott TK16390! We both are in WI and building Jim’s kits. Totally not a competition [emoji12] call it “motivation”! Sanded3 points
-
Thank you very much for the kind words @justjoseph63!! And thank you for the suggestion with the ab button plate..! I will definitely give that a try to make it as close to the originals as I can… only issue I know is that I used CA glue for the ab button plates, but if there’s a way to replicate the screen used version with what I have, I will absolutely make that happen Again, thank you (and everyone else who has provided input) with this build, I appreciate every bit of feedback, and I love the attention to detail from everyone in the FISD..!! Once I get the 501st approval and FISD TK access, I will most definitely be submitting for Expert Infantry, and later down the road, Centurion..!!!2 points
-
Using by hand is the best way to control the bit, moving forwards and backwards with a small amount of pressure.2 points
-
Countersinking involves making the sides of a hole angled to allow certain types of screw head sit flush with the surface. You can VERY carefully use a drill bit, but that comes with the risk that if it catches it can tear and ruin your plastic. Less risk is a proper countersinking tool. These are available on the net and at most hardware/tool stores. You can use one much bigger than the hole you are working on, just be very careful not to go too deep. You only want to go deep enough that the screw head sits flush, and no deeper. Take it SLOW, and don't apply too much pressure! Doing it by hand (rather than using a drill) is good because you have more control. Be patient and you'll be absolutely fine [emoji4][emoji106]2 points
-
(Sorry for another post) Here's a couple of diagrams showing strapping. (Looking from the inside of the armour) And here's some popper tabs I made up for my build using short lengths of nylon webbing. You need enough material around the popper so that it is held securely and doesn't pull free. These are then glued to the inside of your armour using e6000, or something similar.2 points
-
2 points
-
Hello and welcome to this build thread! Since I've already mostly assembled my RS kit, this thread probably won't get too long, but as it is my first build I will appreciate any advice that you can give me -- even if that advice consists of "take this entire thing and now rebuild it" (which I don't think will happen, but who knows). One thing to keep in mind when giving me tips, is that I'm building this on the floor of my childhood bedroom, which A) isn't ideal and B] probably tells you that I don't have access to a dremel or similar advanced tools. (scissors might be more work, but I've managed so far) My BBB day was around the end of May (actually, there were three boxes, the last of which arrived at the end of June) and I've been using YouTube tutorials from Richie Stormtrooper and RS Propmasters, as well as several posts on this site as guidelines for my build. Since I build most things already, my plan was to just share my current progress with you and hope for feedback. The armor As I mentioned, the armor build is mostly completed, but I still want to re-work several things (smaller return edges, screws + paint and get rid of some of the glue). For now I'm using the original strapping system, but I was planning on changing that once I get around to ordering some press studs (is that the right name? I'm German and the technical terms are easily mixed up) Here are some pictures: (I apologise for the bad quality) http://imgur.com/a/XfIPw2d http://imgur.com/a/xJAYtJQ http://imgur.com/a/RgjmssE http://imgur.com/a/AwAQwKK So much for the Torso (minus ammo belt). As I said, it's not completely done yet, but it's mostly done. Then there's the arms: http://imgur.com/iH6fUze http://imgur.com/a/Zjkpi8o I'm very happy with those. I've also got the thighs done: http://imgur.com/a/AgZDNeY http://imgur.com/a/vBF52tJ They still need that small ABS piece to cover the gap in the back. The shins are where I've still got a bit of a problem, because I can't get them to close in the back the way I want them to, nor can I get the knee plate to align right. Any help is appreciated! http://imgur.com/a/EXuR50R http://imgur.com/a/mMYE1fv I've heard that using velcro in the back works, but I fear that there would be too much pressure on the velcro to hold it closed. http://imgur.com/a/Hdhdasu I'm sure you can see my problem here. I can't get it to align right. Therefore I was thinking about taking away the millimetre of return edge that I have at the bottom, so that there would be more plastic that I can glue together... What do you think? I won't share a picture of the ammo belt for now, because I'm still waiting on the holster. The last piece of body armor left is therefore the thermal detonator: http://imgur.com/a/Tu81eeY I'm currently working on the helmet: http://imgur.com/a/q1AC5mk http://imgur.com/a/ZLg3178 Please just ignore the mess in the background- As you can see I've trimmed them down and was planning on putting them together later today. Please let me know what you think and what I need to work on, as well as any ideas for the shins. If you require any other pictures, please let me know! (I hope these pictures will show up, I'm new to imgur) Thank you for reading all of this!1 point
-
Wow man!1 point
-
Impressed-? I'm surprised, since at least to me it seems very obviously hand-painted with all those little details that I just want to get a bit better than they currently are. And, well, let's see if the rest of my painjob manages to impress you as well. Regarding the toothpicks: I only used them as a help, the main paint job was still done with a brush. But, yeah, I love using toothpicks for whatever reason. Those things are super useful for the weirdest stuff and always get underestimated Good to know! I think I'll stick to ABS then once I get around to re-working my strapping... And thank you for the information about metal! I do not know whether that's the case for E6000, but if it is, I don't want to be the one to find out by putting it on the metal Padding? Yeah, I might have to look into that. The thought did cross my mind before when I was putting on my armor for the first time, but I had somehow forgotten about it until now. Then again, it is more noticable when you're looking for that overlap than when you're exited to wear your armor. I look forward to taking them! This is literally a childhood dream come true and I can't wait to finally join the 501st properly... Only waiting on a few shipments now, as well as those last details that I'm working on at the moment. Oh- regarding those details, I recently noticed how many of my screws are sticking out a bit further than I would like to. I've heard that "countersinking" (?) might help, but I don't know what exactly that is, nor how to do it... Is there a tutorial on how to deal with those screws somewhere on here or would anyone be willing to supply an explanation on what I should do? I feel it would really improve the overall look and feel of the armor if I could get that done. Thanks in advance!1 point
-
Morgi, I'm.very impressed with your painting! First time I've seen someone paint with toothpicks, and I wasn't sure it was going to work, but you've done a great job. Good luck with the rest. For the popper tabs, you can use either abs or webbing. Both are commonly used, so it's just personal preference. Some glues can react when they come into contact with metal, so be careful where you apply the glue to avoid metal parts (the reaction creates heat which can warp armour). Not sure if that applies to the original e6000; we struggle to get that in the UK, so I used gorilla glue clear contact adhesive. From the pics you certainly don't seem to have a problem with gaps. As you've said, it's more the opposite. I'm not sure if 'too much' overlap is a clearance issue, but I have a feeling it might be. I've seen posts where people stick some foam padding to the inside of their armour to make it sit right (I have my own padding so didn't need that [emoji1]). Given that, it may be that you don't need to install the second strap, and your belt will do all the securing you need. The only way to tell is by kitting up. Just remember to always kit up wearing your under suit, as anything else may affect how your armour fits. Your going great, and I'm looking forward to seeing your clearance pics [emoji106][emoji106]1 point
-
That sounds like a good idea. I'll have to post a photo of me wearing the suit with the belt, so that I can get a feedback on whether that's necessary and how I should go about fixing the issue... If I need that snap, I'll definitely refer to your picture! So, here's what it looks like (just put on the undersuit and the armor in this weather, I'm dying of heat, lol): It's probably even more recognisable on the other side, but it closes rather well with the belt - too well, to the point that it rather overlaps if I tighten the belt: You can't even see the rivets on the front anymore if I tighten the belt as much as possible. Any ideas on how to solve this, other than not tightening the belt as much? Or is this still okay? (I've got a feeling it isn't) Regarding the snaps, I'll definitely use E6000, but I was just wondering which material you would recommend for the snaps, because I've seen both your nylon webbing and ABS pieces being used. I gotta admit that ABS would be a bit easier, because I've still got a bit lying around from my cover strips material, but I'd guess that nylon webbing or a similar material might be easier to attach to the armor. Thanks! Glad to hear that you think it's going well so far! I'm sure that without all my questions, this would not look as good, because I've gotten a lot of help from you guys! I've also managed to get those brushes and started painting the grey. I've used Humbrol's number 5 for those grey parts. It took me a spare piece of ABS and some trial and error to figure out how to paint the helmet. Let me tell you a secret: I hate working with brushes, because I just can get the same level of control that I manage with literally everything else. I'd like to think that I did just fine tho. Here's the first layer of grey: (yes, I used wooden toothpicks. Those things saved me a lot of effort and worry by holding the U-trim away from the paint) As you can see, the paint was still not very even and I wasn't really satisfied with it, so I let it dry overnight and used this morning to put on a second layer of paint. The picture from the front is now missing the toothpicks because the paint already had two hours to dry and it seemed dry enough to not get smudged too badly. (or at all) I gotta admit that I'm very nervous about those black lines though, so I'll be using tape for that one and not just free-handing it the way I did with all of the grey. As of now, I'll probably start with the first layer of black today and I've gotta see whether I finish with the black today or tomorrow. Since my tube-stribes template hasn't arrived yet, it might take a while to fully finish the painting tho. (wow, that was a long update...)1 point
-
Looking good Morgi. Loving that you're not afraid to ask questions, and describe each step.1 point
-
I also agree, very nice and clean build, well done Joe.1 point
-
Hey I have had some of the best armor builders in the world give me some pretty sweet advice. Even one help with this Anovos belt plate (cough cough) @ukswrath1 point
-
I like it!!1 point
-
Here's an none stitched version for those who like elastic hoop around the palm, badly trimmed too
 1 point
 -
Clean build1 point
-
Last post on Facebook was Dec 2020 I see what you mean about the return edge on the yoke I had an over trimmed clone kit many years ago which had all the returns removed. What I did was cut pieces of ABS plastic to fit the curved areas then glued in place with a 2 pack 5 minute glue, once dry I added some fiberglass and resin behind for some extra strength, then it was just a case of filling up the seam/join with bondo (automotive filler), then sand, prime and paint, it's not too difficult to do so you may be able to save your yoke, could be worth a try.


 1 point
 -
Man, what a great build thread. You do some excellent work here.1 point
-
6 down 18 to go1 point
-
First was getting all the extra support out of the barrel. It took me probably around 3 hours. Very slow and tedious process. I would recommend some needle nose with a very small point. I also made good use of my set of angled picks. Still took ages to get them cleaned out. Sent from my SM-G991U using Tapatalk1 point
-
Thanks for letting me know! Here's the updated sniper plate: This is cut the way you marked the plastic, however, I couldn't help but notice how the reference pictures seemed to suggest a cut more like the one that I marked in with a pencil. Should I leave it like this, or should I trim down to the pencil line? Helmet-wise I've added the S-trim around the bottom: (I'll have to trim the screws down before I poke my eye out) What I noticed with the S-trim was how it didn't quite fit here, so maybe I'll have to trim a bit more around the bottom to make the S-trim overlap the ear a bit better: I also managed to get the hovi tips inserted: This means that I'll have to do the painting next, if I don't want to risk any paint getting on the lens. Therefore I'll be going to buy some brushes later today. Depending on how much I get myself to delay the paint job, it might take me a few days to get to the point that I can post another update on the helmet. Since I've had so much fun seeing everything come together though, that update might as well happen tomorrow I've also been thinking about getting a blaster, because I have heard that I will need one for anything beyond basic approval, so that's something I've been thinking about as well.1 point
-
Looking good Joe! I had the same issue with my butt and kidney plates. I replaced the outer most snaps with the hook and loop. I glued white hook to the ab and kidney plates and then ran two vertical 2” strips of loop from the kidney to the butt plate and that locked everything up real tight.1 point
-
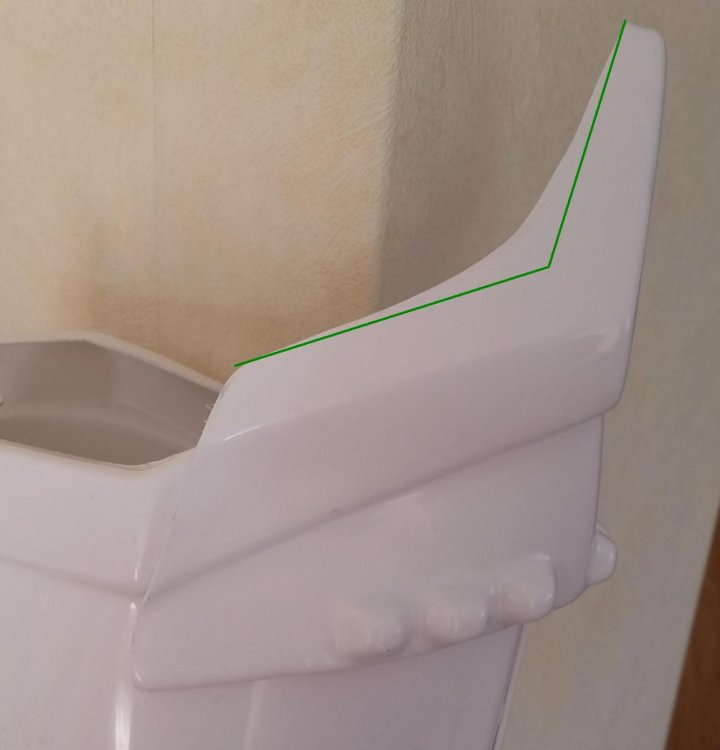
Nice work, you could remove some material from the inside curve of the sniper plate: "For a more screen accurate look, it is suggested that the top of the rear ridge of the sniper plate be aligned with the top ridge of the calf. Also note that the sides are angled rather than curved."
 1 point
 -
Looks like you may have done this before1 point
-
Got the second ear done after hours of adjustment... Again, those gaps looked different once I screwed it on. Also, is it just me, or is the right ear (left in the picture) thinner than the other? I hope that isn't a problem, even when it comes to reaching EI or Centurion.... As you can spot the end of the back in the gap, I was wondering, whether there's anything that I could use to fill the gap. And one picture of the back I've also reliefed my sniper plate of the clamps and magnets, and I got to say that it looks way better now, so thank you, gmrhodes13! (well, aside from the bit of dirt that I have to rub off) It is a bit bend where the clamps were, but nothing huge. At least nothing that's immediately noticeable. If everything goes according to plan, I should get some press studs soon to rework part of my strapping and hopefully close the gap between my torso and kidney plate, making it closer to screen-accuracy and Centurion requirements. Before I do that, I'll probably get the S-trim around the bottom of the helmet done today or tomorrow and maybe the rest of the build itself, so that I'll only have to wait for my tube stripes template to arrive before I can start painting the helmet.1 point
-
…had the first preliminary suit up, wasn’t aiming for any sort of submission-style photos at all, just wanted to get in it and see how it fit. Overall I’m happy with the direction it’s headed, but still a few minor tweaks… wasn’t wearing the detonator, and the elastics that hold down the backs of the plastic shoulder bridges are not yet installed… I was able to see the dressing issue with my right shoulder that was causing the shoulder bell to come away from the bridge and chest armor; basically the right bicep was not properly aligned, causing the interior elastic connecting the bicep to the shoulder to pull the bell outward… gotta add some velcro to the belt and ab plate to hold that directly at the bottom of the ab buttons, and still need to add support to keep the butt plate from pushing outward… Like I said, the first of many suit-ups, but glad I was able to identify a handful of issues that I’ll be able to work on between now and the next time..!1 point
-
For the benefit of anyone in the UK, this is what I'm using. 175 litres, £20, from Argos. Plenty of room for all armour, blaster, helmet and accessories. (Identical to the one CableGuy uses in the video I shared further up, just with a deeper lid to give extra volume). Standard wheels aren't the best, so swapped one end out and installed light up scooter wheels. (If anyone already has the 145 litre version, the lids are interchangeable)1 point
-
Oh wow, that's a lot of info, thank you so much! I'll keep the trick for the images in mind, thank you for sharing that! I'll try to take a bit more out from the teeth... ABS paste? I'm gonna have to look that up, but that does sound good. And, yeah, someday I'll convince myself to finally open the white paint that's waiting for me Okay, I'll get the sniper plate off, gather my glue, clamps, magnets and tape and then put the entire thing together again before putting it into the garage for some time. I hope that will work out! I hadn't heard of a hot water bath before, I'll make sure to keep that in mind, that sounds like a good idea. I'll get some pictures of me wearing it done once the temperature has cooled down enough that I can bear the thought of wearing the undersuit... Again, thank you so much for your advice, this was very helpful!1 point
-
1 point
-
Welcome, if you use the "direct link" option with the image tags ie: .jpg, .jpeg, .png you will find your images will show in the thread. How to for adding images Looks like you could take a touch more out of the teeth area, a little top and bottom, you can just see some ridge before the gums. Some of my favorite go to's for helmet assembly: https://www.whitearmor.net/forum/topic/14806-how-to-assembling-ata-abs-helmet-1/ Also for ear fitting https://www.whitearmor.net/forum/topic/29238-my-helmet-ear-tutorial/ https://www.whitearmor.net/forum/topic/41250-ear-trimming-made-easy/ Brow height http://i5.photobucket.com/albums/y200/ukswrath1/DO/Screen%20Reference/gallery_14191_25_57708.jpg Teeth Angle of ears And if you need more references there is our gallery area or Star Wars Helmets If you have any scrap ABS you could make some ABS paste to fill the openings in the bottom of the thigh ridges, also add some white paint to the thigh ammo strip rivets. Front views Back views Looks like the sniper plate could use a little work, many of us use E6000 glue as it is very forgiving but also very strong, minimum drying time is 24 hours, but I normally leave a few days for anything which is under strain. A lot of clamps, tape and magnets can help keep it in place while drying. Some references: Here was my RS sniper plate attachment Really depends how your back shins are closing, make sure you are wearing boots as that will make a difference, you may need to tighten the hook elastic or even do a hot water bah to help both sides to meet and lay flatter Be good to see some images with your wearing so we can give you some more feedback, especially for you snins. Looking forward to seeing the progress.1 point
-
Looking good1 point
-
knee plate came out pretty decent, finishing up the accessories to the legs… now just to add closure fasteners to the back…. spent the morning fitting the shoulders and biceps with snaps and elastic strapping…1 point
-
Hi Joe, this is a real challenging section , mine is a RWA armor too and what I did was to align the best possible the sniper knee to the ridges of the shin and make strong pressure with clamps, lot of clamps. This pressure for about 48 hours drying let the piece stay in place and mold to the shin. Here is my Sniper knee, as you can see there's a little gap in the bottom, It doesn't have to align perfectly but ideally we look for the best possible.1 point
-
Thanks so much for the very kind words! Jim, I think we've gotten there with TrooperTalk!1 point