Leaderboard


Popular Content
Showing content with the highest reputation on 07/15/2021 in Posts
-
Last post on Facebook was Dec 2020 I see what you mean about the return edge on the yoke I had an over trimmed clone kit many years ago which had all the returns removed. What I did was cut pieces of ABS plastic to fit the curved areas then glued in place with a 2 pack 5 minute glue, once dry I added some fiberglass and resin behind for some extra strength, then it was just a case of filling up the seam/join with bondo (automotive filler), then sand, prime and paint, it's not too difficult to do so you may be able to save your yoke, could be worth a try.


 2 points
 -
6 down 18 to go2 points
-
There are a few variables, including what type of ABS your armorer uses. I have trooped for countless hours in the Florida sun in my AM armor with no noticeable yellowing, but my Anovos (Hero) armor has only been used a few times (it stays in a bin otherwise) and has gone darker. Even without sunlight, heat can (and will) cause yellowing, so it's best to store your bin in a controlled environment if possible. Once I get it back to it's original color I will be trying this product.2 points
-
Thanks for letting me know! Here's the updated sniper plate: This is cut the way you marked the plastic, however, I couldn't help but notice how the reference pictures seemed to suggest a cut more like the one that I marked in with a pencil. Should I leave it like this, or should I trim down to the pencil line? Helmet-wise I've added the S-trim around the bottom: (I'll have to trim the screws down before I poke my eye out) What I noticed with the S-trim was how it didn't quite fit here, so maybe I'll have to trim a bit more around the bottom to make the S-trim overlap the ear a bit better: I also managed to get the hovi tips inserted: This means that I'll have to do the painting next, if I don't want to risk any paint getting on the lens. Therefore I'll be going to buy some brushes later today. Depending on how much I get myself to delay the paint job, it might take me a few days to get to the point that I can post another update on the helmet. Since I've had so much fun seeing everything come together though, that update might as well happen tomorrow I've also been thinking about getting a blaster, because I have heard that I will need one for anything beyond basic approval, so that's something I've been thinking about as well.2 points
-
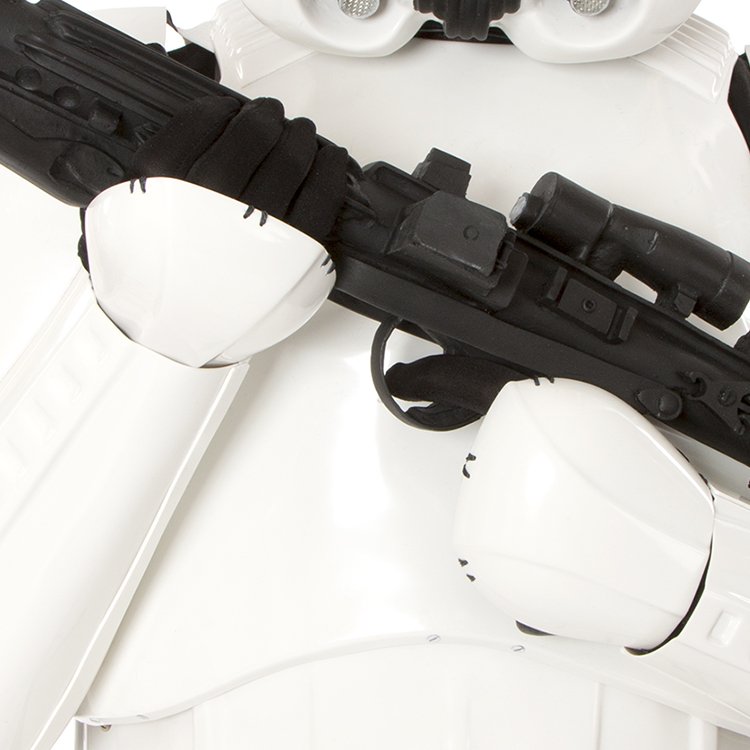
Nice work, you could remove some material from the inside curve of the sniper plate: "For a more screen accurate look, it is suggested that the top of the rear ridge of the sniper plate be aligned with the top ridge of the calf. Also note that the sides are angled rather than curved."
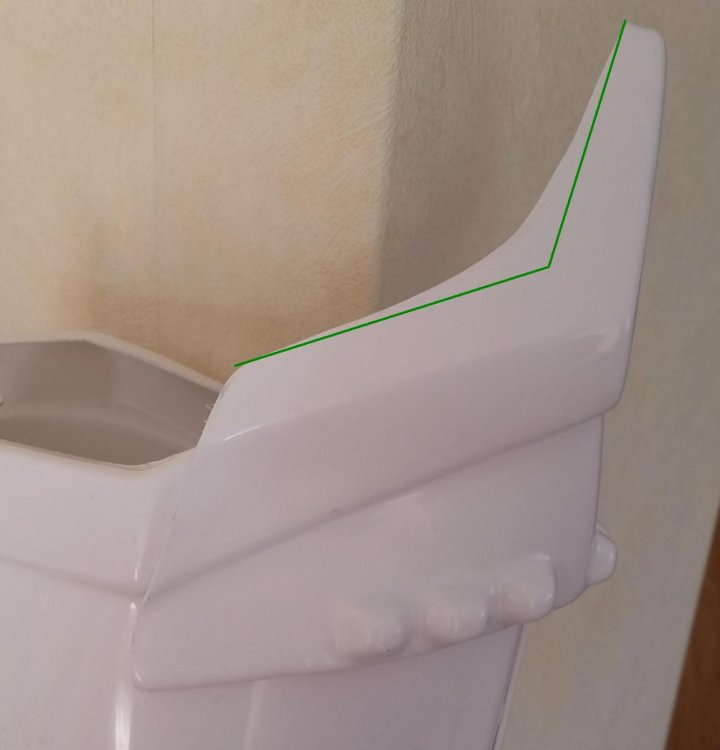 2 points
 -
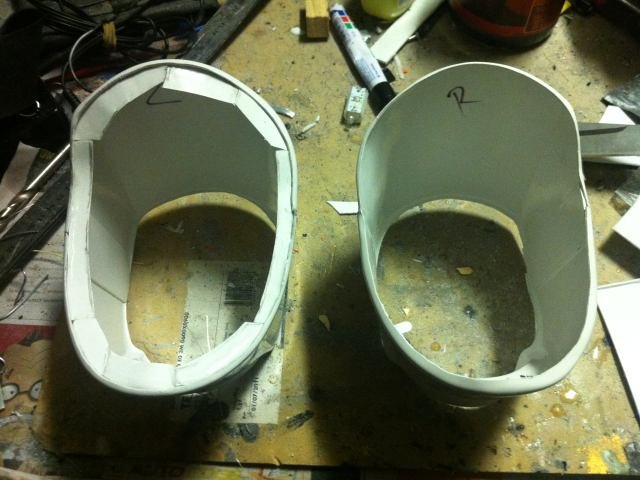
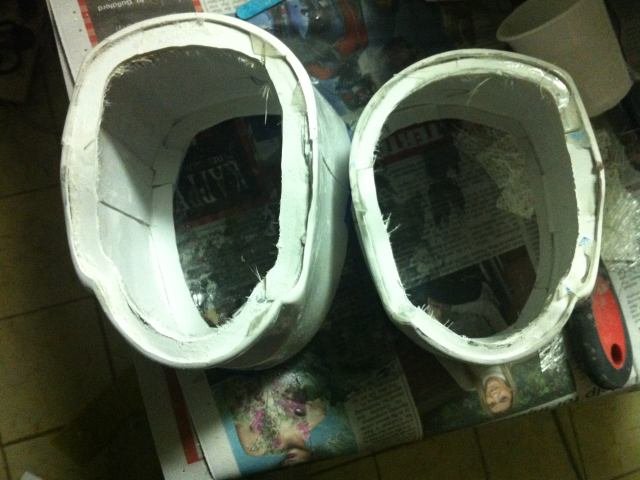
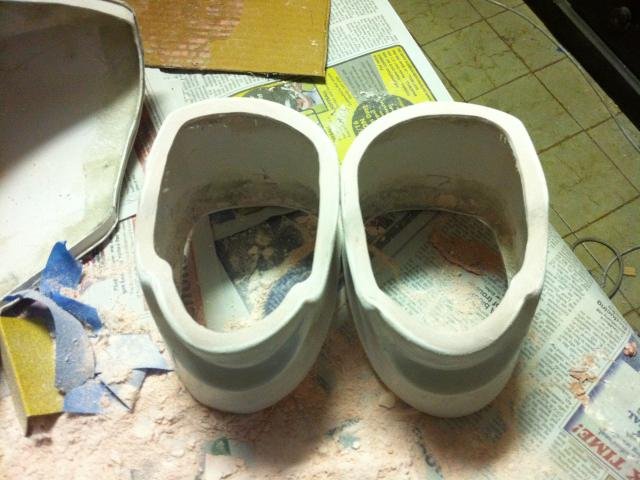
Hello and welcome to this build thread! Since I've already mostly assembled my RS kit, this thread probably won't get too long, but as it is my first build I will appreciate any advice that you can give me -- even if that advice consists of "take this entire thing and now rebuild it" (which I don't think will happen, but who knows). One thing to keep in mind when giving me tips, is that I'm building this on the floor of my childhood bedroom, which A) isn't ideal and B] probably tells you that I don't have access to a dremel or similar advanced tools. (scissors might be more work, but I've managed so far) My BBB day was around the end of May (actually, there were three boxes, the last of which arrived at the end of June) and I've been using YouTube tutorials from Richie Stormtrooper and RS Propmasters, as well as several posts on this site as guidelines for my build. Since I build most things already, my plan was to just share my current progress with you and hope for feedback. The armor As I mentioned, the armor build is mostly completed, but I still want to re-work several things (smaller return edges, screws + paint and get rid of some of the glue). For now I'm using the original strapping system, but I was planning on changing that once I get around to ordering some press studs (is that the right name? I'm German and the technical terms are easily mixed up) Here are some pictures: (I apologise for the bad quality) http://imgur.com/a/XfIPw2d http://imgur.com/a/xJAYtJQ http://imgur.com/a/RgjmssE http://imgur.com/a/AwAQwKK So much for the Torso (minus ammo belt). As I said, it's not completely done yet, but it's mostly done. Then there's the arms: http://imgur.com/iH6fUze http://imgur.com/a/Zjkpi8o I'm very happy with those. I've also got the thighs done: http://imgur.com/a/AgZDNeY http://imgur.com/a/vBF52tJ They still need that small ABS piece to cover the gap in the back. The shins are where I've still got a bit of a problem, because I can't get them to close in the back the way I want them to, nor can I get the knee plate to align right. Any help is appreciated! http://imgur.com/a/EXuR50R http://imgur.com/a/mMYE1fv I've heard that using velcro in the back works, but I fear that there would be too much pressure on the velcro to hold it closed. http://imgur.com/a/Hdhdasu I'm sure you can see my problem here. I can't get it to align right. Therefore I was thinking about taking away the millimetre of return edge that I have at the bottom, so that there would be more plastic that I can glue together... What do you think? I won't share a picture of the ammo belt for now, because I'm still waiting on the holster. The last piece of body armor left is therefore the thermal detonator: http://imgur.com/a/Tu81eeY I'm currently working on the helmet: http://imgur.com/a/q1AC5mk http://imgur.com/a/ZLg3178 Please just ignore the mess in the background- As you can see I've trimmed them down and was planning on putting them together later today. Please let me know what you think and what I need to work on, as well as any ideas for the shins. If you require any other pictures, please let me know! (I hope these pictures will show up, I'm new to imgur) Thank you for reading all of this!1 point
-
Bought this off outerrimoutlet on etsy. Build quality looks good. Definitely going to need lots of sanding to get all the print lines removed. He did send a printable pdf for instructions and tips for putting it all together that is helpful. Sent from my SM-G991U using Tapatalk1 point
-
[emoji23]1 point
-
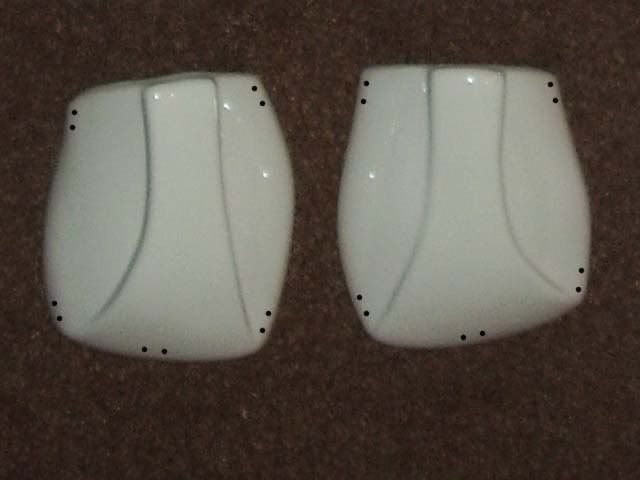
Here's an none stitched version for those who like elastic hoop around the palm, badly trimmed too
 1 point
 -
Welcome to FISD, Tarkan. That blaster wound looks painful but no doubt the garrison will have you patched up and ready for battle soon1 point
-
Probably It would be ok for Basic depending on your GML. For EIB an elastic strap over the palm is allowed if wearing rubber gloves. Hand Plates These shall be clam shell, or snowtrooper-style hand plates and not the trapezoidal design seen in A New Hope. The hand plates shall be mounted securely over the back of the glove. OPTIONAL Level two certification (if applicable): If rubber gloves are worn the hand plates are affixed via an elastic strap over the palm. If silk or satin gloves are worn, the hand plates have the correct visible stitching pattern using black cotton, with a five point/star pattern, equally spread out with 2 on each side and 1 in the middle front, and needs to be double stitched at each point.1 point
-
Wow this is awesome Richard1 point
-
I stitch mine at all the holes, I would say someone in the wardrobe department found a few holes sufficient. RS also stitch all of theirs
 1 point
 -
Drilled holes and stitched is my preferred way, more accurate too
 1 point
 -
Man, what a great build thread. You do some excellent work here.1 point
-
Coming along nicely1 point
-
1 point
-
Hello and welcome to the forum!1 point
-
Congratulations Trooper, Welcome to the ranks.1 point
-
Those are amazing resources for making your armor white again, but I was wondering, whether there's anything you can do to protect your armor from the beginning? Especially in the last post they mentioned UV protectant wax/spray and I was wondering, whether there are any recommendations as for what to use, or whether there are other options available to protect your armor.1 point
-
Appears some of the grey traps are not recessed, the line around is but the center areas are high, reference below of how they should be. Ears don't appear seperate. Cheeks traps are quite high on the center grey. Also appears a big gap under the bottom mount of the vocoder When in doubt it's always a good idea to check against the reference galleries https://www.whitearmor.net/forum/gallery/category/21-starwars-story-reference/1 point
-
The issue with CA glue is that it becomes brittle over time, and depending on the manufacturer it can also turn an ugly (and permanent) shade of yellow. If applied is large areas it could potentially ruin the appearance of some parts (especially the calves, which are opened and closed a lot) with spiderweb type exterior cracks. I always suggest that it never be used on a build. I built the majority of my first set armor using it and ended up selling it on ebay because of the dripping issues. The gel type is easier to work with, but it also become brittle with age and can cause joins to fail. Trust me.1 point
-
Hello Daniel, welcome to FISD. take a look to the links Glen pointed and let us know if you need some help.1 point
-
Hello and welcome aboard, lots of info for our FOTK's in the First Order Battle Group Also don't forget to check out our gallery sections for references. Good luck and looking forward to seeing a build thread from you soon.1 point
-
Hi Daniel, Welcome to FISD, you're definitely in the right place to get all the help you need. Can't help re first order stuff, but you'll find someone here will be able to get you on the right track. Good luck with your build [emoji106][emoji4] Rich1 point
-
I've never heard of this before, although I would suspect it would be a costly and less accurate way to coat the plastic. Here are a few other threads on armor yellowing: http://www.vintagecomputing.com/index.php/archives/1891 point
-
Hi Paul, I'm also vegan, 6'4" in my socks and no helmet, and in the UK. Really cool to see you here. Below are what I used, just to give you some ideas. I got my boots from Asos https://www.asos.com/asos-design/asos-design-chelsea-boots-in-black-faux-leather-with-black-sole/prd/21328697?ctaRef=my%20orders And dyed/painted them white https://www.amazon.co.uk/dp/B000P5H6Z2/ref=cm_sw_r_cp_apa_glt_fabc_5Q3F2XEFAXJN9Y5C8CFG I got my holster from Burkbench (just ask for faux leather) https://www.facebook.com/burkbenchdesigns/ And my neck seal (along with my armour) from RWA. For the blaster I went for a rubber Sheartech e11 https://www.facebook.com/sheartech/ If I have forgotten anything or you have more questions just ask! Finally, I totally understand when you say about being shy and unable to approach people. If we're ever at an event together (I'm sure we will be) it will be a pleasure to meet you, and we can look for the vegan fast food stall together! [emoji1] All the very best with your build, Rich1 point
-
Yeah I just touched base with my armourer from the uk Garrison. And he mentioned that I should buy some black or brown Chelsea boots to paint/ dye white. Sent from my iPhone using Tapatalk1 point
-
I think you will find it a touch easier to bend your arms once swapped. You are right the elbows seem more covered with the forearms on the other arms I will change this[emoji106] Sent from my iPhone using Tapatalk1 point
-
Hi Paul. Welcome to the FISD. I have the same boots (they are my backup pair). I believe the seam is Ok for basic approval. If you want to upgrade and you can't find white vinyl boots without that seam, you can always try to find brown or black boots and paint them white. Cheers.1 point
-
Got the second ear done after hours of adjustment... Again, those gaps looked different once I screwed it on. Also, is it just me, or is the right ear (left in the picture) thinner than the other? I hope that isn't a problem, even when it comes to reaching EI or Centurion.... As you can spot the end of the back in the gap, I was wondering, whether there's anything that I could use to fill the gap. And one picture of the back I've also reliefed my sniper plate of the clamps and magnets, and I got to say that it looks way better now, so thank you, gmrhodes13! (well, aside from the bit of dirt that I have to rub off) It is a bit bend where the clamps were, but nothing huge. At least nothing that's immediately noticeable. If everything goes according to plan, I should get some press studs soon to rework part of my strapping and hopefully close the gap between my torso and kidney plate, making it closer to screen-accuracy and Centurion requirements. Before I do that, I'll probably get the S-trim around the bottom of the helmet done today or tomorrow and maybe the rest of the build itself, so that I'll only have to wait for my tube stripes template to arrive before I can start painting the helmet.1 point
-
Looks a little low, the one I purchases is about twice the height BUT I only use it for air transport these days, found it too cumbersome to take for smaller events, especially those were you have to take the box up stairs. Hard suitcase does me well know, I have a wall of them, lots more room in the vehicle and a little easier for mobility. I also use a helmet bag and I have a couple and not forgotten to take a helmet as yet I find the soft padded motorcycle bag or aviation helmet bags work well.1 point
-
Almost there. You may want to look at the butt plate, it is overlapping your kidney, using V tabs helps keep them spaced and in alignment, may be an option: With a heat gun (hot water bath, oven) you bend strips of ABS plastic into the shape of a V, only glue one side and the other remains free to allow movement when you bend. Just helps stop the butt plate from pushing back from the back plate.1 point
-
Whichever case you use, it's a good idea to wrap your black items separately, to reduce the chance of getting black stains on your white armour1 point