Leaderboard


Popular Content
Showing content with the highest reputation on 06/12/2021 in all areas
-
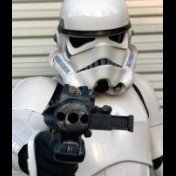
So, I've been trying to figure out the right color of the helmets. White paint is not white paint. If they used automotive paint in the 70's for these buckets, the whites had a yellow tinge due to the limitations of the paint production at the time (it was very hard to make durable true white paint that wouldn't yellow due to sun light). So knowing that I wanted to prove that the buckets are more yellow than the ABS armour. I've grabbed some screen shots - I tried to color correct as much as possible (the color is greatly affected by lighting, filters on the camera if used, the Kodak film stock, color timing during film processing, and digital post production shenanigans that have happened over the years). The images then had the saturation dialed up a bit to help show the difference. It is impossible to know how much more yellow the paint was than the ABS, but it was very likely a lot more than what we normally see on screen. Also, the paint is likely more reflective than the ABS, giving is a stronger value or brightness in some lighting cases. No, I didn't alter the buckets in any way.2 points
-
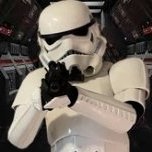
Some minor paint chips. The paint is a bit thicker than ideal and still a bit soft - so I'll have to go back and make the chips look more natural at some point. I'll also take a wire brush and try some finer scratches too. I'm not going for an exact replica, but I'm using this bucket (Tantive IV) as reference. He's the one on the right of the image below (sorry Leia, sort of has that crazy ex-girlfriend-from-The Blues Brothers-look going there)2 points
-
Thanks again, Rhodes. I’ll let you know how I get on.1 point
-
Exactly right, and excellent to see how far you’re looking into it. :-) There was definitely a colour discrepancy on screen. Here’s Ford Diamond White against ABS in natural light. Very close to those images you shared. :-)1 point
-
Nice work. [emoji122] The low brow makes sense now. [emoji1303]1 point
-
Hi Shawn, and that is a fantastic looking set of armor! I'm not sure which of us will be reviewing your submission, but we will need you to do us a favor before we can move you along and get that EI badge under you name.. As per the CRL for Basic approval, "Frown is painted gray and does not leave the teeth area". You have a bit of work to remove some of the paint as shown below, but 15 minutes with some non-acetone paint remover, a few toothpicks and cotton swabs and you will be golden! Since you will need the points at the ends of the frown, I would highly suggest repainting all the teeth ( Humbrol # 5 or Testors # 1138) as the color would not match the original one Anovos used. Just take your time, use a quality brush, and you will done quicker than you think! (Keep the caffeine to a minimum beforehand, though ) We have faith in ya', sir, and as soon as you are done, post up some revised pics and we can get going!1 point
-
Could be how you have positioned and may need some more trimming, @TheSwede has a nice KB build, his appears to conform quite well to the yoke and looks like it has a lot less return edge A couple of references1 point
-
Hey @CableGuy, I think I got it sorted. Performance White by Duplicolor seems to have the right balance of the creamy color. And I got my gloss back. Crappy colour in this pic now that I look at it. Oh well, looks better in person.1 point
-
Some have tried heating in an oven which helps heat them, but you don't want to go too far with heat, Really depends on how far they stick out over the edge of the armor, I really don't notice mine, can't feel them while wearing. Seems to have done the trick, nice work1 point
-
Do the V shapes prod or irritate much? I did some hot water bathing to try and mold them and I made softer U's. However, since I was boiling the water, I thought why not just try to alter the butt plate? This seemed to do a good job, along with changing the right side straps with elastic. The tips still seem to protrude just a bit, so I'll probably use the V-tabs anyway. Thanks for the tip!1 point
-
You know, I have not seen this video - I will check it out tonight when I get home. The bonding/etching primer was based on something Simon at RS mentioned on FB - the bucket was hard to strip the paint off (if I read his post correctly). I got the feeling he suspected the studio applied some manner of etching primer. So I did the same. I also didn't want the paint coming off if I had to so some masking for the traps/tears details and tube stripes. The ears are based on the "stop that ship" bucket images. I am of the school of thought that the buckets were painted by AA with the ears off (Maybe some on? mix match?). Then they were stripped at some point. Studio (?) re-applied paint - I assume red oxide primer followed by white (I just went with the gloss over the primer) - with the ears on. I can't imagine the "stop that ship" bucket being done any other way. Mind you, It's possible that some buckets didn't have the ears on, so... I'm not convinced any one way is the gospel at this point. As for the drips, I intentionally went for it. I had a nice even base coat of white - and I must admit it was a bit painful to deliberately add the drips. But now that it is done, I love it. The whole idea with this build is to show how rough these helmets were up close and in person. This is why the dull finish is confusing to me - the paint is on fairly thick. Anyway, I will try a "whiter" paint tonight and see how it goes.1 point
-
So I have determined the problem. I wasn't using my phone or doing it as a mobile upload so we can eliminate that. After I posted initially I went back and tried the link choices including Direct Image. After inserting the direct image link nothing happened it remained a hyperlink so I removed it. The issue is I had multiple uploads/ downloads happening and my already abysmal internet speed (>10mbps) simply didn't post the image. So I deleted the link and tried the remaining choices. Mystery solved! Appreciate the troubleshooting input1 point
-
Cody Butler TK-11705 EIB Letter Chemi Thanks! https://www.whitearmor.net/eib/certificates/11705-eib.png1 point