Leaderboard


Popular Content
Showing content with the highest reputation on 05/19/2021 in Posts
-
I took some photos in a warehouse with a photographer a few months ago, and had this idea for a photo edit. Pics are by Jeff Cox, and the troopers are all me in my AM 4.5 armor (except the laying down one in the back, that is a Black Series figure, haha): I do edits like these from time to time, I am on Instagram as "Oddviking". I have done a lot with my Clone Trooper, but I love how glossy the classic TK is!4 points
-
As far as I can tell, the positioning of the top one looks pretty consistent.. placed just behind the ridge at the front. Screen caps Mine For the other two, we only have a single reference photo of each but they are clear enough to show the approximate position. Screen caps Mine3 points
-
Behind the scenes shot. Corridor is a 3D image purchased from Shutterstock. The key is finding a background with similar lighting, at the exact same angle for the perspective to work (and having the trooper move in the physical space, so the feet are all at the right angles on the floor):3 points
-
Hello! This build IS NOT dead, I work in healthcare and with the craziness that was 2020 it really put this project on the back burner. I was feeling inspired and broke the kit back out and I finished all the rough trimming. Taped up the forearms and biceps for a rough fit. I was told return edge is for those pieces will need to be trimmed off for screen accuracy and higher level certification. Excited to keep this going! Sent from my Pixel 5 using Tapatalk2 points
-
Joseph has a thread here2 points
-
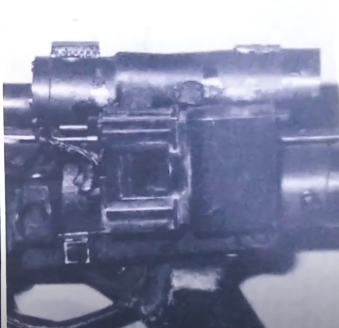
Square detail is on the left side above the trigger and between the magazine and counter as shown below
 1 point
 -
This is really well done! Incredible work!1 point
-
I love idea and execution of this! Definitely gonna have to try this method out on my build now. Ordering magnets now. Thanks Colin!1 point
-
Wow, awesome1 point
-
It may be the angle of the photo, but it appears that the bottom is not lined up evenly. If so, I would consider raising it unless you will be putting in mobility cuts. Mobility cuts1 point
-
That is very cool and very clever. Well done. Sent from my iPhone using Tapatalk1 point
-
You can contact @justjoseph63 for a set of them. Not sure yet, if he still has some left. Oh, and welcome back.1 point
-
Hi guys - long time no post but I'm coming back (family life forced my retirement from the UK Garrison), but I'm going to build a Fieldmarshall E-11 & find this really interesting. Are these greeblies available for purchase? Sent from my SM-N986B using Tapatalk1 point
-
Off to a good start, here are some measurements for the detonator which may be of help
.thumb.jpg.e865042b8ff9a40ac7cd855d367e2146.jpg)
.jpg.868b9fb43196c77cd340314af620c2c9.jpg) 1 point
1 point -
overwhelmed at the sheer abundance of molded ABS in front of me, I figured I’d ease my way into TK land... simple measuring, trimming, sanding... not E-6000’d quite yet, but a decent start nonetheless... then I hit the ammo belts and belt boxes with little trim... ...then, like never forgetting how to ride a bicycle, I jumped back into it. Tackled the faceplate trimming; eyes, teeth, brow trim, and riveted the back and faceplate... got a little more trimming and fitting of the ears, fitting of the mic tips, trimming the opening, and sizing the s-trim, but all in all off to a confident start1 point
-
After a bit of fiddling, got the right ear fixed up using ABS paste, and lots of sanding/polishing! It’s not perfect - did several passes and still couldn’t completely get rid of all air bubbles, but there are few enough that I’m happy with it now. Sits well enough on there too I think! Also, got the chin straps and s-trim in there: It’s crazy how once you get the ears on and the s-trim on, it goes from being a plastic thing to a fairly solid feeling helmet! Despite my lack of painting expertise, I’ve been feeling encouraged, so I moved on to the vocoder and frown. I’ve done two coats so far, and it definitely needs a bit of cleanup, but it’s getting there!1 point
-
Very cool, nice work, looks great1 point
-
I’m still constantly amazed by your masking and feathering skills. That decade of imaging work work certainly shows! Your highlights and light sources are always spot on too, which as you said, is important to get correct on the set too. Sent from my iPhone using Tapatalk1 point
-
Thanks! I think I’ll glue on the front cover strip, with an inside cover strip as well, and leave the back open for now and move on to the left thigh. M Sent from my iPhone using Tapatalk1 point
-
Wow, great job researching this. I also suspect that the modifications were made to belts for stunt scenes just like the omission of the Thermal Detonator on most of the stunt TKs in the fight on Jedha. Although, I believe the intention of the designers was to have the belt protrude past the ammo boxes by 1/8”, I would not be opposed to removing this requirement or changing the wording to allow for more flexibility give these references. Another possibility would be to develop a stunt class of the ROTK like ANH and no, I will not be writing that CRL but I am happy to assist anyone wishing to tackle that task.1 point
-
Dude, you’ll rock this one outta the park like you do all of your builds. Can’t wait to see your progress cause I know it’ll be amazing!1 point
-
That's the one I've got. Wasn't cheap, but worth every cent.1 point
-
I have a couple of different balaclavas, I don't wear them all the time and it depends on which helmet and which costume. I do find the thinner material type do keep you a lot cooler.1 point
-
What also works really well is the 3M Headlight Restoration kit (Home depot or Amazon for under $20). Using a cordless or corded drill take the kit supplied buffing pad and liquid polish and buff your cover strip area, and the rest of the armor. Regardless what you use slow polishing works best, prevents plastic melting as mentioned above.1 point


.jpg.cdfcfcd6fe9e74bbaf0decf674dbb407.jpg)