Leaderboard


Popular Content
Showing content with the highest reputation on 04/13/2021 in Posts
-
Yeah I saw those fancy contraptions of yours. Lol. Very cool idea. I was thinking about using them. Although the issue might be that the straps on the sides might be a little too tight and the middle might be too loose. So I'm going to try that first as I don't yet have a heat gun. Sent from my SM-G986U using Tapatalk1 point
-
Thanks Mario. Nice thread. I sent him a PM about the gaskets. Thanks!!1 point
-
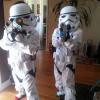
Nice work trooper, just a couple of suggestions before the DO's review: Watch the gaps match on both sides, you can see one arm the forearm is touching the handplate the other has a gap. Also different gaps between the thighs and cod. You also have quite a bit of black showing between your shoulder bells and chest, the original shoulder bells had a curve to them, you could also bring the bells in closer at the top, they appear to have a gap under them to the top of the shoulders as well. You may want to bring your thighs down a little or try move the whole back armor upwards to give you some clearance at the top of the thighs. Detonator not quite centered on the rear. Your ab and kindney plates are not quite lining up. Also your drop boxes need to be in line with the end of the plastic belt. Ideally the large tab is removed (or trimmed to match to the other tabs) Some paint missing from the top front ab rivet Thigh ammo strip rivets are very close to the corners. Could you also supply image of the inside rivets connectors. Also rivet heads are quite big. Plastic belt corners should meet with the width of the fabric belt, also the button covers should not be placed on the end of the belt. Detonator clips should be closer to the detonator panel A few tweaks would really make this application stand our. Good luck with approval.1 point
-
I need gaskets to finish my TFA armor kit from 850 and i cannot find them for the life of me. Anyone know where i can purchase them?1 point
-
Like it [emoji106] Thanks for this Sent from my SM-A715F using Tapatalk1 point
-
Hi Richard, definitely we never have enough magnets and clamps , a tip I have been using when assembling thigs and shins is to place a piece of wood along the cover strip and pressure with clamps. It has worked really good to me.1 point
-
Hey Dan, that's a huge help, thanks so much. I'm always open to any tips and advice. I'm putting together my materials for lenses and frown mesh now. I'll be basing it on Paul's idea (or Paul's use of another troopers idea) of using standoffs and JB welding putty. I'm planning on using "Plastidip" for the black coating on the inside of the lid. I'm always open to any advice so keep'em coming.1 point
-
Hi Joachim, and thank you for your submission for ANH Hero EI! After reviewing your photos, there are a few items that need some work before we can move you along, sir. Please note that as stated in the CRL Text descriptions are only one part of the guideline. GML’s and costumers must consider both text and pictures (CRL and Reference) when reviewing the costume. . As D.O.s this also applies when reviewing submissions for Expert Infantry as well as Centurion. Starting with your bucket- You have applied for ANH "Hero", and while the ear bars have the correct number of bumps (3), unfortunately the faceplate on your helmet is that of a "Stunt" and is ineligible for approval for Hero EI at this time. Allow me to explain: The Stunt version has one (sometimes 2) extra "divots" (recessed areas) on each side of the frown as seen in your photo (see red arrows), while the Hero versions clearly have only 3 ***. Can this be changed? Yes. For my own Hero helmet I modified the Anovos version by filling in those extra recessed areas with ABS paste. It was a LOT of work, I won't lie, but it can be done. ***This is thought to be because the 6 Hero versions were made of ABS weeks after the 50 original Stunt helmets were made from HDPE and that the molds had suffered damage. Reference images We are suggesting that the interior "nipple" areas on the rear of the inside of your Hovi-tips be painted white. Reference images Hero ears tend to be much thinner at the top than the Stunt type, so we are strongly suggesting that yours be trimmed down. (The bottoms could be taken in a bit as well). Reference images We are also asking that you re-paint your tears and traps. As seen in the reference images, the tears had 7 or 8 long thin lines as opposed to 5 short thick ones. Reference images The lines in the traps should be lengthened as well. Reference images As seen in the reference images, the "Han" snap needs to be replaced with the correct one. Reference image As listed in the CRL. for Level 2 the TD screws must be slotted (not Philips) and be painted black. V head screws are not permitted. Reference image We noticed a small anomaly on your chest plate. It may be the lighting or camera angle, but there appear to be bumps that look like nipples. If they do have these bumps they will need to be sanded down, as there are no screen references showing this feature. We realize that you have some work ahead of you, but you can do it and know that we are here to help, and if we can be of any assistance please don't hesitate to ask!1 point
-
If you have some spare ABS, cut a 15mm wide strip into 1-2 inch long pieces. Tape 2 or 3 of these together and place them in the inside cover strip ridge. If your magnets are strong enough, they’ll hold flat on the scrap ABS pieces. Sent from my iPhone using Tapatalk1 point
-
Thank you for the info. I will check out the links. Much appreciated!1 point
-
Geeky Pink (SoulArt) Vendors list is here1 point
-
Welcome to the FISD! It's always easier to trim than add shims. When you have to shim the seam needs to be filled with ABS paste(a mix of small pcs of armor scraps mixed with acetone) then sanded and polishing. Lots of work. But doable. I have a set of RT Mod and it definitely will fit you. AM is also another option to look at. Both are great set's. Good Luck Future Trooper!1 point
-
That was some sanding, nice work1 point
-
If you haven't 3D printed before I would suggest adding slightly thicker walls when printing, helps with strength of pieces, I find printed parts can be easily cracked.1 point
-
So... since I have STL files, better get the hardware to print it out Just ordered an artillery sidewinder x1. Pretty excited to get into 3D printing, not that stevechewbacca pushed me heavily somewhat1 point