Leaderboard


Popular Content
Showing content with the highest reputation on 12/30/2020 in Posts
-
Its been a long haul (2+ years) but near the end now. Will have a build log on the site. There are pre-production pics but will wait until the kit is released to share in the build log.2 points
-
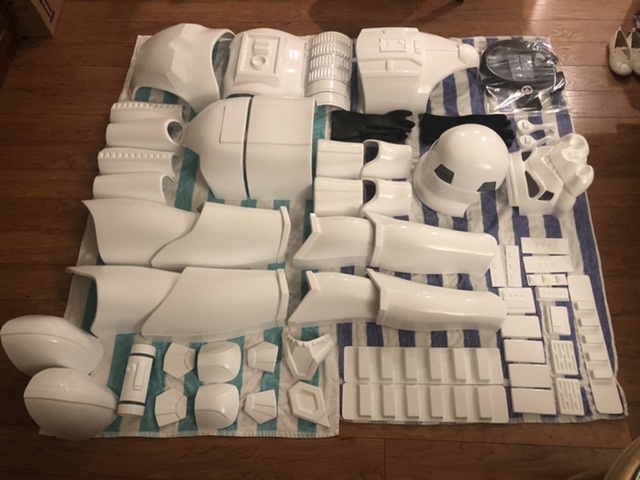
Aloha, I just received my kit from Dave yesterday. My first challenge so far is just trying to make sense of what is what. I have everything laid out in my living room on towels while I figure out what each part is. Being a mechanic, I have access to a lot of tools but I did order quite a few others including lexan scissors and small magnets. I’m definitely feeling mildly intimidated as I’ve never done anything like this but Ive been on the forums nonstop. Looking forward to this challenge even if it may take a while. Mahalo
 1 point
 -
You don't have to have any return edges on the biceps but many of us with smaller arms keep some to stop them moving around as much. A few of us have to also use foam inside to stop them moving. You can trim to match the bottoms of your shins, also remove any return edge so they don't rub on your boots.1 point
-
Oh, I have to completely trim to size yet. For the buttons themselves, I wish I could have thought of a simple template method but I came up with a blank. So, I'll just have to make them a bit more round with toothpicks. If you suggest I start over again, I'll have to run out and pick up a Filbert.1 point
-
Thigh time. Top return edges removed and taped the halves together. Next is to size the rear to my legs. Then install the inside cover strips.1 point
-
Hi Kaden, The Phasma CRL's need a lot of work and we rely on our resident experts to help with this process. This year has been very tough on some of those, so unfortunately the project has not been able to move forward as far as we would have hoped. These CRL's are long overdue and will take time to make them just right, I know members dont want it rushed this time around as it was originally, and yes we want to have a good EI and Centurion level fleshed out as these costumes so rightly deserve.1 point
-
Congratulations!! looking forward for your advances. remember "measure twice, cut and glue just once"1 point
-
Exciting times, remember research is the key, measure twice and cut once, when in doubt check out the gallery sections https://www.whitearmor.net/forum/gallery/category/24-anh-tk-reference/ Good luck with the build1 point
-
The photos of the BS are broken links, could you update that so we have a clearer picture (no pun intended)? From everything I'm seeing, this should be a basic L1 passable TLJ helmet with no mods. Even the tiny little line around the aerator shouldn't be an issue, but definitely for L2 and L3 it should be changed. In addition, for higher tiers I think whatever color the rest of the armor is, needs to match almost perfectly with the red on this bucket. BS helmets have a tendency of having a "off" shade to their colors (such as with the R1TK), and always make it difficult to match perfectly with the rest of the armor. So a total repaint is potentially in order. The clips? Do you mean the trap-greeblies? I'm not seeing any issues there either. I am noticing the tube stripes are NOT totally hollow. If you look at the underside photo of the BS, only 3 stripes on each side are hollow, while the rest are covered by the interior plastic shell. This I highly believe should be modded as well. However, it's probably worth mentioning that I have no idea how dark the lenses will be when they're finally shipped out, so they MAY or MAY NOT be too clear, and easy to see the wearer's eyes inside. This tends to be a huge issue with any commercial bucket, the lenses are too clear from the outside.1 point
-
Many of us use a suit case, fits in most vehicles, all the parts will fit inside the torso so fits easily in a suit case, helmet carry separately1 point
-
Daniel Jimenez TK 26306 Centurion Letter JustJoseph63 https://www.whitearmor.net/eib/certificates/26306-centurion.png1 point
-
Not sure about honorary mention, but there would be serious bragging rights!1 point
-
Does #501 gets an honorary mention?1 point
-
Meant to add the BBB photo too. Tada:
 1 point
 -
1 point
-
Hi Mark, and thank you for your EIB application! CRL and EIB Application Requirements: All required photos have been submitted, and on behalf of the entire D.O. staff we are pleased to welcome you to the rank of Expert Infantry. Congratulations! Other-Armor Fit/Assembly; In this area we review observations made by your fellow troopers and the DO team. Some observations may lead to suggestions to improve the overall look of your armour. Note that we consider both text (CRL) and pictures (screen caps/reference images) when reviewing submissions. *************************************************** I followed your Building Thread till your pre approval submission and let me say you did an awesome work with your build . Let's start with the Helmet. We are suggesting to clean up a bit your vocoder to reflect the more accuracy the the screen used helmet. This is an easy fix ! Reference Images *************************************************** Centurion Requirements; In this section we prepare you for Centurion. Because Centurion photos show more detail than EIB, items pertaining to Centurion might be seen there and not here and additional photos may be required. We try to point out all that we can from what we see, but the final accuracy is the responsibility of the trooper. This could be just a dressing issue or a hot bath need, but your left shoulder bridge seems is not quite centered to the backplate, also there is a little "curl" of elastic showing, just something to consider every time you suit up. . Reference Images CRL L3: Ideally there no gap between the abdomen and kidney armor. Abdominal and Kidney Plate align horizontally at top Looking closely to your ab to kidney connection, we noticed that the kidney plate protrudes a bit from the ab plate and causes a noticeable gap on the left side, this could be just a simple strapping adjustment. Reference Images CRl L3: The top of the ABS ammo belt should sit at or just above the bottom of the central and vertical abdomen button panels. It would be necessary to raise your AB belt a bit to achieve the L3 requirement , in your case it seems that you already have a Velcro piece on the abdominal plate so it is easy to adjust. Reference Images Finally , your E11 Blaster. Your your cocking lever is silver color and these are normally black , a little silver (weathering) is ok, as you can see in the reference images. Just a simple detail and easy to fix in a quick painting session. Reference Images Congratulations again and looking forward for your Centurion submission soon. Well done Trooper !!! ***************************************************1 point