Leaderboard


Popular Content
Showing content with the highest reputation on 10/22/2020 in Posts
-
So after putting filler primer on the helmet pieces and sanding with 220 grit, it was time to begin assembling the bucket. Jeff cut small tabs of sintra and used them to help reinforce the inside seams Still have some of the face greeblies to smooth out before they can be attached. Hopefully I can take another weekend and we can knock more of this out. That's it for now folks!2 points
-
CableGuy: Thank you for the encouraging words. It is also a good idea to watch the Videos from RS. For the DA helmet I start to watch your Videos :). And you are right why should it Not possible for me. Gmrhodes: Also a Big thank you to you ! Always I asked sth. You are one of the first to Help. Sly11: I had this thoughts too. It must be a great feeling to look at something and say: I have built it. Maybe you are right and that is a good way. I only was afraid to damage this nice armor...and it cannot be repaired. Masked V: Ok :))) Harder: I thing you made the perfect decision. And wow......your deciding factor is incredibly great ! I hope you will bring a lot of fun and luck to this children/people. And I am sure that you are able to build an armor by your own:). So like I said the helmet will be a assebled. I have to make the painting. I also asked DA to let the eyes inside. I thought there is Maybe a Special way to cut them for a screen accurate look. But when the helmet arrive I will go to the building section. He also send me some pictures….but I am not sure if I have the permission to upload them.2 points
-
The other big thing you can’t replace is the feeling you get from building your own kit. You will be asked multiple times once you are approved and trooping where you bought your armour and you will be able to take pride in stating you built it yourself from a kit. You will learn new skills and be able to talk in confidence about the experience and joy that it is. I promise you, you will not be disappointed if you assemble it yourself. Sent from my iPhone using Tapatalk2 points
-
48hrs later, going to give more time given the glue for gloves hasn't arrived Sent from my SM-A520F using Tapatalk2 points
-
Hello and welcome, lots of great build threads to follow here and plenty of knowledgable people reading and waiting to offer feedback and assistance. If you have ever put a plastic model kit together then this is just the same. It can be a very rewarding challenge building your own armor as you take pride in your achievement. Yes you can purchase a ready to wear but you may find you will still need to do a little work to get everything sitting just right. Either way there are many who have purchased RS armor either way and the majority have had little issue. Good luck which ever you decide.2 points
-
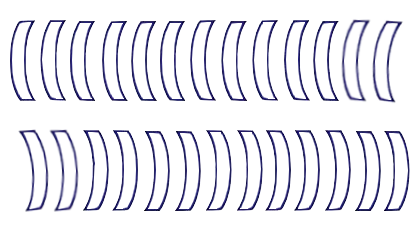
Here's some tube strip masking templates if you want to cut your own. I made these in Adobe Illustrator from scratch, they are not based on any specific trooper or design. Print them out to size, then place them on top of sign vinyl, etc. Cut through the paper and vinyl (ideally without cutting through the vinyl backing paper) and simply weed out (remove) the inner bits on the vinyl to create the template. You can use sign vinyl, masking tape or airbrush frisket. Use a sharp Exacto / hobby blade. Here's how I paint them: http://whitearmor.net/forum/index.php?showtopic=14806&view=findpost&p=179529 When printing these out, they should be 13/16" (@16mm) tall. Modified version, front stripes fall forward Paint options http://whitearmor.net/forum/index.php?showtopic=8117
 1 point
 -
A slow process but worth it in the end, coming along nicely1 point
-
Yep. Been a forum moderator for many years. I know the tediousness of what you and the others are working thru. I am following the top post, unfortunately, I’m not an all access member yet. So I’m limited to some of the “lighter” forums. I like to read and lurk a little. I’ll keep an eye out. (Raises glass) -Cheers Sent from my iPhone using Tapatalk1 point
-
Many thanks Craig, it's not too bad, unfortunately the editing side of things have to be staff as we have access to the threads but if you do find any threads which have watermarked images please post a link in this thread. We are trying to go through section by section so it doesn't get confusing to keep track, I would say we have taken a big piece out of the pie so all being well it won't be too much longer.1 point
-
Very nice work. A block of foam either side before your ears is great for holding the helmet in place, so you don't get the "bobble head" wobble while moving your head.1 point
-
Sorry i made a double post.1 point
-
Hi Jakob, what Glen means is that your biceps looks a bit uneven and you can down the left and I would suggest to down a bit your forearms to close the gap wrist/hand plates. I know those photos aren't for approval , but you can take note. Reference images1 point
-
Glen, I know this is tedious work. Thank you! If I can help, I would be happy to.1 point
-
Good morning! Completely agree with the previous comments before me. The question your asking is really your question. To their point. Some people prefer to have that experience. And some are looking for the fast route. I will tell you my choice. I chose to buy, yes at a high cost, a fully commissioned set of armor. I did a lot of research, and I’ve also purchased the posible mannequin, electronics, etc. I have a degree in ME, PSY, BA, and Statistics. I am more than capable to build my own. But for me.. my decision came down to Volunteering and Trooping. I highly desire to help people. I have personal experience with children with needs and I saw the affect in their spirits and strength when the troopers come and volunteer. It fills my heart immeasurably. That was my deciding factor. But much like different ingredients in chicken soup, even the 501st needs variety of people. You should decide what gives you the most benefit, personally. Either way, you’ll not be disappointed. Good luck future trooper! Sent from my iPhone using Tapatalk1 point
-
Garrett this is an amazingly well detailed build thread. Thank you from those of us who are building too. Sent from my iPhone using Tapatalk1 point
-
I’m just going to go back a few posts to where you are looking for a way to stabilize the knee ammo pack. I simply used gaffer tape behind mine to reduce its movement. I use a strip in the center inside of the box that runs up to the inside front ridge of the thigh. It stops it from dropping but also raising or tilting up. You would never know it is there. I chose white gaffer tape to honor the production crews, go too patch job on the screen used armour. Sent from my iPhone using Tapatalk1 point
-
It makes a lot of difference for viewing if you can get right into the inner inside corners of they eyes. Nice work in the teeth1 point
-
Thanks, I'll do a visibility check once I've cleaned my lenses :-)1 point
-
Looking good so far, a few references for you1 point
-
Ok. I'll definitely sort it out before I go for EIB, but I'll try to get it through basic as is.1 point
-
I think for basic approval you should be fine but it may affect higher level clearance. You may need to replace but I'd wait until a DO chimes in, or you can send them a PM to check, @justjoseph63 @TKSpartan or @shashachu1 point
-
Nice work, just a couple of things Your biceps are almost coming out from under your shoulder bells so I suggest bringing the biceps upwards, this will also give you a little more room at the elbows. TD boxes are being pushed forwards, you may need to lengthen the elastic so they sit straight. You have a gap under your thigh ammo strip which you could move upwards. There is also a step on your left thigh lower ridge, normally you fit the thighs together so the bottom ridges align Small gap between your left shin closure at the top You may need to add some shims on the sides of your ab/kidney Any gap between the abdomen and kidney armor is no more than 1/2" (12.5mm) wideAlso the tip "han" snap is a little far away from the corner Decals do not fully fill the trap areas, there is a gap around them, this would be more for EIB Looks like you still have some return edge on the sides of your TD panel as they are rounded on the ends A few teaks and I'm sure you will do fine. Good luck1 point
-
I am just about to start this build (a V3 Imperial Arms 3D E-11), the last part of my kit, so I will update you all with how it turns out. It has a lot of actual bolts and metal parts, and is so disassembled that it should make sanding the individual ones easier. I will be using XTC 3D for the first time to try and speed it up.1 point
-
I ended playing around with the classic shin strapping method, and then settled on this as suggested by @MoSc0ut with the straps on top and bottom and using bits of left over cover strips in the middle to make slots to slide the no cover strip half into. I may have made the slots too long - test fitting proved them not too easy to get on, but I'm calling them done for now! Added some padding based off of the test fitting as well: Sniper plate glued on: Painted screws/rivets - didn't get a picture of the abdominal -> kidney rivets but they are painted too: Painted abdominal buttons and glued on: Nearly done!! Here's a silly video of my test fit. I was so happy with it - was not expecting it all to look quite that good. Note that I was having trouble with the shoulder strapping, but this should be fixed now (and the bucket is my wife's Anovos ANH):1 point
-
Thanks that's what I had in mind1 point
-
Lid finished!!! I'll clean it and add a chinstrap tomorrow. For the sniperknee the sides are now glueing, we'll see how that turns out. Here's some pics showing the newly positioned arms:1 point
-
I think I’ll start a new topic and post pics there, I could also post pics of the crack test I did before I sprayed the armor! However I am not at home for a while so it’ll have to wait a few days before I can show you!1 point
-
This feed was crucial for me and approval of EI with minimal corrections! Sent from my iPhone using Tapatalk1 point