Leaderboard


Popular Content
Showing content with the highest reputation on 09/28/2020 in Posts
-
Hi folks, Checking in today and I’ve just noticed I’ve reached 3000+ posts on this wonderful forum!! Wowza... For me, this all started back in 2017. I wanted to renovate my yellowing SDS helmet and stumbled across “whitearmor” on google. I followed some excellent videos by Mike of Trooperbay and resprayed that helmet. Following that, I read more and more on white armor and, not too far down the line, I bought my first helmet kit from Ross at RWA. I documented that here on FISD and received excellent support and advice. That was a big part of the build, helping and supporting the build. After finishing the build, along with the armor kit, and clearing it up to Centurion, I was asked if I’d like to join the Imperial Attaché team - “HELL YES”, I said. :-) I later joined the DO team, helping troopers reach THEIR goals of EIB and CENTURION. If it weren’t for the changing of the guard that year, I’d have likely carried on in the role, along with the legends that are Joseph and Tony. Alas, things changed, however, this year the FISD is back on track under the exquisite leadership of Andrew. Anyway, enough waffling from me. I just wanted to say a huge THANK YOU to the FISD community. I won’t get into shout outs as I don’t want to exclude anyone, however, I’m pretty sure many of you know who you are - people that have made this forum, this community, so welcoming, supportive, and knowledgeable. Keep up the great work, everyone.---------- Best wishes Dan / CableGuy2 points
-
Got some more painted this weekend and was able to assemble almost all of the upper pieces. I am going to need to figure out how to keep this scratching easily. I will take Glen up on the advice of putting the foam pieces under the yoke to abs so it does not scratch so easily. Since these are fiberglass, it does not give as much. If this keeps happening, I might need to go with the ABS yoke and abs. I am ordering the boots and gloves for Giovanni. Cape will be from Geeky Pink, once I get clarification on the border (silver or no border). Biceps will be next, I have some rework to do on the seams first (need the etch in the lines better and fix my overlap issue).2 points
-
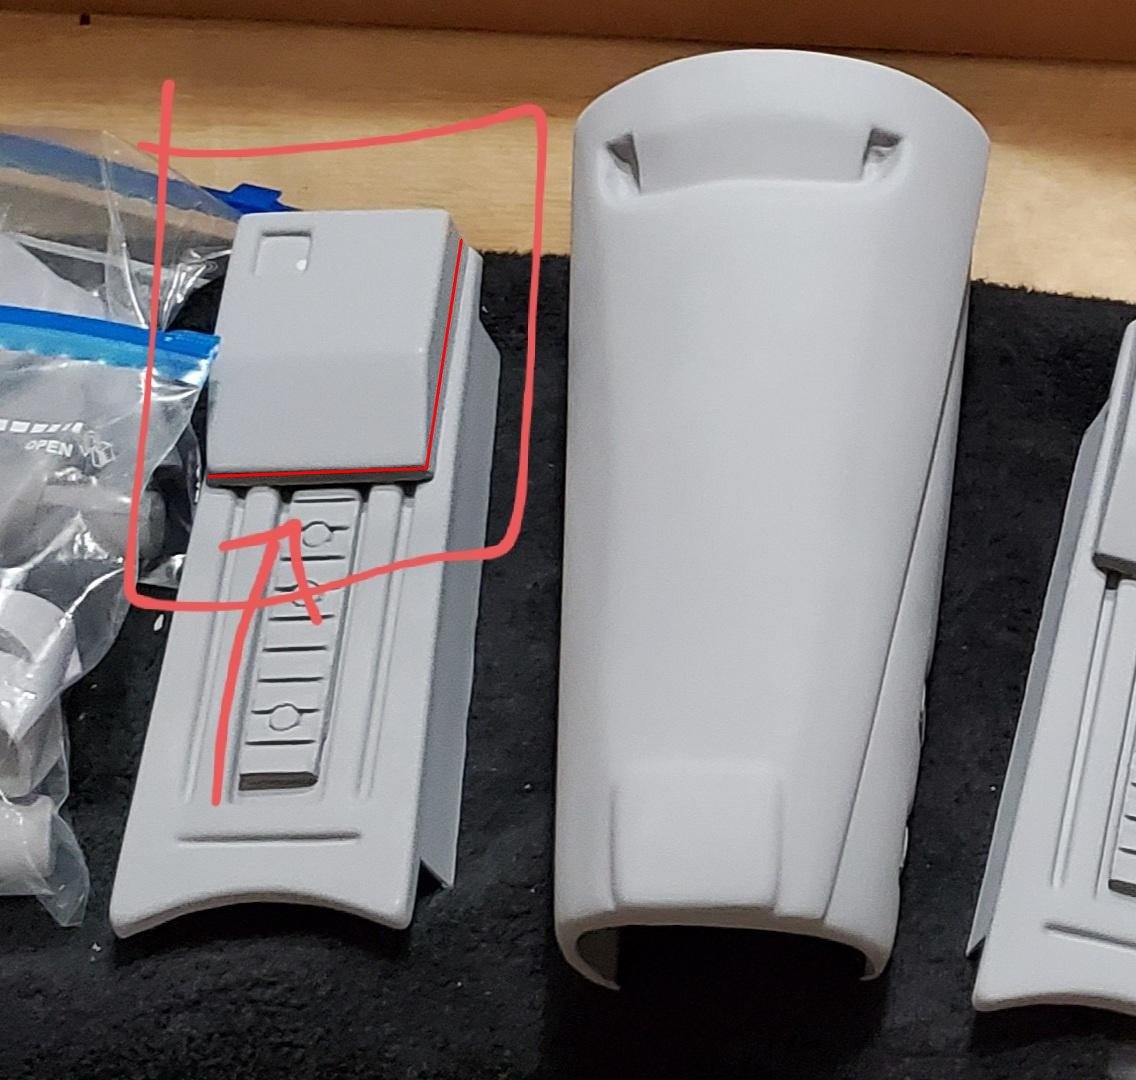
Drop box straps updated in CRL from 1" wide to 2" wide, so they are now correct.2 points
-
What can I say, Dan... you have been a vital part of the FISD community and done an outstanding job as a Staff member, so here's to the NEXT 3000 posts, brother! Cheers!2 points
-
Dan, you are a legend! :) Thanks for the 3k+ helpful posts you've done!2 points
-
Final paint detail to the ears Making mesh piece for behind the teeth Mic tips painted and once dry mesh added Have most of the pieces for the TD so will start on that. Trial fit end caps, need a little heat Getting size right Going for the "game version" TD so cut a piece of poly pipe. Adding some tape to get sizing right Then trim Just adding some glue to the panel and then wait for screws to arrive then can fit the brackets I made earlier.2 points
-
I've had this blaster around for some time and previously started to do some work on it, but never started a build log. since I'm starting to work on my FOTK and did start a log for that, I figured it was time to star one for this as well. and I plan on also start 2 other logs for 2 other blasters. for my first post, lets start with some unboxing photos! and it's built... ok maybe not yet... I was surprised by how few parts they chose to make it... just painted and glued together would be a simple build, but I'm not going to do that... this needs at lest glowing lights in a few places. The original plan was to try and install a BlastFX setup in it, even though it is solid cast foam parts, but that has changed! The BlastFX is now going to be part of my Imperial Factory printed 5th horseman build. [link to that build to be added once I start it]1 point
-
As Justin says, definitely check out Hellhounds. I have one of their E-11s from their very first run from about a year ago, and it looks and feels fantastic! I actually created a detailed photo review thread of it which is designed to be viewed alongside with kman’s Praetorian vs Hyperfirm thread. Here’s the link: https://www.whitearmor.net/forum/topic/48449-rubber-e-11-blaster-hellhounds-photo-review-vs-hyperfirm-praetorian/ Daniel is pretty responsive to IG messages, and as Justin linked to, he’s also on FB. Hope this helps! Sent from my iPhone using Tapatalk1 point
-
I have the funds and am ready ‘ to pull the trigger’ LOL ... I saw the RS propmasters as well but wasn’t sure about durability for trooping . Either way going for a rubber one for the same reasons you mentioned.. Thanks again for all the advice , you all rock as always !!! Sent from my iPhone using Tapatalk1 point
-
Just going through comparison from TKC to TFU and we allow both overlap and butt/join/coverstrip for TKC so I'll add both versions to TFU I will also lock this thread as Mike has sold the armor, new CRL thread is here:1 point
-
Congratulations Dan1 point
-
Very nice1 point
-
I started figuring out how I want my forearms and greaves to close, but I noticed the edges and interior had some sanded putty and fiberglass epoxy showing, so I sprayed some satin white inside. Now I have to wait a few more days before I'd be comfortable sticking velcro on there... The shins will clamshell with elastic in the front and velcro down the back. I trimmed some elastic strips for the forearms that I'll velcro in. They'll stay completely closed and hopefully expand enough to get my hands through. I noticed some spots around the edges of the thighs too, so I also sprayed satin white. They're ready for a final exterior coat of gloss white when it gets delivered! Then, of course, I wet sanded! 220 on the ammo boxes. Just a few spots that need more putty. And 220 on the TD. I also had to file some of the grooves and ended up poking through! Jim's TD is so finely detailed it's amazing, but some spots are terribly thin. I'll putty those areas and file them again more gently.1 point
-
Looks like minimal effort went into those holiday troopers. OT TK with a vibro-axe and a Porg? I love Christmas and Star Wars and the two together have potential but these are not good. @gmrhodes13 Agreed. Your holiday TK is far better.1 point
-
yes, I haven't seen that one before. I have seen the ones from celebration or something, and some movie frame caps. I look forward to seeing MORE1 point
-
The kit has sold and will be shipped out either tomorrow or Wednesday. It's going to a Legion member in Missouri. I've given him the link to this thread and asked that he check in with the team here.1 point
-
Nice work Steve, I love your fault finding, it's good information for those new to resin printing.1 point
-
Perfect! Thanks so much, that's way clearer & less scary to put together!1 point
-
Trim line added Same as FOTK
 1 point
 -
We have plenty of reference photos available without watermarks across them, this is one of screen a used TFA armour grieve spat. When I have some more time Ill load some more angles for you sir.
 1 point
 -
While I was at it, I decided I wanted to make the scope see through as well, so I modeled up the tube and other parts. then I started to print the tube and discovered a few issues.... first, even with super high detail STLs my printer can replicate the facets. then I realized it also printed things to tall. this photo is after I scaled Z to compensate. I thin it was 98% And I noticed what looked like some rings... and after paint those rings because CLEAR. there where waves in the surface... I spent some time looking into things only to find, my MOAI printer doesn't have any Z calibration, and the heater for it to make this resin work in cold weather was the cause of the ringing waves in the print surface. as it would let things cool down to far and heat up over large enough periods of time to make expansion and contraction of the machine it's self become visible in the print surface...1 point
-
Thank you, everyone. Those comments mean a lot. :-)1 point
-
another part of the blaster that kind of bugged me was the scope. it's also solid and the mold for the knobs was starting to show signs of wear but the time they pulled mine. it's not bad but a bit messy... and I prefer the versions with a bit of a gap under the knobs so. it was time to build my own scope. first I created the knob model and printed it. cleaned it painted looks good to me.1 point
-
ok, so... as I stated before I was going to do a BlastFX, but seeing as how this thing is SOLID parts. I chose to start making a 3D model of some potions to help me replace them if I where to just destroy them. OR, maybe I would use the 3D printed versions if I needed space inside. this is the part I started with. I build a 3D model of it. adding details bit by bit. I haven't done anything more with this part since, and with my changes of plan, I may just need to print the end cap, if I overly damage the real one while trying to removing it to hollow out behind the LED windows.1 point
-
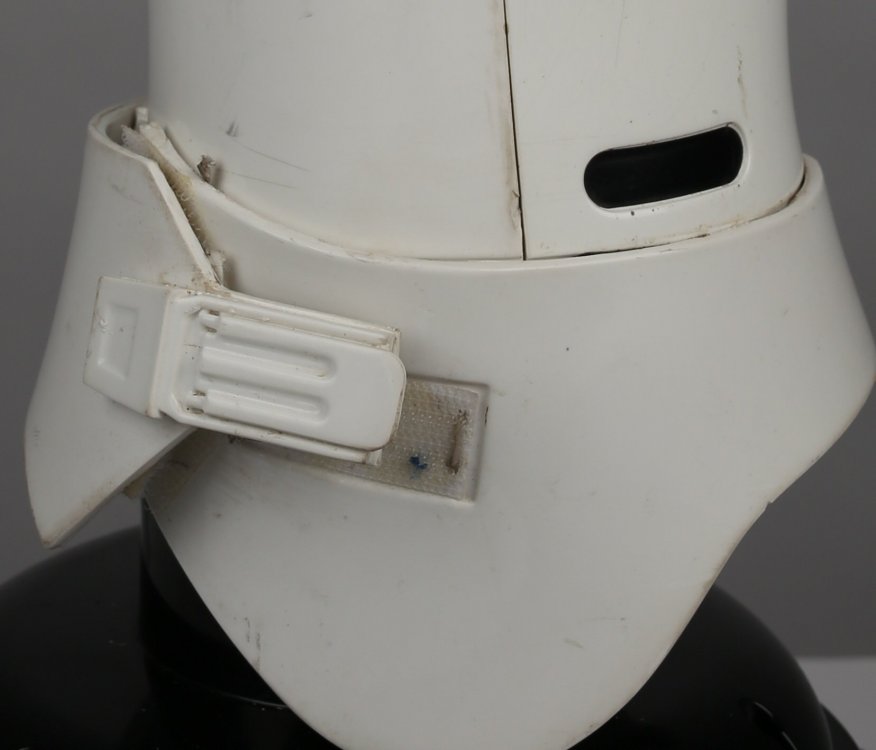
Quick reference guide for armor used in ******** Otherwise known as the OT (Original Trilogy) ******** Whether you are aiming toward Basic 501st approval, Expert Infantry or Centurion level, the FISD Gallery section is an invaluable resource for information containing hundreds of images of screen captures and film used armor. However, searching for the exact reference you are looking for can take a lot of time, especially for those seeking higher levels of accuracy or approval. This thread contains edited versions of those images and is designed to be a quick reference. It also contains notes and CRL (Costume Reference Library) requirements as applicable, but does not contain them all. For complete info. you can view the various costumes here: CRL IMPORTANT! Please be aware when applying for higher levels that the Deployment Officers do not depend solely on the CRLs when reviewing submissions. Screen caps and reference images are also taken into consideration. When in doubt, always feel free to contact any member of the D.O. Staff for assistance... we are here to help! The costume categories are shown as ANH (A New Hope) Stunt, ANH Hero, the Empire Strikes Back (ESB) and Return of the Jedi (ROTJ). Items for Basic 501st approval will be listed as Basic Items for Expert Infantry approval will be listed as Level 2 Items for Centurion approval will be listed as Level 3 Requirements from the various CRLs will be shown like this: bold, italicized in white, and may be paraphrased for brevity. Comments will be listed as Notes: or Important: TO SEE A PARTICULAR AREA, JUST SCROLL OVER IT BELOW AND LEFT CLICK ON IT! HELMET ARMOR BOOTS/HOLSTER Brow Trim Chest/Back Plate Boots Ear Placement AB/Kidney/Posterior plates (including strapping Holster Ear Screws Belt (ABS-Canvas) and Drop Boxes Ear Bars Shoulder Bells Tears/Traps Biceps/Forearms Frown Thighs/Lower Leg Armor Tube Stripes Thermal Detonator (TD) Hovi Tips Gloves/Hand Guards Vocoder DOWNLOADABLE PDF for PRINTING: Courtesy of Caleb (MaskedVengance) https://drive.google.com/file/d/1BbwWkC8nwLgH-jvU634IUcrO2mf4Yovb/view This will be an ongoing project and more photos will be added. I have locked the topic, but if you have any reference images you would like to see added, please feel free to PM me. Thanks for looking, and I hope this helps! SHOUT OUT to Mark (sskunky) of CFO for providing me with some great photos of his screen used ROTJ armor. THANKS!1 point