Leaderboard


Popular Content
Showing content with the highest reputation on 04/30/2020 in Posts
-
This is why Glens other nickname is "Q", as in the Q from James Bond, the gadget guy.4 points
-
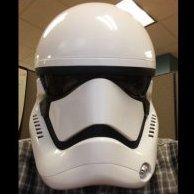
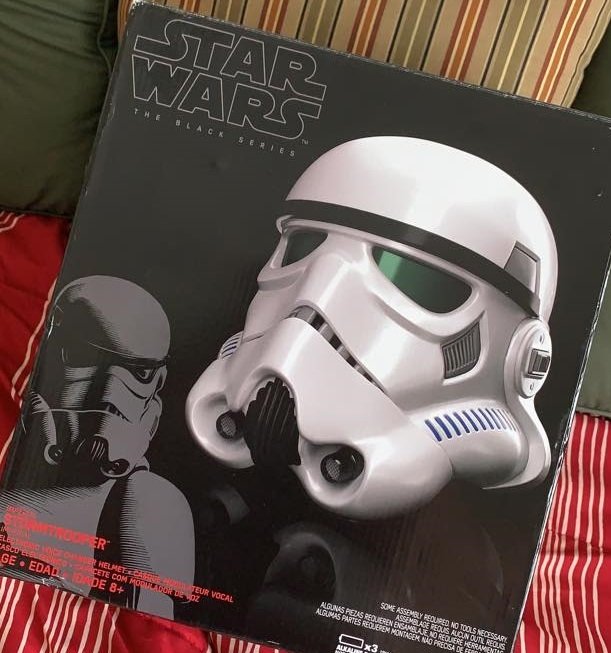
So I just ordered my raw ABS kit for my R1TK from 850 Armorworks. Going to go with The Darkside Closet for my soft parts, Imperial Boots for my boots and gloves. Got my bucket already, which is a Black Series helmet, pictured below. Got replacement hovi tips for Ukswrath, new lenses and helmet gasket from OPLEprops on the way! Just waiting for my BBB day! I'll continue to update this thread as things progress! FOR THE EMPIRE!
 2 points
 -
@CableGuy - nice to see you! Been through most of your videos!!!! After much research - you cant beat personal recommendations at the end of the day. - I went with RWA (Ross's Kit)2 points
-
Hi Caleb, Have you checked out the RS Propmasters YouTube channel? They ran an excellent series on how to accurately build their armour. They give all of the original dimensions of their suit - for me, this would be the best starting point. See if the original sizes fit your frame - if it does, that’s great and you have screen accurate sizes. If they need to go up of down a little, you can make adjustments. For the ab buttons, yours could still be trimmed down some more. It’s like that you can counteract the warping when you glue by using some strong magnets. If you want nice, straight edges, you could try the score and snap method. If you’ve not used that before, let me know and I’ll point you in the direction of a example of the process. :-) Best wishes Dan2 points
-
Little update! It's been warmer here in SoCal (actually TOO warm some days haha), so I've been able to lay more paint. Everything (save the helmet) is FULLY WHITE now! All the interiors are resin-ed, decently smoothed, and painted flat white. All the exteriors are fully primed and have had at least 1-2 coats of flat white base, then at least one of gloss white on top. Just need to sand them back to 1500 or so, then let them sit for a week to completely offgas, mask everything, then I'll spray clear, hopefully in the next week or two. Tried to do a front and back shot so you can see a few of the interiors that aren't masked yet. At this point, the helmet is the furthest behind and is sitting in its last coat of primer, sanded and waiting for a coat of flat white - just need to finish filing out the tube vents and teeth. What a pain. I caved and used my dremel to connect holes I drilled at the edges, and nicked a couple spots, so I'll need to fill them back in a bit. I wanted to make sure these were cut out before spraying white though, so that's my project for the next couple of days. Oh, and in other fun news, got my Heavy Weapons Trooper EIB-approved finally, so that's cool! Centurion next once I find more energy to make a couple changes... I'm now halfway done with radiation treatment (10 out of 20 down!), and have been SUPER tired and achy, so it's been hard getting motivated to finish, but I'll get there. Thanks for stopping by!2 points
-
I printed a full F-11D kit using @The5thHorseman files probably around when TLJ came out. I'm finally beginning to do something with it. I started with a full inventory and assessment of what I have. I have come a fair way in printing and also now have a resin printer which changes things a bit also. I am going to be reprinting most of the smaller parts again on the resin printer to give better detail for less prep work. I did start this 2 days ago but a silly mistake ruined a full plate of parts, so that's currently back on the printer. I'll post pictures once I have some. I also want to add some basic electronics to the weapon. I want to have the red LEDs in the magazine and Hengstler, and also the front torch. I am struggling to source the one listed in the build guide PDF. Instead I have found the smallest one I could on eBay and will see if I can make it work, modifying the parts as needed. The rough plan is to run all of this off a single battery and 2 switches. I have modified the magazine file to add a place for a switch and hollowed out the Hengstler as a possible battery location. I have also added some wire paths to some files, but on others I will drill the prints out and then fill the exposed infill. The modified magazine file. Once I prove these work, and any other modded files, I'll make them available to anyone who wants them. For the front torch I want to be able to choose when it's on or not for photos/effect in darker rooms. I am hoping I'll be able to gut it and run some wires down the barrel to the battery and switches. I have bought some 12mm tactile switches which as luck would have it are almost perfect for the blaster trigger. They are meant to be PCB mount so I have modded one slightly to fit in and still have somewhere for the wires to go. Mine are 6mm height, so a 7mm would probably be even better. I'll solder on some wires and then glue the switch to the trigger, and a thin EVA sheet to the other side as a bit of filler/padding. I will be reprinting the handle for better quality so will run some tests on the old parts to check it works. Biggest issue with this project is fitting it around the armour build so I can get parts sanded and primed for paint once the world reopens.1 point
-
Hi everyone, First off I am sorry that I am not on here very much. I have been trying to stay at home as much as possible to help stop the spread of COVID-19. When I do go shopping I do not just wear a mask, I wear a helmet! I have been doing this since the state of Pennsylvania has asked for people to wear masks. My main goal was to bring some cheer to everyone else and to not look like a cowboy or surgeon ;p Has anyone else worn their helmet out and about? I would be shocked if I was the only one. Keep safe and hope all of you are doing well.1 point
-
Hello All Finally after years of trying to convince my wife that I really needed to become a trooper, I brought my first suit. I say first because although I started the kit 2 weeks ago it has already consumed my life and my head's been turned on other suits already. Im enjoying doing the research into the tricks and tips of the build and can't wait to finally post my acceptance pictures. Here's to an exciting journey1 point
-
Hello, My name is Gavin and I have no clue if I'm doing this forums thing correctly. Anyways, I am building my stormtrooper armor kit right now and I just figured I'd reach out and ask for help. I have a few questions for right now, and maybe more to come. So if any of you could answer any of these questions that would be great! 1. Does anybody know where i could find a FOTK instruction guide on the internet? I've searched the internet looking for a tutorial and i have barely found anything. 2. Are there any First order troopers here that have big feet? I wear a size 14 and I can not find any First Order boots that fit me, so if any of you know where I can find First order shoes for a larger foot I would appreciate it. 3. I wanted to make my armor more sturdy, (the armor is expensive and I want to ensure that it isn't going to break) What would you recommend i sue to make my armor more sturdy? I was thinking i add fiberglass to the armor but I am not sure. 4. Does anyone know where I can find the under armor gaskets for the First Order stormtrooper? That about sums it up for right now, like I said, If anyone can answer any of these questions for me I would appreciate it. Thanks so much, ~Gavin1 point
-
Coming along nicely1 point
-
Will do, thank you very much!1 point
-
I taped together all of my armor yesterady, hoping to do a quick fit test. But I quickly realized how difficult it is to approximate fit with multiple pieces precariously fastened with painters tape. I settled for a photo of a single shin and thigh piece, with me holding up the ab to approximate fit. My lovely assistant (an amused fiancee) helped tape the shin to create more of a taper. I've read that you want a little space between the bottom of the shin and the boot to prevent the shin riding up (I will be trying stirrups or attaching velcro to the boot to prevent shin shifting/ rotation during trooping). Is there specific guidance on this gap? My main takeaway was that I'll want to reshape every piece of armor so that it actually conforms to the shape of a human limb. How do you guys water bath larger torso pieces? Or is a heat gun necessary for these? I've decided to shift my approach to test fitting/trimming/gluing the forearms, then biceps, then shins. After that I'll test fit all torso pieces and lastly the thighs and shoulders. I'm also going back and trimming all remaining return edges to 3mm for functionality (less armor bite and risk of cracking). After further guidance from Jospeh, I've removed/ I'm removing the following return edges: Wrists top of the inside Forearm piece top and bottom of Biceps top of Thighs bottom of Shins neck and sides of Chest and Back sides of Kidney tab of the Butt (minimal to no return edge left) Shoulders around the Cod (minimal to no return edge left)1 point
-
Hello and welcome aboard, as mentioned there is no assembly guide most of the info you will find in build threads, lots there with different ways to assemble and strap so have a good look through. I'm not sure what size Imperial Boots goes up to but you may also be able to reach out to CROWSPROPS on Facebook, he does custom sized boots, to sure about FOTK though. Good luck with the research.1 point
-
Thanks again!1 point
-
Hi Gavin, Welcome to FISD. Glad to read you're building your FOTK armor. Here you can find lot of info and help from some skilled Trooper that can give you advices and tips. I would like to recommend you to open a Building Thread into the following forum sections depending of you're building a TFA OR TLJ TK : https://www.whitearmor.net/forum/forum/161-tfa-build-threads/ https://www.whitearmor.net/forum/forum/195-tlj-build-threads/ About your questions, I'm not an expert but I'll try to give some help. 1. Does anybody know where i could find a FOTK instruction guide on the internet? I've searched the internet looking for a tutorial and i have barely found anything. You can find this info into the building threads links I have gave you before. 4. Does anyone know where I can find the under armor gaskets for the First Order stormtrooper? Take a look to this thread: Hope this can help. Cheers1 point
-
Thanks! Just started my build thread under the Rogue One forum. Will definitely keep things updated as the build progresses!1 point
-
Congratulations for your purchase . looking forward to see photos of your BBB day. !!1 point
-
Just put in my order with 850 Armorworks for my R1TK kit! Now to get the soft parts, the last few supplies, and then wait for BBB day!1 point
-
Working on it as we speak. Waiting on some deliveries to complete and then send pics for approval!!1 point
-
Good stuff, Stuart. I’ve had 17 troops with my RWA kit and it’s been great. An awesome, and affordable way to get into this hobby. Hope you enjoyed the videos. [emoji1303][emoji16][emoji1303]1 point
-
Brilliant Dan, thank you for adding.1 point
-
Now you've got me thinking, Stew. If only I could find a discreet place to hide my Aker amp I would do this in a heartbeat!1 point
-
The fitting of your forearms/biceps looks pretty darned good to me! As long as you can get your hands through the wrist opening you should be good to go. Can you post up a pic of the ab-button plates sitting on your chest plate where they will eventually be glued? If the warp is severe, a hot water bath followed by immediately using a heavy object to press them down may be the answer. A heat gun can reach over 1000 degrees and melt/warp ABS in a flash so is not recommended.1 point
-
https://www.501st.com/members/displaymember.php?userID=17130&costumeID=127 Sorry. Thank bro.1 point
-
I have a RS commissioned TK ANH stunt armor set. I was asked to give them a lot of body/limb measurements before they started building it. It fitted like a glove right out of the box for me. A few minor adjustments were needed for EIB (level 2) status, like shorten the straps of the shoulder bells. No need to cut into armor pieces itself. For basic aproval the armor usually is good to go right out of the box. It's almost May The fourth. .... they might have some nice discounts....1 point
-
Thanks, I've been slowly getting through their videos, they are still making them so I'm catching up. I've not worried about their exact sizes to much but that's a great idea. I imagine I'm a little bigger than screen accurate, but I shouldn't be too far off. Thanks for the button pic, I keep seeing some and forgetting where they are. I already trimmed the smaller plate to match, I'll trim the larger one tomorrow and compare. I've been using the score and snap as well as lexan scissors depending on the piece I'm trimming. Thanks again1 point
-
I do like it. But not enough to build another character. I’d go Mandalorian or get better quality pieces to upgrade my Obi Wan. I gotta get me one of those printers. Seems dangerous though. The ability to make things.. I don’t have the room to display all the stuff I’d wanna print! Sent from my iPhone using Tapatalk1 point
-
There are several modelers working on these at present so there wont be a shortage of supply that is for sure. Files are already available to print your own.1 point
-
Very nice, I add a 3.5mm jack to my blasters that are wired along with the speaker, normally fit them underneath the barrel at the back behind the handle then your hand covers the wiring, so they aren't seen, allows you to run a cable from the Aker amp down your arm to the blaster, nice and load for conventions.1 point
-
First ab section is done (bottom row, rear to my right side). I printed it with 2 perimeters and 5% infill to keep it light and as flexible as possible. This means it's currently a little translucent when held to the light. Looks pretty cool.1 point
-
Saw on instagram that this is happening.. in case anyone needs another bucket to add to their collection. Sent from my iPhone using Tapatalk1 point
-
Took a day or so off to organise. There's a lot to deal with in this project: about 17-18 armour pieces (made up who knows how many sub components), 2 blasters and a helmet that all need more planning than "that bit looks like a good one to do next". I went through all the blaster parts I have and decided what needs a reprint in resin. Modified some to make it easier to add electronics to them. Things like adding a switch on the mag holder, went for a bigger one to make it easier to use but in the correct place, and hollowing out the Hengstler to make more room. I now have a plan for all those and will slowly work through the list. Some parts will be grey as shown above and I picked up some black for bits that will be black to help with con damage. The first plate came out prefect but was ruined when I washed them. There was a build up of old resin in the cleaning tub that stuck to the new parts. This has now been filtered and so should prevent future mishaps. It was a bit cold today due to rain so will re-run that plate again another day. Picture for interest: on the resin front here is my UV curing "bucket". It's a Rogue One Popcorn bucket lined with almost 5m of 405nm UV LEDs. Don't look in there, it's bad for your eyes. I take care to ensure its not on when not covered. I also scaled all of the upper body armour to what I think should fit me. It's up at 105% in the horizontal planes, and no change to height. The scaling was done part using armorsmith, partly in meshmixer. Armorsmith I'm using for a "does this look about right all together", this is so that nothing ends up out of proportion with the whole. Whilst 5% doesn't sound like a lot it's better to be able to see it before you spend days and money printing. The actual scaling was all in meshmixer. I won't go into to much detail as the plan is to make some videos on this process but I need to figure it out for my self first. This shows all parts after import into mesh mixer, combining, scaling, separating and then finally renaming. I also did was a couple of sizing tests. I was a bit worried about if certain parts would fit me after my scaling. Rather than print 4 full sections at about 11-13 hours each and over half a roll of filament, I cut out a ring from the model in the area I was most concerned about. I have child bearing hips my mother used to say... This was then cut up to fit onto my printer and printed as fast as I could get it to. We don't need quality here, it's only a test. This hopefully shows what I mean, I've move the parts to exaggerate what I am doing. Once this was printed out, which took about 4 hours for all of it, I was able to super glue it together. You need to let the glue truly set, so leave it for a few hours or you'll just break the glue when you flex it. I also did a slice from the chest plate as a check for further up the body You can then use the slice as a real test of size on your actual body. Tomorrow I will start printing part 1 of 8 abdomen parts. I'm able to print about 1 a day as I only print during the day and only have a single printer. I've taken a short screen capture as an experiment to see how I will make the videos so you might as well get to see it. It's rough as I didn't plan on actually making it until I was checking my work at the end.1 point
-
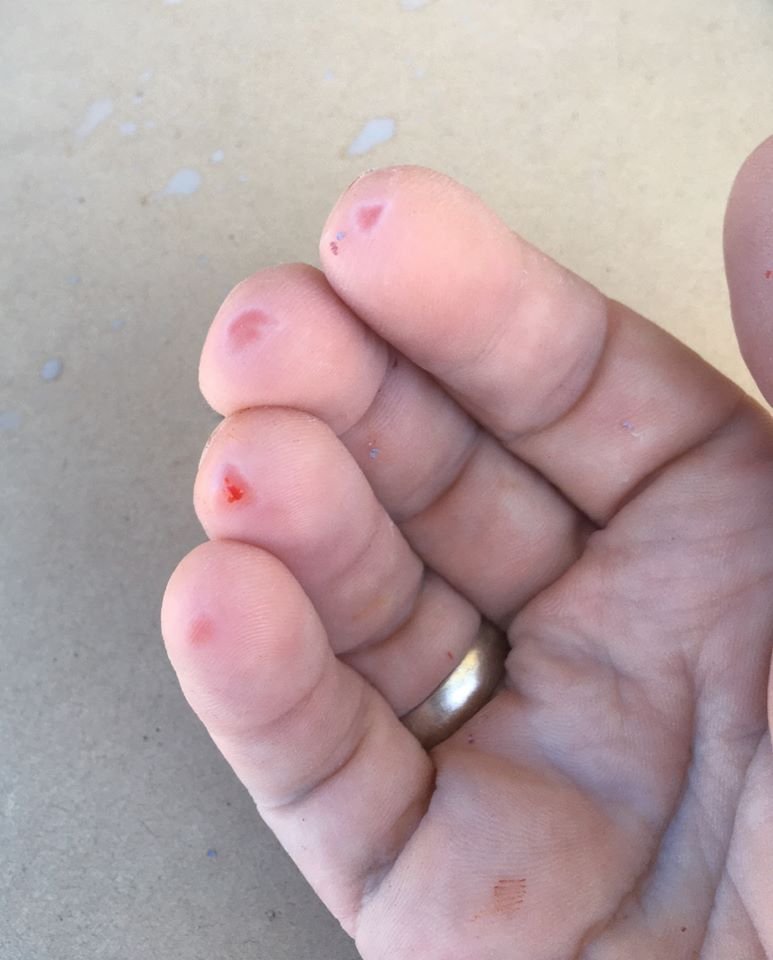
Just allows the sandpaper to glide a little easier and doesn't clog as much as dry sanding, I know what you mean about sanding your fingerprints down, here's my fingers after wet sanding my Sithtrooper armor, you don't realise the skin is going until it's too late
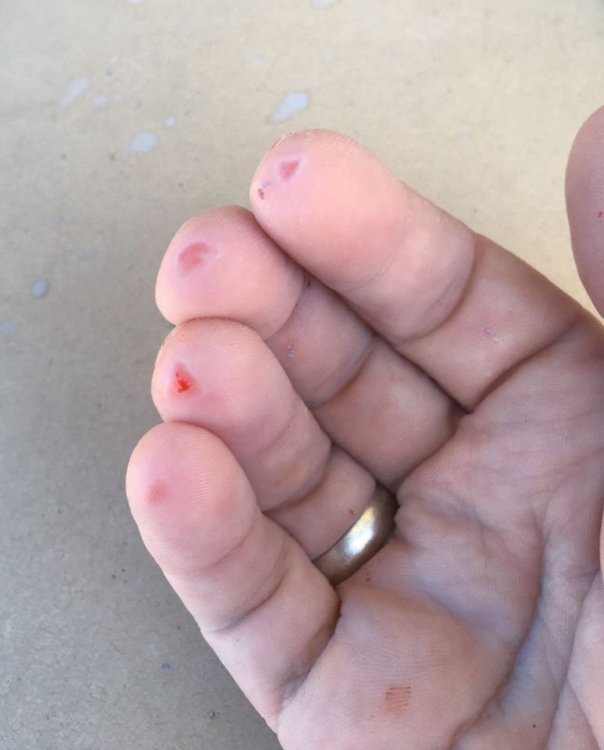 1 point
 -
I made a post on the First Order Stormtroopers FB group page and Darren ended up putting me in touch with Justin Lee Morrison. I believe he also makes holsters, but cannot conform this. Sent from my iPhone using Tapatalk1 point
-
Nothing like a big brown box full of shiny white ABS to make your day! Which armorer did you you go with, James? The reason I ask is that different makers can have their own little nuances on some pieces, and knowing who made it will allow us to better help you. As Mario mentioned, posting pics is really important (even if you have to do it one post at a time) especially if you have an issue. When you do have a question, it's always better to ask ahead of time before forging ahead. We are here for ya', so always feel free to hit us up if we can be of service!1 point
-
Looks real nice i wil follow this topic i have Some files to the 3D printer today1 point
-
Ok guys, the test of the shoulder straps was successful; however, the Velcro attacked to the front top section of the shoulder strap to attach them to the inside of the chest armor was not sufficient to hold the straps in place. Although, they stay tucked inside the chest armor, they did move and displayed a gap between the straps and the chest armor. This is not a serious issue and I am considering adding a snap to the strap and inside of the armor to hold the straps in place. Here are some pictures taken when I test fit everything the night before my troop. And here are a few pictures from the troop. So, in the coming weeks I will work out the remold and how to attach the straps. Once all this is done, I will put a feeler out to determine how many of you Rogues are interested in these. As always, thanks for the interest.1 point