Leaderboard


Popular Content
Showing content with the highest reputation on 04/10/2020 in Posts
-
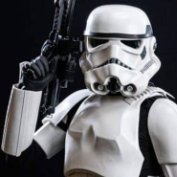
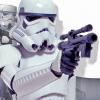
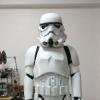
Heeey troopers! It's me again, with yet another build. I've had to fast track this one, so it's taking priority over progress on my 3D printed Shoretrooper (that build is going on over at the Pathfinder's Detachment). I finally have enough pieces printed/welded together that I can share some activity now. I'll begin by saying that this is a build for my 10-year-old son, Cameron. A few years ago, I built a Battle Buddy FOTK conversion for him, and he loved it more than anything. He would have slept in it if I allowed it. He was treated like a rock star everywhere he went in it, and he completely embraced the bada$$ FOTK trooper we all know and love from the movies. He was approved in it for Galactic Academy, and has trooped with me many times- always stealing the show! Earlier this year I was approached by our GML who requested some guidance from me about the FOTK Battle Buddy conversion process. The Garrison was looking to build a kid-sized FOTK for a 5-year-old boy named Jimmy (he has chronic heart conditions) whose only wish was to have a stormtrooper helmet. (Most people don't even consider that something like an entire suit of FOTK armor exists in a child's size, so the best Jimmy could hope for was a FOTK helmet.) However, we ALL know that it's possible! Since I am one of just a few troopers in our Garrison who have taken the journey of the FOTK Battle Buddy build, there was hope that I could help with putting one together for Jimmy. I told my son about Jimmy and his conditions and that I *might* be making another one. My son started to cry, and when I asked him why, he said, "I want Jimmy to have my stormtrooper armor. He's had a hard life, and I want him to feel happy." I was very moved by his reaction, but told him to think about it first. I didn't want Cameron to give his armor away simply because he thought it was something that I wanted him to do. He was very attached to his armor, and I didn't understand how he suddenly could offer it up like that. He said he would think about it, and we didn't discuss it any further. A week later, Cameron brought $60 of his saved allowance (which was pretty much all he had), dumped it on our kitchen counter, and said, "I want to donate this to the American Heart Association." What??? It was such an "out-of-the-blue" gesture for him, and it took me by surprise. Then I remembered Jimmy. So I asked Cameron, "So, is this about Jimmy? The armor?" And he yelled at me, "Yes! I want to help Jimmy! I want to give my armor to him. I haven't changed my mind!" Okay then. He wanted to keep the helmet, though. And that's what happened. Somehow I was chosen to be the person who was the "voice" for the surprises during the Bert's Big Adventure presentation . (Watch out- nerd with a mic!) The Georgia Garrison presented Jimmy with a Battle Buddy first. Jimmy was soooo excited about it! I don't think that the family knew that there was moooooore! After that, Lord Vader presented Jimmy with a FOTK helmet (a lovely Rubies Deluxe conversion crafted by our own Sith Lord, Scott Britt). Jimmy was thrilled! Then came the biggie... the Garrison donated a small case on wheels to hold the armor (just like the one I used for Cameron's armor), and the case was wheeled out in front of Jimmy and his family. I don't think they understood what was being presented until I started pulling out the chest and back plates and said, it's his VERY OWN ARMOR. Jimmy cheered, and the parents started to cry. Cameron suddenly became shy and stood off to the side, a little overwhelmed at all the people and the excitement. Could a mom be any prouder? I think not! And if you're still here... As a gesture of thanks to Cameron, I'm rewarding him with a new set of 3D printed FOTK armor. This set will be more screen accurate than the Battle Buddy for sure. I'm trying to build to 501st specs along the way. I don't know a thing about the FOTK armor, so I'm learning as I go. I bought my files here, and the person who made the files has been very, very, very receptive when I've requested changes to the files for improved accuracy and/or model print improvements. Seriously, if I ask for a change, I usually get a new file within an hour. I don't think he ever sleeps. Most change requests were for improved thickness of the parts. Everything prints out really solid. Here are most of the parts I've printed/assembled so far. Using Armorsmith, I've been able to scale everything down to fit Cameron nicely. Still have lots of sanding and gluing of greeblies before priming these parts. The white stuff on the seams is Apoxie Paste, and it sands like buttah. The shins are two halves (another request I made), and they are attached with heavy white elastic on the outside. I'll be securing them closed on the insides with some elastic and velcro. I love the shape of the FOTK back. Another change that was made per my request was that the yoke and back be formed in one piece. It is incredibly solid and very strong, yet has some flex to it as well (yay for ABS printing!). Cameron loves sliding this piece on. He keeps saying that it's like a Halo backpack. And today was the first day of priming parts! The weather was nice enough today to get a few light coats of filler primer on the biceps. One thing I love about filler primer is how it shows you what you need to work on. Like more fine sanding on those printed buckles. A small step on a much longer journey, but I'm excited about the trip!4 points
-
Happy Friday and thanks all!! Your kind words are keeping me super motivated After finishing gluing the reinforcement pieces for the brackets I drilled holes for and installed ab/kidney and cod strapping. Holding all of the bits in place to hammer the split rivets definitely wasn’t the easiest task! Ended up cutting the elastic for the ab/kidney a bit short too as shown... we’ll see how long it holds up for! Might redo at least the middle one if I have any elastic left over at the end! I also gave the rivet heads a quick sand prior to installing them to help the paint stick... not sure if that was clever or unnecessary, but I accidentally sanded all of the rivets including the non-painted one for the cod so maybe not that clever after all! Next, the rest of the torso strapping! I used the super glue method for these, and it went pretty well over all. Using Zap CA plus kicker it dried in no time and it was pretty exciting to see everything come together! Once that was done, got out the e6000 again and finished off the day by adding the right side torso strap and gluing the shoulder straps into place. Pretty happy with this progress so far! I’m a little concerned that I did some of the strapping a bit too tight in - it seems to be pretty stiff in some places, but I’ll revisit that later on if need be. P.S. I keep checking out @Ruffalo’s submission pics as more reference since they are gorgeous! Hope mine comes out half as stunning as yours is sir!2 points
-
Hello all. I'm Derek, currently residing in Northern Ireland and using the lockdown to try and complete my TK build. Its a DA Props kit and just about ready for strapping. I've done my e11 using a doopys kit with Blast FX installed. On here to brose for build tips and ask the usual how do I do something questions. Cheers!1 point
-
Hey everyone, back after a bit, here's what I've done. Thighs I came back to the thighs, and reshaped them at the top. Mostly just because the shape was inaccurate. Test Fit I did a quick test fit(before I shaped the thighs). The ab sits too low as well as the knee pads are droopy. These will be fixed soon. I also purchased some black Dockers suspenders, which I will attach soon. Here's another lower body test fit with the reshaped thighs. Strapping I also was able to finish strapping the shoulder bell to yoke connection. I also strapped the bicep to shoulder bell with Velcro, although it is not holding up so well, I may change it out for snaps. Other Stuff I also had to take a glamour shot with the armor on Here's a fun photo I took with the "boys"...er armor And that is pretty much it. Until next time1 point
-
So Anovos has a glorious product update for us...... Yes, all of you fortune tellers are correct, everything pushed to Q2 or even "Towards End Of" Q2. There has never been a bigger bunch of conmen and crooks than Anovos, they are the worst.
 1 point
 -
Hi again Jon, great work with your adjustments for Centurion. Good luck with your application.!!!1 point
-
Greetings from Orlando, Makaze Squad! No better time to get started on a build when the Empire is in full lock down! We are all here to help! Sent from my iPhone using Tapatalk1 point
-
As Daniel mentioned, most of the sizing will be done on the back sides of the calves, thighs and forearms. Using his photo, you can see that the ridges on each side of the front run closely parallel to the cover strip on each side. Once you get that lined up/cut correctly you can adjust the sizing in the back as needed. This applies to the calves as well. When cutting down the height of the thighs, just follow the existing contour. You will definitely need to remove most (if not all) of the return edges on the majority of the pieces, but do this before final fitting/gluing.. (don't worry, doing this is screen accurate). Note in the reference photo the absence of return edges in most areas. This thread may help. Normally the return edges are left on the top/bottom of the kidney plate, the top of the posterior plate, the top of the ab plate and bottom of the chest plate. But Luke's armor had to be cut down as well, so in the image below you can see that the bottom of the chest has no return edge, so this is perfectly acceptable at Centurion level. You will probably need to trim the top of the ab plate as well to cut down the height, but again, no problems with approval there. Just make sure the top of the ab/kidney connections on the sides are level. In posting these pics of your build, you are doing the perfect thing. It's always better to ask before cutting, and remember there is absolutely no limit to the questions you can (and should) ask. We are here for ya'!1 point
-
Lol. HWT is something I might consider for sure!1 point
-
You are posting this in Sven's (HSM76) thread. Dracotrooper's (Jesse) thread can be found here: https://www.whitearmor.net/forum/topic/42791-doopydoos-full-resin-kit-wip-tinochris-more-additional-parts/1 point
-
Make the eyes like this. Sent from my SM-N920V using Tapatalk1 point
-
Dracotrooper, please tell me there's more to your build !1 point
-
Hi, You're going the right way trimming little by little. here a couple of reference photos for you to compare .I think you can trim a little more in the left eye and more in the right one. and try to take a complete picture of both eyes together. cheers.1 point
-
Just shy of 4 years since my original post and I'm finally getting back to it....Picked up right where I left off, parts were all trimmed and the painters tape has been on the armor since my initial fitting 4 years ago! Well last weekend I got back to it and have made good progress. Good news is I've lost a few lb's so thighs were able to be trimmed down and now everything is fit, retrimmed, and cover strips have been glued...except for shins as my boots were in the basement and I was too lazy to go get them....so that will happen this weekend! I also got the side and cod rivet on the abdomen/kidney and cod all drilled. Cleaned up the Anovos bucket quite a bit, removing paint from frown and trimming up the eyes. Got all of my elastic, nylon, snaps ordered. Half finished replacing the Anovos belt with a Kittle one, just waiting to attach things~ Hoping to make another push this weekend!1 point
-
@husky68 is right on the money, Chris. The biceps are a good place to get the hang of cutting, sizing, etc. and are a great starting point. If I could offer some advice, it would be: 1. If you have a question or are unsure about moving forward on a particular piece, ask (and post a photo) first before moving ahead. 2. Measure twice (or 3-4 times), cut once. You can always take more off in most cases, but putting it back is a different story. 3. Take.... your.... time. Rushing things leads to mistakes, so consider your build more of a marathon than a sprint. 4. Don't be shy about asking questions, no matter how small you think they may be. This is one of the advantages of having a build thread of your own... we've all been in your position and we are here to help, not judge. We want you to get it right the first time! I have some tutorials below that may help, especially this one, and will be following your thread. While you may be thinking of just Basic 501st, approval so you can get out and troop with the Tampa Bay Squad, hopefully you will consider going the extra mile toward screen accuracy and aim for EI/Centurion. It's really not as hard as you may think, and much easier to do during your build rather than after. This link will show you some more details.1 point
-
Great news Chris, I look forward to following your build thread. Sent from my SM-G960F using Tapatalk1 point
-
Hey guys, Previously I have trouble finding a high resolution of the crosshair to be printed in HD on stickers as everything elsewhere is in JPEG format. So I decided to draw my own. based on references I found on the white armor (FISD) forum. Sharing it here for all to use/mod. (This is in AI format, so all may size it to whichever sizing required without it getting pixelated) Cheers! Happy Trooping Wilson TK31593 Preview: E11 Ratina Display V1.ai1 point
-
Heavy Weapons Trooper is also an option... (hint hint, wink wink).1 point
-
Small update today (less time available now that the holidays are over...) Separating the T-tracks Spent this evening carving the sides of the T-tracks to create the illusion that these are separate parts, which I believe was first done by Dan. I hesitated to use a Dremel cutting disc on this delicate part of the tube, so I decided to use my engraving tool, a small file and 2 wax carving tools (in that order) instead: 20190105_000836 Fortunately I managed to avoid collateral damage and I’m quite pleased with the result: 20190105_001510 20190105_001609 20190105_003745 The more build threads I read, the more ideas I get for my own build. Thanks Tino for convincing me to start my own build thread; I really appreciate the feedback from experienced blaster builders! I also realized that I’m lucky that my electronics kit hasn’t arrived yet. Otherwise I may have rushed to the “pew pew” part, while now I’m taking my time with all the details that really make a difference. Unfortunately that was all that I had time for tonight... Cheers!1 point
-
Not much time left tonight, so only a minor update. Removed the edge on the back side of the rotary selection switch such that it requires less gutting of the grip. Thanks for the tip T-jay! Before: 20181213_235748 After: 20181213_235245 This saves a few mm....1 point
-
Hello everyone! Today, I proceeded with the End Cap Clip. As Doopydoos comes with a static resin piece, I opted to mash together two separate sources. I used Suitecase Props T-piece along with Tino's aluminum u-channel from his completion set. Here is the original piece Here is the combo of the two separately sourced pieces. Here are some comparison pictures: I decided I wanted the u-channel a bit shorter so I took out my trusty Cobalt hacksaw blade and took off around 2mm. In my estimation, it now looked more proportional against the T-piece. I also rounded off the edges of the u-channel following SMG references (FISD E-11 Blaster Reference: PDF Document Photo Compendium) Here, I would then, following SMG references as well, imprint knurling patterns using green stuff to the bottom of the T-piece. Following, I would use a curved aluminum piece to lever the T-piece for press functionality. 1 /16 " drill bit used to create hole in aluminum piece and on T-piece. A nail was scavenged to get at its head for insert and keep the aluminum piece in place. Initial attempt using JB Weld was unsuccessful. Used Tino's powerful CA glue did the trick. This aluminum strip styled after SMG references as well. I then proceeded to create the two support holes for the pin. Piloted using 1 / 16 " then to 5 / 64 " for the actual hole size. Since I didn't not have a 5 / 64 " pin, I had to shave it down from the 1 / 8 " solid brass rod I had. I inserted the rod to my drill and held it up against my square file. For anyone attempting this, please use ear protection. I found it necessary to examine the filing process closely therefore, putting myself close to the drill motor. Done! I will proceed to add a bit of E-6000 to keep the pin in place. I had thinned out the pin a tad too much. Also, if I ever have to disassemble, I can heat it and get the pin out. Thanks for checking in once again! Have a terrific day!1 point
-
Cutting the cod seems really scary, but it's not! You'll wonder why you feared doing it once it's done. The most difficult part is trying to figure out how much to bring the cod up. Reading other threads, I learned that the cod should be fairly close in to your nether region. I measured the gap between the cod and my bits, and used that measurement as the amount that I needed to move the cod up. Once it's been moved up, you'll find that it's much easier to walk around without all that extra junk out there. At least it was for me. haha... Yep, inner cover strips on everything for me first. It adds strength and is less prone to shifting on the parts while sizing. (Especially when shaping things in hot water baths!) So for the greaves, I cut them all down when fitting, including the inner cover strips. Here's what one of my shins looked like during fitting of my RS kit with just the inner cover strips installed. (Apologies for the lousy vertical cut on this. Ugh!) Then once the whole kit is sized to fit, I add the outer cover strips as a final step. This way, I can ensure that the cover strips I install are the correct size. I wouldn't want to install the outer cover strips first because I like to include the little corner details to the cover strips. Installing the outer cover strips first would mean that those details would get removed if/when I needed to shorten things during final adjustments. If you're a screen-accurate purist, you could always install inner cover strips first, then once you're done with the build, they could all be removed.1 point