Leaderboard


Popular Content
Showing content with the highest reputation on 08/24/2019 in Posts
-
First test cast with some old resin. Not bad so far. Still some practice needed to reduce trapped air.2 points
-
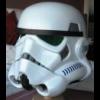
I see all this discussion of the new Sith Troopers and the Rocket Troopers but where's the love for the FO TKs in Episode IX? Has anyone noticed any difference between this FO TK and the FO TKs of Episode VIII? Just curious to know if any differences have been noticed. Maybe it's in a different thread altogether and I haven't seen it yet.1 point
-
It must be the pics. They are lined up perfectly to the edges. Must be just how they hang in the photos.1 point
-
Model building without instructions. Sent from my SM-N960U using Tapatalk1 point
-
Epic job mate - watching anxiously to announce your achievement to the Garrison!1 point
-
If you could remove “all” of that forearm return edge (wrist side) then you won’t be asked to do it later when you apply for Centurion.1 point
-
Resizing the forearms and E-11 assembly today! Sent from my SM-N960U using Tapatalk1 point
-
stormtroopers are five foot nine inches tall. the extras in the OT were taller, which is why their armour fit poorly. AM, TM, RT-MOD are enlarged for bigger and taller troopers.1 point
-
Unfortunately, that didn’t work- overnight soak made no difference. Looks like replacements in order.1 point
-
Also got my Praetorian E-11 blaster1 point
-
Looking good so far, abs paste tomorrow.1 point
-
Looking fantastic! Good Luck Commander!1 point
-
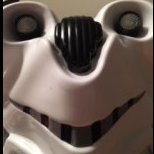
When I look at the helmet I hear Arnie’s line from Predator.., “You’re one ugly MF!” Sent from my iPhone using Tapatalk Pro1 point
-
All things you pointed out are on the list. I agree with the forearms but, the biceps fit perfectly. Not sure if I can make any smaller. Maybe remove some more return edge? Will these things affect basic approval? I'm totally planning on fixing these things, just want to know where I stand now. Thank you so much for the help! Sent from my SM-N960U using Tapatalk1 point
-
For everyone with a Husky armor box..., lets make a more usable workspace. This build will explain how to easily add shelving to your armor box, giving you more staging room when you’re suiting up for a troop. First let’s start by removing the 2 plugs on the opposite side of the handle. Same location, opposite side, of where the handle slides into the box, there are 2 plugs that need to be removed. From the underside of the ledge, push the locking-foot up and start working the plug out. For me one plug just popped out and the other was very difficult to remove. To make it easier, you can drill a screw into the face of the plug, then clamp vice-grips to the screw, making it easier to pull the plug out. Don’t forget to push the locking-foot up. Removed? Great! Next you’ll need 2 each, 1/2” pvc 90s and some 1/2” pvc pipe. 1 piece roughly 19” long and 2 pieces roughly 15” long. Leave the lengths a hair long just to make sure you get the best fit. You can trim them down as needed. The 19” piece of pipe is your center and the 15” pieces are the legs. Connect the pipe with the 90s to make a U. Now take your U of pvc and slip each leg into the Box where you removed the plugs. Take your Tote that came with the Box and set it in the pvc U and mark the pipe, near the Box, so you know what the maximum distance the pipe needs to be extended to hold the Tote. As long as you’re happy with the fit, go ahead and glue that pipe to the 90s to make your U solid. To hold the U in place while in travel I used a Velcro cord wrap. I drilled 3 small holes side-by-side and trimmed between the holes to shape a slot. Then I feed the Velcro strap through the slot and secure the U. NOTE - Do not use the U, secured or extended, as a handle to lift your box. Lid shelf frame - You’ll need some 3/16” steel rod which should be available at any hardware store. I bought 36” lengths for my small shelf frame. Measure the distance apart of the eye ports on the underside of the lid. Mine measured about 12” apart. That will be the width of your shelf. Next decide the depth of your shelf. I went with 10”. Now take your 3/16” steel rod and measure the depth first (again, mine was 10”). Bend there 90 degrees. From that bend measure the width (again, mine was 12”). Bend another 90 degrees making a U. Now the last leg will be to long and will need to be cut. Hacksaw, bolt cutters or I used a copper pipe wheel cutter. Cut the last leg the same length as the first leg. WARNING - CUT EDGES ARE SHARP! Use a file, grinder, stone or concrete to round off and smooth out the cut edges. Take your steel rod U and test fit it to your lid. If it’s angled up to high, remove the U and bend the last inch or so of each leg down a little, then reinstall. Repeat until you get the angle you like. Like magic, you made a shelf frame. Repeat to make an additional shelf frame if needed. Next you need a shelf platform for your pvc U and your steel U. I used fabric for mine. Basically you’ll need a piece like a pillowcase that will slip over the frame you made. With that said, it’s possible a pillowcase might work for the pvc U. But an even easier option would be a tee shirt ab section. Take an old tee shirt you don’t mind cutting up, see if the opening securely slides on the pvc. If so, trim it down, cutting straight across from armpit to armpit. For the steel shelf frame find yourself an infants tee shirt and do the same thing. You can always make your own if you, or someone you know, is handy with a sewing machine. That’s it! Now you have more room to set out and access your armor for a troop. Upon closing up your Box, pack up your armor, return your Tote to its position, remove the fabric platforms and toss them in the Tote. Next remove the steel frame U and turn it legs-down, over your Tote, against one of the inside walls, it will just hang there. Slide in the pvc U and secure it with the Velcro. Happy Trooping!1 point
-
This all sounds very promising. Vacuum pots aren't too expensive for a small that would easily fit scopes mags and many of the smaller parts, and I'm sure well worth the quality difference. I'd happily pay more for bubble free casts that require less time to clean up Cant wait to see some product and pricing.1 point
-
It is money well spent. We bought one from Ali express and its still going strong. Make sure you get a reasonable size so you can fit larger items in it. I am considering making a larger version with heavy duty PVC pipe ( industrial grade) the type used for under ground piping, sealed at one end with a silicon gasket and Lexen window at the other. The existing pump should work fine just take more time to evacuate the chamber and draw the bubbles out of the resin.1 point
-
Paint curing 101, funny how a lot of people don't understand the importance.1 point
-
Make sure to leave the helmet alone for a few days to allow the paint to cure properly before you start the detailing. I know it's hard but it will be worth it in the end.1 point