Leaderboard


Popular Content
Showing content with the highest reputation on 05/10/2019 in Posts
-
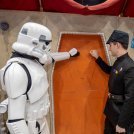
We have our yearly convention coming up at the end of June and I'm always looking to build something new for the public to see and as many of us down under won't get the opportunity to get to see Galaxy's Edge I thought it could be nice to replicate a few thigs we've seen so far. 709th legion banner and also the new Star Wars style aurebesh Coke and bottles. Reference Now this was a bit of work, of course I couldn't find any fonts that exactly matched so I had to photoshop a few different versions together. FO Emblem and helmet weren't an issue as they are standard and I was able to find them on a google search, shame I couldn't find larger versions though as they are just a little soft/pixely on the edges. I prefer using the pull-up banner stands rather than flags as they are self standing and don't require any fixings but I'm thinking I may still do a flag in case there is hanging room. Have a fellow member who works at an Officeworks store who can get printing down at discount which saved some $'s and here it is. Coke reference So the first thing was to replicate the font, again it was a matter of photoshopping a few different fonts as well as using the iconic Coke font. Had to print a couple of pages to get the right size, roughly measuring from computer screen. I was pretty happy how they turned out, not exact but pretty close. Next was to find orbs, half an hour walk around the shops and found some plastic orb solar garden lights roughly the right size, $4 each. Indecently we've never had the Coke round bottles here but did notice while searching they've been a thing at some Christmas's in the US. Next was the tops, no way I could have found these locally so it was time to put the new 3D printer and software to work. Enlarged the images with the girl holding the bottle on screen and roughly sized and designed from there, next printed just under 2 hours each, not exact but I'm pretty happy with them. Painted the orb's with a base silver, once dry added strips of black decal sheet to emulate the dark lines (I gather these are clear and can see the Coke inside). Next cut out the printed wording, added clear tape on top, gave them multiple cuts on the ends to help them bend and applied. Lastly the paint, I used acrylic water based paint, found them really easy to use when weathering my Sandy so used the same principals with them. Once rubbed back and weathered I sealed them with a clear coat so the weathering won't rub off. That done I tried find a box similar, no way I was going to find the exact box and I really didn't want it that big. Happy with a similar box I gave it a light sand and applied a few coats of red enamel, once dry in was on to weathering. While drying I made a couple of bent strips of aluminium, when you take of the lid you can turn it around and with the aluminium strips you can stand the lid up showing the logo. That I made once again merging fonts, printed out on paper, the cut out, traced around those on white decal sheet and then cut out and applied, was a bit of work but nice way to spend a rainy day inside. Also made a base plate for inside the box so I don't have to completely fill the box, covered the plate in chrome finish decal sheet which should help reflect the fake ice I'm waiting to arrive. I've also got some blue EI wire which I may use underneath the fake ice but will have to see how much it shows through before final fitting it. All in all I'm pretty happy the way it all turned out, I wish I'd taken more photos but I was just head down an too busy building. Will update once the fake ice arrives. Got a few more things I am thinking of putting togther but we'll see how the design stages work out, works in my head1 point
-
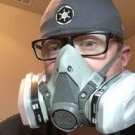
Hi Guys, Before Christmas I purchased a used set of RS Props PVC ANH armour from a member of my garrison with the intention of turning it into ESB TK. I have long been a fan of ESB TK's and used to have a Snowy. My first approved costume was a TK ten years ago, so have come full circle. I have finished this build and am going to trial it at an event tomorrow and get some approval photos taken as well. Here's a photo of the helmet completed once I removed the ANH paint job and added the ESB decals and black frown. I am really loving this kit. I love how the helmet has the old bumps and imperfections from the originals. Also being PVC the armor is so light and durable. I will post some photos of the full armour when I have them. Cheers1 point
-
It's called non roll elastic. I had never seen it before I ordered it. It's supposed to stay flat and not curl up on the sides. Here's a link: https://www.amazon.ca/gp/product/B004ALJMSQ/ref=ppx_yo_dt_b_search_asin_title?ie=UTF8&psc=11 point
-
Nice work the same as I do except I prefer using elastic, just allows a little give when moving and bending.1 point
-
Looking good Andrew. Love the clean snap mounts1 point
-
I enjoy obsessing about tiny details. I like to think of it as OC without the D.1 point
-
Hey John, Thank you so much for being so quick with those photos. You've got a nice, clean build there, sir! Your review is currently being processed by the Deployment Office, and we will get back to you shortly.1 point
-
Here's a picture of the outside. Tandy Leather was clearing out the gunmetal snaps, so I grabbed a bunch. I went with silver on the outside and gunmetal on the inside because it would bother me if one looked different from the rest. Thanks for pointing out the bottom snap. The nice thing about snaps is I can leave it off and have a spare strap for the top. I see some people have made a slot and tab for the right side; I may do that.1 point
-
Thanks man that really helped ill make sure to lable them as soon as i get home1 point
-
OK, I went with snaps held on by the split rivets. Right side.1 point
-
Congratulations on making Centurion. Welcome to the ranks.1 point
-
On the flip side, you could also sand the ends of your shins a little if they're cutting into the boots. I was getting a nasty scuff mark in one of mine before I did that.1 point
-
So that CRL when the show is out, and if we can see the 501st troopers on screen will be fun. You will be your own reference material lol1 point
-
Thanks for the tip!1 point
-
Congratulations mate and welcome1 point
-
Congratulations trooper and welcome to the rank1 point
-
If you hit the search button you'll find quite a few threads on it's use, having a quick look there doesn't seem to be any negative comments that I have seen https://www.whitearmor.net/forum/search/?q=Isopropyl alcohol1 point
-
That depends on what kind of car you have:1 point
-
Looking forward to the progress, we are all here to help and guide you along the way, good luck1 point
-
You can do it Fredrik1 point
-
Even so often I go over my boots with shoe whitener ---------1 point
-
A little wear on the boots is perfectly OK - and screen accurate. Do you have a pic of the damage? That would help determine if a fix is necessary.1 point
-
Finally filled the sink with boiling water again and reshaped the forearms. Filling only enough to cover one side at a time, with getting strips too wet, I was able to bend the halves flatter which is still tight on the arm but can be put on and worn reasonably comfortably. Likely tighter than suggested by others and putting in a strap may not be needed but they can now be worn. Still need to trim down the cover strips. Also I got tired of failing at improving the curve of the TD panel so I gave it one last attempt with hot bath and then just glued it down. Used clamps and elastics, tip from Brian on the elastics, and got it to keep the edges down. Dry fitting the caps on the ends without glue I can see that I am at 190.5 matching the CRL, but the space between caps and panel is 13mm on left and 14mm on right so one side could use a slight trim to get the spacing identical. I've just noticed that the clips provided from AP are not bend to match the tube and will need some adjustments. I will have to research or ask around for the best approach to take for reshaping them.1 point
-
Some have shimmed armor before, you would need to join and fill the seam with ABS paste. Couple of threads I've come across (just Google thigh shim whitearmor) which you may be able to adapt for the overlap method. https://www.whitearmor.net/forum/topic/38921-anovos-anh-thigh-shim-help/ https://www.whitearmor.net/forum/topic/31058-my-thigh-fix/1 point
-
Hello everyone!!! I am starting the process of recording my journey for my first ever build. First off I purchased an ATA kit in mid February 2019 after being on a wait list for 2 weeks. Price was awesome and the quality of the armor was fantastic. Not just from my standards (since I could have been sent crap and probably still thought it was great) but confirming with some local members that the quality of the armor was great. Second, this being my first build I chose to go for a Centurion ESB TK. Why? From my research, mostly because I like that the holster is on the right hand side of the trooper. And ESB is my favorite movie...... = ) I think the extra work and eye for detail to achieve Centurion is well worth the effort as well. If I am going to be poring 60+ hours on this build it may as well be as good as I can make it. So after BBB day, I looked and held the chest plate up to my chest at least 20 times, and then waited....... and waited....... and waited...... Where to start? Should I just start hacking away at plastic, cross my fingers and see what happens in a few months? NOPE! I did my research and learned terms like "return edge, and butt join, and had to brush up on the metric system." Then my prayers were answered... an armor party! I attended a semi local armor part near Peachtree City, south of Atl, and had an amazing time. I rolled in my 52 gallon husky tote with my shiny white armor, bag full of tools, two 2 liters of diet cola, Kroger brand potato chips, french onion dip and some celery and met some amazing people. Lee (Cricket) was an awesome host, and got my on my journey with my project. I spent about 5 hours "cutting off the ugly" on my plastic. Guess who did not own a pair of lexan scissors (This guy). Luckily the young lady who I shared a table with came prepared and gladly shared her tools as well as knowledge. If you have made it down to reading this part, you can tell that my mind goes from idea to idea with very little flow or continuity. Good luck following this build thread. This is the first thing I have written in a "forums". So if I am posting something out of topic or in the wrong location please feel free to delete or move. Also please forgive me of bad grammar or spelling mistakes. My wife is an English major and so far nothing has rubbed off on me from her skills. So why start now right? I plan to post pictures of my progress and give shout outs to those who have help me along this journey. I hope to make this thread in a form that is in my head. So I will make jokes when they come up, and give you way to much information on something as simple as cutting a piece of plastic 22mm in length. (Side note, I tried to spell check "lexan scissors" and one of the options was "Texan Scissors". 1.) Those would be some big over the top 100% cast iron cattle scissors that have to be carried in a Ford F250 Monday - Saturday (closed on Sundays). 2.) had a room mate in college that was from Texas (good guy), but made me hate every sports team from the state. Go Falcons btw. These are things to expect from this build. You will not learn anything new, you may even have a few points shaved off your IQ while reading this, but I hope it to be a fun read, and very realistic representation of a complete noob to this awesome world that is the 501st. I will share my story of how I first heard about this group and those who helped me get to the point of cutting plastic. That being said, my hands have finally healed from last weeks armor party (yes this is a dangerous walk of life, I have a blister to prove it, and the numbness in my hands and thumb has finally subsided.) It is not time for me to make pretty some of the ugly cuts on my shins. Note to self (Thighs front and back 20mm strips with 2mm overhang, Shins 20mm, Calves 25mm, and arms 15mm front and back.) Thanks everyone, I am looking forward to working on this literal dream of mine, and making some new friends during the process. May the Force be with us. -Shawn1 point
-
Cricket! Its going very slow unfortunately. I have trimmed off all of the flashing bits for all the pieces. Still nervous about removing something I am not supposed too =) Right now, I'm digging / researching into making sure I trim the correct measurements for biceps and forearms. Like cover-strip dimensions and overhang and what needs a return edge or not. I bought a bench belt sander and have been working on sanding / leveling and evening out plastic on some scrap pieces before I move to the real deal. OH I can crack walnuts with my bare hands now from the workouts from the lexan scissors and the ABS plastic. Totally worth it though. =) Im getting there. Thanks for checking in, and sorry for the late reply. I try to put in about 2 hours on the weekends most of it right now is making notes on things, and then finding visuals (im a very visual person when it comes to DIY and I second guess myself a lot.) Ill post some pictures of progress soon, once I figure out the picture limit barrier. Im a tech guy, but this is my first venture in "forums" and its love hate right now. Side note--- My wife is working on her Jawa build now too. She didnt want me to have all the fun. We got the monks cloth and brown dye. Shes really excited to start the cutting and building. -Shawn1 point