Leaderboard


Popular Content
Showing content with the highest reputation on 04/23/2019 in all areas
-
In Memoriam Detachment Leader Executive Officer Provost Marshall Deployment Office Pre Approval Forum 3D Section Hall of Fame Just For Laughs In The Media Trooping Trooping Opportunities Imperial Attaché Program EIB & Centurion: What do these terms mean? Advanced Tactics Awards EIB - The March To 1000 Merchandise & Branding Officer Merchandise Public Relations Follow FISD It is sad news that we report the loss of another legion member, Matthew Locklyer SL6456 passed away in early March2019. Matthew was the first approved Darth Vader with the Terror Australis Garrison (now dissolved) and he made the most of his opportunities to troop with his Legion brothers and sisters until his retirement. Jovial by nature, Matthew always had a smile on his face or a joke to tell. He brought laughter and light to wherever he went. Matthew's memory lives on posthumously with the 501st Legion Knightfall Garrison. Our condolences go out to his family and friends. "Buckets Off" Greetings Troopers, Celebration is upon us! The excitement is in the air, especially with the internet buzzing about Episode 9 and what will be revealed. If you're one of the lucky folks heading out to Chicago be sure to check out the scheduled FISD related festivities, including our Photo Shoot and Meetup, More information can be found on our forum in the events section. Special thanks to our very own senior deployment officer Sha Sha for taking charge of the on-scene planning! The excitement isn't only for our folks going to the windy city however. We're well underway into our first wave of CRL Reviews and Updates, which will be posted up in the coming weeks. Even better, we have some cool new FISD merch that will be announced very soon as well! Stay tuned, and in the mean time... back to trooping! With Unquestioned Loyalty Sarah Bailey TK-20466 "Alay" Detachment Leader Hello Troopers (and future Troopers)! I am proud to announce that we have passed the 900 mark (908) on our "March to 1000" Expert Infantry Badge campaign. A big "buckets off" to all those who have submitted and been approved, as well as our Deployment Officer team for staying on top of things. Well Done! Speaking of advanced tactics, as you may know we are working on refining the first round of CRL updates (ANH, ESB, ROTJ) and will be posting those for discussion in the coming weeks after the dust has settled from Celebration. We are also excited that there will be new updated CRL models, and are working on adding photos showing multiple angles of armor, which will give those just starting out a better, more defined reference to use. Note that while there are a few items that will relate to Basic 501st approval, many will concentrate on levels 2 and 3. We are also better defining and making the actual text a lot less ambiguous, which will help those on their first build as well as those aiming for EI and Centurion. As I mentioned in last month's NL, "Please know that exceptions to these updates will be made for those who have already posted their requests at the time when the new CRL changes take effect, and plenty of advance notice will be given". so keep this in mind. 2019 is gonna' be a GREAT year here on the FISD! With Unquestioned Loyalty Joseph Pedigo TK-10863 "justjoseph63" Executive Officer With Unquestioned Loyalty Steve Sheades TK-10466 "starsaber25" Provost Marshall Deployment Officers With Unquestioned Loyalty Sha Sha Chu TK-19233 "shashachu" Senior Deployment Officer With Unquestioned Loyalty Daniel Melin TK-99665 "TheSwede" Senior Deployment Officer With Unquestioned Loyalty Christine Lee TK-10401 "Cricket" Deployment Officer With Unquestioned Loyalty Mike Souza TK-11463 "msouza" Deployment Officer The FISD is pleased to announce the addition of a new area in the Advanced Tactics forum dedicated to those ready to submit for basic 501st TK approval. This section will allow future Troopers the opportunity to submit photos of their completed build to be reviewed by the Staff, Imperial Attaches and others in preparation for forwarding it to their GML for approval. Any and all advice/suggestions given will be specific, constructive, helpful and respectful. Please note that this program will NOT take the place of your local GML, as Detachments are not chartered for costume approval and can not override a GMLs decision, but is instead a peer review program designed to help you look your best and offer guidance and positive feedback. You will have the opportunity to ask questions about your completed armor, weapons (if applicable), accessories, etc. and get accurate information from the experts here at the FISD.. the definitive home of TKs worldwide. For more information on this program, please visit the link here Don't forget to check out the new 3D section, and please contribute where you can, also see the link at the bottom for the new Contributor award details Contributor Awards Main forum title: 3D Parts and Technical Sub topics: 3D Printer owners Your place to discuss what printer/s you own, recommendations, tech talk and the like, It’s a place to learn something new 3D CAD Designers Home of talented 3D cad designers, show off your 3D renders, of FISD related costume parts and accessories. Offer help and advice on programs, or offer to commission a piece for a fellow member 3D File Depository A home for 3D file sharing, Troopers helping Troopers is what this section is all about; yes a single location to keep any 3D files offered up by our extremely generous membership. This will be a 501st member’s only section and rules will apply to any usage of the content. I will be looking for content to get these new sections started so If you are interested in helping drive these new forums, then please send me a PM and let’s get the threads and the filament flowing. 3D printer heads will understand that last comment Here is a link to the New FISD 3D Contributor program. What a range of field reports this month I went from spraying coffee out my nose with laughter to that tough lump you get in your throat - thank you all who contributed! Last month I went through and created thread a list of all our Stormtrooper Hall of Fame recipients since the beginning of the program - you can now see your name displayed proudly on this virtual plaque. So without further ado let’s get another Inductee up there!!! This Trooper was only recently deployed to the galaxy and apparently has the luck of the Irish behind her. Everyone please join me in honouring TK - 18131 Lindsey! Salute and welcome to the Stormtrooper Hall of Fame!!! Congratulations! With Unquestioned Loyalty Aaron Gibson TK-99725 "Pyrates" Curator Hall of Fame The world's largest LEGO Star Wars minifigure display was just unveiled at Star Wars Celebration in Chicago! 36,440 minifigs make up a Stormtrooper helmet. Want Your Troop to be Included? Just a reminder if you would like your troop added please post your troop report in the Field Training Exercises section here ****Those with troop logs please post a separate troop report as it is easier to link too**** March - April Flashback to the 1980's Movie Marathon More here By: Glen, TK85421, "gmrhodes13" Astrofest More here By: Glen, TK85421, "gmrhodes13" Retail Embargo Lift - @May 4th For most of the year we are under an embargo from LFL and can not attend retail locations unless prior approval has been given by them. At certain times of the year this embargo is lifted, generally around Blu-Ray / movie releases, May 4th and Force Friday, the recent correspondence from LFL outlines the lift of the embargo: "While there is currently a retail moratorium on character appearances in effect, it is being lifted for the week surrounding the May 4th Star Wars Day holiday, which will be April 29 – May 5. All fans, costumed or otherwise, can participate with retailers of their choice to celebrate Star Wars Day during this one week window with the restriction that costumed appearances must not be used in the advertising for the event. Although these store appearances will be treated like an open invite, we’ll leave it to the fan groups to independently organize around these events as they see fit. LFL will not need to approve or coordinate these." "Please note that retail locations should not include restaurants, bars, or venues with no apparent reason to feature Star Wars characters. If the retail location does not stock Star Wars products you should NOT be attending." As always there are strict rules, please speak to your Garrison Commanding Officer, Squad Leader or if you have one Garrison Events Coordinator before organising any event. *REMEMBER* Always follow your garrison/squad's guidelines when in comes to organising Disney/LFL promotional troops, only command staff can deal direct with LFL. Serve proudly, ladies and gentlemen, and as Tim (Dark CMF) says: "Keep doing what it is that got you here"! Are you an approved TK that spends more time on the boards than the average Trooper? Do you enjoy using your knowledge to help out future and existing Troopers? If so, we would like to invite you to join the Imperial Attaché program! Members of the I.A. team are chosen to help out not only those here on the boards, but on a local level as well. Our aim is to have at least one in each and every Garrison, Squad and Outpost in the entire legion to be the eyes and ears of the FISD on a local level. A suggested level of EIB or above is preferred, as part of the duties include assisting those aiming for levels 2 and 3, but is not a requirement. Being active on the boards on a regular basis , welcoming new members and helping out where you can is, though. Some of the benefits: 1. Access to exclusive Attaché merch., including patches, etc. 2. Having the Imperial Attaché title under your name. 3. Being a part of the team that welcomes new and prospective members of the FISD. 4. Being the "go-to" person in your Garrison, Squad or Outpost. 5. Exclusive access to the Attaché HQ area, Imperial Propaganda Machine (newsletter) and merchandise discussions. We are currently in need of Attaches in many units, especially International Garrisons/Squads and Outposts. For more information on this program, please head here and if you should have any questions or concerns, feel free to contact me at any time. (Pretzel) For a complete list of Imperial Attaches, go here NEW ATTACHES! Please join me in welcoming our newest Imperial Attaches! @Digz Graavz (Chris) - An enthusiastic and eager trooper from Canada that is constantly assisting his fellow brothers and sisters on build threads. He has joined the team because of being inspired by fellow attaches assisting during his journey on becoming a trooper! We are excited to have him part of the team @Mworm1974 (Matt) - Hailing from Sydney Australia, Matt is another trooper who sees the value in "troopers helping troopers." His knowledge and expertise is something we value, and look forward to his contributions as an Attache of the FISD. @FN-1313 (Kyle) - Representing the Alpine Garrison, Kyle is another trooper who understands that having fun in this group is important but wants cadets and trooper hopefuls to get the best advice possible when building their kits. We look forward to him assisting new troopers on their journey @Bazz (Adi) - Garuda Garrison Indonesia has another bright trooper that has decided to volunteer to assist during builds. Adi wants to motivate others to create the best trooper! I cannot wait to see more TK's sprout up in your Garrison! Serve proudly, Gentlemen, and as Tim (Dark CMF) says: "Keep doing what it is that got you here"! IMPERIAL ATTACHE AWARD Imperial Attaché Award for those attaché's who have gone above and beyond [minimum 1 year of service] You can find a list of prior recipients here ATTACHE MERCHANDISE Attaché Patch NOW AVAILABLE For those of you on the Imperial Attaché staff, I am pleased to announce that the official I.A. patches will soon be available... again! Here are the details.. PLEASE READ CAREFULLY! Patches will be limited to TWO per person, and will only be sold to those who are current FISD Imperial Attaches. These patches have been graciously DONATED to the FISD, so all you will need to do is cover the cost of shipping and PP fees, which will be $1.00 each for those in the U.S. and P.R. and $1.50 each for those outside the U.S. What a deal! You can find the thread here Attaché Ambassador Hello Fellow Attaches! March has proven to be a busy month in welcoming new members to the ranks. We are eager to see their contributions. I am confident that our new additions will continue to represent and make us very proud. A reminder that I still have the 2019 Check-in Thread Open. If you are an active Attache, you must check-in to keep your status. Please do so here: Thank You as always for being here and volunteering to become the best of the FISD. Proud to represent all of you. With Unquestioned Loyalty Preston Christman TK-91488 "Pretzel" PRO Lead - Attaché Ambassador So what exactly are EIB (Expert Infantry Badge) and Centurion levels? These programs were designed for those who choose to take their armor above and beyond the minimum requirements for basic 501st Legion approval. It gives you the chance to show a level of dedication and pride that takes your armor closer to being as "screen accurate" as possible, without as much extra work as you may realize! It also works on giving a better look to the Legion as an entity, and you can bet others will take notice of your hard work. The 501st has a list of detailed requirements for Basic approval, (level 1), EIB, (level 2) and Centurion, (level 3) which can be found here in the Costume Reference Library, (CRL) http://databank.501st.com/databank/Costuming:FISD_CRL Here are a few of the questions people may be wondering about: 1. "I am a (tall/short/heavy/thin) Trooper. Can I still apply? Of course! These programs are open and encouraged for all sizes of TKs, as long as the costume is correct and meets the guidelines. There are many specific build tutorials to every option, as well as a vast network of fellow TKs on the FISD to help you out and offer suggestions. 2. "How much extra will I have to pay for extra items"? The cost is actually quite reasonable, considering the few extra supplies you will need, which are listed in the requirements area. While it may run you a little more to implement these additions to your costume, they will go a long way to improving accuracy. All needed items can be found for sale on this thread: https://www.whitearmor.net/forum/forum/16-ongoing-sales-project-orders/ While blasters are not required for basic approval, for EIB and Centurion levels they are, and may need upgrades (also listed in the CRL). 3. "I haven't even got my kit yet, is it too early to start planning"? Actually, aiming for Centurion is easiest to do right out of the box. 4. "I have my basic TK approval, can I still get in these programs"? In a word... absolutely! 5. "Are there any "perks" to this extra work and cost"? Besides knowing that you have a great looking set of armor, the 501st and FISD believes you should be deservedly recognized for your achievement(s), and allows you to wear the appropriate embroidered "rocker" badge of rank (available for a very minimum cost) on your shirt, helmet bag, etc., as well as rank decals to put on your armor bin. You will also have access to select "challenge coin" runs, receive (free) a cool certificate for your new rank, and have your title posted below your name in your FISD signature. Plus, once you reach these levels, you will have the extra knowledge to help out those who are looking to apply as well. 6. "Is it hard to apply, and what happens then"? After basic approval, all you do is make sure your armor is up to the standards set forth in the CRL, post a thread with the required photos in the appropriate area (see below), and wait a bit for the D.O.s (Deployment Officers) to address it. (Hint: Studying other people's threads before you submit can be a GREAT help). These are also listed on the main page of the FISD site. While waiting for approval, you will get some comments from others who will offer suggestions and constructive advice to help you out. If you should need any changes, the DOs will let you know, so you can adjust accordingly. Don't be dismayed if you do need changes... it's all for your benefit! After you are approved for EIB, then you can submit for Centurion. EIB https://www.whitearmor.net/forum/forum/19-request-expert-infantryman-status/ Centurion https://www.whitearmor.net/forum/forum/72-request-centurion-status/ Just remember that the FISD is here to help you every step of the way with whatever other questions you may have, but if you can't seem to find what you are looking for in your research, just ask away here on the forum. This area lists all those who have gone above and beyond basic approval toward screen accuracy. FOR March - April the 1st Imperial Stormtrooper Detachment would like to congratulate: Expert Infantry Badge Award: Shaun Belsey "shaunbelsey" TK 21166 EIB 899 Christopher Mann "Digz Graaves" TK 40834 EIB 900 A. J. Hamler "A.J. Hamler" TK 51351 EIB 901 Zylo Corely "zyloRN" TK 87654 EIB 902 Josh "alotmorestuff" TK 42250 EIB 903 David Lomas "xanatos66" TK 16629 EIB 904 Maria Maloom "Architect18112" TK 18112 EIB 905 Pascal Gutfleisch "GIZA87" TK 39701 EIB 906 Adi Baskoro "Bazz" TK 32294 EIB 907 Ekapol Rojpiboonphun "Skylaughter" TK 50121 EIB 908 GREAT job on your approval, now on to Level 3! Request your free EIB certificate here Centurion Badge Award: Candido Jose "DARTH CANDYMAN" TK 37077 Centurion 430 Miguel Jiminez "Forestrooper" TK 17307 Centurion 431 Lou Meszaros "LTM" TK 32568 Centurion 432 Outstanding job on reaching Centurion, Troopers! Request your free Centurion certificate here If you see any of these Troopers around your Garrison or Squad, be sure to congratulate them! As many of you are aware, the FISD is currently in our March to 1000 program. Our goal is to reach the one thousand mark of Troopers who have earned their Expert Infantry Badge, and although we are well on our way to this goal and have just reached the 900 mark! The amount of approved submissions is increasing (over 80 this year alone) thanks to the dedication of those willing to go the "extra mile" toward screen accuracy. Here is a brief description of EIB as written by Paul (Daetrin), our founder: "Expert Infantryman status is not required for members of this detachment. It should be viewed as an optional set of requirements for those who wish to take the accuracy of their costumes to the next level, and be recognized accordingly. We're a costuming club - think of it as an award for costuming excellence and you get the picture. The requirements will not replace or supersede 501st standards, but only serve as an inspiration for the level of accuracy that can be achieved. The standards are meant to be high but achievable..." Besides the added pride you will have in your armor, those reaching this level can purchase exclusive EIB gear (patches, decals, coins etc.) and get a free certificate for your accomplishment. If you are interested or would like more information about the program head here that will help. You can also contact myself "Pretzel" or any Imperial Attaché, and we will be more than happy to assist you! ****PLEASE NOTE**** Although I try to add any new merchandise to the monthly newsletter not all merchandise runs coincide with each issue, it is always best to keep a watchful eye on the forums and especially on the merchandise area for any new runs as I am not privy to when they may be posted, as such some runs may not be included. FIRST ORDER RACING SHIRTS ***Shirts Posted*** Shirts have shipped, if you haven't received you can contact Chris via PM Berbs42 Lead Public Relations With Unquestioned Loyalty Preston Christman TK-91488 "Pretzel" PRO Lead - Attaché Ambassador Newsletter Looking forward to seeing your Celebration photos, either post on the forum or send via PM to @gmrhodes13 With Unquestioned Loyalty Glen "Q" Rhodes TK-85421 "gmrhodes13" PRO Newsletter Facebook With Unquestioned Loyalty Daniel Lauber TK-55550 "Ripper_L" PRO Facebook - Editor at Large Instagram With Unquestioned Loyalty Preston Christman TK-91488 "Pretzel" PRO Lead - Attaché Ambassador With Unquestioned Loyalty Teresa Nuthall TK-41307 "Soulart" PRO Instagram Twitter With Unquestioned Loyalty Brien Edick TK-92892 "Harbinger" Merchandise & Branding Officer - PRO Twitter Facebook Group With Unquestioned Loyalty Tim Waychoff TK-51878 “Dark CMF” PRO Director Facebook Don't Forget We're on Facebook, Twitter & Instagram Facebook: www.facebook.com/whitearmor Facebook Group: 1st Imperial Stormtrooper Detachment (FISD) Official Twitter: www.twitter.com/FISD501st or @FISD501st Instagram: www.instagram.com/fisd501st On behalf of the 1st Imperial Stormtrooper Detachment Command Staff and the Imperial Propaganda Department http://31.media.tumblr.com/tumblr_m9yfp014BM1qedb29o1_500.gif2 points
-
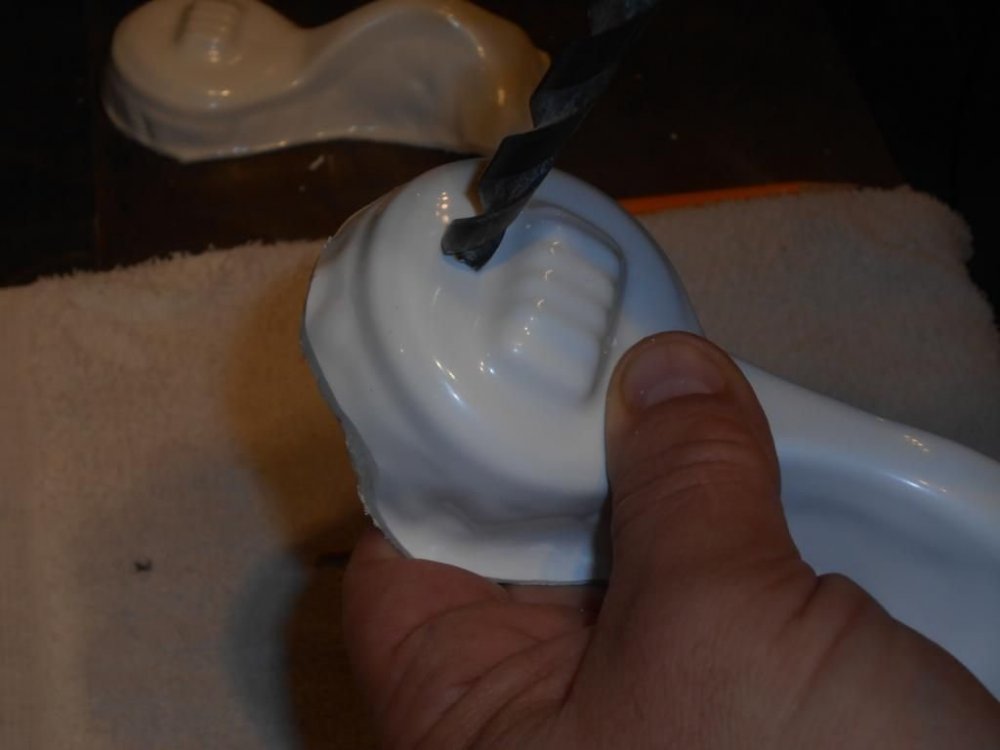
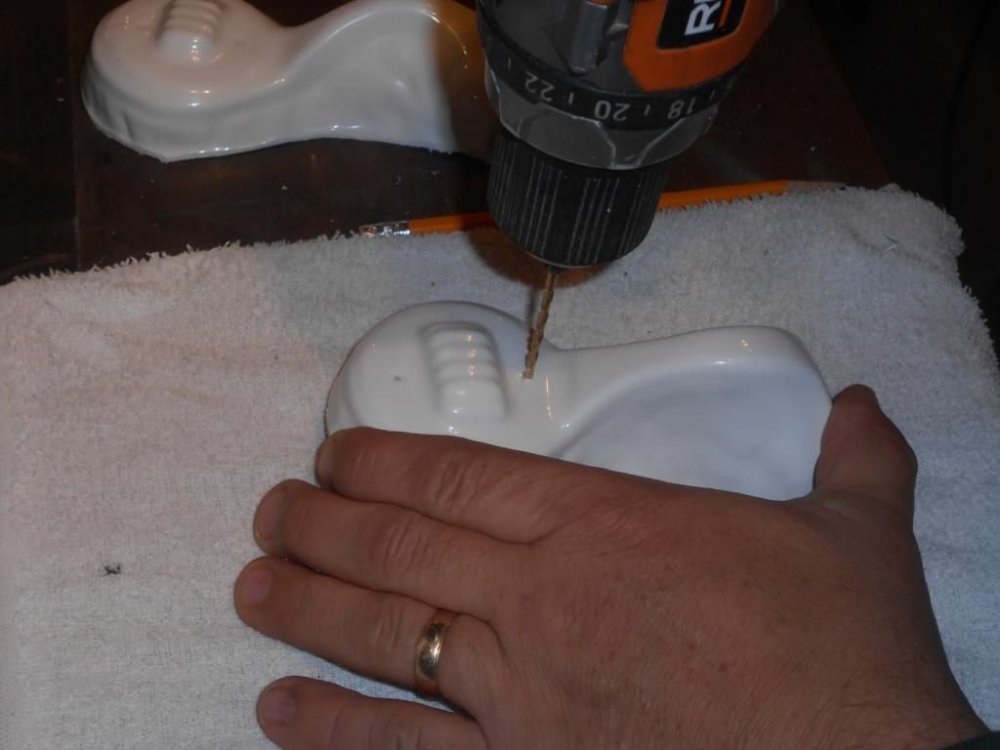
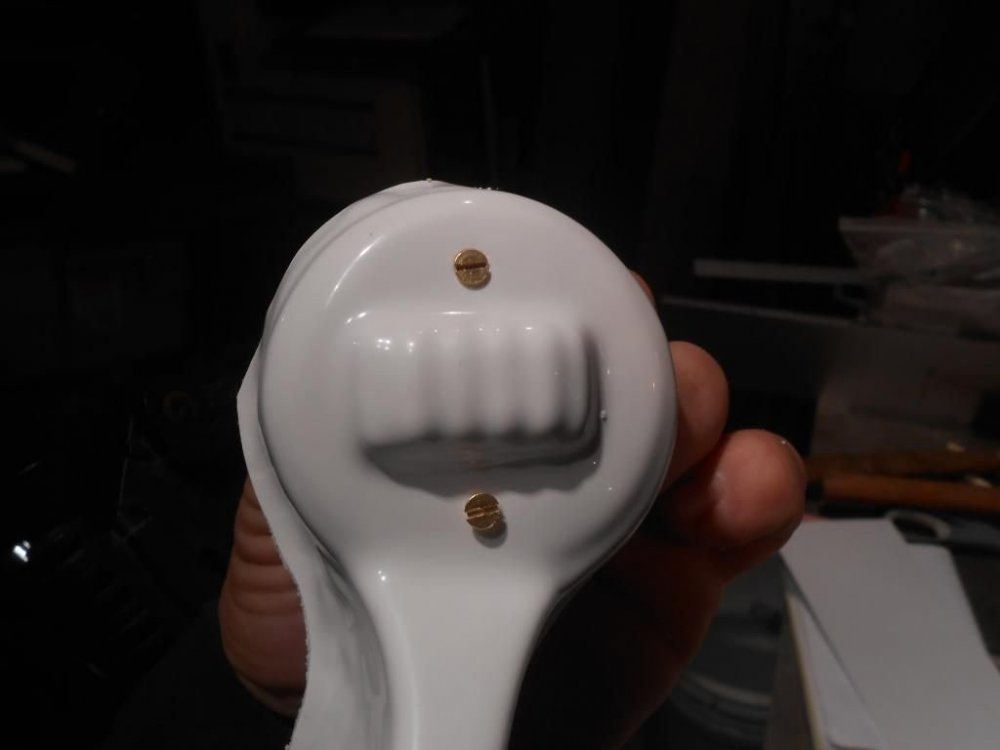
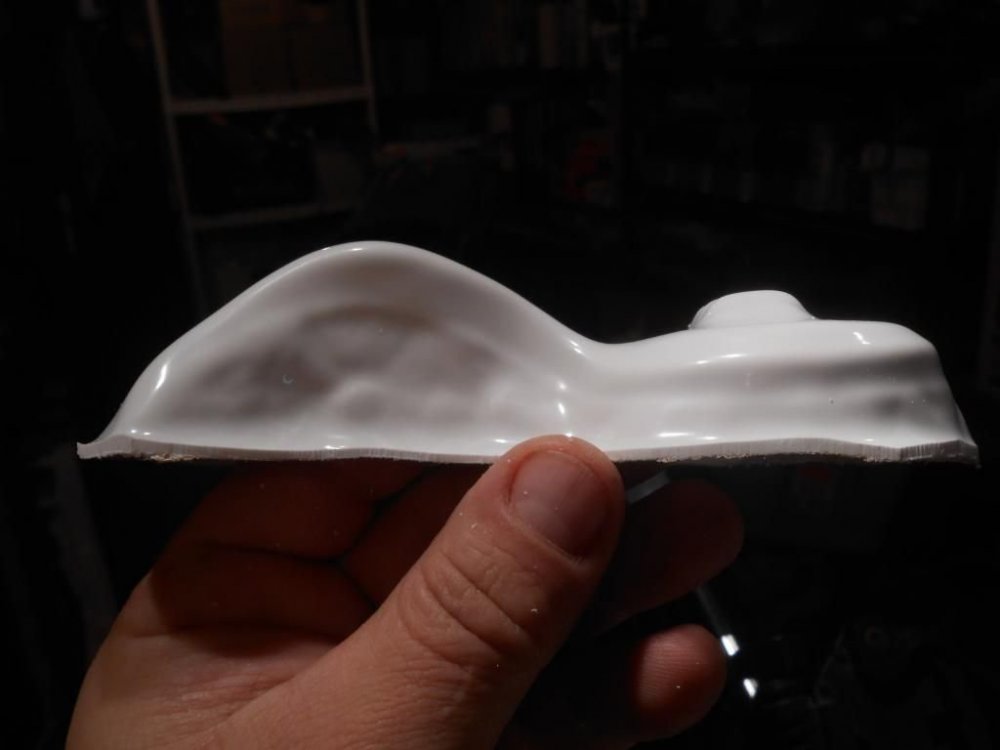
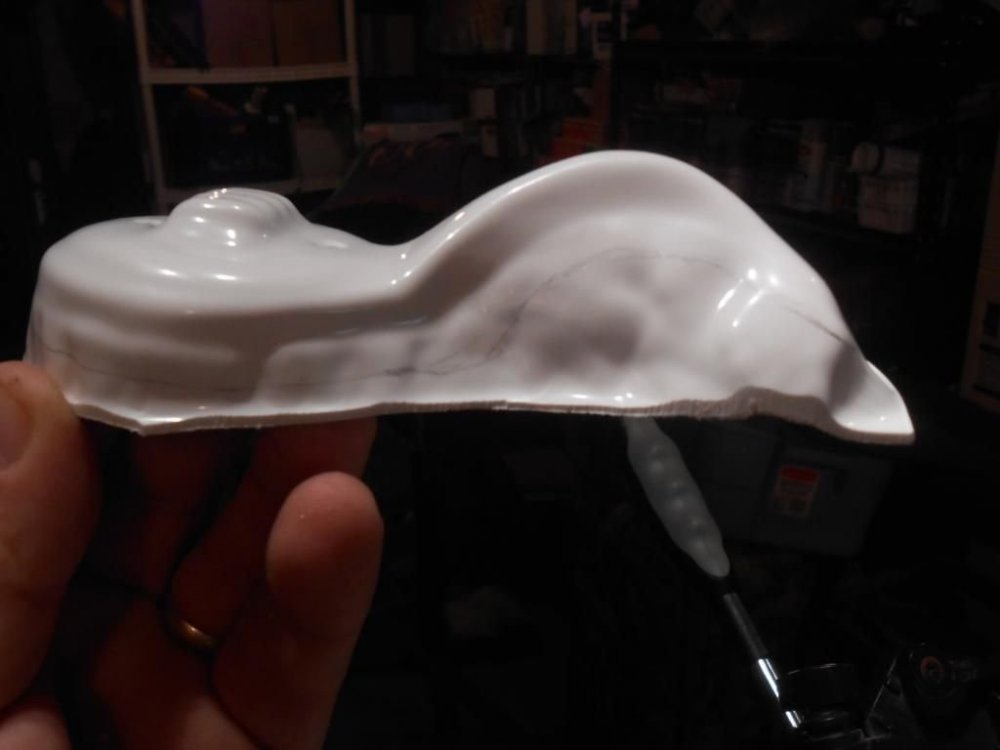
While there are a number of ways to attach the lenses inside your bucket, I found the easiest and fastest is to use a product called SUGRU. It is a kneadable glue, sort of like play-doh (plasticine) that is super easy to work with, and will hold forever. It does keep somewhat of a pliable consistency after drying, can be removed if you ever need to and does not emit heat during the curing process like CA or Epoxy glue. It is available online (like here on Amazon) and in many craft shops, usually in packets of 3. It comes in a variety of colors, but I suggest using the black. HINT: This can be done if you have already built your helmet, but it is easier if the face plate has not been attached. This whole process will take you less than 10 minutes to attach both lenses. Here is a photo of one of the individual packets, and the contents rolled into a ball. In this instance I am using 1 packet per lens. You will need a craft (popsicle) stick, sharpened at one end: Here is the trimmed eye opening from the inside: The next step is to roll the SUGRU into a small "snake" shape about 7 inches in length. (No longer). After that, you simply press it into the outside edges of the eye opening. Note that I left an open spot at the top. I recommend this for ventilation purposes. (Helps keep your lenses from fogging up). Place the lens evenly over the opening. Using a craft (popsicle) stick, push the glue firmly into place around the outside, making contact with both lens and helmet surface. Don't worry if it seeps through to the front. Hint: This glue is strong stuff. You don't need a crazy amount of contact surface. It will not come off unless you take it off. Turn the faceplate over, and any glue that has seeped through (see red circle) can be easily removed with the sharpened end of the craft stick. Allow 24 hours for it to dry, and you are DONE!1 point
-
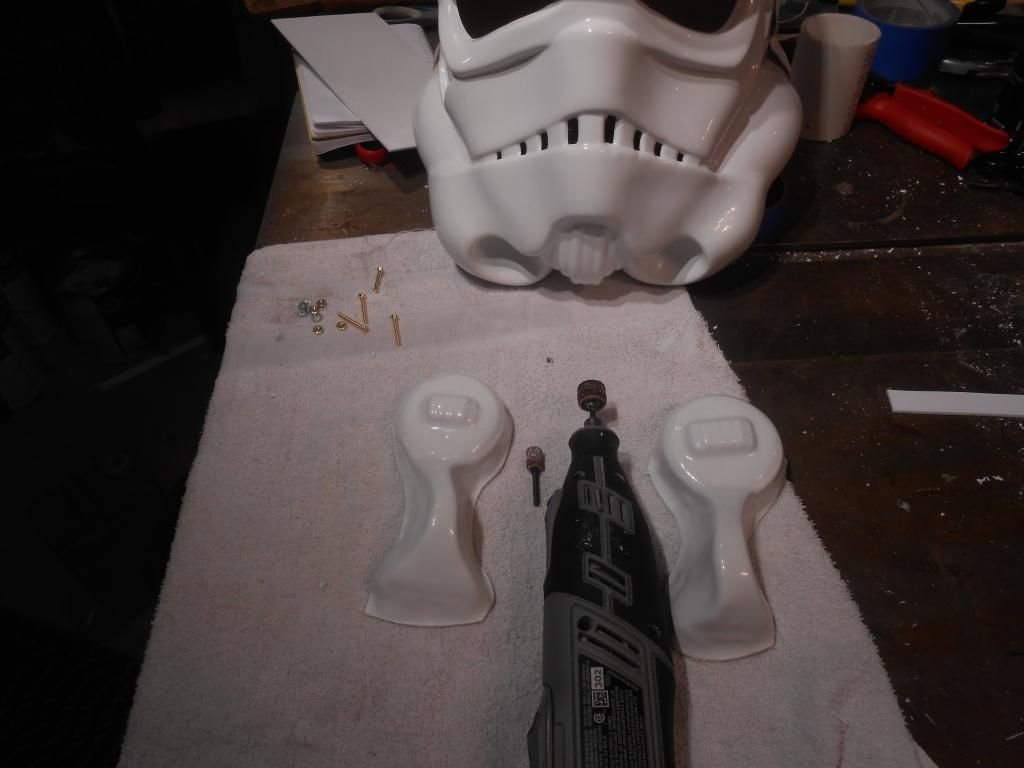
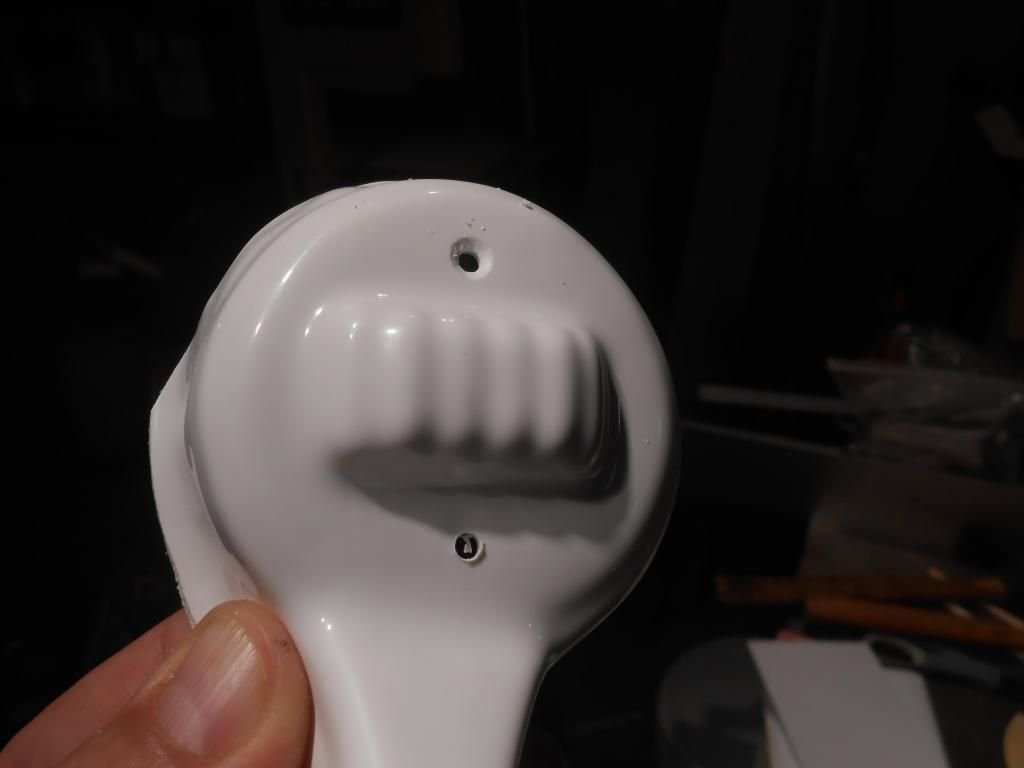
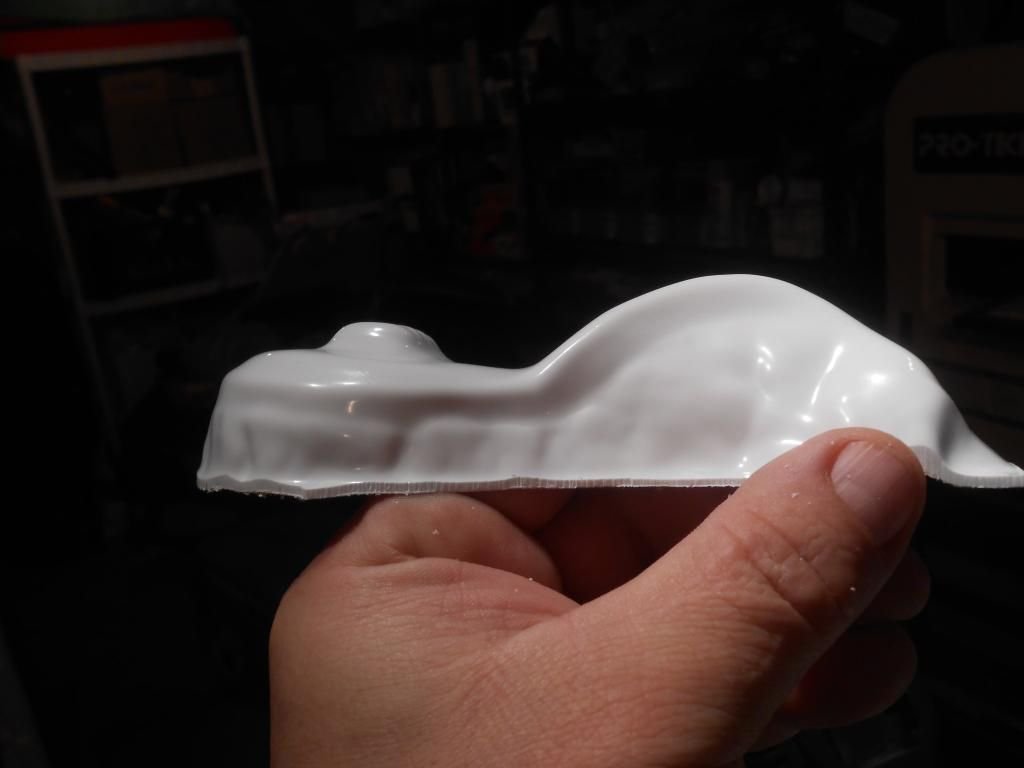
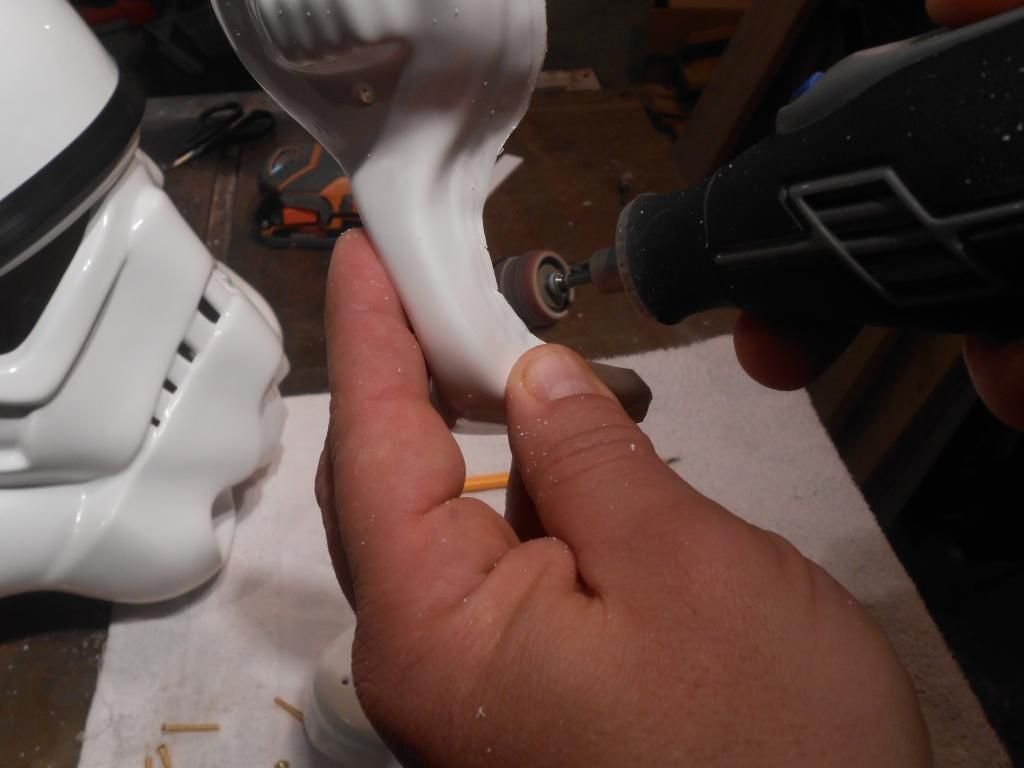
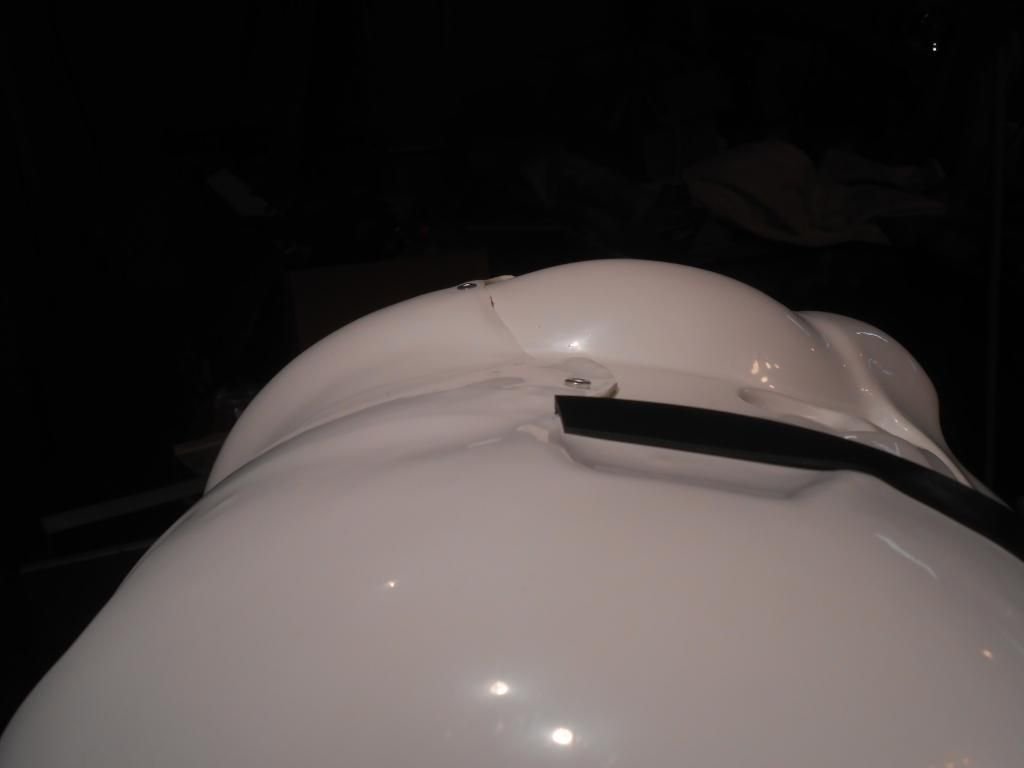
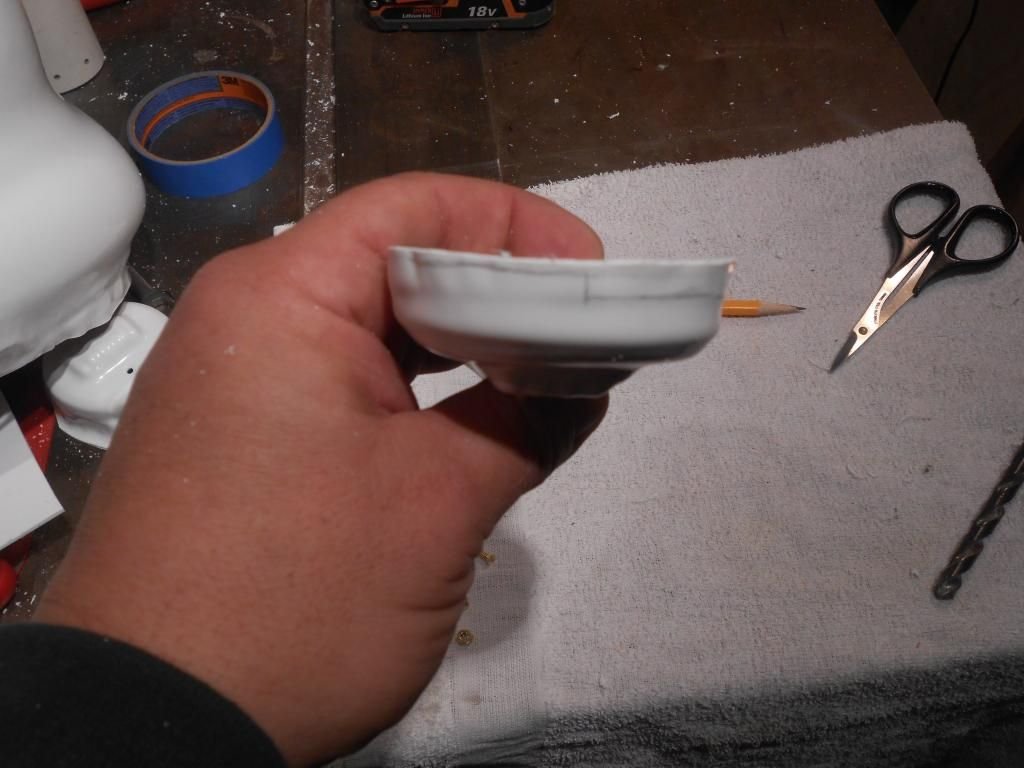
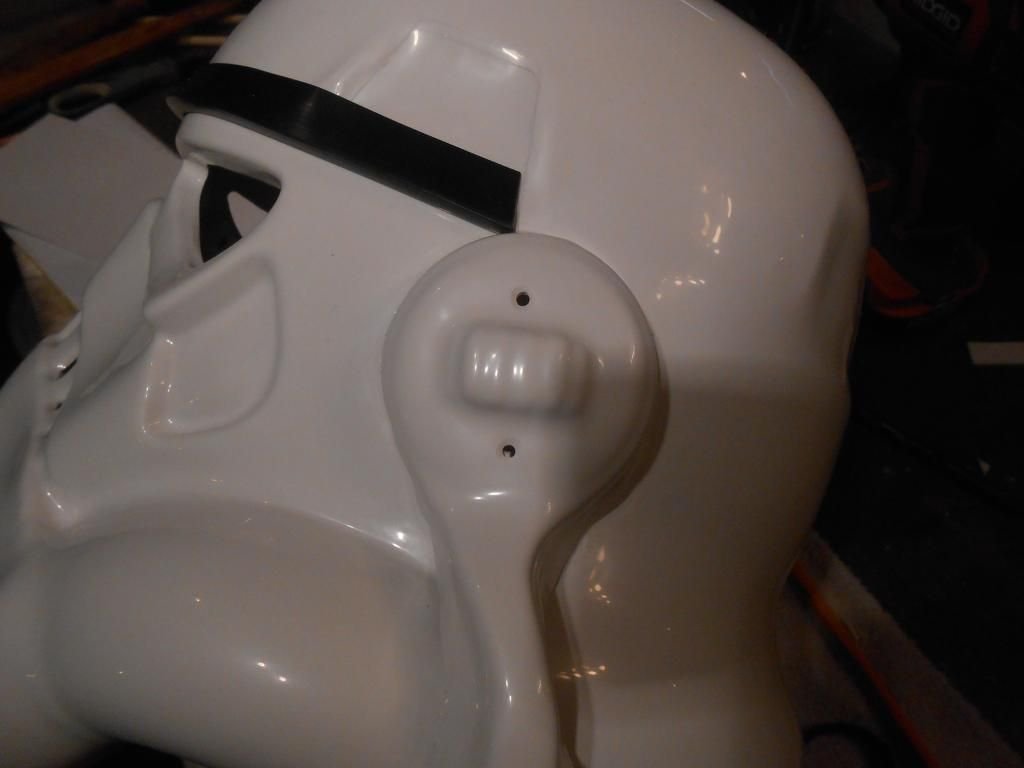
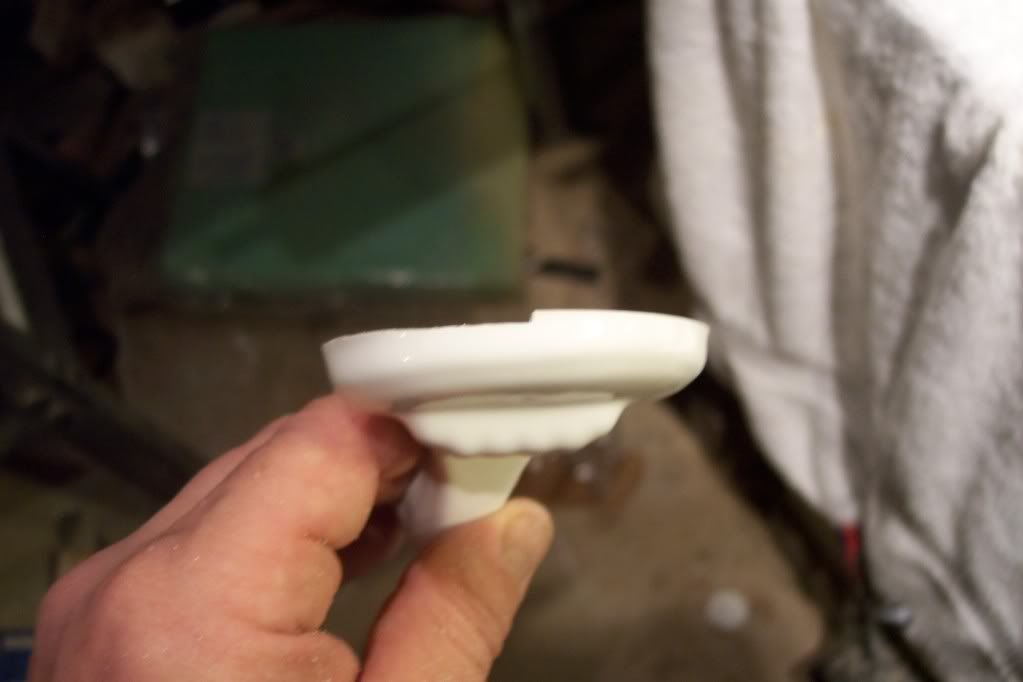
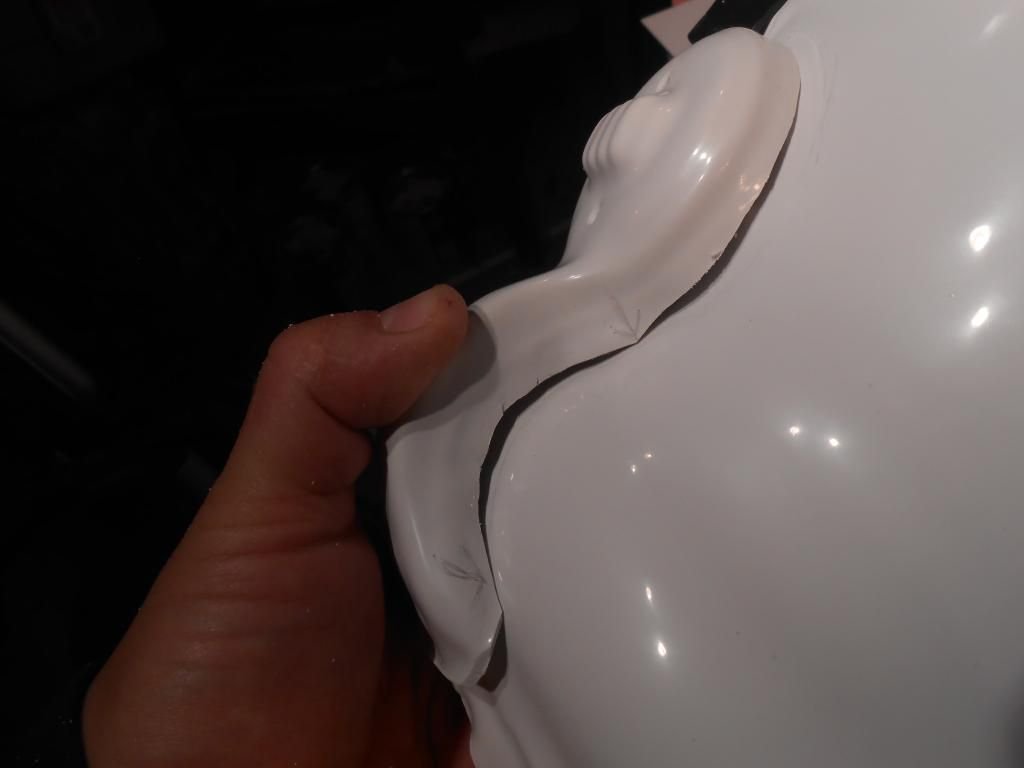
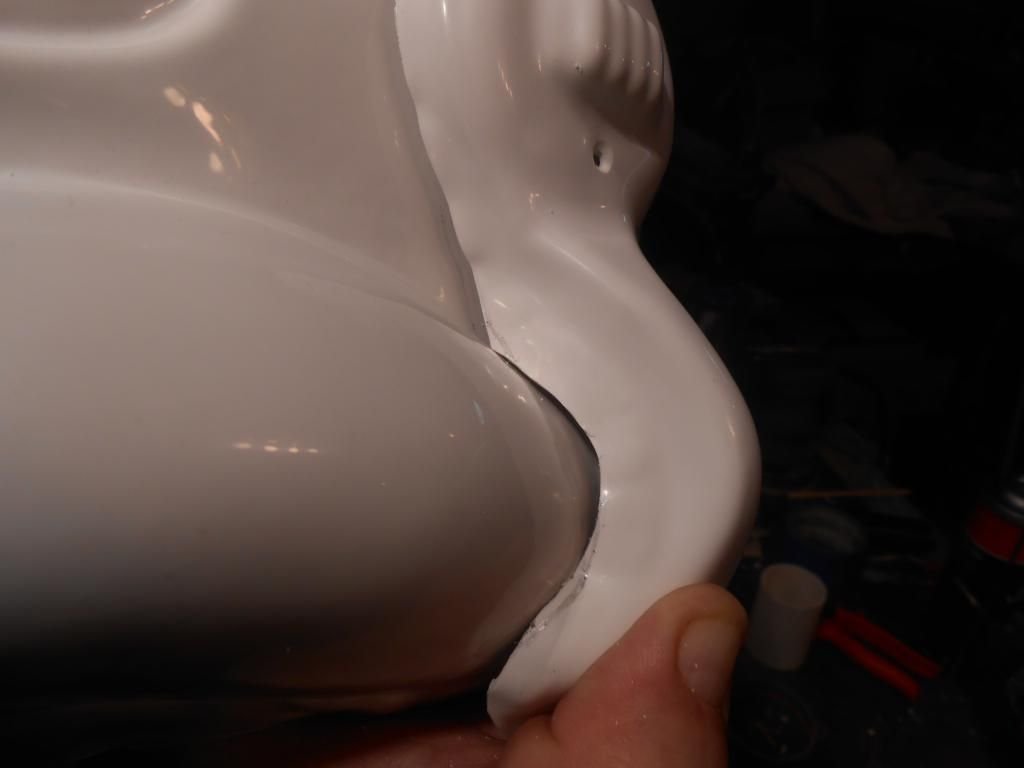
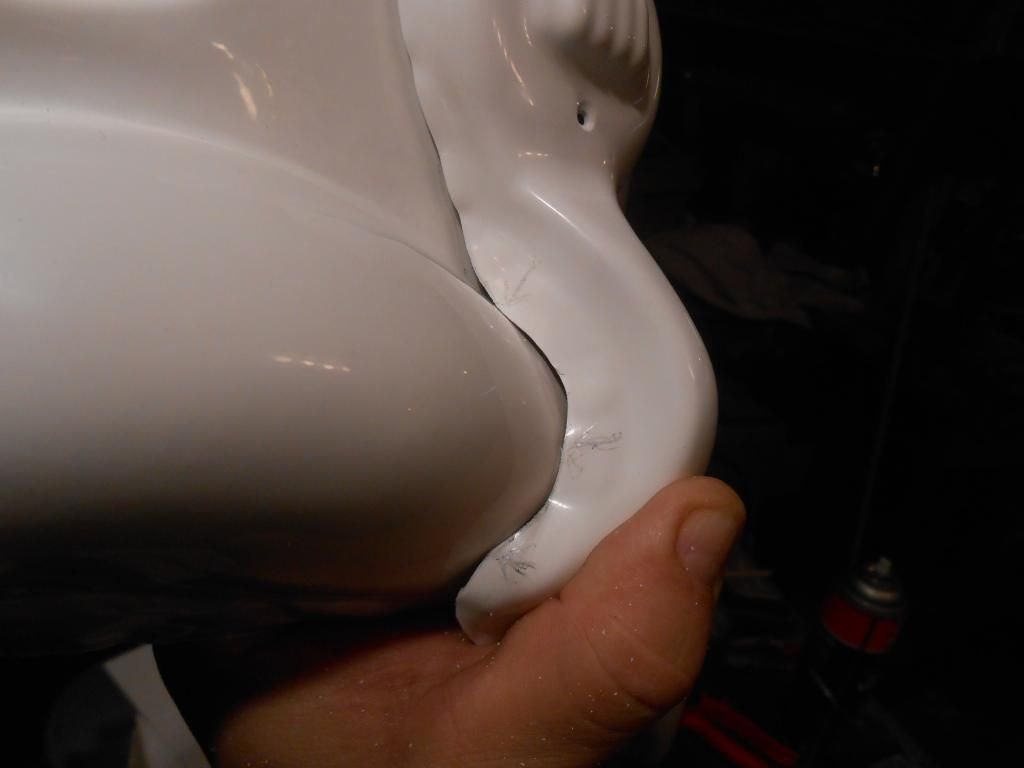
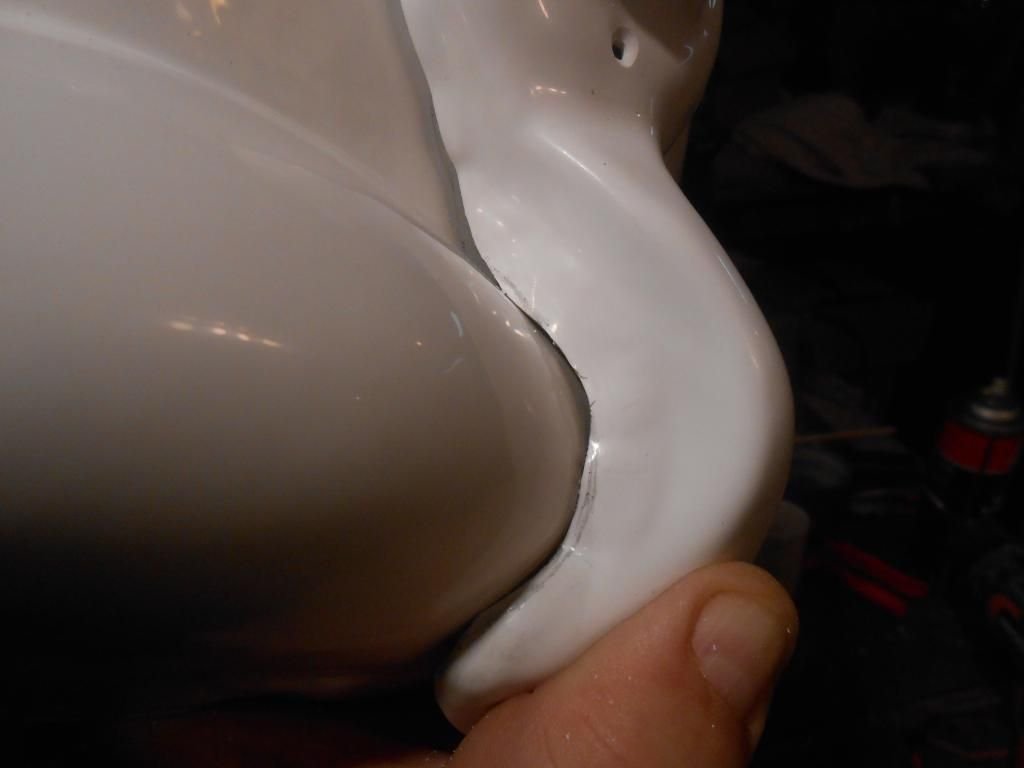
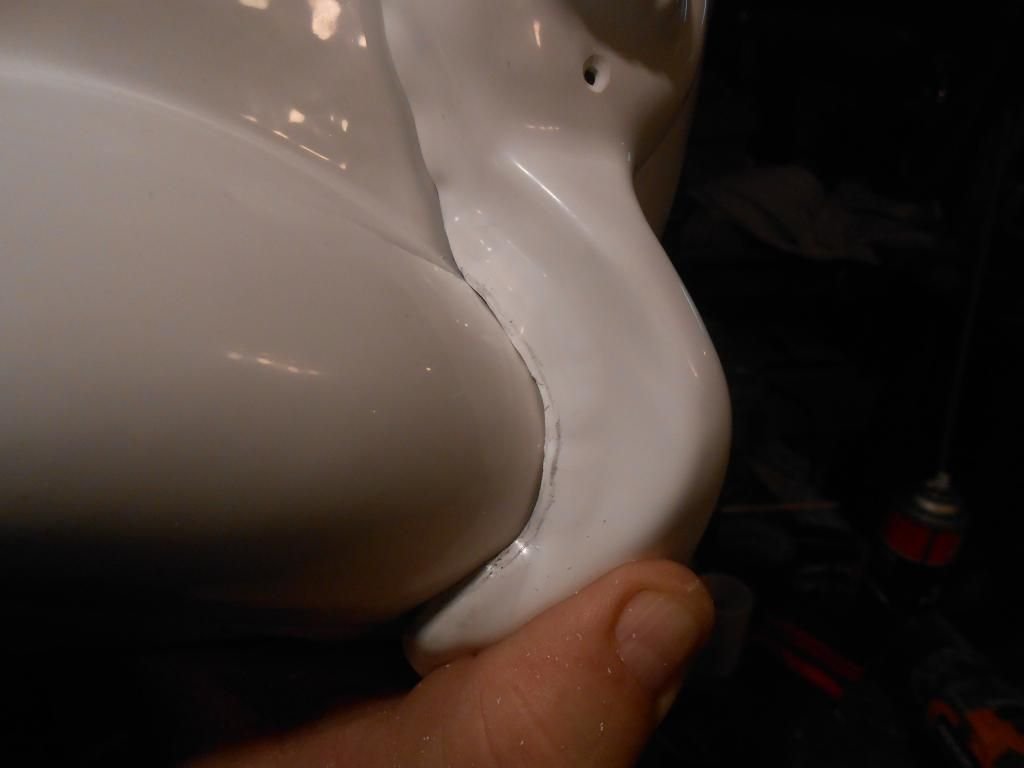
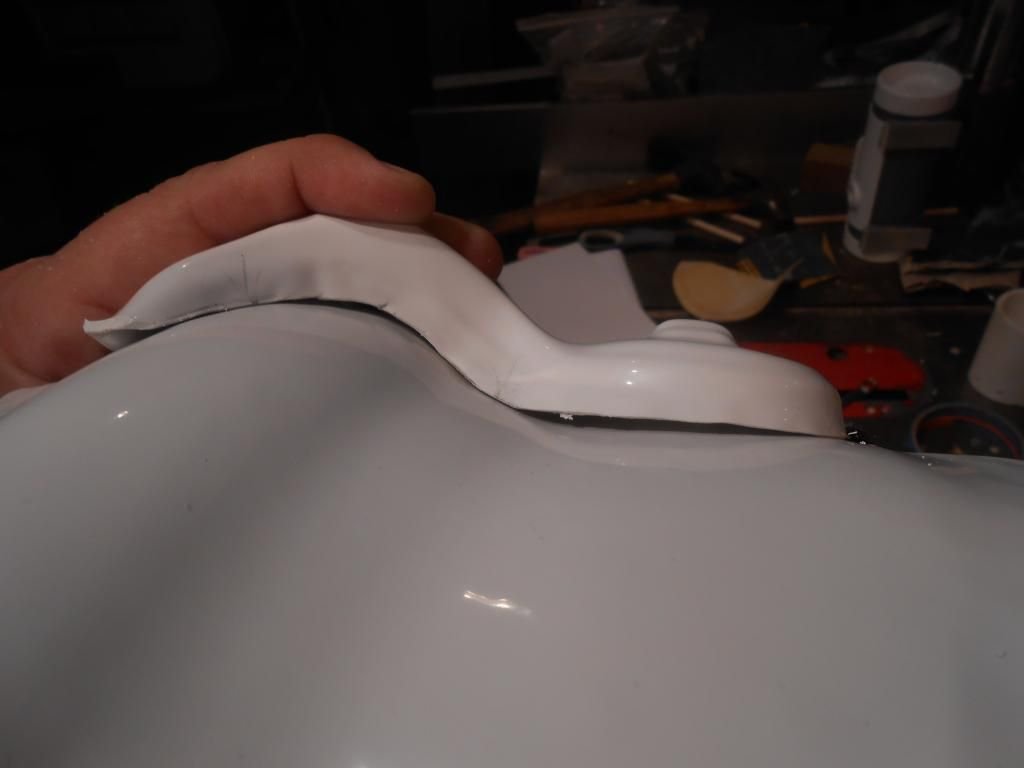
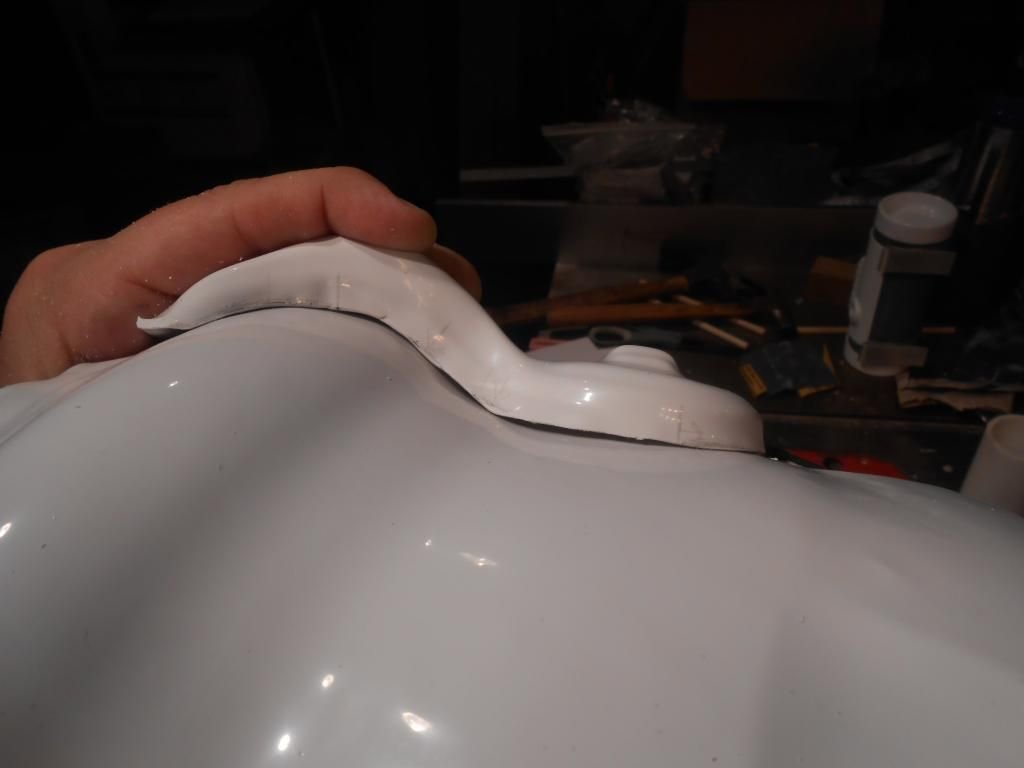
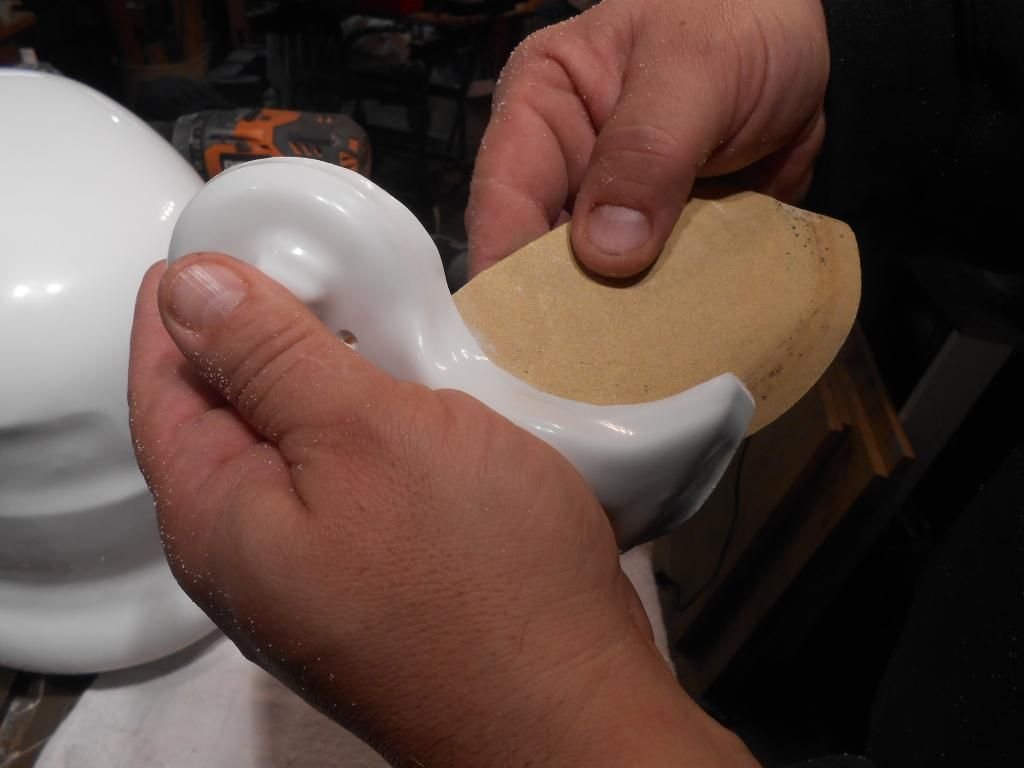
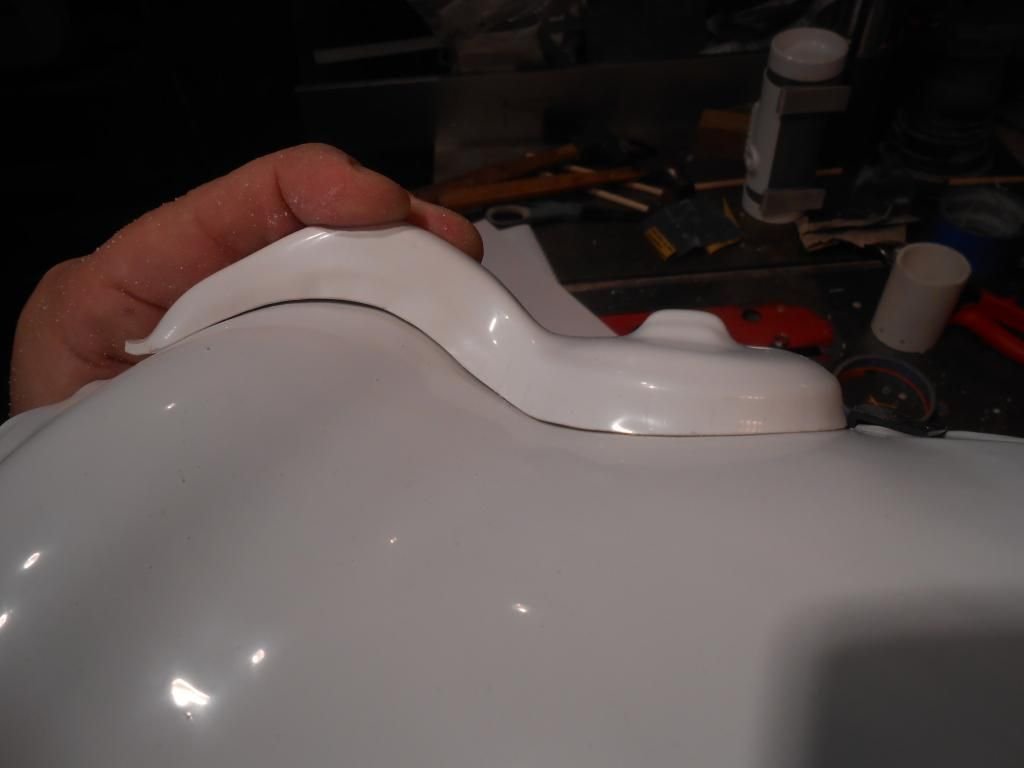
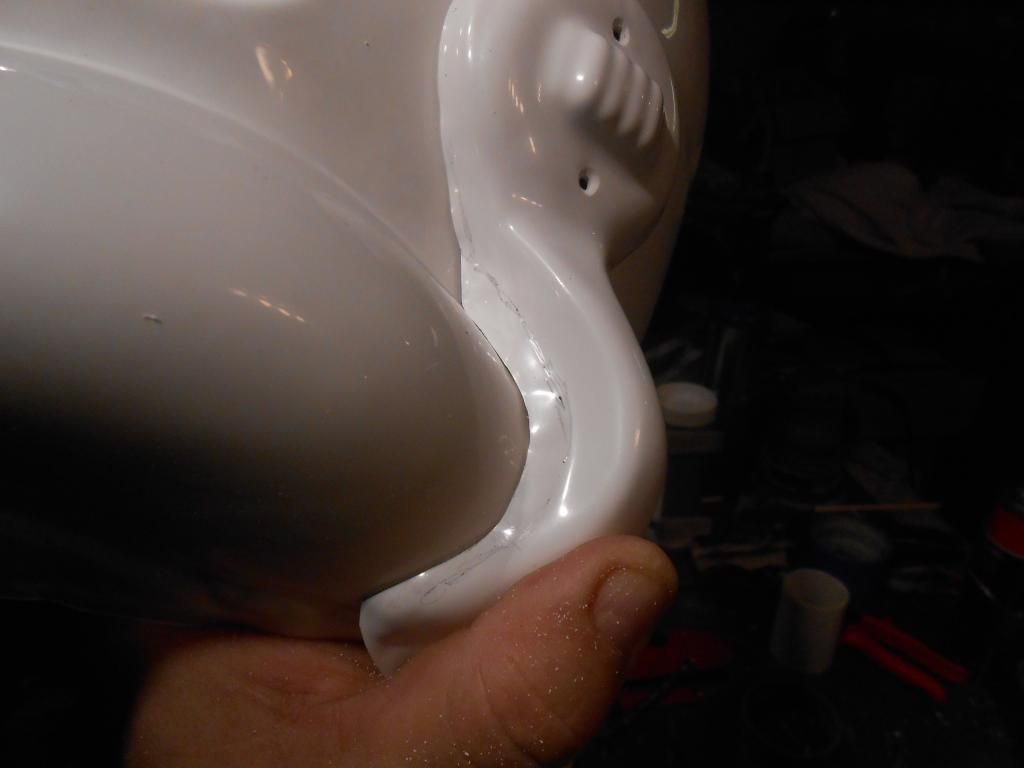
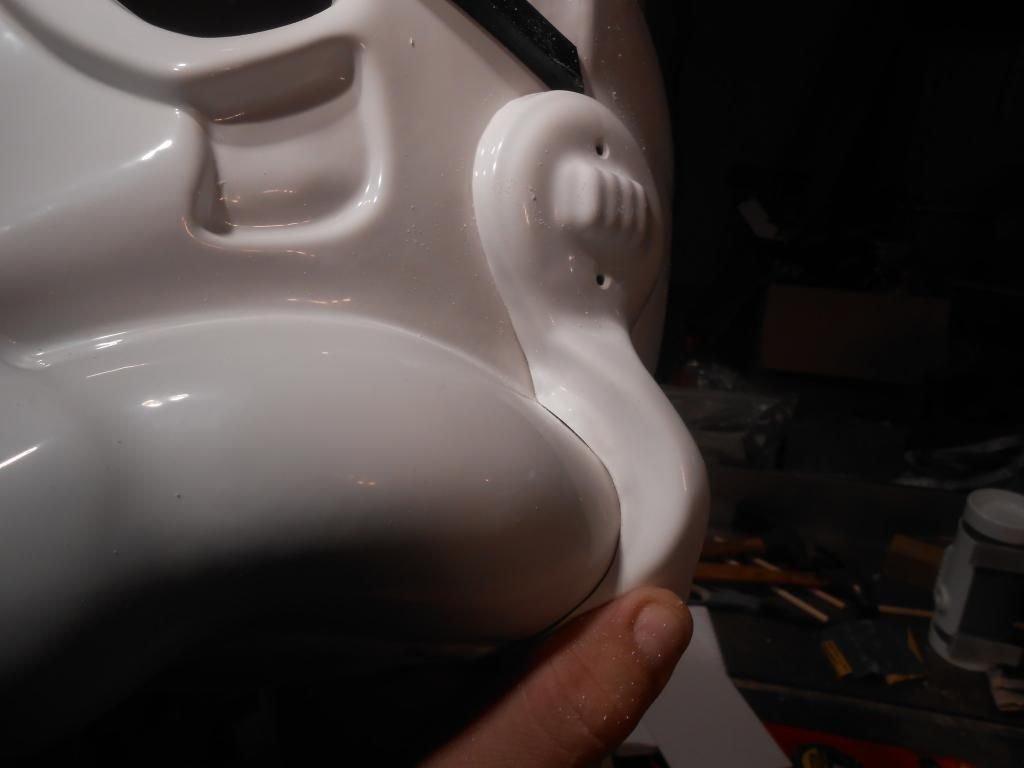
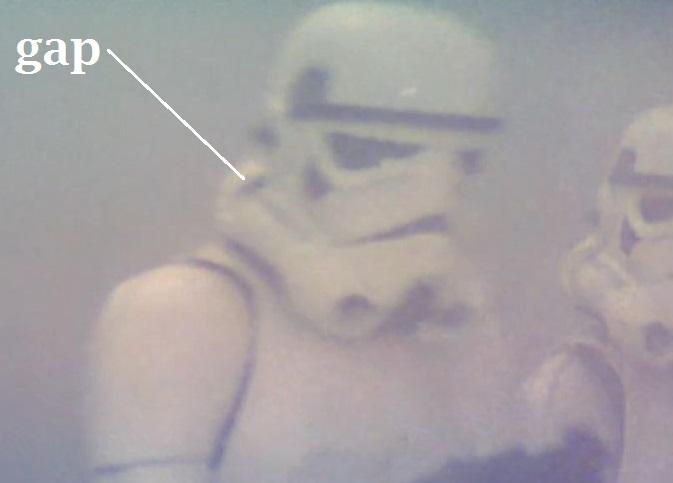
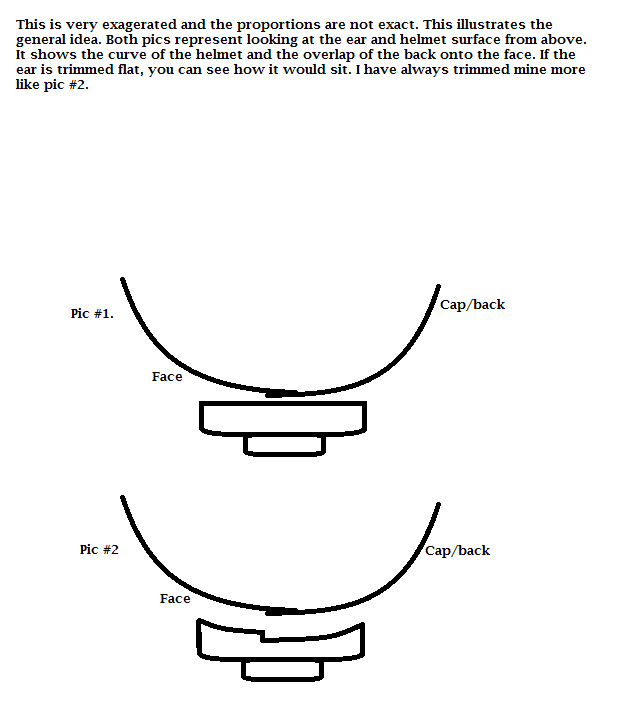
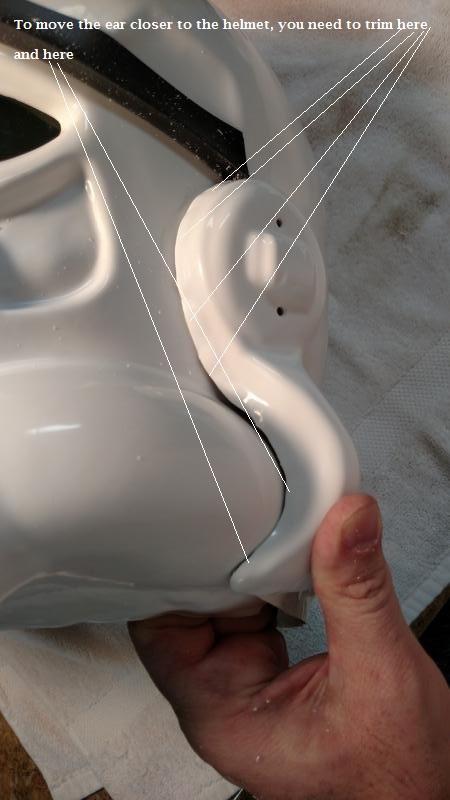
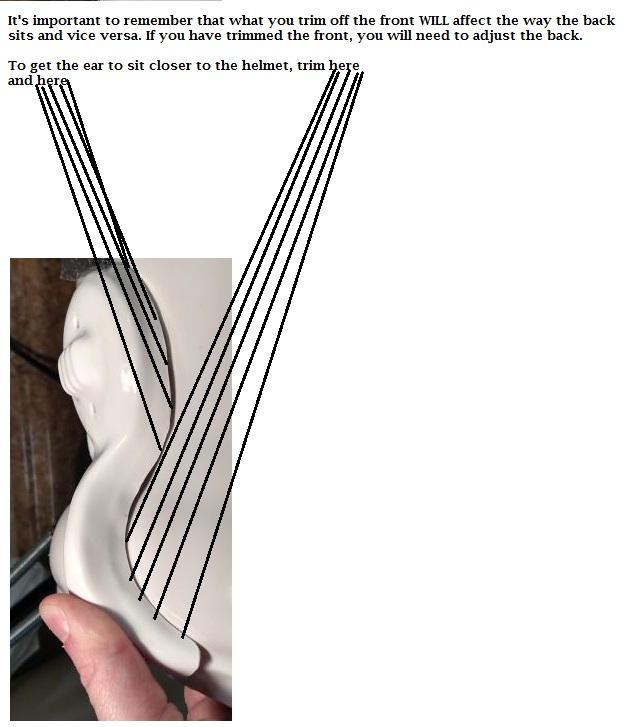
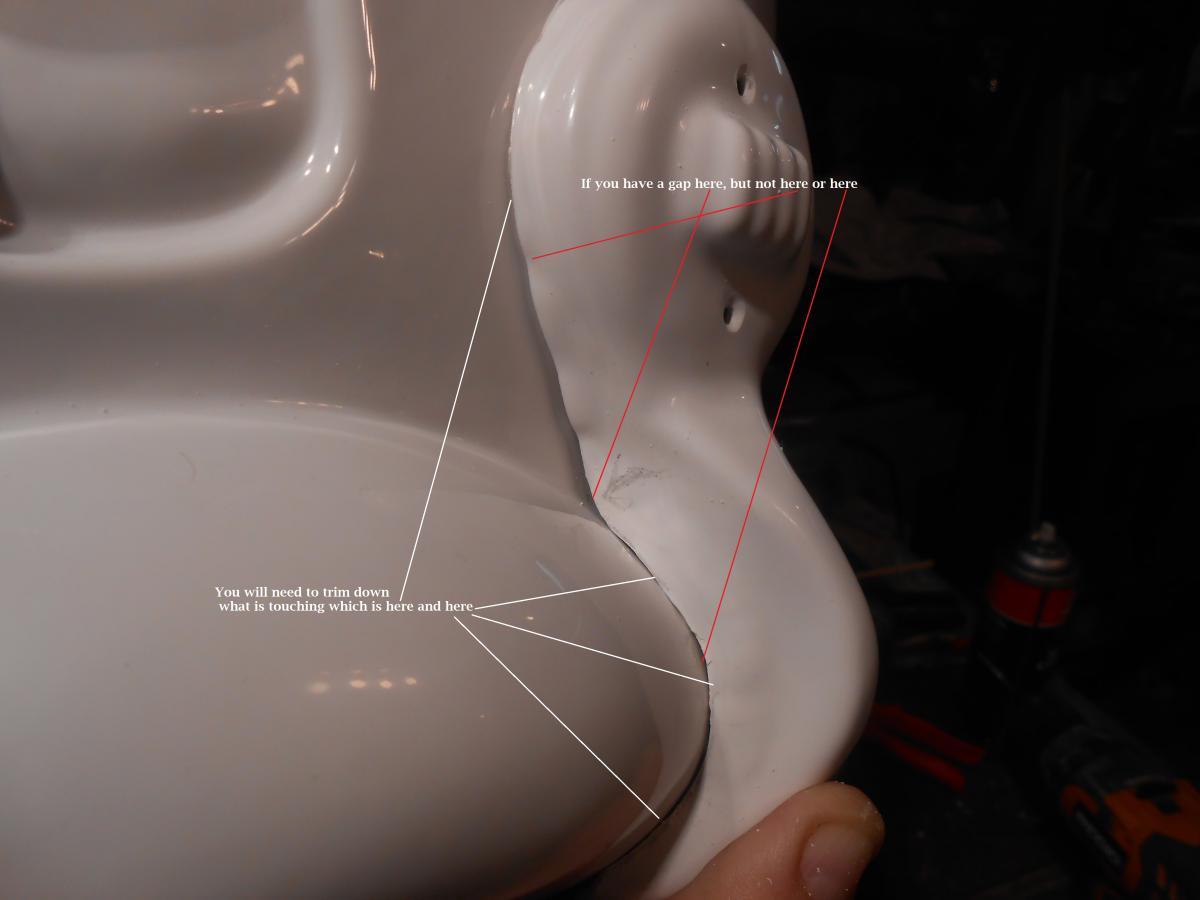
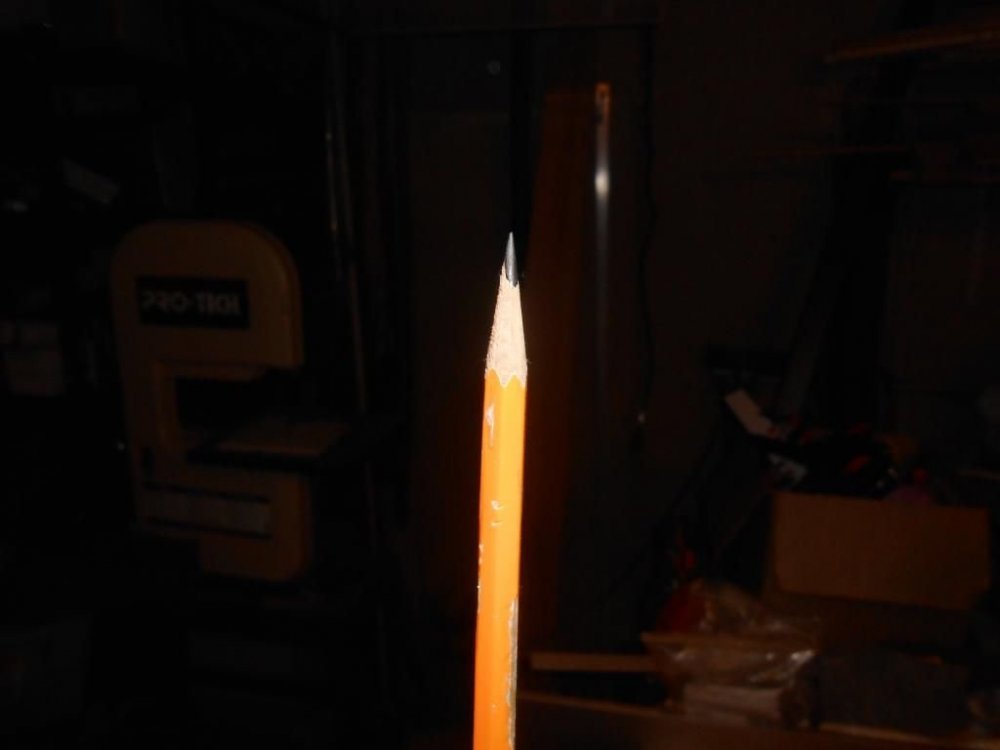
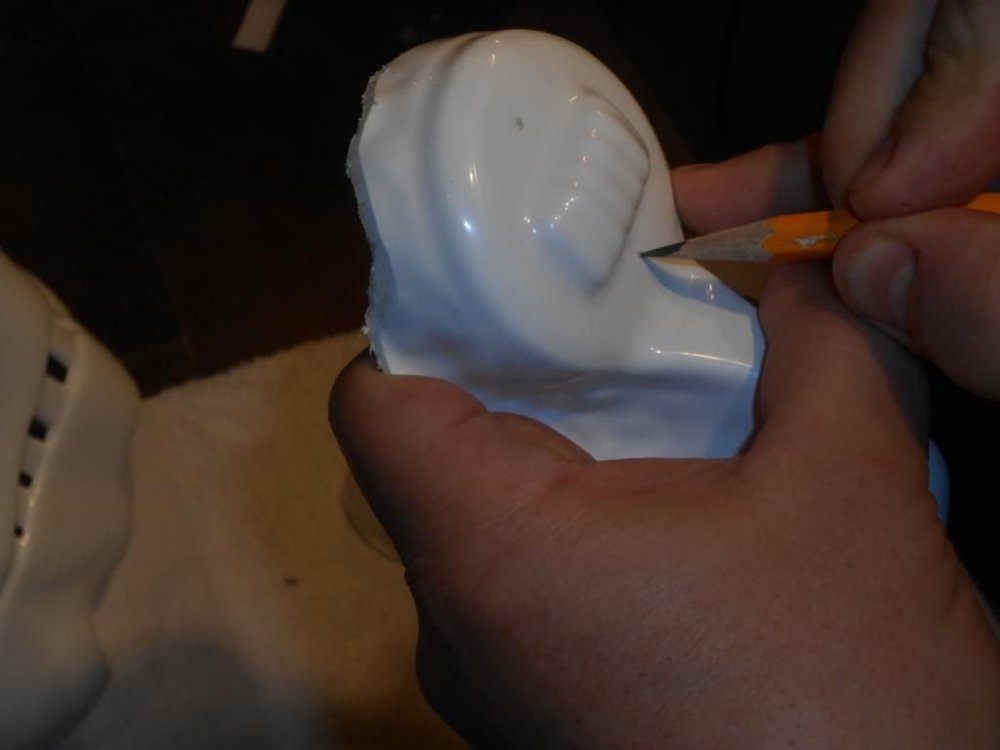
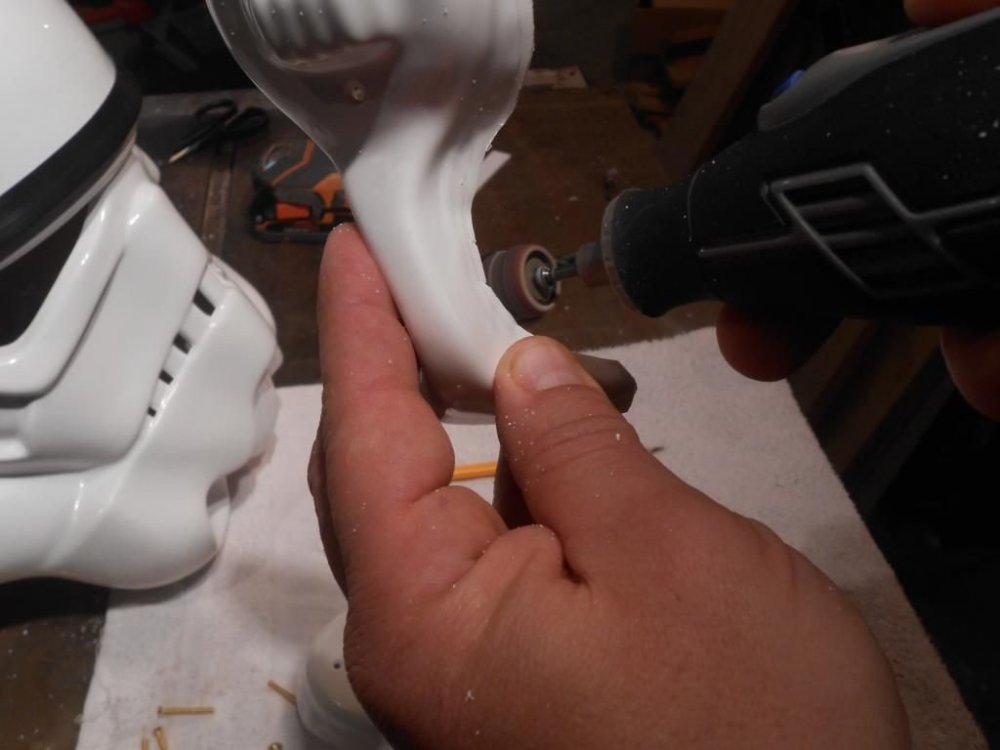
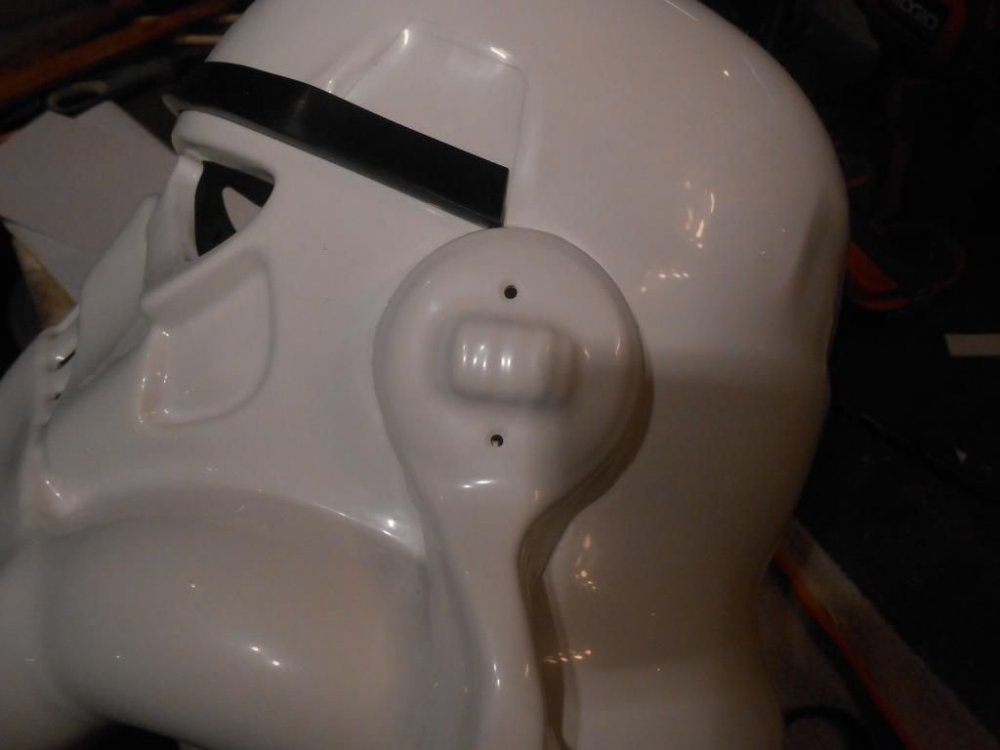
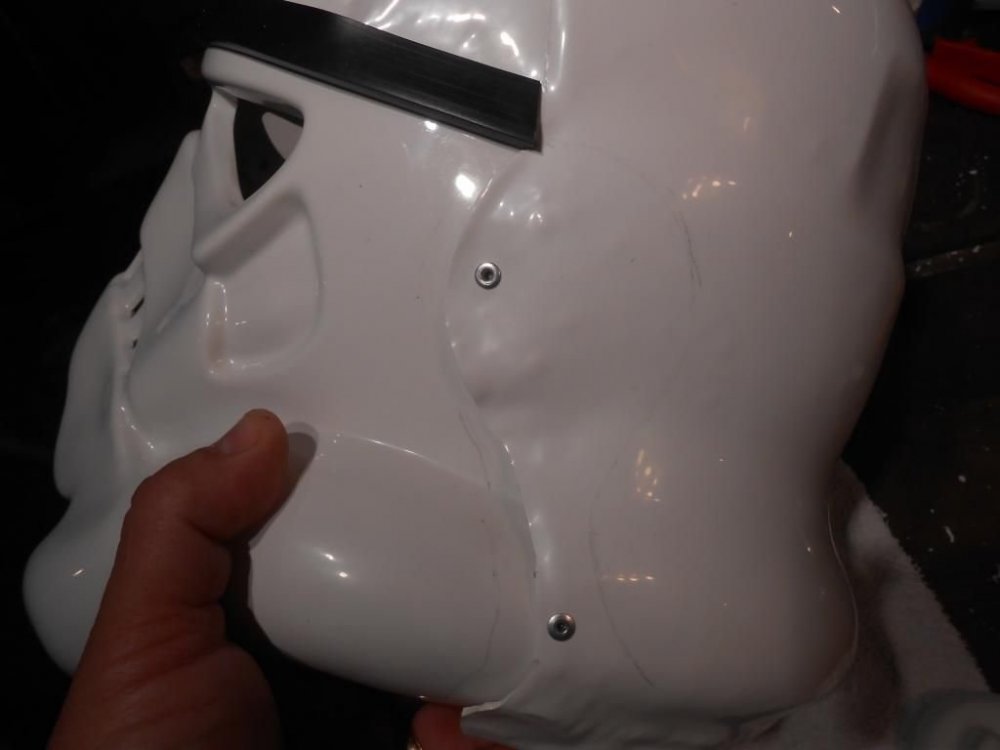
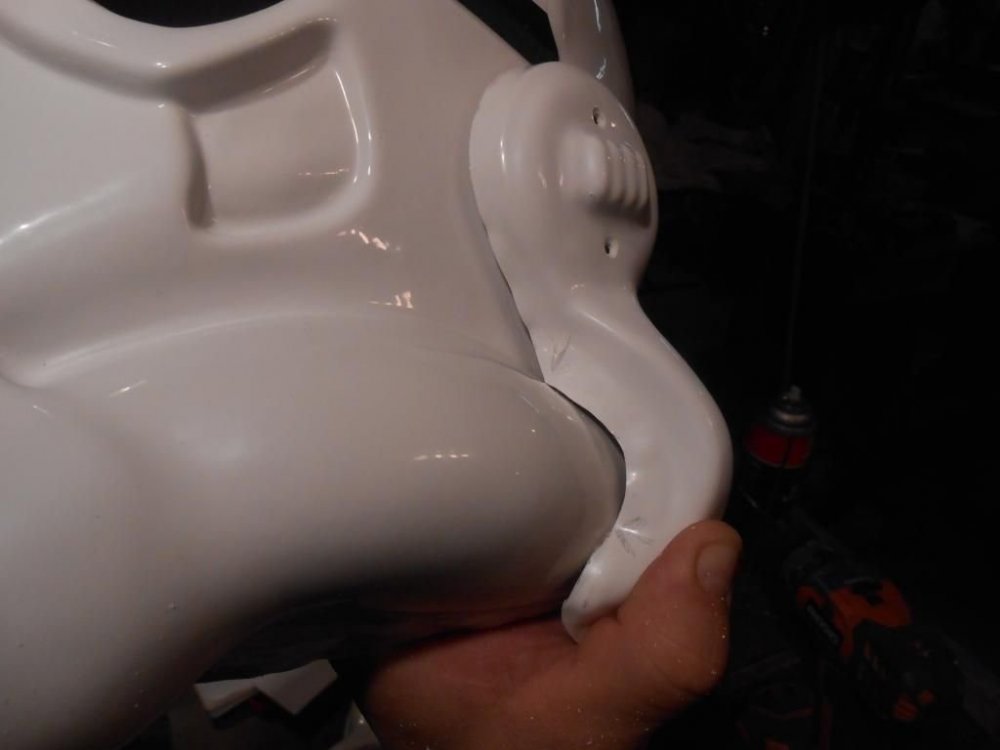
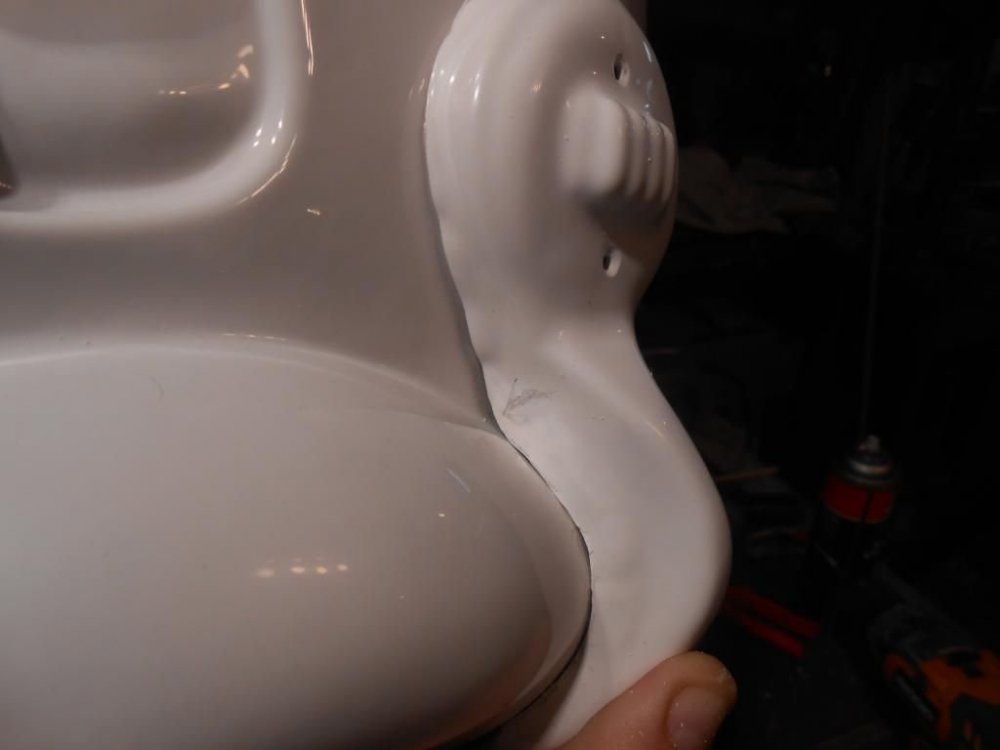
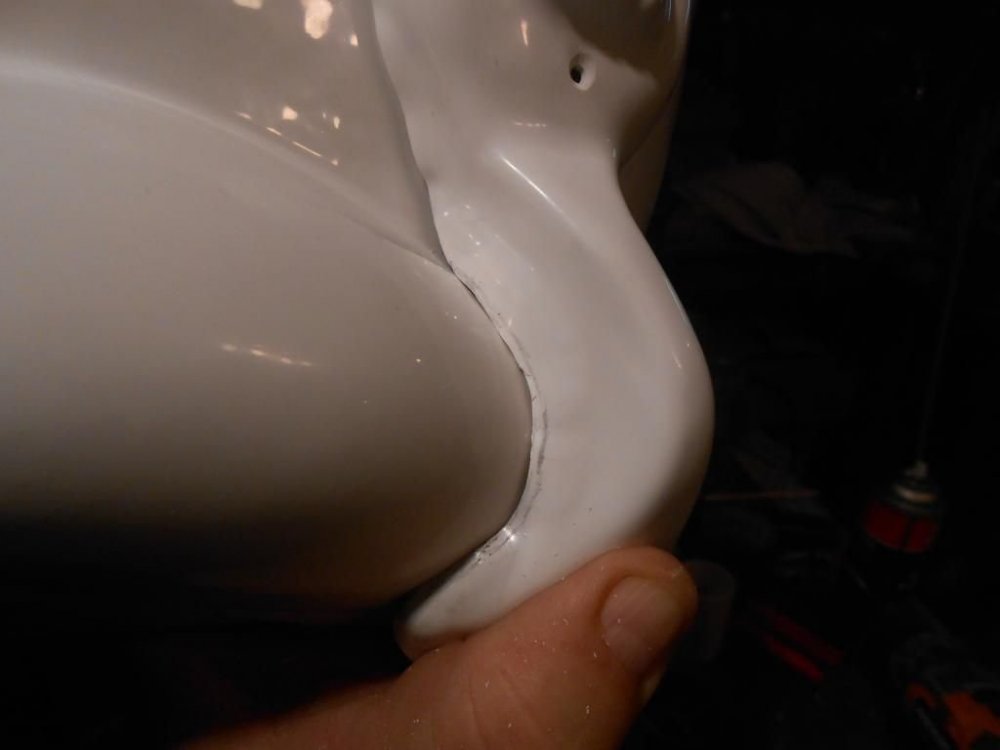
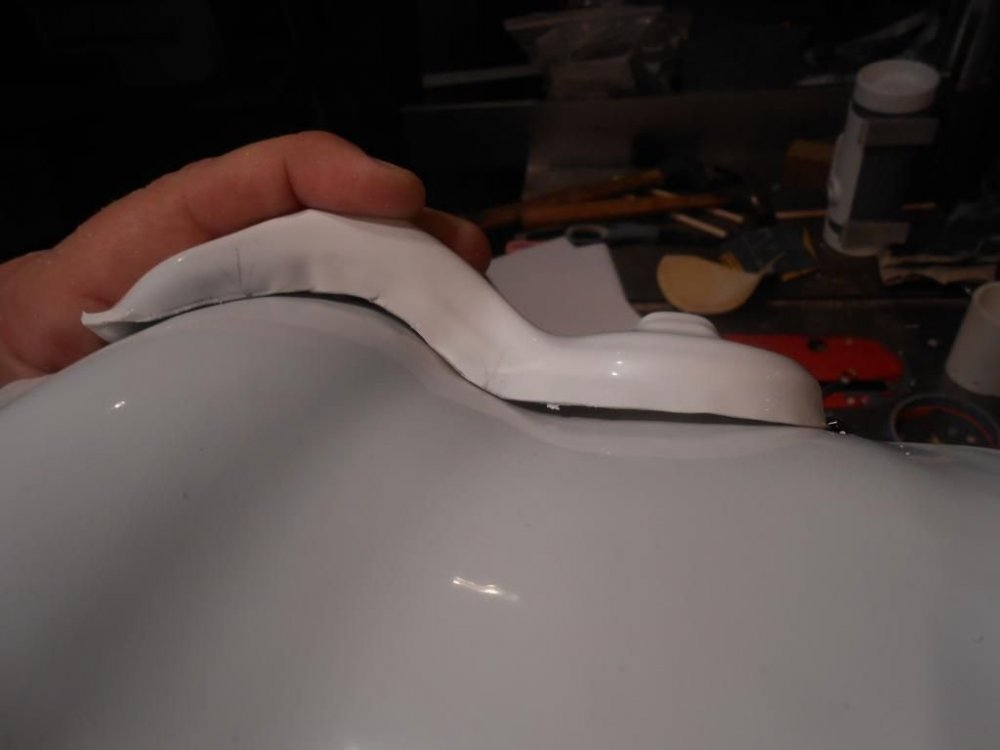
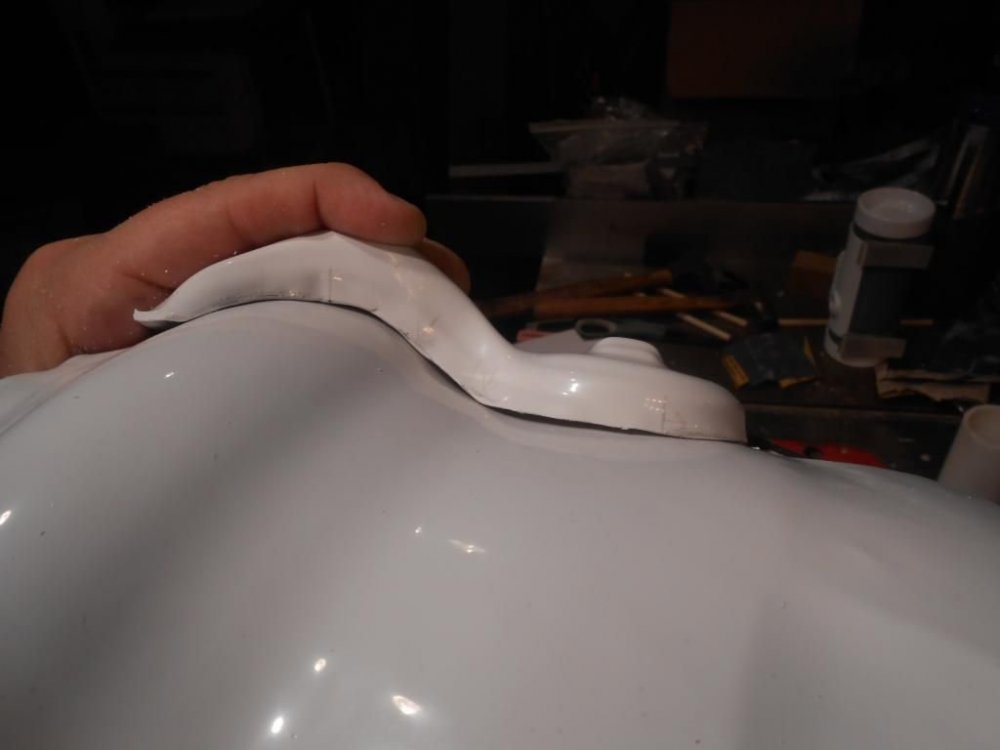
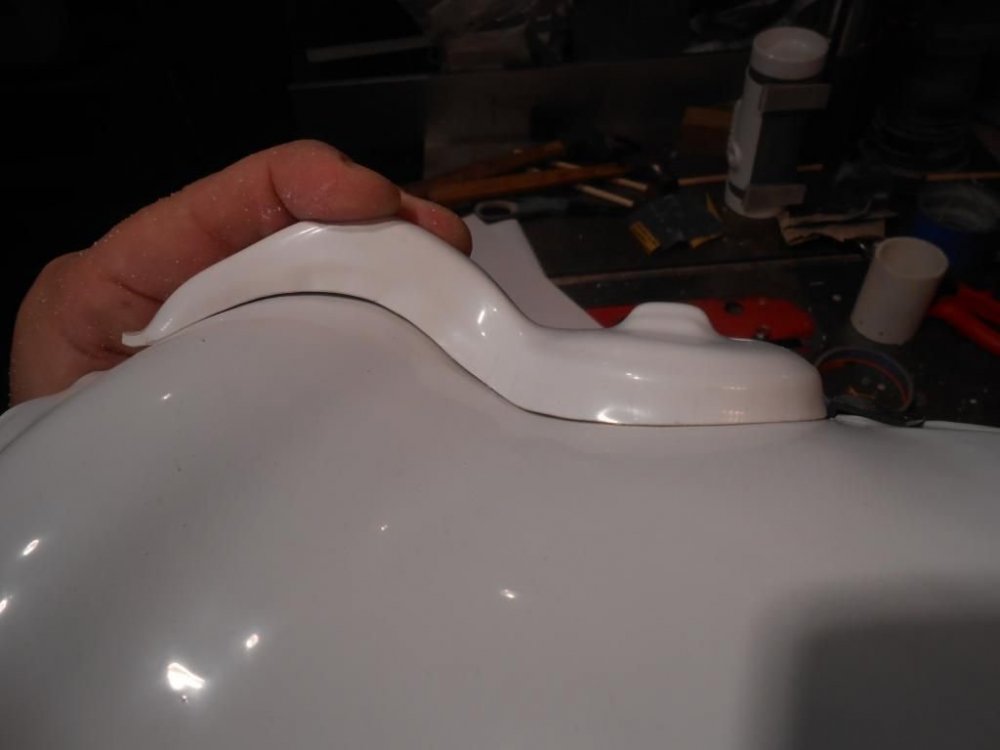
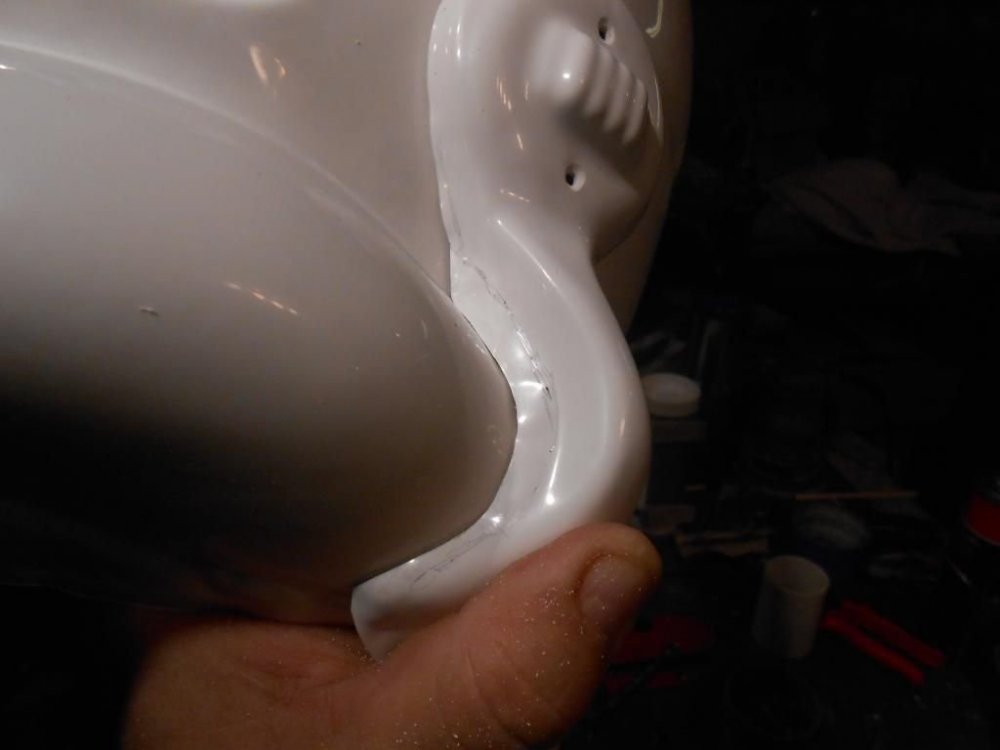
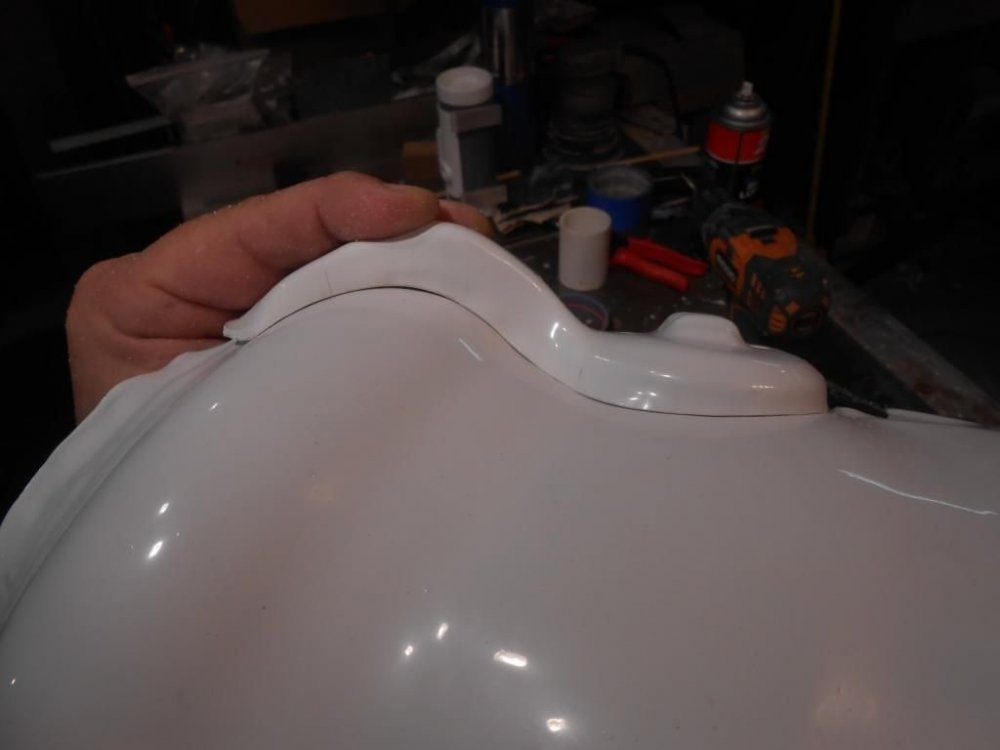
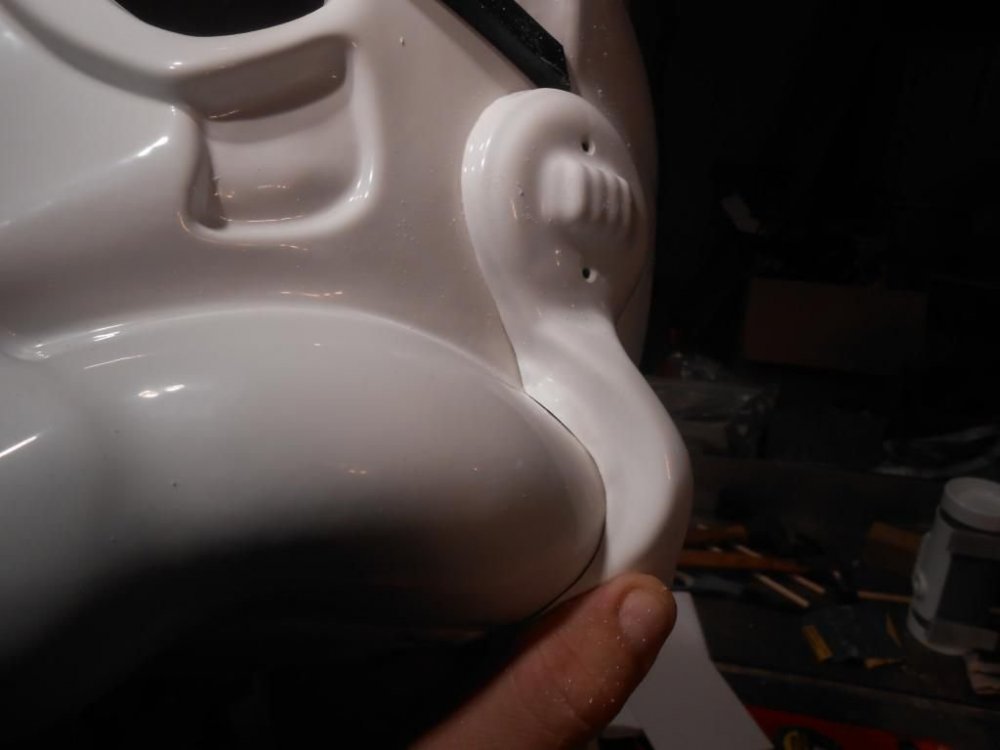
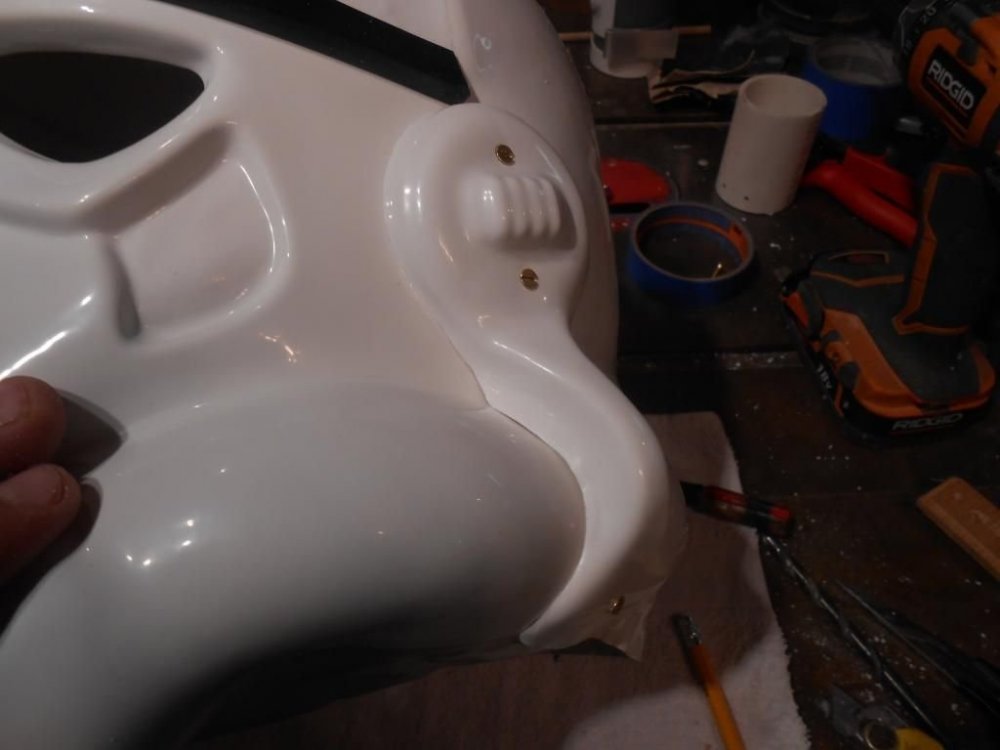
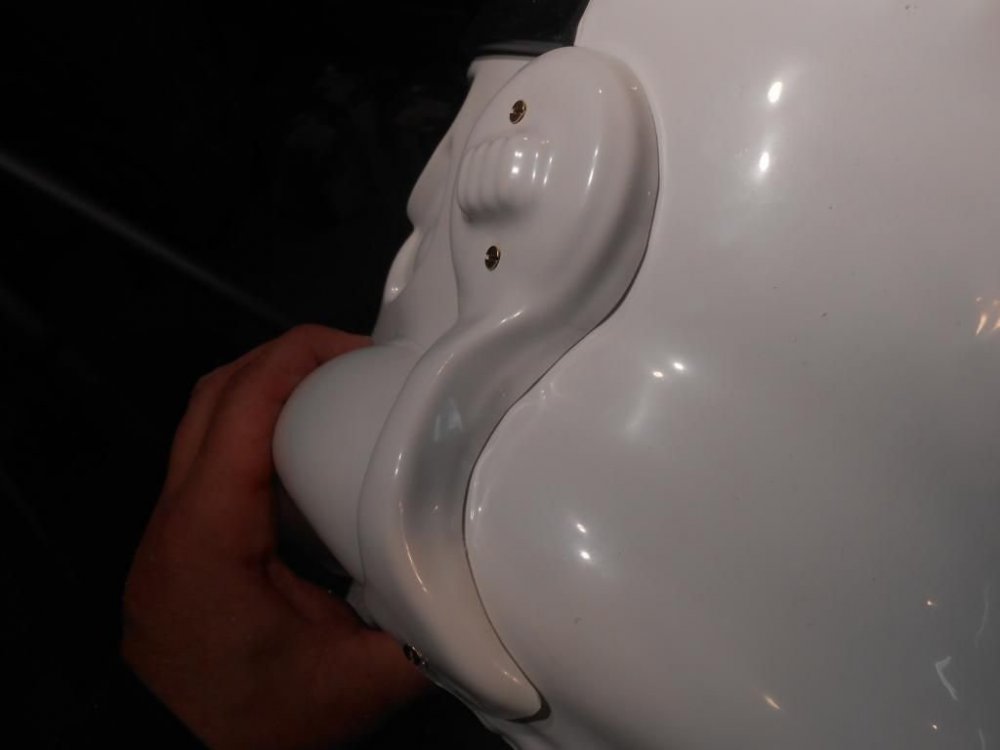
Hey there troopers!! Unless you have your armor maker build your helmet for you, every other armor build will have a helmet and every helmet will have ears to trim out. THE EARS!!!! GAHHHH!!!!! These words have struck fear deep in the butt plate of troopers all over the world. First and most important thing to remember is the the ears on the original helmets were FAR from perfect.For this reason alone, you really shouldn't be so hung up on making your ears sit so flush that there isn't even the slightest gap. However, there are some of you that are perfectionists and there is nothing wrong with that. In either case, whichever result you plan on achieving, having a basic understanding of your approach will help you to avoid making that embarrassing call to the armor maker asking for another set of ears.(Unless you were lucky enough to buy ATA that supplies two sets!! WAY TO GO Terrell!!!!) Keep in mind that there are both things to do and NOT to do. Your equipment can make this more of an art project than a worrisome task. These are my weapons: With a light, controlled touch, you can shave 1/2 millimeters at a time in a specific area or along a line edge. Along with removing the material is knowing what and how much material to remove. NEVER JUST EYEBALL IT!!! To properly monitor this, you will need one of these: Lastly, you will need patience. I know you want to see your lid done!!! After this, you are some paint and a few decals from struttin' your stuff!!! BREATHE!!!!! Let's get to it! will need patience. I know you want to see your lid done!!! After this, you are some paint and a few decals from struttin' your stuff!!! BREATHE!!!!! Let's get to it! The helmet has been riveted at the ears and along the cheeks so nothing moves. I have removed the vast majority of flashing from the portion that was on the vacuum table. I will first drill out the screw holes. Although the indents are there, shadows can play tricks on your eyes, so I mark them so no mistakes are made. I will slightly wiggle the bit to EVER SO SLIGHTLY increase the hole so the screw moves freely but is still well fit. Once the holes are drilled, it is time to countersink them so the screwhead sits flush. IMPORTANT!! Do not use anything but your hand for this step!!! NO DRILLS OR DRILL PRESSES!!! If the bit grabs the hole, it will go right through and there will be nothing you can do to stop it! Just spin it in your fingers and you will have precise control. You can see the difference in the two holes. As well as the difference in the way the screw rests within the holes. Note the shadow coming from the non-countersunk screw. Although there is still a slight shadow on top, this will all but disappear when the ear is tightened down. Now comes the fun! First thing to note is the original mold lines. These are ATA so the mold lines from the original helmet are here. Other armor makers may not have these. Consult the dozens of helmet reference pics we have here if that is the case. But if you have these lines, it is important to remember that these are from the helmet that these were off of....NOT YOUR HELMET!!!! The position you have your cap on your face to make the brow line higher or lower will affect the way the ears sit on the sides. For this reason, the ears must be trimmed to YOUR HELMET. The only kit I know of that the mold lines on the ears comes close to the final helmet without a huge degree of trimming is AP. As long as you use the dimples they suggest, the ears will sit correctly following the mold lines he provides. Anyway, back to these! It is important to note that your ears should look like seam covers and NOT 1978 headphones!! Note how thin the ears are on Han's helmet: You can see the mold lines on the back side very clear as well. I will start bu marking off a general line and trim that. I will smooth out the scissor edges and do a test fit to see where to start. I'm sure there are those of you that don't have the mold lines to start with and are wondering what to do. Note that the top of the ears always comes close to the brow trim and the horizontal ridge that runs around the back of the helmet. If you need to take a measurement between the brow and the cheek/tube crease and use that mark so you don;t trim too much off in that corner, do that. You can always trim more but you can't replace it if you think you trimmed too much. It doesn't need to be perfect, but there shouldn't be so much space that birds will want to nest in there!!! Here is the basic understanding of your approach: You will see this re-stated in the next pic but I can;t say it enough: What you trim away on the front can/will affect how the ear sits on the back. Don't work too long and remove too much without checking the other side from time to time.: Another thing to consider for those of you interested in a really clean fit, is that the helmet surface where the ears are is NOT FLAT! That's right!!! It's curved. Keep this in mind when trimming the round portion. This here is another area to consider if you want that super close fit. There are halves that overlap each other. If you want to, you can notch this out once you have decided the final resting spot for your ear. This is exaggerated, but it just shows what I mean. So here is my first fit. I know.....pretty horrible. It will get better. But first, and I believe this is where a lot of issues happen, I will determine my ear location: and mark it lightly with a pencil. This makes sure that my alignment and the trimming I do will all stay the same. If you ear moves around and you trim it willy nilly, things will be off.......I promise!! Now once you have a basic understanding of what will be affected if you trim certain areas, then you can proceed. TAKE YOUR TIME!!! Note what is touching and what is not. Trim what is touching the cheek to close any gaps that are not touching. My picture failed of the notch that I put in the top most portion of the ear so this one is from another build: Take note that this shows the right ear. I am working on the left so far. Anyway, You can see here, that the arrows point out what is touching and preventing the gaps from closing. Here are the spots on the back. Since you never want to eyeball a cut, I mark off what I will trim. After trimming that, you can see what is touching now (arrows) Noting what is touching, I mark what is to be cut. Now although the fit is tight around the cheek tube, I have a gap in the corner. The arrow points it out. In order to move the round portion closer to the surface, I need to take more out from around the cheek. There is a lot here so I can afford it. I will mark it anyway. After that trim, you can see I have a good general fit. Still needs a bit of honing, but a good fit. What have we NOT done?? The back! So let's go there for a bit. Without wordy describing, you can see the gaps, what is touching and my marks of what is touching so I know where to trim: Sometimes I like to even hit the INSIDE edge of the ear wall so that I am assured that the oter edge of the wall is the only thing touching the helmet surface. I do this with sandpaper so nothing gets out of control and too thin. So now we have a really nice fit in the back. Now is when I notice an issue after I got back to looking at the front. I traced out the original mold lines seen here: In my opinion, the ear is too thick around the curved portion. Using the same methods I used to get to this point, I reduced the curve by another few millimeters or so all the way around including the round portion. So after some additional tweaking and final sanding, the back side fits clean as does the front. I marked, drilled and installed the screws around the rank bar. I never pre-drill the lower location until the ear is fit. As you can see, I needed to drill it at an angle so the screw penetrated the face portion. When tightened, this drew the face up nicely to the curved section of the ear. and the result...(dramatic music please!) It's about as close as I am going to reasonably get it. Note how nice and flush the screws are in the recesses! The same will be done with the other side, but the same principles apply. I want to note that there have been other great ways to accomplish this either through a tracing wire or a toothpick attached to a pencil as a guide that rests on the helmet surface. This is just how I do it. To me, planning, staying constant, slow and steady yields good results. I hope this helps someone.


 1 point
 -
Hi everyone, I received my approval yesterday and have signed up for 2 troops including the Toronto Comicon. I look forward to meeting many of you and to giving to the community. If only I knew: -Just how much information is out there! -That the advice on here is so solid. -Do more research, make more notes -Triple check your supply list -Just how darned HOT it is inside TK armor! Oops! -Gather all of your supplies and triple check your list. It will save a LOT of trips back and forth to the fabric stores, hardware stores, hobby stores, Amazon... A funny thing happened on the way to the Death Star: -My journey started with an email to a 501st member that I found on the 501st.ca site. He welcomed a total stranger (well.. he DID Facebook stalk me and talk to a mutual friend to make sure I wasn't a total psycho) with awesome advice, invited me to his home to see his armor, and has been there for me the entire journey, taking pictures, offering advice, and volunteering to help at any time. Thanks SO much to @Twosolitudes Shout Outs: @Twosolitudes @68Brick @gmrhodes13 @wook1138 and everyone else who helped, laughed, and kept me company during my build thread. Last of all to my dad. Last summer was spent at the hospital with my dad who was slowly wasting away to prostate cancer. The last conversation I had with him was when I told him I had finally found the Trooper armor that I wanted to order, and told him the price. He said "Buy it". The next day he was unconcious and unresponsive, and he died the day after. My TKID is in honour of him. His birthday was April 8 1934, and I am TK 40834.1 point
-
MTK is the only vetted seller on EBay. If it is indeed what's delivered you'll be OK. Good Luck Future Trooper!1 point
-
None of the CRL changes will affect your chance for approval with a FX kit. It may just affect the way you are building it but it is even a very small chance for basic approval. Most of the proposed changes that will be shown to the membership in the future will be for the higher levels of approval. Of course we cant speak for your garrison and GMLs regarding basic approval and what they accept.1 point
-
That was going to be my next question hahaha. They have a set minus snaps. Also I have been talking with Alay on here. She has what looks like a really nice set on her Etsy. Sent from my iPhone using Tapatalk1 point
-
Hey Nick welcome to the FISD. Any generation of Anovos armor is 501st approvable out of the box if assembled correctly, especially ANH stunt or ESB. ROTJ however requires the one piece kidney and posterior assembly. We have a ton of build threads in the build thread section. We suggest starting your own build thread. There we can follow along and offer any assistance as needed.1 point
-
Those proposed CRL changes seem to be causing concern across builds at the moment - however, there is consideration paid to the CRL guidelines that a trooper was following at the time of their build. So, stick to the current CRL for now. If you have complete photos of your progress, or ideally a build thread, we’d be happy to look over it for you. Best wishes Dan1 point
-
Congrats! Double-check the leg armor with sniper knee plate on your next troop. Is it worn on the correct leg?1 point
-
Sugru works great for the frown mesh too. Thanks for the great walkthrough @justjoseph631 point