Leaderboard


Popular Content
Showing content with the highest reputation on 08/02/2018 in all areas
-
First test fit with the weathering and pauldron. Still need to make my thigh garter (temp setup being used) and proper shoulder straps. And yes, those are my dancing shoes (need to weather boots, pauldron, and pouches). I didn’t bother with the pouches but the wife snapped a few pics of the fitting so I tried some poses. Daniel, I was in a hurry and totally botched the pose. Next time And I need to finish the T-21. Sent from my iPhone using Tapatalk4 points
-
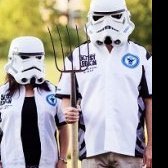
Hey There! A BBB is enroute to me today from across the pond, arriving tomorrow!!! I'm so excited that I want to share. Ahhhhhh, so flippin' excited. I'm currently working on finishing up my WTF Hero build for a garrison friend, and that build will continue (documented on that thread) until she's got full approval. She's aiming for Centurion, so fingers crossed that I can get her there! In the meantime, I get to do my third TK build. The RS Hero TK! Yay! (This build wouldn't be happening at all without @TheSwede and his input, so... Thank you, Daniel!) In the meantime, since I don't have any BBB pics yet, I will share a few choice pics from last weekend's troop. Wearing my RS Stunt TK, of course. First, the ANH scene we recreated... Next, an official BadA$$ pic... Then when Vader left, we goofed off... See y'all soon!3 points
-
I can’t let Daniel ( @TheSwede ) be the only one posting pics of dirty buckets. Added the Hovi mics and green lens. I used the screen accurate green. I might switch out for the darker lens. Also shaved some more off the ears to increase the ear gap. Took pics inside and outside to test the look. Sent from my iPhone using Tapatalk3 points
-
Silicone on the way3 points
-
Thanks! My five year old son told me the weathering looked fake. I told him it was paint. He asked why I ruined my armour.2 points
-
2 points
-
Thanks Greg but I have this to say: I am but the learner and you are the Master2 points
-
Decided to cut the eyes some more, want to look meaner on troops so I guess that rules out swat beforeAfter Liking that ”joker-grin”2 points
-
I'll get those posted up Friday night!1 point
-
So far looking good . Get suited up so we can get the full view.1 point
-
SWAT vision, not everyone has it lol1 point
-
Love it Also if you're shooting for SWAT don't forget the "T" track wiring on the blaster.1 point
-
TK-92577 Reporting for duty. Open the EIB blast doors. https://www.501st.com/members/displaymemberdetails.php?userID=286701 point
-
So awesome you just HAVE to replicate this pose when finished!1 point
-
Not much to show but I have put in some work in sanding in between working on the Sandtrooper-stuff and now I think it’s ready for primer...in other words - to be able to spot more need of filling/sanding1 point
-
Used to play that on Nintendo (the old NES) They had sort of a sleepy-look to them but it was more obvious in person, I like it much better now and thanks also funny to see how colors differ in pics, helmet looks almost yellow on that first one... and added another layer of a different spray, stiff stuff was nowhere to be found exept for one seller on eBay but they haven’t replied so, and gonna add some more layers just to be on the safe side and then rubb that shine off if it don’t come down on its own1 point
-
No, it was definitely a little more width between the pieces. I actually last night went and re-positioned the right box a little closer in. Thanks for the response though. Rather catch it now than later.1 point
-
Congratulations Jeff1 point
-
Your badge has been added. Congrats!1 point
-
Alright guys, I feel like it's time for another massive post today. Since my lectures stopped two weeks ago I had tons of time to work on my armor, and with Power of the Force Con in Oberhausen, Germany around the corner (the event where I talked to a couple of 501st members and decided I was going to get an armor) I spent every free minute working on the armor. Sadly I failed to capture everything with my phone (in fact, what follows is a very small number of random shots I took in between), but anyway, here is what I got up to, sometimes supported by pictures: Carried on glueing all the appropriate parts together which usually made my basement look like this: Went on to the strapping: Which also made my living-room look like this: However, it turned out pretty nicely so far, so I tried to take some pictures with the parts of the armor that held together already: Finally, I would like to apologize to everyone who is reading this build trying to find some helpful hints because I really didn't take enough pictures with enough details However, I would like to point out three builds that were really helpful for me when I built this RS kit: 1. Build by @AsBlondeAsLuke which was an RS kit (like mine) and is also great fun to read, 2. Build by @ukswrath which is incredibly detailed and very easy to follow, 3. Build by @CableGuy which pretty much uses the same strapping system as mine and also offered a couple of interesting hints for building. Right now, I am waiting for a couple of other things to dry, then I will carry on glueing the thighs, and then all that's left is a couple of straps and the ammo belt. So stay tuned Cheers, Freddy P.S.: If you notice something I should change (hopefully it's not too late), hit me up!1 point
-
Sorry to take so long to reply, but posting in case others can benefit. What I found it that the armor fit the torso fine, but the legs, particularly the thighs, needed shortened. I ended up cutting about 1.5 inches off the top of the thighs, and then using a Lineman's pliers I slowly and carefully created a new return edge. I originally was going to use the hot iron method, but in practicing on scraps, I was having trouble being consistent. With the pliers, I was able to ensure a constant line and bend. Trick is to not bend too much in one time and to go slow.1 point
-
So did more work last night on the upper body armor. I got the magnet mountings for the chest piece to the yoke setup. I also attached snaps to the ab plate for my Geeky Pink's harness. In testing the fitting I found that the only downside to the front on the yoke is that with the wing tips going under the arms to the back they get in the way of taking it on and off, so you have to stretch it out. This led to a crack in the yoke on the left shoulder (small one that I've filled with Epoxy glue and covered with Apoxie Sculpt). I will be also reinforcing the yoke much more with fiberglass as it's going to be the most tampered with part I feel and I don't want to find more cracks over time with it if I can prevent it. Luckily it's a piece that doesn't need to be bending much at all. to remedy the stretching I'm going to be slicing the wing tips off (they aren't needed as the chest piece goes to the back plate fine). I'm also going to trim the bottom 1-2 inches off just for better fit/removability. Something like the red lines. Otherwise here's the updated images of what I've got going. And a video showing the magnet chest working: https://i.imgur.com/d6EKBXT.mp4 Chugging along here. Tonight I'm going to reinforce the fiberglass on the yoke and then work on getting the TD magnets to the Ab piece mounted. I have ordered some heavier duty snaps for this and they should be in soon. Once those come in I will be doing some more snap setup on the back of the ab piece and then the chest piece to the back. Plus the strapping for the thighs. After that there's only a few things to do before sanding/filling/priming/painting.1 point
-
Hi guys and girls here the new v3 E11 Sent from my iPad using Tapatalk1 point