Leaderboard


Popular Content
Showing content with the highest reputation on 07/15/2018 in Posts
-
More like “FAIL delivery” I’ll see myself out.3 points
-
Hi Ron, Looking good so far. :-) I’m guessing you’re referring to the parts I’ve marked in yellow: Personally, I would leave it how you have it. If you tried to straighten that edge (ie perpendicular to the floor) you’d be losing valuable material off of your chest plate and it might end up looking a little small. This angle can vary from armour maker to maker, but also depends on ones chest size. What you have looks good so far. [emoji1303] The chest overlap is great. Don’t try to butt them up against each other - you want a good overlap like you have. [emoji1303] You mentioned Centurion - don’t be afraid to set your sights high. By the looks of it, you have a good body shape for a nicely fitted armour so Centurion should be well within grasp for you as you wouldn’t need to shim the sides etc. Obviously, it’s totally your choice (however it does feel nice to get that Centurion certificate [emoji6]) Keep up the good work. Best wishes Dan2 points
-
Weathering test number one. Although I like the look of the subtle weathering one gets with Fullers Earth, I worry about the durability and, more importantly, I need to be able to carefully control the pattern of the weathering. I feel I can do that better with paint since I have experience painting and zero experience with Fullers Earth. Try one is using regular art acrylics and a shop towel to dab the paint for texture. I used burnt umber, black, yellow ochre, and white. I started off drawing a pattern and filling it in with dark grey. Then I did a coat of brown. Then a coat of sand colour. After each layer I rubbed off most of the paint with a towel. Well, I wasn’t happy at all with that. Too dark. So I wiped the piece clean with some mineral spirits and tried again. Outline pattern. Paint in area. Dab with towel and spread some paint around. A layer of brown/tan colour and dab with a towel. Rub away some paint once dry. Flick some brown and yellow at it. Rub off some of the specks. I needed to use mineral spirits for the flecks as they were pretty stubborn. In sunlight at a distance. Sunlight, bit closer. Not terrible. I will try the same thing tomorrow but I’ll use an airbrush. Sent from my iPhone using Tapatalk2 points
-
It`s been a long wait but the armor cleared the Swedish customs as of yesterday so figured it would be safe to start this up When I first watched the force awakens I was really disapointed with the new Stormtrooper helmet - DID NOT LIKE IT! The armor was cool though - however, over the years the helmet has grown on me so now I like it and really look forward building this kit. Here`s the version I´m going for: Besides from the armor (duh) one needs the following items: Cloth gaskets - Geeky pink`s phantastic gaskets (for Centurion you will need rubber). Armor vest - Diversity Props Boots and gloves - Imperial boots Undersuit - stromtrooperundersuit.com Belt and pouches - Trooperbay Blaster rifle - 3Dprops NL Metal holster - R2Dan Back pack - BSP (borrowed pic from FB, kit ships tomorrow)1 point
-
This thread is going to come in handy for a lot of Troopers Greg - beautiful work! Sent from my iPhone using Tapatalk Pro1 point
-
I'm trying to make is look good for the camera and not terrible in person. I figure more people will see the armor in a picture or at a distance. So - I guess I'm making more work for myself than needed since something can look so different from one picture to the next. Doing it so it looks good in person might be a smarter idea (as usual, sir ). The funny thing is - we are trying to recreate weathering from pictures that are over 40 years old, taken with unknown equipment, have been through several editing processes and digital compression, and are now being viewed on non-calibrated monitors. The weathering should be open to some pretty loose interpretations, IMO. I guess that is why SWAT can be such a challenge... "eye of the beholder".1 point
-
Yea it does help, thanks. What do you think. My right is a bit more snug. https://photos.app.goo.gl/jPS7nZLX2ywuvySi81 point
-
Yeah, that's the one I was concerned with, as well. You were clear enough - I just like to double double check!1 point
-
Ah ha. In that case, just follow where Joseph marked. You want those two parts right up against each other, but not overlapping. :-)1 point
-
That makes a lot of sense. I will just leave it long for now and probably do the same then. Not with my boots yet. I have them ordered and on the way. But still waiting for them to show up. Which is why I haven’t finished trimming the backs of the shins yet. Sent from my iPhone using Tapatalk1 point
-
You got some perfect advice from Dan there, Ron. You can trim the kidney plate right at the blue line shown, just make sure the top of the kidney is raised a bit to match the edge of the ab plate. You seem to be a detail oriented guy, and as Dan mentioned your armor looks to be fitting you very well (especially the posterior plate/kidney connection) so I would definitely consider taking this armor to at least level 2 (Expert Infantry) after basic approval! (The blue dots are a rough idea of where the rivets go, hint hint). If you haven't already done the strapping on the back/kidney connection, I would bring that in a bit as well. Keep up the great work, and be sure to ask any more questions you may have. We are here to help!1 point
-
Yep - many, including myself, have gone for a slightly wider radius curve on the bottom corner; however, those pictures above are of screen used so, if I were doing another suit, I’d follow that as a reference. Can’t get better than seen on screen... lol1 point
-
I’ve got my harness done with the gaskets, so tomorrow I’m going to figure out the last snaps for the thighs, then test wear the armor. Got some sanding to do going forward now.1 point
-
I have an ATA kit, and have the exact thing on the shins I have had no issues with basic approval and just made EIB The only issue I have, is the left side is very tight and becomes uncomfortable on a long troop. I plan on widening the opening more with a hot water bath and/or heat gun. The entire left side of the ATA kit is considerably smaller than the right. Forearms, biceps, calves etc.... Sent from my iPad using Tapatalk1 point
-
Thank you! Yes, there's not much to be done about the forearms, unfortunately. But I'd definitely encourage you to do a rough fitting (with tape) and see if the forearms don't look okay once everything is on. It's just a BIG kit. My biggest worry is not being able to take my own helmet off and on due to the length of the forearms, but I figure I'll cross that bridge once I get there. I will likely to the 'Finn mod' and cut out a notch on the forearms, but maybe only after I'm approved.1 point
-
Starting Assembly It's been a busy few months at work, but I was feeling depressed at the lack of progress on my armor, so I decided to sneak in a few hours work last month. Like my OTTK, I decided to start on the biceps. As mentioned before, they are simply massive on me, so I broke out my trusty heat gun and reshaped the right bicep to bring the circumference way down. Here's a comparison photo of the original left bicep, and the heat-reshaped right bicep: And a test fit with the gaskets: Finally, just to say that I glued *something*, I glued the shoulder bell extensions and an inside cover strip on the resized bicep. I also trimmed down the bicep overlap so that the unglued edges below meet in a butt joint, which I'll eventually fill. Aaaaand that's all I've got so far. We are actually moving next week, so I don't think I'll be able to get much work done for a while. At this point, I'll be thrilled to finish this kit in 2018.1 point
-
Accessories Over the weeks, most of my major accessories have arrived: Belt from Belts of the First Order: Boots from Imperial Boots: And custom gaskets, neck seal, harness, and shorts from Geeky Pink: The extra neck seal is an OTTK neck seal that Teresa threw in when I very off-handedly mentioned that the neck seal she made me for my OTTK (which I troop in and love) is just a tad snug. Thank you, Teresa!!! I also ordered shoe lifts from Amazon because the smallest boots that IB makes are men's US 8 (I wear a men's 6 on a good day) so they are super roomy. With the boots, lifts, and helmet, I think I should come in at a TOWERING 5' 6"!!1 point
-
Catching up on updates, I have finished rough trimming the armor. Lower Limb Trimming Checking the CRL, I noticed that the shins come together in a curve, not a straight line. While it's not explicitly mentioned in the text of the CRL, I figured I'd do my best to match the photos. I haven't trimmed them yet, but I did tape up where I want to trim them: For the thigh pieces, I have to say that I'm not super happy with the very rough trimming they did in the shop. It's clear they were rushing things. Nothing unrepairable, but it's certainly not making my life any easier. I don't know how much return edge is customary, but they tend to rough trim extremely closely, so I don't have much of a choice: They even cut into the armor itself: Nonetheless, I did manage to rough trim everything, and taping it up, the lower limbs are (like the rest of the armor) quite massive: It'll be a bit of a decision how much to size them down. With my OTTK I sized everything down in circumference quite dramatically, but with the size of the FOTK torso, I think that may leave me a bit chicken-legged: Finishing the rough trim With the limbs finished, I moved on to the rest of the pieces of the armor (minus the ab boxes): And laying everything out:1 point
-
Brian, thanks. Having a basement for a workshop was a mandate to my wife when we bought our house. Her mandate for me in the next house is a detached workshop so all the fumes from paint and fiberglass do not make the house smell like a body shop. Update, I am back from my work trip. Man, being away for a week has killed me but I am back and today I tied up some loose strings in preparation for paint tomorrow. First, I reworked all my air compressor lines and re-dehydrated the desiccant for the filter. I replaced the inline disposable filter and got some new hose. All that sorted out, I hung two more hard mounted wire hanging contraptions to hold the armor being painted. I also added the last cheap A/C filter to paint booth so it now has 4 20 x 25 A/C filters. The negative pressure inside the booth is better managed now and less likely to collapse the drop cloth walls. So here is how the booth looks now. I have staged the primer for mixing. The paint and clear coat are also ready to go as well. These are the paint guns we will be using. So the plan is to start painting at 08:00 tomorrow. I will have the assistance of a fellow Mandalorian Merc who has more experience in painting automobiles than I do. He will do most of the painting and I will mix the paint and mostly stay on the outside of the booth helping when needed. We hope to get two or three layers of primer on the armor. This will depend on how the first coat goes. After the first coat we will deal with any issues with the armor to ensure a smooth surface. For this I have staged a ton of sand paper ranging from 100 grit through 2000 grit. After we get all the armor primed, we will apply two or three coats of the white base coat. After another inspection and addressing any issues we will apply two clear coats. At that point we will remove any of the parts that get airbrush color added. Then we will spray two more clear coats on the remaining armor. I will let all the armor cure for 24 hours then being to mask the parts that need airbrushing. These parts will be the helmet, thermal detonator, abdominal, and back plate sides. I have looked over the “Rogue One Paint Guide” here on FISD and went a step further, I made some graphics to better outline what needs to be painted and what colors to use. So basically I will be using three colors; French Blue, Black, and Medium Grey. For this I will be using flat acrylic opaque airbrush paints. The French Blue and Black are US Art Supply “airbrush ready” (meaning they do not need to be thinned) and the Medium Grey is a Tamiya acrylic that will need to be thinned for the airbrush. Once I have masked the parts, I will airbrush them and then remove the masking. Then these parts will get two more coats of clear coat round them at a total of four coats just like the other parts. The airbrush I will be using is an Aztek A7778 kit that has 9 interchangeable tips. While these last four parts are curing (for 24 hours) I will apply the flex seal white rubber paint to the inside of the other parts. These last four parts will get the flex seal after the 24 hours curing. After another 24 hours to cure the flex seal, then I will add all the Velcro and straps, and the lenses and vent covers in the helmet and lastly do a test fit. Hopefully, I will be updating this thread throughout with what I experience and more pictures. And that is the update, thanks for the interest.1 point
-
That reminds me I never showed the butt plate, I cut it to look like the Anovos one but apparantly was a little sloppy and made the center tab a bit small, it should be about the same as the outer ones as it helps adding snaps to either side of the kidney plate which will be cut along the seam, I can make it work but ..oh well.. And as the ab plate now is molded to fit taller people it dosen`t line up to the kidney plate, my guees to why that`s not altered too would be that the kidney is easier to shim hight-wise. Anyways...was gonna leave it but decided to cut it, it`s enough plastic with this torso Construction as it is and forgot to take a pic when done but just used some tape to make a straight-ish line and the cut..apparently didn`t learn any lessons to be more careful after the butt-debacle aslo removed that top lip from the kidney portion. Neat storage. except for forearms, one bicep and one shoulder bell (they`re not trimed yet) everything is in there, sort of like a Stormtrooper-bowl1 point
-
Got my thigh garters made today. Took some trial and error on my part using a sewing machine. (Haven’t touched one since middle school) But using justjosephs63 style with Velcro I finally finished them up. And I’m pretty happy with how my thighs are sitting with them. For the belt I used some leftover 2” nylon and wrapped that in some denim material to be a little less likely to slip. Not the prettiest thing ever, but it gets the job done, and it’s completely covered by the armor. Sent from my iPhone using Tapatalk1 point
-
Great progress and a nicely detailed build, Daniel!1 point
-
My m38 casting are looking great,,,, 30 more days and they will be ready1 point
-
Well, Since I don’t watch these boards I had no IDEA we were back to this, but lets cover Kevin’s post one point at a time... ** I signed and agreement with KB stating I would not speak of his business or his business practices and so did he. However his post now voids that agreement so allow me to retort** 1. Kevin moved into the shop under the agreement that he might not be able to pay rent the first few months but would make it up. So I agreed to float him till he was a little more liquid. This never happened. Not because KB couldn’t. But because KB simply wouldn’t. He moved in the first week of December. In the time KB was in my shop he paid rent ONE time. Jsin NEVER paid me rent. In fact every time Jsin shipped something for the shop, I re-embursed him, insisting that it needed to be tracked so that costs could be kept straight. And in Mid January took out an 18K loan from Paypal... with which he bought a couple 3D printers and a VERY expensive Gibson Guitar. (We will come back to this) 2. He is correct. I notified Dana of Anovos we had stuff that Shaun Colquhon had stolen. HOWEVER what KB is *STILL* refusing to acknowledge is that he snuck stuff out of the boxes I was taking to return to recast the parts for himself. To my knowledge the only thing he modified without recasting is the Sholder bells that he straight out traced onto his wood bucks. The knee Caps he currently ships and the Cod Piece I know for certain are recast from the kits because I confronted him about them. That brings us to his “Special new cast TD”. KB Kept one of the Anovos TD’s and their TD Plate. I found this out when he used 1/2 of one of my DragonSkin30 5 Gallon kits to make a mold of it. Many of you still have it. And in fact KB is still shipping the TD Plate because I have seen it in the posts of kits going out as recently as last week. I kept the mold of the TD he did in DragonSkin and I destroyed it. Because I do not support re-casting. When I found this out KB was still in the shop and I made very clear I was not ok with this. KB ignored me. This is why Jsin did all the pulling of Armor, and I did Casting. And I never once rolled or pulled a recast part. I will not do it. FURTHER MORE: KB’s Patrol helmet is a re-cast Black Series helmet. He sold them for 250 each. Over and over again showing he has no problem re-casting. 3. The Discovery job... AGAIN... I took a job from Discovery. I am a working Professional Prop and Costume maker. Discovery Approached ME. I told KB what I thought would work best and KB went so far as to pull bucks from HIS HOUSE out for me to use. HE was offered 1000.00 for the use of his bucks. He would provide no labor, materials or time to it. HE AGREED. The number of suits is immaterial. I told him I would need to use them for a week. And he was so amicable to this he offered several suggestions as to how I would mix and match parts. 4. In the course of “Helping” KB I purchased plastic for him 3 times, I shipped kits twice and I purchased molding and casting materials twice. As he has shown over and over KB does not understand the efficient running of a business. Shipping cac cost upwards of 500.00 to send 5-8 kits depending on where they are going. And Casting materials were a 1000.00 trip every time I went to Reynolds in LA. Trips for plastic from Polymershapes were between 800 and 1000.00 a trip as well. 5. Jsin was offered 25.00 an hour for his work. But he needed to keep track of hours and I wanted him to do 2 10 hour days. He came in for an hour and a half the first day, 2 hours the second and an hour and a half the last. HE was offered cash for it and he insisted that I keep it to help cover KB’s groaning tab. 6. Speaking of his “Growning tab” KB offered infront of several members of the “team” to give me a 3D printer in exchange for some of his debt. I agreed I would take off 2500.00 of the cost as it was a broken and used printer he bought from the company at CES. 7. Let’s cover the “”Flame Trooper” parts kB wants you to believe I “Stole”. KB left in such a huff he left 4 boxes of soft pulled parts in my shop. There is a wide variety of trooper parts and pieces in there. And in order to re-coup costs for my mistake of lending him a dime I will use the abandoned parts in anyway I feel like. 8. As for the split of kits at the end, it was to be 1/3, 1/3, 1/3. KB insisted that after everyone laid out thousands in money for him and were CONTINUEING To lay out money, he be the only person to *GET* money because he couldn’t manage his personal money. When I told him I would not be involved with someone who would not repay his debts, he began trying to covince everyone that this was all me. I grow tired of having to repeat this stuff. At this point KB still cant supply everyone their kits and we’ve sailed right past his promised deadline. And we’ve sailed past it because KB only works till noon everyday and has no money to ship anyone’s kits or buy the resin he needs to cast helmets and greebs. I don’t have to keep telling everyone what a shucks business man he is it keeps getting proven over and over. Anyone who wants to see the screenshots of the coversations I have posted before again, I will happily send them to anyone now that I am no longer held to the agreement I signed with KB (Which can be seen on the Sandbox page as a pinned post) And just for the record, Ive said this before but let me end with this. When KB approached me in March to help him he was not communicating with customers at all. He assured me it was only 7-10 kits he was behind and that 3K would fix that. It wasn’t until *I* started talking to the customers that I found out it was 45+ kits and I FIRMLY believe that, had I not made that number public, KB would still be running his Ponzi Scheme now. For anyone who does not believe me.... 45 kits at an average of 800.00 a piece is 36K 45 kits worth of plastic is 9K (200.00 x 45) He could have ordered Fresh Plastic 3 Times and still have money left over... and tell me, what company do you know that makes you keep defective plastic? Ive been doing Costumes and Props for a decade and there is no company around that will not take back plastic if you can prove its their failing not your own. KB is lying to you. And has been, as far as I can prove, since I foolishly invited him into my shop. More than likely much longer than that.1 point
-
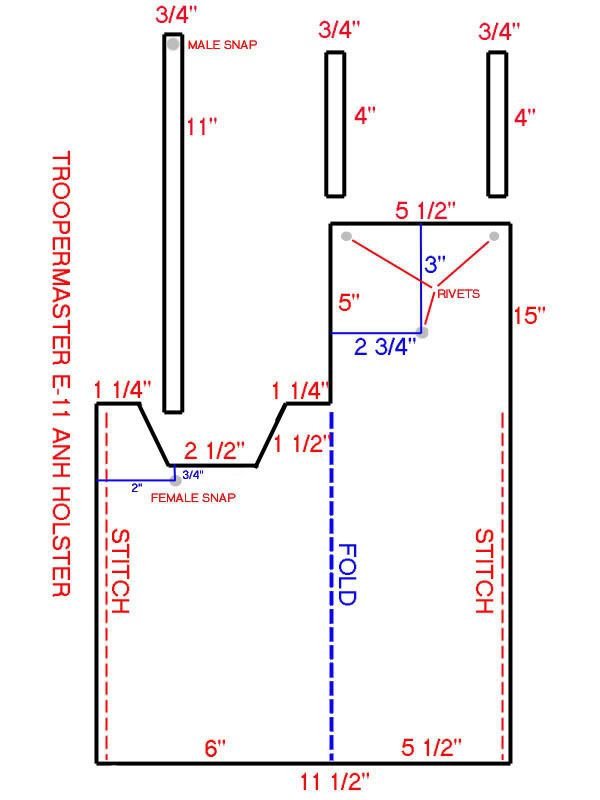
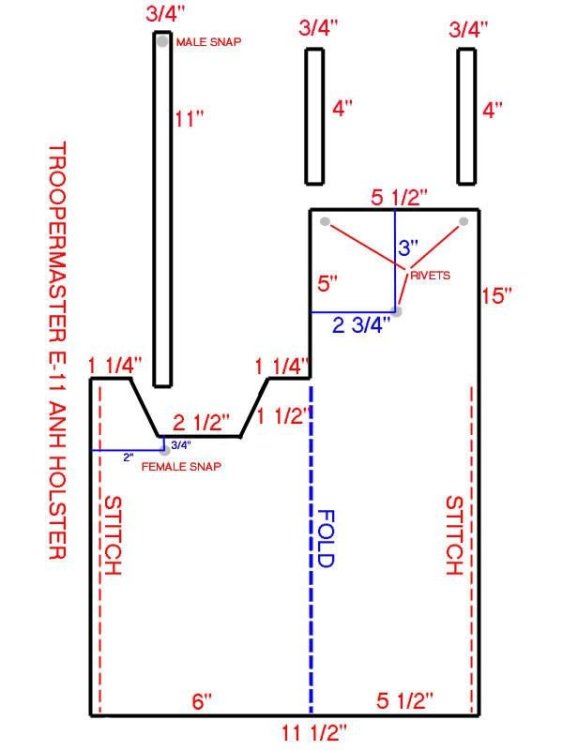
Google search is thy friend https://www.google.com.au/search?q=stormtrooper+holster&source=lnms&tbm=isch&sa=X&ved=0ahUKEwiA8Y6a8IvTAhUK2LwKHeIcCcEQ_AUIBigB&biw=1279&bih=639#spf=1
 1 point