Leaderboard


Popular Content
Showing content with the highest reputation on 09/17/2017 in Posts
-
You may have heard the term "Armor Party" mentioned here, and wondered exactly what that means. While these are not "official" 501st or FISD events, below is some basic information which may be helpful for those who would like to either attend or host one. How do I find one in my area? These are normally posted on your local Garrison or Squad websites, usually in the "New recruits" or Events area. If you have any questions, you can ask the board admins for your local unit. A list of all Garrison/Squad/Outposts can be found here: http://www.501st.com/members/displayUnits.php You may also have a local Imperial Attache that you are welcome to PM. A complete list can be found here: https://www.whitearmor.net/forum/topic/38483-fisd-imperial-attache-list/ Goals These events are aimed for those who are beginning or are in the process of building a set of TK armor. There will be approved Troopers there who have been there-done that and will help you with any questions or problems you may encounter and offer advice. However... if you have not received or even ordered your kit you are more than welcome (and encouraged) to attend. These are "judgement free" zones, so no matter how strange or inane you think your questions may be (or how many you have) we have heard them all, and are here to assist you. You will also get to meet the future friends you will be eventually trooping with. Supplies "I have my kit, so what else should I bring"? 1. I would start with a spiral notebook and a pen. This way you can write down any questions you may have before you get there, as well as take notes and contact information. Bring these items even if you don't have your armor yet. 2. Many hosts may have some supplies on hand, but what stage of your build you are in will determine what you will need. I suggest bringing a Dremel tool (with accessories), clamps, magnets, E-6000, sandpaper, a pencil, etc. When in doubt, bring everything you have. A complete list can be found here: https://www.whitearmor.net/forum/topic/31404-supply-list-for-your-tk-build/ 3. If you have them, bring your undersuit and boots. These will come in handy for fitting your armor if you are at that stage. 4. If you have a laptop, bring it for FISD references. Food/Drinks While some hosts will supply snacks and water, some make a whole day event (or a barbeque) out of it. Ask your host in advance, and be prepared to bring your own water/soda/juice, snacks etc. Some hosts allow alcohol (usually BYO), some do not, so please respect their wishes. Again, check with the host before bringing it. Not to be a buzzkill, but I personally don't recommend drinking while using a razor knife or electric tools. Conduct 1. If you smoke or vape, please check with your host to see if there is an area where you can do this and not offend others who don't. 2. If you drink (alcohol), please be responsible. 3. If you need to use someone else's tools or supplies, ask beforehand. 4. Please try to avoid bringing small children without checking with your host first. Sharp objects, flying ABS pieces and kids may not mix. Plus, they can get really bored. 5. The same goes for pets. 6. If you sign up to attend, please do so. You may also want to enquire about where to park. 7. Please do not expect others to build your armor for you at an AP. They are here to help, not do it for you. I have heard of some who actually dropped their armor off and said "I'll be back later to get it". Needless to say it was left in the box untouched. When it's over.. Remember to thank your host, as well as those who helped you, and PLEASE offer to assist in the clean-up afterward. It's the right thing to do. HOSTING AN AP If you wish to host an Armor Party, I highly recommend it. A Saturday or Sunday afternoon of camaraderie with fellow (and future) TKs can make for a great time, and is REALLY appreciated by those who need help with their build or have questions. So how do I do it? 1. Determine what type of space you have and how many people you can accommodate. Some use a garage, basement or patio, as long as there is shade (summer) or heat (winter). You will also need multiple electric outlets for tools, as well as sufficient tables, chairs and hopefully a workbench of some sort. 2. Ask the senior TKs, EIs and Centurions in your Squad/Garrison if they can commit to attend and help out with build questions. You really can't have too much white-armor knowledge at these events. Having one or more experienced FO TKs will definitely help. 3. Check with your neighbors. These events very rarely get loud, but parking may be a concern. 4. After you have determined that you are good to go, post up the information on your local 501st site (and FB if you have that). Be sure to give all the details you can in the post, including day, date, begin/end time, food/drink/alcohol/kid/pet/parking policy and if there is a limit on how many people you can accommodate. Don't forget the address/directions to your house! You may also want to provide an alternate date in case in inclement weather. 5. Have a laptop or computer online and at the ready with the FISD site available. This will help with any technical info. 6. Be prepared to answer the same questions over and over. These folks are depending on and will appreciate your knowledge. 7. If you get the chance, take lots of photos and post them up here! If you have any suggestions/additions for this, please feel free to post up below, or if you have any questions about hosting or attending please feel free to PM me.3 points
-
CRL stub created. I'll update it today based on gmrhodes13's excellent text he sent me. https://origin-wiki.501st.com/databank/TK_TLJ_Executioner3 points
-
Good luck with the build I will be keeping an eye on your build so just let me know if you need help with anything. This is what your kit will look like once finished. Have fun3 points
-
Back to work on the follower. I found a pen that fits the diameter of the rollers, so I cut two pieces to size. I filed the chamfers by hand and primed them. Painted and ready to be installed. I cut a Lego piece to use as studs on one end, and as pin receivers on the chamfered end. I should have the completed and weathered follower in the next update.3 points
-
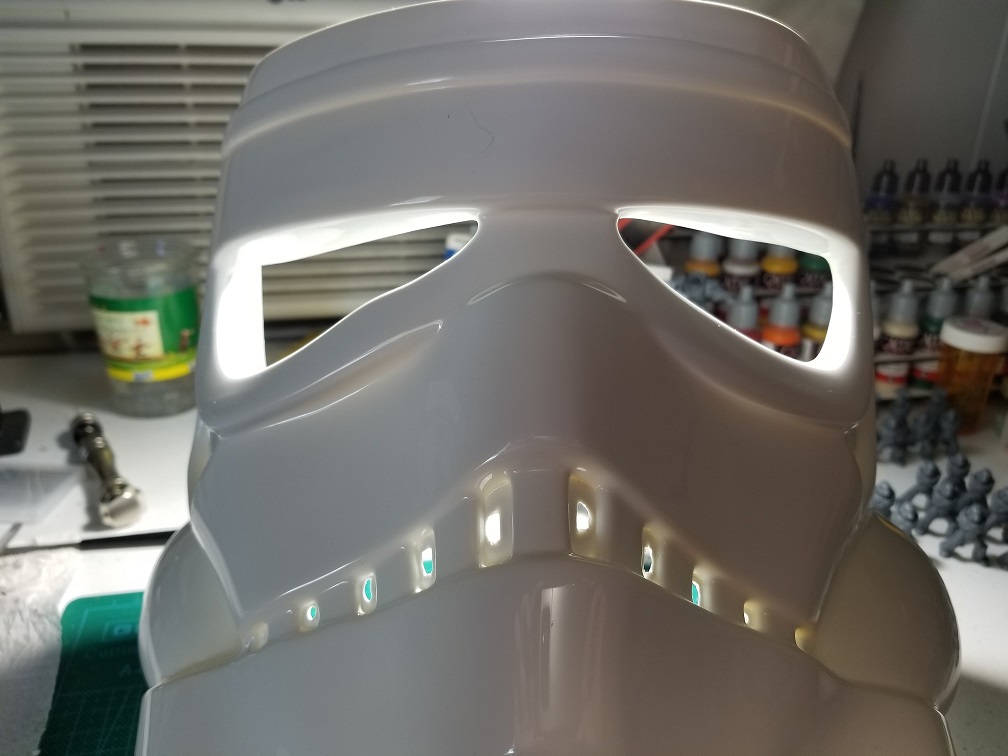
Hello and welcome, the bump in the eye is very screen accurate so don't worry about that ;). Great news you are aiming for centurion right of the bat, best way to build from the start. Looking forward to the progress, good luck2 points
-
TM ANH Hero is my all time fav TK. Can't wait to see the finished product.2 points
-
So for those of you who haven't seen my New CRL post I've got my heart set on one of the newest characters to come out of Force Friday II. Captain Cardinal! Sadly these are the only two images we have of him. The first is an exclusive poster from Barnes and Noble and the other is the back cover of the book. There are plenty on descriptions of him in the book although he is a regular FOTK with a red paint scheme lol. At any rate I was planning on doing a regular TFA FOTK before the book was released so I was already in motion to do it. Time to just add a cape and change the color scheme from white to red! I already have a set of TK7 gloves and boots from Imperialboots but they are still white. I'm unsure about dyeing them so if anybody has any tips or a trustworthy process for doing it then I'm going to wait until IB does their run of red. I also have my undersuit from stormtrooperundersuit.com. I also picked up my helmet from KB Props on Monday. Gotta go with the local armor maker right? I'm so stoked to be working with him and hopefully the rest of my garrison on this. At this point I realized I didn't grab my clip greeblies so last night i got them an attached. I didn't really take a good picture of the process but here they are attached. I also started painting the cheek greeblies black. I hope to make more process this weekend!1 point
-
Hey, I thought I'd share my progress as I start the build of my TK. Although this is not my first armored costume (I have a TS), it will be my first time building a kit. I received my BBB a few days ago. I carefully unpacked and unwrapped all of the parts. I am waiting on a few tools to really start work but feeling that I wanted to do something I grabbed the faceplate and started to sand out the teeth. As I was doing this I noticed something about the right eye. There seems to be a bump about 2/3 of the way along the bottom edge of the eye. Is this right for a Stunt? It seems, looking from the inside, that it was molded this way. I've included a couple pictures of the face. It could be that I just never looked closely at a stunt TK helmet, but I never noticed this before. I want to make sure that this is right before I go any further. Please feel free to let me know.
 1 point
 -
Yay BBB (big brown box) oh wait, IBB (itsy bitsy box). Well every piece adds up in the end I also use imgur and have had no troubles so far, it's really hit and miss with free hosts, any of them can start charging at any stage, I'm just cheap and don't want to pay for it1 point
-
Thanks Ensi! I agree it is. Soooo...lots of stuff in shipment to me. But nothing arriving yet. Haha. So photos of actual kit bits will be down the road. I'm on round 3 of my printing of my blaster rifle. I wanna post photos buuuttt....no idea what site to use. What sites do you guys use for photo hosting so I can bombard you will 3d print photos hah.1 point
-
Awesome nice work Q1 point
-
Great write up Joseph. We had to change the name of ours to Armor Workshops, seemed a few took the Party name too lituraly and some would indulge in some alcoholic beverages,early in the day which of course put a stop to building1 point
-
Oh, so so insightful fellas, intrigued and following closely [emoji6]1 point
-
Appreciate your compliments buddy1 point
-
Parts are from another Anovos kit I bought that someone had over trimmed in places. Shoulder cogs are 2.5" I heard KB is offering parts kits and pretty sure Jim is too.1 point
-
Perfect, those two pictures say it all. Yes, maybe a new trigger guard will fix the movement problem as well.1 point
-
Hey Dan, great progress so far. Yes, hollowing the folding stock is a time consuming thing but you did it good and that little mistake can be fixed with the "green stuff" or something similar. Now onto your trigger problem: This is a typical issue on a DoopyDoo's blaster build, because the trigger guard is thicker than the original ones (resin is fragile) and it also is placed slightly closer to the trigger. If you study reference pictures you will notice the upper mounting point is mislocated. You can build you own trigger guard from aluminum to correct this. To question 1: The "maximum pull of the trigger" on your above photo looks okay, but you can go deeper to win more room for trigger movement. To question 2: The upper end of your trigger (next to that nail) will "push" against the resin in your grip piece. You can add a tiny plastic piece there to stop it earlier.1 point
-
I'm guessing so too. This is my first 501st kit, so I'm going balls to the walls!1 point
-
You have major innovative talent here by sourcing ready owned material to improvise - great approach [emoji106] I'm reminded to think along these lines [emoji6]1 point
-
Nicely done. Where did you get the spare parts - back/yoke, thermal detonator, and shoulders? Also, what size (diameter) are your shoulder cogs?1 point
-
Thank you Liz my wrangler slash photographer1 point
-
Apparently that's the same thing it does to your brain if you inhale too much of it. What a visual1 point
-
Has worked well on FOTK armor for a while1 point
-
Sounds like a good idea1 point
-
I think it will be easier to just have a second set of parts, just like going from ANH Stunt to ESB, e.g. it's easier to have a second helmet, hand plates, and full belt.1 point
-
Wow, you work so fast and make it look so easy. Do you ever sleep? Great work1 point
-
Wow, this is coming along nicely. Keep up the great work. Glad to see another TM suit, he does a great job.1 point
-
Nothing better than a BBB, good luck with the build1 point
-
That looks just sooo nice1 point
-
You know that moment when you feel really really excited and happy? well...I´m having that moment now....my Big Brown Box has arrived! with great anticipation I opened it and wow..just wow, it was so well packaged that even if a tank rolled over it the only thing crushing would be the brown box Just look and you`ll se what I mean and when unrapping it I discovered this! instructions on how to cut and assemble and all the strapping was individually labeled! and extra set of ears! Just amazing and here it is, resting securely in the bin awating assemly - truly amazing armor and I´m over the moon happy to call this set of armor mine! and...just love the Hero-helmet..perhaps going for the really low-brow look? To Troopermaster: a BIG thank you Sir!1 point
-
Dang. You're making all of use mere mortal dads look bad! Very cool! SB1 point
-
Oaaahhhh This is freakin' awesome, Chris. Never expected you to go THAT deep into this detail.1 point
-
sterling Stock spring guild1 point
-
Not quite sure I follow, Dan.. Why would someone want to "Get a costume without any involvement of the FISD"?1 point
-
Hello, I appreciate the response. I have "most" of the larger pieces trimmed The CRL has the following stipulations and I'm trying to know where to trim for the following using the butt joint method. I don't know the trim stats for the armor OR the cover strips for each piece. I appreciate the tip on searching using titles - seems to yield more accurate results. I guess a part of my issue is 'knowing what to search for.' Any reference links are of much help. Thanks again. Forearms must be constructed using the butt joint and cover strip method. Biceps must be constructed using the butt joint and cover strip method. Lower legs must be constructed using the butt joint and cover strip method. Overlap construction is not allowed. Thighs are constructed using the butt joint and cover strip method.1 point