Leaderboard


Popular Content
Showing content with the highest reputation on 07/31/2017 in Posts
-
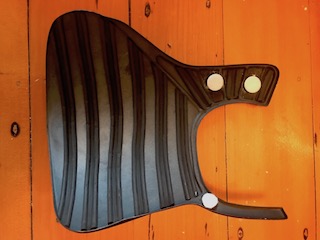
e11 retaining rings completed and ready3 points
-
For me I trimmed return edge off on the inside edge of bicep and forarm. Leaving a bit on outside edge for illusion of thickness. Remember to remove all return edge at wrist side. Do the pc.s fit now taped up for test fitting? If so then good. If not trim a little more.2 points
-
Registering for The Master Armorer Program. Troopers Assisted: 1. TK-4912 Tim 2. TK-9492 Issac 3 .TK-9113 Jeff 4. TK-9729 Michael 5. TK-13031 Gabe 6. TK-31709 Craig 7. TK-99421 Justin 8. TK-32478 Mike 9. TK-69937 Jay 10. TK-213401 point
-
Hey Brian! Here you go... I double stacked the magnets but you could easily use abs pieces of Apoxie Sculpt to build up height. You want them as flush to the edge of the cauldron as possible. I also added Velcro circles (the soft side) to prevent scuffing on the armour. Hope that helps
 1 point
 -
Kristen holding my new aluminum stock assembly onto the prototype e11 body... I will have them brazed on in production1 point
-
Rivets changed and painted… paint still wet right now!
 1 point
 -
Thanks Brad! Yes, we've definitely done final fittings with the undersuit; initial attempts (which I realize now are usually the ones I post) are as seen with whatever we're wearing or not wearing at the time just to get a general idea, primarily on length vs. width. As for his arms, his are pretty much sized the same as mine so they have a bit of room but without being too oversized. Seeing as he is still growing and working out (he's put on 10 pounds since summer started), I wanted to make sure I wouldn't be tearing them apart to resize them as soon as we finish the complete build. We can also use a little foam if needed as I've seen on threads for slimmer troopers.1 point
-
Gary's solution of Velcro on the boots and shins is a widely used one, and rightfully so, it's simple and it works great. Use "Industrial Velcro".1 point
-
I would keep the 10 teeth. Better to leave it alone than to risk making a mess while trying to "fix" it.1 point
-
Nice job Dan. Great looking paint on that bucket!1 point
-
Looks fantastic, good luck!1 point
-
Alright guys, sorry for the lack of updates. Back at the trimming. Still pretty fresh into the process, but trucking along! I got three kids, so it can be difficult! I'm sure a lot of you know what's up lol. Had some time tonight, so turned on some Clone Wars and started cuttin away with the Lexan's. Anyway, check out these edges on the chest and back plates. How do they look? Thanks for the input!1 point
-
I have been looking for CRLs for Rogue One armors, but could only find one for standard Stormtroopers. For Tank Troopers, Shore Troopers and Death Troopers, there do not appear to be any such pages. This is really bothering me, because I wish to begin building a set of Death Trooper armor. I am new to this, so correct me if I'm wrong, but any armor without a CRL is not allowed in the 501st, correct? If that's the case, then a CRL for Shore Troopers has to exist somewhere, since I saw them at Silicon Valley Comic Con earlier this year.1 point
-
Worked on the helmet a little bit today. I sprayed it with a couple coats of primer yesterday and then filled a good amount of the pin holes. Then I went about sanding the helmet down and took about 50% of the primer back off again. Now the helmet is super smooth and another couple coats are setting up on the helmet.1 point
-
Looks like you have things well in hand! Great photos and explanations so far. Keep it up!1 point
-
Thanks Gary (great name BTW ). The velcro is something we'll definitely keep as a backup for now - once we start trooping, we're bound to see how things will work and/or benefit from additional "behind the scenes magic" as needed. So far so good with the chair foam and it actually makes for a nicer feel to the fit of the shin piece along with stopping the creep. And being a little OCD, I would rather avoid sticking Velcro tape on my brand new boots although I'll likely change my tune after the first few scuffs and scratches take hold .1 point
-
Yes, I'm in contact with Walt, giving recommendations on updates. I need to expand the calves a second time so it will be a bit. I think we're all in agreement that we'd rather have it done right rather than quickly...!1 point
-
Two years later (almost exactly!!) and I found and purchased a beautiful TK saber. It's from Arm on Fire Custom Sabers on Facebook, there was about a 4 month wait (he got an order for 6 sabers at once, which took a lot of time, of course). Here's the video the maker made, showing it off... This also serves as a POC for anyone who wants to buy their own. https://www.facebook.com/ArmOnFireCustomSabers/videos/1436817806401941 I built a quick and dirty belt attachment for the Covertech clip that fit the 1.5 inch belt clip part, as well as kept it centered on the plastic plate by way of a couple cap rivets around the belt clip portion. It's attached to my belt through the top two chicago screws that normally hold on my holster. The bottom two screws are just hanging out. It works a lot better than a pool noodle!1 point
-
I have helped a ton of new recruits I just need them to take pictures and submit for EIB. I can at least post the nine that have helped to get their EIB, with maybe another 12 or 13 more that need to submit. If anything we can maybe overtake MEPD.1 point
-
Glad to see it worked out! (Not too sure about that undersuit, though... )1 point
-
First we have to reach the 10 000 complaints, only then will tapatalk achievement be unlocked. We're not even halfway now, so you guys will have to write some more posts using the mobile-friendly skin to complain, only then can we get it. But we can do it if we work together!!1 point
-
Guess it all depends on your size. Mark's kit leaves room for varying body types; we ordered our kit already trimmed so for my son and I we seem to be ok, but my brother is thinner so we're going to need some more removed from his. Would recommend after you trim all the parts, try to do a full fitment (using good old painters tape and an extra pair of hands). That will give you an idea of where you might need to make some adjustments. Check out my build thread and you can see the comparisons across our three suits when we tried it. There's plenty of AP builds out there to reference and if you need to reach out to Mark, he's really good about responding.1 point
-
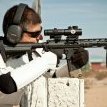
Hot off the press and using the newest TINY display and driver board, Bulldog's M38 scope kit fitted with custom electronics. Everything fits inside the main front collars including a convex lens, red acrylic cover and the display itself. and a quick video... https://youtu.be/ZNMxuq9ewi4 Brian, can you hit my up on PM or FB messenger please, I seem to have lost some of your details! Paul1 point
-
Alright I've trimmed all the leg pieces! Minus the fitting process. How do these return edges look on the thigh pieces? Sent from my iPhone using Tapatalk1 point
-
Final photos Okay its seems like this build has been going on for ever, but I think now it is finally at an end. I want to thank everyone for their comments and help along the way, with special mention to Tino (T-Jay), Arron (usaeatt2), Brian (Bulldog44), Chris (themaninthesuitcase), Dennis (Tr00per), Chris (Thrawn's guard). All of you guys have great build thread which really helped me out in a big way. So what would I do differently: I would do the scope rail fitting before painting - I bought one pre- made from toshie traders. I do like it, but I had to cut it up a bit and fill some holes to get it the way I wanted. The scope and hengsler were mounted too far forward and the front was too high. Will definitely do the crinkle paint on the next one – hopefully a pipe build Probably wouldn’t use a metallic paint on the undercoats, they seem to come off quite easily when weathering. I will probably do a bit more weathering as time goes by, adding rust etc. So anyway here are a few shots and more at this gallery. http://imgur.com/gallery/eDin7 Anyway thanks everyone for reading and now onto my ATA build..1 point
-
Hi Again, I got all inspired after reading T-Jays latest post on power cylinders, so I decided to finish off mine.. So after a I bit more sanding and a few more coats of paint and here is the outcome.. So good news, Chris’s (the maninthesuitcase) 3D parts can come up really nicely.. Cheers for now..1 point
-
It seems as if the more precisely we try to quantify the costume details, the more people argue about it. I vote that we refer to this as the Tarkin Uncertainty Principle, in honor of ol'Moff, because the more he tightens his grip, the more stuff slips through his fingers. Which is why no one invites him over for pudding. Plus, y'know, he blew up.1 point