Leaderboard


Popular Content
Showing content with the highest reputation on 07/16/2017 in all areas
-
Good advice, Michael. I do Civil War reenacting, and that's the same technique I used on the holsters for my 1861 Colt revolvers. Cricket -- You haven't said what your blaster's made of, but no matter what it is be sure to bag it in plastic when inserting it into the wet holster. A.J.2 points
-
May have to add one of these to the arsenal1 point
-
Ah great, thanks. I think I might buy one of the helmets from rspropmasters.com They seem decent and within my budget just need it for picking someone up at the airport and for a few cons where I want to be just comfy and just wear it with a normal suit1 point
-
Only parts that are black on the armor are the shoulders and yoke. BTW, finished this recently:1 point
-
Hi all,Slow but steady progress. With two young children it's sometimes hard to find "trooper time". I've been working on the traps and decided to follow the method of Black first, grey later. With my previous lid I did grey first, then tried to carefully apply the black pinstripe. Although I was quite pleased with the results at the time, I've quickly seen that this other method is working much better for me. Here's some pics. First, marked my boundaries with a pencil. Carefully applied the gloss black. Overlap the grey to create a nice sized pinstripe. Moving on to frown and ears. More to follow soon. :-)1 point
-
Some tweaking needs to happen, but I got my upper strapping figured out. Big thanks to Gary for help in figuring out some stuff..!1 point
-
And from the new pinball game It was thought that the shoulder bells would be red from this earlier photo but it may just be a red reflection as you can make out the FO emblem on the bells. The weapons still appears to be more of a mallet though so there could be a couple of versions. http://screenrant.com/star-wars-8-artwork-stormtrooper-snoke-guards/ A difference from this photo and preliminary sketches is we don't see the black markings on the helmet in the video, but it does look like some of the armor may be black (between backplate and chest)1 point
-
I haven't even caught up with the goods from episode 7 yet. Looks like they are trying to make our costuming hurdles even harder! But yeah, I gotta have one of those! Great start to my Sunday morning! Thanks for posting this!1 point
-
I get asked that quit alot... Dont see why not .. i did aquire the scope to copy whe n the time comes.1 point
-
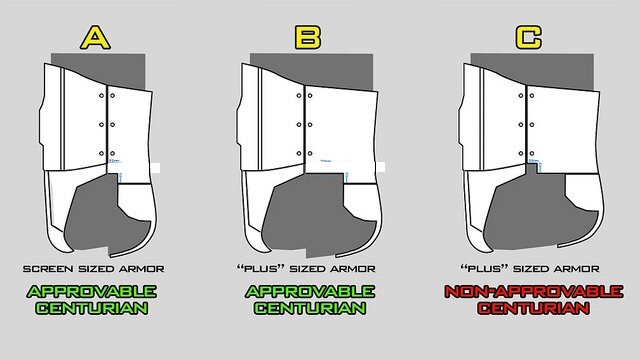
This is how the parts should match up correctly.
 1 point
 -
Great advice from Christine...as usual. Isn't it nice to see the pieces coming together and really looking like a TK? I also think you should work on the permanent strapping. Getting the chest/ab/kidney/but pieces fitting correctly is the bulk of the work and really the most important. You can't truly fit the arms and legs properly until the torso is correct. I think you'll have to trim some off the bottom of your kidney plate to raise the but piece up. The chest position over the ab looks pretty good as does the chest-to-back positioning. Like Christine said, it's hard to tell for sure because your shoulder bells were taped hanging off your back piece rather than hanging from a point where the chest and back connect but it looks pretty good to me. Your newly trimmed bells will look better next time you tape this up. Oh, and if your chest piece is choking you, you can trim the neck line for some more room. You should consider bending the lower sides of your chest in and around your ribs. Those ends are flaring out a bit. May help the overall look/proportion...it did on mine. You could start with something simple...the white strap connections between the top of the chest and the top of the back. This would also make it easier to get the armor on/off during test fits. Then trim the bottom of the kidney. Then tape it up again and check the fit. If OK, do your brackets connecting the kidney/back and chest/ab. Test fit again. Check alignment at the sides between all the pieces and check that your bottom of chest is in a good spot above your ab buttons. Put your belt on too, helps hold it all together and gives you a better idea how the armor truly feels around you. If OK, do brackets connecting kidney/but. Also do your left side connection between the kidney/ab. This is an important part as this not only fixes the pieces together, it also makes the whole thing more rigid, taking some of the weight of the ab piece so it isn't completely hanging from the chest. Test fit again, checking the left side connection (you want it tight). If OK, do your right side rivet/strap connection. This is just an outline of the process I would do....if I could go back and do it again. You may have a better method in mind, take it slow. Trimming too much off these large pieces can be catastrophic so baby steps are needed. Lots of test fits are critical. If something doesn't seem right or you need help, just let us know....especially if you're using screen accurate strapping/bracket system...it can take a while to figure it all out.1 point
-
Looks amazing as with all of your other stuff. Will you be using the same molding shop for the M19 clear light port bulbs? Can't wait to see how they come out.1 point
-
Just a heads up for the folks selling/buying things on this forum or posting pictures of your builds. IF YOU USE PHOTOBUCKET TO POST YOUR PHOTOS, as of July 6th 2017, Photobucket now requires people to pay for the ability to see photos on 3rd Party Websites. That means if you post pictures on this website, which is considered a 3rd Party Website, the people going to your thread cannot see the photos of your product or builds unless you have purchased Photobucket's Plus 500 plan which according to their site is $40 U.S. dollars a month ($480 a year). Now there are other sites like www.flickr.com that offer free 3rd Party Website picture sharing so there is no need to pay $40 a month to see photos. However, if you want to continue to use Photobucket or purchase the $40 a month plan, that is entirely up to you. I am not advocating one way or the other. This is just a public service announcement. Here is an example of what people who do not have the Plus 500 plan will see when looking at a thread on the Forum: Here is a screenshot of Photobucket's policy change:1 point
-
I am like a kid waiting for Christmas and your posts are the Sears Wishbook. The plastic top piece and window look great. Can't wait to see your finished Hengstler.1 point
-
Yes, all 3 colors made it in to the film. The black pauldron guy is also seen talking to Kylo during the Resistance attack, and then Kylo tells him to pull the division out. Thanks Clint for that screen cap - I missed that reference for the black pauldron. And yeah, we'll also have to allow scuffing/light weathering on the CRL as an option.1 point
-
So I'm sat there last night looking at some of the armour all clamped and setting, when I thought about how many magnets had jumped out of my hand and smashed (usually when they're doubled/ trippled up) due to me not being able to determine the positive and negative. I then remembered that I had seen some people using the fabric pouch method. I'm pretty much done with glueing the limbs and thought about going that way, and then remembered what I saw on another thread (apologies, I don't recall who it was ). So, I began wrapping masking tape around my magnets and as I began stacking them, I made a mark to identify which way they would stack. The other benefits to this are: I have full flexibility in terms of how many I want to stack. If any do leap out of my hand and break, then the tape should hold them in place. Also this prevents the magnets scratching that lovely white armour [emoji6] Marc1 point