Locitus[Admin] Posted March 4, 2012 Report Posted March 4, 2012 Great news Shawn! Congratulations! Quote
Rich330[TK] Posted March 4, 2012 Report Posted March 4, 2012 I admire your staying power. Hang in there man! Almost there ... etc. Quote
Nassik Posted March 4, 2012 Author Report Posted March 4, 2012 (edited) It looks so good. Here's the full set... You can even see the glossy white ABS within a few pieces. And here is a comparison shot... This picture shows the originally painted back plate next to a newly painted shoulder bell for the sake of color comparison. I had my original TE armor color-matched over a year ago and it looks like the paint was perfect. Edited March 4, 2012 by Nassik Quote
troopermaster Posted March 4, 2012 Report Posted March 4, 2012 Personally I would have painted it all white. I don't know why there is this fad about creamy ROTJ armour? Matt's armour was ESB MKII and was haircell ABS that probably just yellowed over time. I have seen no evidence to say ROTJ armour was anything other than white ABS. Quote
Nassik Posted March 5, 2012 Author Report Posted March 5, 2012 (edited) It wouldn't surprise me. In the end, I figured that it was easier to paint my arms and legs to match the usable torso and helmet than it would have been to repaint those bits. I'd have had to paint everything to ensure that it all matched. It seemed easier just to match everything to the off-white TE bits that I can use. It certainly wasn't quickly accomplished, but it was quicker to paint the arms and legs than it would've been to paint the entire kit. The color-matched paint I bought over a year ago wasn't terribly cheap, but it has made the armor match. If the TE kit had been glossy white I definitely would've gone that route. That wasn't the case, though, and so I stayed with the creamy-colored look. I'm truly thrilled that my armor is finally in a presentable state. It's taken two years to finally get it to this point. I don't mind that it's creamy off-white as opposed to gloss white, even if it may not be dead-on accurate. It's nice to have a set of armor that is finally all one color. . Edited March 5, 2012 by Nassik Quote
Nassik Posted March 6, 2012 Author Report Posted March 6, 2012 Today is touch-up day. I've added in black and dark blue where it's chipped off the ab plate buttons. And I've repainted the bumps on my helmet's ear caps. My TE bumps had three black rank stripes on them and so I had to paint over the stripes in order to put on the correct number and pattern of rank stripes. Quote
Nassik Posted March 6, 2012 Author Report Posted March 6, 2012 It's so close to finshed. I need to rivet on the sniper knee plate and thigh ammo belt (as per the CRLs), adjust the strapping on my left arm, rivet on the holster, and paint my boot soles white. And then it's done! Quote
Nassik Posted March 11, 2012 Author Report Posted March 11, 2012 Further progress on this suit... The sniper knee plate and thigh ammo belt have been riveted on and their rivets painted to match the armor. The holster has been attached to the belt. My boot soles have been painted white. The black rank stripes have been repainted on the helmet. I've lost the strapping for my arms. After seven+ months I'm glad to have found everything else. We'll recreate the missing arm straps, hotglue in my replica ROTJ hardhat liner, and install my chin strap. That will finish everything. Quote
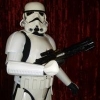
Nassik Posted March 12, 2012 Author Report Posted March 12, 2012 (edited) The armor's out back under cover at the moment. The paint keeps smudging, despite drying for days. It seems alright now, but I've clear-coated everything under multiple coats and I'm leaving it to fully dry outside. The temperature is 38 today (in the 90s if you're used to Fahrenhiet). The heat ought to dry everything completely. I'll check on it in a few hours. Right side of the helmet with new rank bars. Yes, that's accurate S-trim underneath the helmet put on correctly. Front view. With first run Russrep mic tips Left side of the helmet with new rank bars Right side attached E-11 holster. The buttons really are black and dark blue Sniper knee plate Thigh ammo belt Drying in the heat Boot soles going white And yes, that's a Ghostbusters proton pack behind my boots. Edited March 12, 2012 by Nassik Quote
RogueTrooper[TK] Posted March 12, 2012 Report Posted March 12, 2012 Personally I would have painted it all white. I don't know why there is this fad about creamy ROTJ armour? Matt's armour was ESB MKII and was haircell ABS that probably just yellowed over time. I have seen no evidence to say ROTJ armour was anything other than white ABS. +1 Quote
dashrazor Posted March 12, 2012 Report Posted March 12, 2012 i agree they were originally white.. but one thing that really stands out is your U-trim stands out far too much in contrast to the rest of the armor.. in ROTJ the belts,U-trim trim were all matched in color very closely.. i would recommend painting the U-trim to match the armor or vice versa Quote
Nassik Posted March 14, 2012 Author Report Posted March 14, 2012 My ROTJ replica hardhat liner and the chin straps have been installed in the helmet. The arm strapping is the last remaining bit to do. I can very easily see the discrepancy between the armor trim and the armor. I've noted it ever since the armor arrived years ago. The only feasible thing to do, if I were to try and make them match, would be to paint the trim. But the trim is rubber and rubber just doesn't take paint very well. My boot soles took around ten coats of paint to make them white and they certainly aren't perfect. Quote
Nassik Posted April 9, 2012 Author Report Posted April 9, 2012 (edited) I'm still working on this. We had to take a break in order to get my Ghostbusters proton pack built for an event this week. With the pack built, we've come back to my armor. Today we created the final strapping for the arms. The armor now wears properly. We added a bit of padding to the left side arm and leg so that they fit me better. The last remaining task is to mount the shoulder bridges to the armor. Because of the rubber armor trim, the bridges can't sit flush on the armor. We've removed a little of the bridge curvature with a heat gun and that has helped but not enough to fix the problem. So now we're creating plastic spacers on the underside of the forward end of the shoulder bridges to bridge the gap. This seems to be working. Once the E6000 sets on the spacers we'll put some industrial Velcro in there and that should fix the problem. Edited April 9, 2012 by Nassik Quote
Kade[TK] Posted April 9, 2012 Report Posted April 9, 2012 Good to see it almost there Shawn, looking forward to trooping next to you in it Quote
Eldrik Posted April 9, 2012 Report Posted April 9, 2012 Is the ROTJ knee ammo belt position different from ANH & ESB? If not I would have aligned it deeper like shown on the LFL pictures I copied the look on my ANH build Despite the knee ammo belt your ROTJ suit looks sweet Quote
Nassik Posted April 10, 2012 Author Report Posted April 10, 2012 I've seen the thigh ammo belt riveted in different positions.Some are up high like ANH and I've seen a couple of screen captures riveted about halfway up. I went with the halfway point as it keeps the thigh ammo belt from pivoting on my armor. Quote
troopermaster Posted April 10, 2012 Report Posted April 10, 2012 Is the ROTJ knee ammo belt position different from ANH & ESB? Not that I have noticed. I've seen the thigh ammo belt riveted in different positions.Some are up high like ANH and I've seen a couple of screen captures riveted about halfway up. Do you have any photo evidence of this Shawn? ROTJ armour is not my speciality but I have yet to see any knee ammo straps riveted like how you have done. I see a lot of guys doing the same thing and it just looks wrong to me, so any evidence of screen used armour with the straps as you have them would be nice to see. Quote
Nassik Posted April 11, 2012 Author Report Posted April 11, 2012 Hhhmmm... maybe I'm wrong. I've found a picture of fan armor riveted like mine but I'm not able to make it out in the screen shots I've got. I know that I did it this way on purpose based on something that I'd seen, though. That's going to be stupid if I based it on fan armor. I'll keep looking, though. We did grab a few pictures of my armor last night, though... Quote
Nassik Posted April 24, 2012 Author Report Posted April 24, 2012 (edited) I received word from my garrison's GML tonight... "BTW looked over the ROTJ TK all good Approved looks great mate Cheers" I'm finally a TK. It's taken me a little over two and a half years to get to this point, but I've finally done it. Once my 501st profile updates with the TK approval, I can go for EIB status. Edited April 24, 2012 by Nassik Quote
Rich330[TK] Posted April 24, 2012 Report Posted April 24, 2012 Well done, man. What perseverance! Quote
Nassik Posted April 28, 2012 Author Report Posted April 28, 2012 Thank you. Now I keep checking for my 501st profile to update. The FISD was the first 501st Legion detachment forum that I joined and it was the first costume that I started. Once my profile updates, I can get proper TK status here in the FISD and I can submit my photos for EIB and Centurion status. Quote

Recommended Posts
Join the conversation
You can post now and register later. If you have an account, sign in now to post with your account.