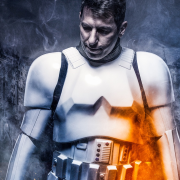
TK-Sharp[TK] Posted December 26, 2014 Report Share Posted December 26, 2014 (edited) TK-12169 requesting Centurion status for his Stormtrooper armor (Trooper Master - ANH Stunt) Name: Michael Seeger ID: TK-12169 Forum Name: Trooper Mitch Garrison: German Garrison Armor Maker: Trooper Master Helmet Maker: Trooper Master Blaster Type: Doopydoo Height: 170 cm Weight: 72 kg Boots: Busse Jodhpur (painted white) Canvas Belt: Self made Hand Plates: Self made (latex painted white) Neck Seal: TK-2647 Holster: Self made (using TM's template) The following pics are "small" versions. Each main section is followed by thumbnails which are links to the preceding pics in their original (higher) resolution. You'll get to my EIB-Thread by clicking here ... 1) Full Body 1a) Action 2) Armor Details 2.1) Ab/Kidney Attachment - Button Orientation 2.2) Butt/Kidney not fixed 2.3) Hand Plate 2.4) Shoulder Bridge and Connections 2.5) Thigh Pack Attachment 2.6) Knee Plate 2.7) Drop Box Back (and belt modifications) 2.8) Cod and Butt Plate Attachment 2.9) Interior Strapping 2.10) Kidney Plate Notch 2.11) Wrist side of forearms 3) Helmet Details 4) Blaster Details 5) Accessory Details Edited December 26, 2014 by Trooper Mitch Quote Link to comment Share on other sites More sharing options...
Tusken RTT Posted December 26, 2014 Report Share Posted December 26, 2014 Looks fantastic- Awesome build! 1 Quote Link to comment Share on other sites More sharing options...
Snaps[TK] Posted December 26, 2014 Report Share Posted December 26, 2014 Good luck 1 Quote Link to comment Share on other sites More sharing options...
gazmosis[501st] Posted December 27, 2014 Report Share Posted December 27, 2014 Hey Michael!!! Wow! Merry Christmas to us!!!!! Thank you so much for this incredible example of both a stellar EIB/Centurion application process and of course, a stupendous build! This will be at the top of my "how it should look" list to link people to when they want to see a fine example. CRL and Centurion Application Requirements: All required submission photos have been posted. Your armor contains all required elements for Centurion. Now for a Christmas gift from the FISD.......I would like to congratulate and welcome you to Centurion! Other Suggestions: Thank you for making the little changes you did; Adjusting the thighs, good brow trim position, proper drop box position, better drop box thickness, all were icing on this tasty TK cake!! How could this possibly be improved?? I would dampen a brush with mineral spirits and go around the black outlining of the tears, traps and rank bar areas of the ears and tweek the paint just a bit to smooth out those lines. But if this is something you think is cool, by all means leave it. Now get out there and make your Garrison proud!! Like you haven't done that already! 1 Quote Link to comment Share on other sites More sharing options...
Snaps[TK] Posted December 27, 2014 Report Share Posted December 27, 2014 Congrats Michael and welcome to the Centurion ranks! 1 Quote Link to comment Share on other sites More sharing options...
TK-Sharp[TK] Posted December 27, 2014 Author Report Share Posted December 27, 2014 (edited) Hi Steve, Hey Michael!!! Wow! Merry Christmas to us!!!!! Thank you so much for this incredible example of both a stellar EIB/Centurion application process and of course, a stupendous build! This will be at the top of my "how it should look" list to link people to when they want to see a fine example. Thank YOU for this amazing Christmas present!!! I'm pretty overwelmed and quite speechless about this honor This really means very much to me. It's the first TM armor I completely built myself and to be honest: I wanted to build this TK having it Centurion-Ready right from the start As all of the Centurions here I spent numerous hours of research before starting the project. During the build I had an awesome Garrison mate that reviewed the pics I made and I had at least one GMO who gave me some very useful hints. At least I had you and all the guys responding to my EIB Thread giving me all those precious hints for getting even better and reaching this rank. Thank you for making the little changes you did; Adjusting the thighs, good brow trim position, proper drop box position, better drop box thickness, all were icing on this tasty TK cake!! Doing these mods was a matter of honor to me. I worked on them as good as I could. Be sure that I'll have a look on how to smooth out the black lines of the tears, traps and so on THANK YOU ALL !!! P.S.: Be sure to get another application for EIB/Centurion as soon as my Incinerator Trooper armor is finally 501st approved ... already waiting for almost four months ... Edited December 27, 2014 by Trooper Mitch Quote Link to comment Share on other sites More sharing options...
The5thHorseman[TK] Posted December 27, 2014 Report Share Posted December 27, 2014 Merry Christmas Michael! Enjoy your well-deserved FISD gift 1 Quote Link to comment Share on other sites More sharing options...
TK-Sharp[TK] Posted December 27, 2014 Author Report Share Posted December 27, 2014 Merry Christmas Michael! Enjoy your well-deserved FISD gift Thank you, Germain !!! Quote Link to comment Share on other sites More sharing options...
gmrhodes13[Staff] Posted December 27, 2014 Report Share Posted December 27, 2014 Congrats trooper and welcome to the ranks 1 Quote Link to comment Share on other sites More sharing options...
TK-Sharp[TK] Posted December 27, 2014 Author Report Share Posted December 27, 2014 Congrats trooper and welcome to the ranks Thank you, "Q" Quote Link to comment Share on other sites More sharing options...
Locitus[Admin] Posted December 27, 2014 Report Share Posted December 27, 2014 Nice work! 1 Quote Link to comment Share on other sites More sharing options...
TK-Sharp[TK] Posted December 27, 2014 Author Report Share Posted December 27, 2014 Nice work! Thank you Mathias ... also for the quickly produced certificate Quote Link to comment Share on other sites More sharing options...
2thin[501st] Posted December 28, 2014 Report Share Posted December 28, 2014 Great looking set of armor! Congrats!!! 1 Quote Link to comment Share on other sites More sharing options...
DarthChridan[TK] Posted December 29, 2014 Report Share Posted December 29, 2014 Baaam...what a bad an impolite person gear. Well done, comrade...and like Steve has written, this is a great example for a good application.... Congratulation for your 'Centurion' Status....... Cheers... 1 Quote Link to comment Share on other sites More sharing options...
TK-Sharp[TK] Posted December 29, 2014 Author Report Share Posted December 29, 2014 Baaam...what a bad an impolite person gear. Well done, comrade...and like Steve has written, this is a great example for a good application.... Congratulation for your 'Centurion' Status....... Cheers... Thank you also for that, Sir Looking forward for the next troop! CU Quote Link to comment Share on other sites More sharing options...
Spycee[TK] Posted December 31, 2014 Report Share Posted December 31, 2014 Congratulations, a very good build ! The only thing I would change is to put the S-trim junction under the vocoder to hide it, it looks better when you look at the back of the helmet. Quote Link to comment Share on other sites More sharing options...
TK-Sharp[TK] Posted December 31, 2014 Author Report Share Posted December 31, 2014 Congratulations, a very good build ! The only thing I would change is to put the S-trim junction under the vocoder to hide it, it looks better when you look at the back of the helmet. Hi Spycee, it's true: It looks better but the most accurate way is having the junction at the back I had a short discussion on that with a Garrison mate when I did that with my Incinerator helmet ... Quote Link to comment Share on other sites More sharing options...
Spycee[TK] Posted December 31, 2014 Report Share Posted December 31, 2014 The eternal debate : accurate vs realistic ;-) 1 Quote Link to comment Share on other sites More sharing options...

Recommended Posts
Join the conversation
You can post now and register later. If you have an account, sign in now to post with your account.