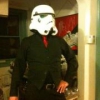
Toddo[TK] Posted December 29, 2013 Report Posted December 29, 2013 As far as I can tell, nobody has submitted a Rubies costume for EI status, or held five Expert Infantry Badges, so here goes nothing. I modified the heck out of a cheap Rubies costume. The list of modifications includes Replaced helmet with CFO bucket Trimmed biceps, forearms (including removal of return edges), thighs, and shins. The shins were giant not just for my skinny legs, but in proportion to the entire suit. Drilled out the rivets on both ends of the shoulder bridges. Trimmed the bridges to a reasonable length and re-attached using Velcro. I then added nylon load-bearing straps under the shoulder bridges. Trimmed the oversized hand guards to better fit my hands. Cut out the ab button plate and inverted ROTJ-style. Painted all of the abdomen buttons with Testor's to match the screen-used pattern. Drilled-out the rivets connecting the belt to the abdomen. Trashed the ABS belt strap and replaced it with fire hose. Tried to add a pair of Kev's inner drop boxes the existing drop boxes, but they don't fit. Instead I modified Kev's boxes to work inside the smaller Rubies' drop boxes. Riveted the new belt assembly and drop boxes to the abdomen plate. Re-strapped the entire suit ROTJ style. The existing straps were way too long for anybody really. Drilled out the rivets connecting the thigh ammo belt as Rubies installs this upside down for some reason. Reattached with rivets to the correct orientation. Removed the arm straps from the shoulder bells and added padding for that ROTJ linebacker look. Painted the soles of a pair of TK boots white. Weathered the whole suit with inspiration from sskunky. Instead of wood stain (and because I'm a scaredy-cat) I used acrylic paints. Now the suit looks like it has spent a little time on Endor. Replaced the ears on the helmet with a pair from Scootch as the exiting ears had visible screws attaching them. Scootch also made some bubble lenses for the bucket. Built a holster with longer straps from one of Darman's kits and attached to the belt. Replaced the weird undersuit with my usual Under Armour stuff. Armor: Rubies Helmet: CFO with CAP-W bubble lenses and ears Blaster: Hyperfirm TK6647 Height: 5'9" Weight: 165 lbs Boots: TKBoots Neck Seal: TK409 Holster: Darman Gloves: rubber chemical gloves TD: T/MC Front Back Left Right Left Arms Raised Right Arms Raised Shoulder Bridge attached with Veclro at front and back with nylon strap beneath Inner Drop Box Longer Holster Straps on Right Side Film Reference Thanks for taking a look. Quote
Cantina Security[501st] Posted December 29, 2013 Report Posted December 29, 2013 Good job, I have a JR kit I want to modify for approval. Just been working on a Shock trooper for the last few weeks . The TK is next... Quote
Daetrin[Admin] Posted December 29, 2013 Report Posted December 29, 2013 Pretty amazing Todd. You are right on both counts - no one has ever tried to do what you're doing, and both would be unique events for the Legion & FISD. Wish you the best!!! Quote
SuperficialBurn Posted December 29, 2013 Report Posted December 29, 2013 Good luck Todd Sent from my 1520 using Tapatalk Quote
gazmosis[501st] Posted December 31, 2013 Report Posted December 31, 2013 Apologies in regards to the timeframe of this response. Because of the nature of this armor, you can expect that this needed to be looked over with great care and interest. If I could, I would pass this based on your efforts alone, Todd. A well done transformation of a historically frowned upon set of armor. You are so close with this I want to get this this through quickly and with a minimal amount of adjustments this will happen. CRL Requirements: The outer edges of your frown are squared off. Please adjust these to look more rounded, I have reviewed over and over the bucket off shot to see if the 1/4" straps on the inside of your shoulder bells are present. If they are, could you provide a clearer picture and if not, this needs to be updated. Photo Requirements: I just need a shot of the inside of your armor. Other- Armor Fit / Assembly: Although EIB will not be affected by these, here are a few suggestions. Your forearms seem to fall a bit over your wrist. I know because of the pre-assembled diameter this is no fault of your own, but perhaps for more comfort you could install straps between the biceps and forearms to raise them slightly. The weathering on the Hyperfirm blasters has always been extreme to me. I would knock back the weathering on the grip. These were originally gloss black plastic.Gloss black paint has a hard time sticking to the rubber compound but again, this is just a suggestion. And lastly regarding your holster. Although nothing is noted regarding the requirements for the hardware that attaches the belt straps to to the main body, they have always been shown to have a rivet like appearance. I would reverse the Chicago screw so the "screw head" portion faces the rear. Thank you for your stellar efforts on this! Quote
Toddo[TK] Posted January 1, 2014 Author Report Posted January 1, 2014 Happy New Year Steve, and congratulations on landing the DO job. I took some more pics to illustrate things better. I already have strapping between the forearm and bicep, but the Rubies armor thickness (it's much thicker than any of my other armor) makes it awkward to size the forearms snugly even with heat applied. I added some foam on the interior of the forearms in hopes that it helps that issue. I also rounded-off the frown on the helmet. Hopefully the new photos show the 1/4 strap on the bells. Thanks for your feedback. Todd Quote
gazmosis[501st] Posted January 2, 2014 Report Posted January 2, 2014 Thank you, Todd for following up. Everything meets the criteria for EIB and it has been passed!!! Through you efforts, you have taken a suit that has been frowned upon and made it something that is a pleasure to look at. Your hard work had earner you your 5th EIB award. Congratulations!!!!! Quote
Locitus[Admin] Posted January 2, 2014 Report Posted January 2, 2014 You should still consider moving the knee belt to line up with the thigh properly and place the rivets in the top corners. ROTJ knee belts are the same as any other, except for using pop rivets instead of cap. Quote
Toddo[TK] Posted January 2, 2014 Author Report Posted January 2, 2014 Thanks Steve. I appreciate it. Quote
Daetrin[Admin] Posted January 3, 2014 Report Posted January 3, 2014 Congrats Todd - well deserved!! Quote
captsafe66[Admin] Posted January 3, 2014 Report Posted January 3, 2014 I'm speechless...congrats! Quote
Toddo[TK] Posted January 3, 2014 Author Report Posted January 3, 2014 Thank-you everyone. Special thanks to Paul for his constant encouragement. This is quite an honor. Quote
Daetrin[Admin] Posted January 3, 2014 Report Posted January 3, 2014 You deserve every kudo Todd. We are simply recognizing the accomplishment. Quote
bjsavage7[TK] Posted February 14, 2014 Report Posted February 14, 2014 Awesome build! Congrats! Quote
Daetrin[Admin] Posted February 14, 2014 Report Posted February 14, 2014 Congrats again - this is a huge achievement. Quote
KaitoTrooper[TK] Posted February 16, 2014 Report Posted February 16, 2014 This is awsome! Congrats Quote
Arnie_DK[TK] Posted February 17, 2014 Report Posted February 17, 2014 Wow! didnt think that could be done! Congrats Just out of curiosity. The edges on your armour. Is the raised areas molded into it, or is it attached separately? But again. Big congratulations on this achivement. And 5 EIB's...impressive... How many Centurion do you have Quote
Toddo[TK] Posted February 17, 2014 Author Report Posted February 17, 2014 Wow! didnt think that could be done! Congrats Just out of curiosity. The edges on your armour. Is the raised areas molded into it, or is it attached separately? But again. Big congratulations on this achivement. And 5 EIB's...impressive... How many Centurion do you have The raised edges are built into the Rubies armor. As far as Centurion goes, my understanding is that that can only be awarded once per trooper. Quote
Arnie_DK[TK] Posted February 17, 2014 Report Posted February 17, 2014 But I assume you can still apply for centurion on other suits. If I ever get another TK I would get it Centurion approved, even though I already have it on my current suit. But was just wondering Quote

Recommended Posts
Join the conversation
You can post now and register later. If you have an account, sign in now to post with your account.