

TK-4510
-
Posts
2,991 -
Joined
-
Last visited
-
Days Won
2
Content Type
Profiles
Forums
Gallery
Articles
Everything posted by TK-4510
-
Well.... I didnt get it. I was the #1 choice until yesterday when another guy interviewed with better experience and typing skills. Never needed true typing skills till this interview. They said there were over 30 applicants. I am pissed and tired of looking. I called them every day. Pissed, Pissed, Pissed. :vader1:
-

where do I get ROTJ mic tips????
TK-4510 replied to TK-4510's topic in Build Threads Requireing Maintenance
Scott's got the hero mic tips I think. I dont get what you mean by "foam shavings".... here's the ones I have seen.. -
Take it slow Nathan. Glad to hear you will be OK!!! Be careful out there.
-
Still weighing that. The ESB eyes were originally carved out alot. I dunno if I should on this or not..... Gotta think about it
-
-
OK.....now I am getting scared. You know my Father-in-Law was laid off just two weeks ago. He had been with the company 28 YEARS AND 4 BUY OUTS!!!!
-
ah! I see
-
You can find the original videos pretty easily at second hand stores and ebay. I had some laying around for a long time. Its fun to see them untouched
-
Tomorrow I will add the decals and polish it up. Also will make sure everything is how it needs to look....
-
Since I already have the black out I decided to go ahead and paint the rank on the ears.. Also repainted the screws white...
-
The vocoder gets painted with a special flat rounded brush that is perfect for this. I just load up the brush and start at my marks. Gently push down and lightly pull the brush along. I do the top of the vocoder first. Then flip the bucket around and tie in the bottom.
-
Next comes the frown. I am using model masters semi gloss black paint for the frown and the vocoder. I find it easier to paint the frown if I lay the bucket in my lap. Also, I use two different brushes for the frown. Pretty much a standard brush for the most part, and a 0 liner for the 4th and 5th tooth areas...
-
Here is the brush I am going to use for the ears. The paint is ad gray 5 Humbrol. Mix the Humbrol well or it will not be a consistent color when it dries. I am just going to stay within my lines as I paint..
-
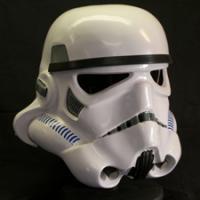
Tonight I am doing the paint. I start out by using the picture that I posted in the beginning as a reference. I want this helmet to have that same look, so I use a pencil to mark areas that need more attention and to draw out the guide lines I will follow when painting. I need to cut a bit more of the eyes out. I also want to minimize the bump a little...
-
Oh sorry to hear that man . I havent heard anything from the interview. They said I was #1 or #2 in the line up and said they were going to call me back possibly for a second interview. Then nothing.... So I am still waiting. Thats a bummer for you man, I am sorry for you. Mike
-
OPERATION OMG REBUILD!!!!
TK-4510 replied to TK-4510's topic in Build Threads Requireing Maintenance
Old pillow case -
OPERATION OMG REBUILD!!!!
TK-4510 replied to TK-4510's topic in Build Threads Requireing Maintenance
That happened to me yesterday when I was loading the photo's too. Maybe the hacking isnt finished? -
OPERATION OMG REBUILD!!!!
TK-4510 replied to TK-4510's topic in Build Threads Requireing Maintenance
Nope I cleared my cache and I see em too... -
OPERATION OMG REBUILD!!!!
TK-4510 replied to TK-4510's topic in Build Threads Requireing Maintenance
I think its a 2. I know the molds are destroyed for this version. he is making another soon. -
So all thats left here is to trim the edges to meet properly underneath. See you soon!!
-
-
-
Next comes the fun!!!! EARS!!!! Here is how I do it. I score a line about an 1/8 inch away from the cap then follow around at the front of the ear tracing the guide line. Pretty much the same in back too except I do a sweep from the cap of the ear to the guide line. The ears always fit better that way. Once I get the ears to fit properly, I sand them down a bit with 80 grit and then use a blade to lightly scrape off the extra material thats left from sanding. That way they are nice and smooth. On the AP mounting the eras is a snap. Just use the pre marked holes and drill them out. Then put the screws in.
-
I am going to use the pre drilled holes for faceplate placement. I drill them out with a 1/8 inch drill bit...Using the provided screws I mount the faceplate to the cap n back...
-
Now its time to trim the "flash off the faceplate and fit the rubber trim to the brow.