
TKSpartan
-
Posts
5,720 -
Joined
-
Last visited
-
Days Won
32
Content Type
Profiles
Forums
Gallery
Articles
Everything posted by TKSpartan
-
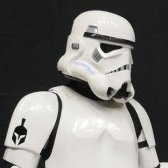 Hi, looking good, E6000 gluing is always challenging because of the swoop . just a quick question : Did you left the 7.5 mm from the internal edge in the black arrows direction ? I say this because It looks ,( I'm not sure if it's a light effect or not) like the cover strip didn't cover the edge? It's not a big Deal but is a personal option. For the Biceps pairing, take a look to this page Cheers.
 -
Hi future Trooper !! Great purchase you made. Welcome to FISD and looking forward for your Photos. Good luck
-
Yes, the back joint as I marked in red in the above photo, the trimming is as you have said, test an adjust. glue the inner cover on the front and test, I think a good tip would be to test together with each bicep (Blue Pinter's tape) and see the shape. Measure twice or more, cut once and glue once Just a short story : when I was building my armor, ( as you, I built it alone, just browsing this forum) , I searched the web looking for several Stormtroopers images to figure out how I wanted to look like and I feel It worked for me to get the best shape.
-
Great work with your arms Emma, from my sight, It look like you have still enough room, It's supposed to have just enough so your hand with no glove enter in, I think you can make some cut to adjust at least 1 inch. In the following photo you can see how different it looks when reduced And the inner bicep with the indented oval on it the left one . Cheers
-
Yes, you can cut at the red line and If you feel there's enough room on your forearms , you can make adjustment on the back seams. This is a Tip taht a fellow trooper @Cricket gave in another building thread "If you haven't shaped your forearms yet, may I offer a tip? (I remember how badly oval-shaped the WTF forearms are.) I suggest assembling the fronts of the forearms together first by gluing an inner cover strip. Tape the heck out of the outside seam, though. This will allow you to clamshell-fit your forearm securely for width. All sizing adjustments for width take place on the back seams. Once you've got it properly sized and trimmed for width, glue an inner cover strip to the inside back seam (taping the heck out of the outside seam again). Then boil up some water and knock that oval into rounded submission! Inner cover strips add a lot of strength to the forearms, and allows you to get some decent hot-water shaping done without falling apart. " This is how thy should go together Cheers
-
Hi Emma , You're right, cover strip will cover the join line. And about the arms I have found the following WTF build thread that I think could be useful for you for other build issues. there's this following photo showing the order of arms. Keep on doing an excellent work, and remember you're not alone. Here in FISD. No one left behind.
-
Hi Ryan, personally , I prefer no ridge showing too, and it's more accuracy and it looks like you have still enough room in your forearms . look at the following reference photos. Keep on doing a great work !!
-
looking great.
-
I would suggest to leave a flat edge of 7.5 each half and put then together using painters tape and let see some photos of how they go on your arms.
-
Yes.
-
Hi Emma , glad to see your build setup, nice. About Return Edges trimming, I would like to suggest you to take a look to this useful link about Trimming . And for the shoulder bells curve, this reference photos may help to figure it out . Cheers
-
What I did to make the elastic stronger was to double it, just fold it a couple of times. I have read of some trooper that reinforces the elastic with an ABS strip inside. I have not tried that .
-
MV's ANH TK Stunt [ATA] 1st Build Thread for Centurion
TKSpartan replied to MaskedVengeance's topic in ANH Build Threads
Amazing !!! -
Congratulations again mate!!!,
-
Your Centurion badge is waiting for you Trooper !!
-
Could you please post a photo for the complete helmet form botton? I mean to see how the complete "S" trim is going. cheers
-
Si puedes postea fotos de tus avances. Once you're ready , post photos. Troopers Helping Troopers
-
Good luck Trooper !!
-
Another practical tip to remove the E6000 glue in excess is just rub it with a soft cloth. the heat makes it peel off easily. try it.
-
Congratulations Trooper Well done !! Welcome to EIB. and as all of us may be thinking right now , your next goal is just around the corner Centurion .
-
Hola Ulises Bienvenido al FISD, ya echaste un vistazo a los requerimientos para EIB y Centurion? https://www.whitearmor.net/forum/forum/18-fisd-expert-infantryman-badge-eib-requirements/ Puedes abrir un thread en esta area y postear fotos de tu armadura para recibir tips y sugerencias o chequear otras solicitudes en esta sección para que veas otras armaduras como al tuya. https://www.whitearmor.net/forum/forum/19-request-expert-infantryman-status/ Estamos para ayudarte, no dudes en hacer cualquier consulta. saludos Hi Ulises Welcome to FISD. Have you taken a look to the following sections yet? https://www.whitearmor.net/forum/forum/18-fisd-expert-infantryman-badge-eib-requirements/ https://www.whitearmor.net/forum/forum/19-request-expert-infantryman-status/ Take a look, open a thread and post photos, receive suggestions, tips from our very experienced troopers. We are here to help. Cheers
-
Congratulations Trooper, Welcome to EIB !! . just few adjustments and go for the next Goal, Centurion !!!
-
Hi Adam, welcome to FISD and congratulations for your BBB day!! Looking forward for your building thread . Cheers
-
Hi Darin, welcome to FISD. What I have read here and if you look at the screen captured photos It seems like a ANH TK helmet with a R1 armor. There's no official CRL yet. cheers
-
Mar2D2 ANH TK Stunt Stormtrooper RS kit build thread WIP
TKSpartan replied to Mar2D2's topic in ANH Build Threads
Amazing work Martyn keep it up !!!
