
.jpeg.ff3078cf696d324fa576c149490ede78.jpeg)

themaninthesuitcase
-
Posts
5,295 -
Joined
-
Last visited
-
Days Won
95
Content Type
Profiles
Forums
Gallery
Articles
Everything posted by themaninthesuitcase
-
 I think they where pointing out a typo, which I fixed
 -
NightTrooper Helmet CloseUp Screen Used
themaninthesuitcase posted a gallery image in StarWars Non Saga Reference
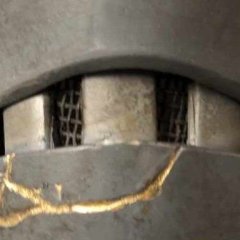
From the album: Night Trooper (Ahsoka)
-
NightTrooper Fabric Screen Used
themaninthesuitcase posted a gallery image in StarWars Non Saga Reference
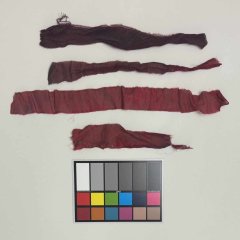
From the album: Night Trooper (Ahsoka)
Screen used fabric from Ahsoka Night Troopers. Fabric is custom dyed silk. There is more than one base fabric used. -
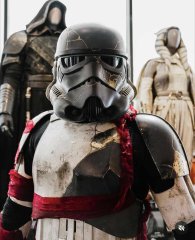
NightTrooper2-ScreenUsed.jpg
themaninthesuitcase posted a gallery image in StarWars Non Saga Reference
From the album: Night Trooper (Ahsoka)
-
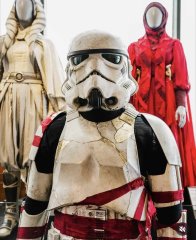
NightTrooper-ScreenUsed.jpg
themaninthesuitcase posted a gallery image in StarWars Non Saga Reference
From the album: Night Trooper (Ahsoka)
-
Themaninthesuitcase SE-44C build
themaninthesuitcase replied to themaninthesuitcase's topic in Weapons of the First Order
Custom jigs is one of the best things about owning a 3D printer. Especially when you need to drill holes accurately or repeatedly. -
Themaninthesuitcase SE-44C build
themaninthesuitcase replied to themaninthesuitcase's topic in Weapons of the First Order
Update time. Whilst I finished about a year ago I never added the mount plate as I had a plan. Well I have actually completed that plan! Shocking I know. I'll start at the end and show how I got there, please excuse the wrong screws I need to get some M5 Security Torx as I don't apparently have any. The plate is actually 2 plates, or more accurately PCBs. Yes PCBs for making electronics. Aluminium PCBs are now a thing, and come in the perfect thickness (1mm in this case) and most importantly are pretty cheap. These cost around £9 plus shipping for enough to make 5. They are designed in KiCad to fit the horseman TFA blaster, I assume the TLJ is the same but I've not made one yet to confirm. They arrive as 2 plates, a front and a rear. The front side of each is a brushed aluminium, the back is a white PCB solder mask, with black silkscreen and hidden message in the copper layer (for the first order in besh). Also a logo because why not. I then use a 3D printed jig to CA glue them together to make the final plate. This is a little fiddly but only takes a few minutes, and a drill to drive the screws speeds things up. The result is pretty stiff, the individual parts less so. Next is mounting them. Problem is the horseman files have no pre located holes for the screws, which I pre added to the plates to fit the @R2Dan holster. The solution to this is more 3d printing. I created a jig that locates where the plate fits and allows me to drill the holes perfectly. Step one is to secure the jig. I use the "super glue and masking tape trick". Essentially you are about to make some low tack double sided tape. Apply a strip of low tack masking tape to the blaster And to the bottom of the jig and trim the excess Apply a few dabs of CA glue to the bottom of the jig and hold in place until secure. You can use accelerator if that's your thing, I didn't as I want to worry what the spray might do to the paint. We're using an M5 bolt, so the correct size hole is 4mm, well 4.2mm but close enough for what we are doing. Ensure you mark the depth so you don't get carried away. I allowed for a depth of around 12mm which should give enough meat for a secure mount. Drilling out holes in 3D prints cuts into the infill. This now leaves you with a really terrible screw interface, and it will probably rip right out. So to make this significantly stronger we're going to fill the hole we just drilled with 5 minute epoxy and leave it overnight. Apply some more masking tape, trim the holes and fill with epoxy. You might want a tooth pick to help poke it in and let the air out. It will need more then you expected as it spreads out into the print and fills the cavities in the infill. Try not to get any on the blaster, if you did like me: it's now weathering. Though in all seriousness no one will notice, as it cures very clear but just try be tidy as you will know it's there and it will haunt you. Once cured, setup you drilling jig and do it all again. You now have 2 4mm holes in epoxy not 3D printed infill. Hooray. Now if you're bored, glue on the pate screw in the bolts and call it good. If you're extra like me, continue. We have a 4mm hole, not an M5 hole and that will not do. So now print a 2nd jig, identical to the first, but with a 5mm hole in it. Mount this and use an M5 tap to cut a perfect M5 thread. The epoxy cuts well, especially if you leave it a few days to fully cure whilst the tap arrives from eBay. You don't need anything fancy, £4.88 on eBay plus a tap handle if you haven't got one. We're not cutting steel here. Do not be tempted to use a drill to drive the tap. Anger leads to hate. Hate leads to suffering... Preferably don't drop the tap and scratch your paint, allegedly. Use some white paint to touch up the alleged paint chip. For extra points apply a light countersink to the hole. Though you probably should do this before tapping. I am not a machinist, I won't judge. Glue the plate on and screw in the screws. And you are done! How accurate is this method? Perfectly accurate... and they are perfectly straight too. -
Basic confirmed for @stormztrooper1 +1 and @Crow2xs +1 New total: 15
-
Hello from South Carolina
themaninthesuitcase replied to ggrant001's topic in New Member Introductions
Welcome to FISD -
TK-707 reporting for duty
themaninthesuitcase replied to streetjudge79's topic in Newly Approved Members - Sound Off!
Welcome to FISD Steve. -
Reporting in from Portugal
themaninthesuitcase replied to xcunhax's topic in New Member Introductions
Welcome to FISD and congratulations on your new Incinerator. Make sure you request your 501st Stormtrooper access -
I've removed this from the Over skirt section. Otherwise the rest is unchanged.
-
At this time all First Order armour kits require at least some filling of seams to be clearable. The holster can be found here, though a non-functional one is included in the DN kit. A full list of resources is here in the First Order section
-
Update for relaunch Total 16 points, 2 more EIB and you make Master! It sounds like you may have had a part in some basic clearances as well if those can be confirmed you would be able to earn some extra points there also. Jim @gijim - TK-28888 - MTK ANH Stunt - EIB - 2 points Grave Wong @MrGrave - TK-36036 - MTK ANH Stunt - EIB - 2 points Billy Au-Yeung @baysk - TK-71814 - Anovos ANH Stunt - EIB - 2 points Henry NG @Henry Ng - TK-12762 - Anovos ANH Stung - EIB - 2 points Peter Lee @TK28228 - TK-28228 - RS ANH Stunt - EIB - 2 points Galton Ho @Galton - TK-28823 - TM ANH Stunt - EIB - 2 points Tiffany Wong @rabbitiff - TK-92230 - MTK ANH Stunt - EIB - 2 points Gary Ng @TK66124 - TK-66124 - RS ANH Stunt - EIB - 2 points
-
Update for Relaunch Hi Justin, I have gone through and I will take your word for the extra singles on the 3 confirmed, as bar 1 which is classified they only have one TK so would be their first and so would indeed count. There are three unconfirmed assists on your list, for these to count we will require confirmation. I make your confirmed total 13 points, 16 if the rest are confirmed. Thanks, Chris. Confirmed: Jessie H. @JHowe102 - TK-10272 - Anovos ANH-S TK - EIB #805 - 2pts Max P. @Ninety-Nine - TK-42199 - AM ANH-S TK - Basic Approval, EIB #923 - 3pts Dwight S. @Dsposato0 - TK-62345 - Anovos ANH-S TK - Basic Approval, EIB #1038 - 3pts Michael G. @Gh0stxxiv - TK-11914 - Anovos ANH-S TK - Basic Approval, EIB #1048 - 3pts Scott S. @TattooedStormtrooper - TK-82077 - RS ANH-S TK - EIB #1049 - 2pts Unconfirmed Michael W. @Crow2xs - TK-40473 - Anovos ANH-S TK - Basic Approval Yahir G. @OFFICER_LASKY- TK-10896 - Anovos ANH-S TK - Basic Approval Zachary D. @stormztrooper1 - TK-98752 - MTK ANH-S TK - Basic Approval
-
Themaninthesuitcase Denuo Novo TLJ Build
themaninthesuitcase replied to themaninthesuitcase's topic in TLJ Build Threads
Finally opened it all up and took inventory. The pulls all seem reasonable, few marks in places that hopefully won't cause too many issues, though the back triangles need a little work. The trim lines on the shoulders are borderline invisible, which will be fun to deal with. Biggest worry remains the proper trim line on the forearms, but others have managed so I am sure I can too. Guess I need to start cutting bits out, I have set my self a goal of being done by November and that's only going to happen if I actually start. What's the glue of choice on these builds? Still E6000? -
So far the best screen reference we have is in this post https://www.whitearmor.net/forum/topic/54641-welcome-to-the-captain-enoch-resource-thread-for-crl-creation/?do=findComment&comment=780859 I was seeing it as a pleat but given we've already ruled out a single piece, that crease could easily be more just how it's hanging. In which case a simple overlap could be the truth. I am not a huge fan of using toys as reference but in general they are based on the originals at least to a course degree. I am happy to change the wording to reflect an overlap, but would appreciate some other input on this one.
-
Hi Justin, The points were calculated taking the old awards into account. As you state, to get Armorer under the old program required 5 EIB assists. Under the new program that works out at 5x 2 points, giving 10 points. So at a minimum, no trooper is worse of than they where 2 days ago. However if you have also assisted on the Basic clearances, and are able to document those you might well be on your way to master armourer. Over the coming days I will go through and update the current threads based on the EIB clearance. If there are basic ones to take into account on those same troopers that will need to be accounted for separately as currently we have no documentation of those.
-
The updated Armourer system is points based. By assisting other members in person you can earn points which count towards the ranks of the program. Ranks Apprentice Armorer (new) - 5 points Armorer - 10 points Senior Armorer - 20 points Master Armorer - 30 points These ranks will be awarded in the form of a forum badge in your profile. Rules All assistance must be in person and for a minimum of 30 minutes. Help is given in the spirit of Troopers Helping Troopers, no money or items of value may be exchanged. The candidate armourer must create a new thread in the Armorer Program Forum, For each member helped add a post to your thread stating: Who the member helped was. A summary of the help given. A link to the relevant approval page (legion for basic, or FISD for EIB). For points to be claimed the member helped must confirm the assistance in that thread. Should 2 people assist one member both may claim but must have assisted to a similar level, and both must be claimed and confirmed individually. Staff will update your running points total, and awards as they are earned. Points will be awarded as follows: 1 Point for assisting a member clear their first stormtrooper costume. 2 Points for assisting a member earn their first EIB award.
- 26 replies
-
- 10
-

-
FISD has many wonderful programs to help members build and submit costumes for our detachment, whether it be a classic Stormtrooper, a First Order Stormtrooper, or even one of the new Imperial Armored Commandos. While our Expert Infantry and Centurion programs get most of the attention, FISD staff wants to relaunch the Armorer Program (Currently called the Master Armorer Program). What is the Armorer Program you ask? Well, it is a program designed to recognize those troopers that go above and beyond to assist themselves and others in getting costumes built, submitted, and approved. One of the goals of all the detachments in the 501st Legion is to help members build and submit costumes that meet and hopefully exceed the minimum requirements of the Legion’s CRLs. Currently the Master Armorer program has the requirement of helping a minimum of 5 members achieve Expert Infantry status. The member must have spent at least 30min physically helping another member with cutting, gluing, sizing, etc, just because they want to help (no money exchanged). The definition of an armorer is “a maker, supplier, or repairer of weapons or armor”. So while we certainly love the feedback that members provide to others on the forums, and the extra steps some do by having video calls to help walk people through issues with their builds, this program requires hands on work. The new program will have the same physical help requirement, but we are going to move from a “wins” system, (where a win was help an individual for 30 min or more) to a points system, and we aren’t limiting it to only Expert Infantry builds. While we are pushing the Advance to 1500 to try and achieve 1500 Expert Infantry members, we recognize that the goal of the detachment is to get FISD members build, submitted, and approved. So we will be awarding points for Basic builds as well. Currently there are 3 levels of the award, FISD Armorer, FISD Senior Armorer and FISD Master Armorer. The new program will add a 4th level at the beginning called the Apprentice Armorer. The point scale will be as follows. 5 points - Apprentice Armorer 10 points - Armorer 20 points - Senior Armorer 30 points - Master Armorer The Armorer candidate would earn points based on what level the member costume they assisted with achieved. If you help with a basic build, you get 1 point, if you help with a EIB build you get 2 points. So a person to basic you get a point, help them again to get their EIB earning another 2 to a total of 3. The thought again here is that we want to help build as many stormtroopers as possible. If you love building armorer and love helping fellow members get their costumes built, then this is the program you’ve been searching for. We look forward to awarding more members with this award as we know how much we all love Troopers helping Troopers.
- 26 replies
-
- 11
-
-
Not sure I could recommend that, it looks like the 5thHorseman files (https://www.whitearmor.net/forum/topic/45171-first-order-f-11ds-the-force-awakens/) but there are parts missing in the photos.
-
Hello from the UK, getting rid of armor
themaninthesuitcase replied to Mynxy's topic in New Member Introductions
Hi Isabel, You might have better luck at https://ukgarrison.co.uk/forum/, try get an idea of price and post up there and I am sure some one will be willing to take it off your hands. -
Hi Troopers, I am going to assume that a number of you who are requesting access are looking to order a racing shirt, and that closes tomorrow. Given you're waiting on us, if you want to order a shirt please contact @jsilvius with the same link you provided here, and so long as you meet the costume requirements he will help you order. We will catch up on the paper work later. This only applies up until the deadline - 29 May 2024 at midnight US ET (GMT -4). Any requests after closing will unfortunately be declined. Apologies for the delay in your approvals.
-
A reminder to those of you working on this costume that we still need a CRL model. If you are done, or almost done and would like to start this process please do get in contact and we can get this one over the line.
-
All I can say really is try make it look right. There are at least 3 different materials in play, the leather, the fabric for the borders, the fabric for the rest. The hip pads probably are that same fabric, but they could be leather or even something else entirely. I appreciate that this isn't a very helpful answer but so long as it looks right, and the difference in tones is not to big I expect you would be okay with your GML.