Mcott65
-
Posts
226 -
Joined
-
Last visited
Content Type
Profiles
Forums
Gallery
Articles
Everything posted by Mcott65
-
It was never my intention to cause this on someone else's post I understand the reasoning behind the wepon just wanted to let other's in the UK looking at this know if they didn't already.
-
No honest I've read it in several posts on the ukg . Mandatory for approval if the characters carry wepons in the film's. Also can't be deactivated, decommissioned only replica.
-
That is not the case in uk no wepon no base approval.
-
Thanks Joseph <br> Think i will have at least another go at refining my technique then I can put some proper how to pics and Paterns up. This has only cost me about £20 and a bit of time so worth a go. <br> Mark
-
This is neck seal 2.0 my first attempt looked the part but was very stiff and more like a neck brace. Now i have used 90%of my first seal. I have removed the neck from the bib which has also had a minor tweek. The back was cut down the center and all the edges were hemmed round. The front and back were sewn together at the shoulder . The bib is made of suit jacket lining. This is up to the point where the neck comes in. This is a piece of neoprene 3mm thick cut into a strip 4inch high by 18.5 inch at the bottom and 17.5 inch across the top. this was supper glued into a tube that i was able to fit over my head and that way i could mark where i needed to trim to fit. Once this was done I broke the glued joint . Now the rib part was made using 4mm neoprene cord. The main ribs were trimmed to length and taped together on my cutting board then E-6000 was spread on at points to hold it together. E-6000 was then used to fasten the nine ribbed section to fit at the lowest point under the chin. The sides were then built up using extra cord until the base layer was covered these were then trimmed at an angle to match . Once this was done they were given a light sand down to even out the trimming a bit using fine wet and dry paper. Using a knife and steel ruler the ends were trimmed flat. To aid in adding the zip the inside edge was chamfered at about 45` as was the top edge around the neck using scissors.
-

Positioning For Top Right Ab Snap
Mcott65 replied to cjdesign's topic in Hard Armor (General Discussion)
Hi that would be what I have seen called the Han snap top right hand side of the abdomen. It is about 10mm in from the edge and about 20-25mm down if functional would line it up with the snap plate on the kidney . -
Thanks it's nice to get another opinion if you ask at home you just seem to get" mmm very nice what is it."
-
Thanks Germain I'm not to bothered about size that was there for me really was just after some feedback about the general look. Also you are right i should have titled it alternative hand guards.
-
Thanks Joseph very kind of you to say.<br> Vern coming from you very high praise and thanks for the tip will have a go at that.
-
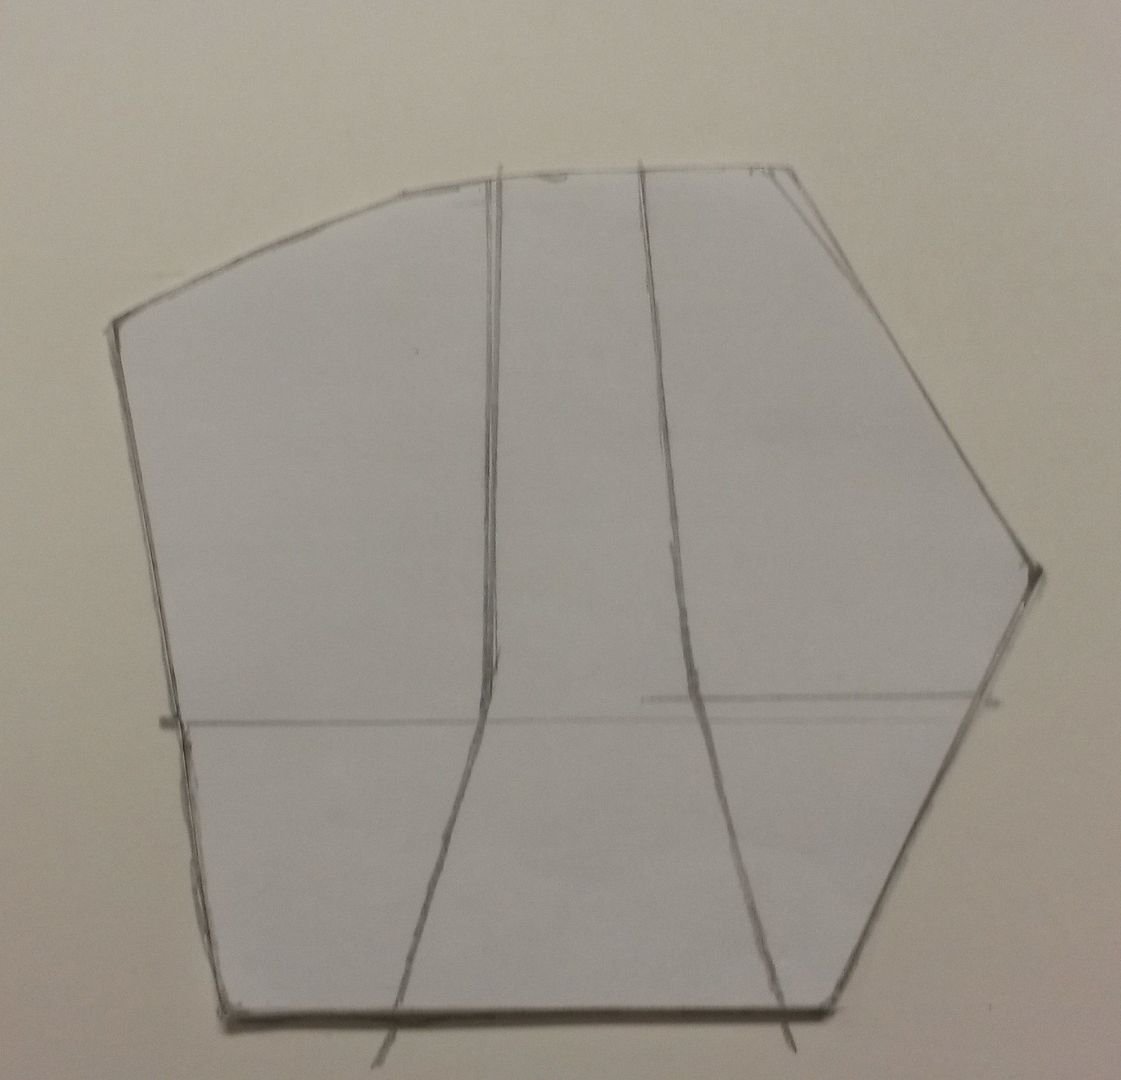
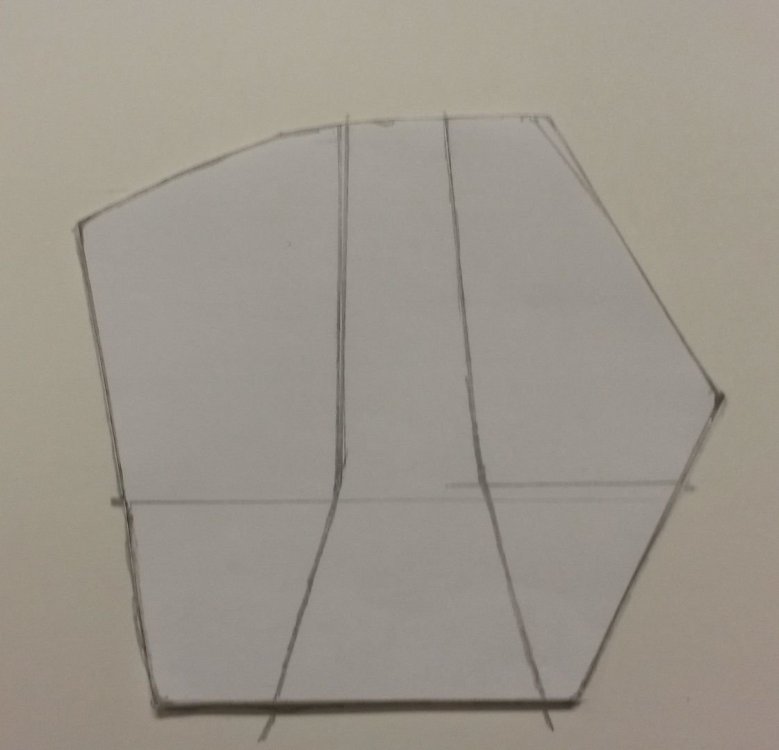
Thought i would post some pics of making my holster. To start these are the plans i followed. Then after i had cut my leather i found these oh well. I picked up some raw leather for £30 from ebay 1.8MM THICK VEG TAN COWHIDE CRAFT LEATHER 89cm x 43cm - 35" x 17" I used a snap knife and steel ruler to cut a straight edge on the longest side and used that as my start point to draw the plan onto the rough side of the leather . By doing this i was able to cut two whole holsters and with a bit of juggling a third that is in two parts. (I think i will make this one up for a friend of mine who is not planning on joining but i made a blaster for last year). The main part of the holster was given two coats of black leather dye on both sides Once this was dry it was given a generous covering of black shoe polish and buffed up. The inside part was also polished where it could be seen when folded over. The straps were cut using the steel rule and snap knife . Before starting this i was a bit daunted about doing the leather work, but once i got into it i found it very easy to cut, and following TM`s plans made it very straight forward. The main strap was given the same treatment as the body. Using my lexan scissors i cut the curve into the end of the strap. Everything was riveted on then time to sew it together. Using a tool to punch the holes for the stitching. I ran the tool up the side of the top part but it was not enough to go through both pieces so using a pin vice and micro drill .7mm drilled out the holes. The two parts were stitched together using strong cotton with a back stitch. Back stitch is done by pushing the thread through from back to front starting with hole two then front to back through hole one . The next stitch goes from hole one to hole three from back to front then into hole two front to back then hole four and so on.
-
wanted to get an opinion on my progress on making my latex hand guards HERO style.
-
When I asked this question on the ukg forum i was told anywhere from 0 to 7mm .
-
<a data-ipb='nomediaparse' href='http://www.whitearmor.net/forum/topic/33372-resin-stormtrooper-helmets/?hl=resintrooperhelmets'>http://www.whitearmor.net/forum/topic/33372-resin-stormtrooper-helmets/?hl=resintrooperhelmets</a><br><br> <a data-ipb='nomediaparse' href='http://www.whitearmor.net/forum/topic/18889-recaster-on-ebayanyone-know-him/?hl=resintrooperhelmets'>http://www.whitearmor.net/forum/topic/18889-recaster-on-ebayanyone-know-him/?hl=resintrooperhelmets</a><br><br> Think these posts should help you decide on him.
-
Richard's ANH Stunt 2 mm [TM]
Mcott65 replied to VulpX's topic in Build Threads Requireing Maintenance
Nice work looking great. -
Thanks for making me laugh. I think that you will find you will be able to adjust the shoulder strap to lower the back slightly but I'm sure that some gap is ok. Check out some of the centurion threads of people who have the same make armour and are about your size then you can compare.
-
Richard's ANH Stunt 2 mm [TM]
Mcott65 replied to VulpX's topic in Build Threads Requireing Maintenance
That is a feature of the original helmet that TM has reproduced. -
What are your opinions on this armor set?
Mcott65 replied to bing305's topic in Hard Armor (General Discussion)
I doubt that was ever approved the cover strip on the shin is riveted. -
I Second that.
-
Richard's ANH Stunt 2 mm [TM]
Mcott65 replied to VulpX's topic in Build Threads Requireing Maintenance
Mine has five on the front but I was counting the big one as the first so does that mean I only have four? Think aslong as it looks right on that is more important. Let's see it on I'll show you mine if you show me yours. -
Richard's ANH Stunt 2 mm [TM]
Mcott65 replied to VulpX's topic in Build Threads Requireing Maintenance
Looking good Richard can't wait to see all on. -
Authentic Props TK ANH to ESB Conversion
Mcott65 replied to ComradeDave's topic in Build Threads Requireing Maintenance
Dave you seem to have tiny hands.<br> Or are they dinner plates -
DLT-19 Illustrator and PDF
Mcott65 replied to ComradeDave's topic in Build Threads Requireing Maintenance
Dave you are top banana. Looks great -
These are only a guide they dont have to be exact so if you have to make them larger to fit in your armour you can
-
DLT-19 Illustrator and PDF
Mcott65 replied to ComradeDave's topic in Build Threads Requireing Maintenance
When you have time Dave would like this as well. -
To work out how much you can cut use some painters tape and close the two halves together butt joint the flat edge and overlap the raised side so that top of the raised area is about 15mm the width of the cover strip. <br> Now slide your hand in and see how it fits if all is good that is how much you can cut if it's to loose ovelap the other side till you are happy mark up and trim. Hope that helps.