Oztrooper
-
Posts
467 -
Joined
-
Last visited
Content Type
Profiles
Forums
Gallery
Articles
Everything posted by Oztrooper
-
TK 70701 requesting ANH Stunt EIB status(AP) [376]
Oztrooper replied to Oztrooper's topic in Request Expert Infantry Status
Thanks Adam....Aussies REPRESENT..! -
TK 70701 requesting ANH Stunt EIB status(AP) [376]
Oztrooper replied to Oztrooper's topic in Request Expert Infantry Status
Thanks very much..I have the photos ready for Centurion. Steve, the snap is there it us just covered by the chest plate so I'll include a different picture for centurion. I have no return edges on my forearms..they are snug around my hands and I wouldn't be able to get them on/off if there were edges !!! Thanks again everyone.... Centurion here I come !!! -
99c... Unbeatable !!!
-
Creating the ESB greeblies/rail for the DVH kit
Oztrooper replied to Darth Voorhees's topic in ESB BlasTech E11
As always I'm with you Lou....You're going out of your way to entertain this moron when you shouldn't have to.....Matthias please ban this guy already....it's obviously frustrating to everybody who has replied here... -
TK 70701 requesting ANH Stunt EIB status(AP) [376]
Oztrooper replied to Oztrooper's topic in Request Expert Infantry Status
Thanks for the vote of confidence everyone...I appreciate it !!! -
TK 70701 requesting ANH Stunt EIB status(AP) [376]
Oztrooper replied to Oztrooper's topic in Request Expert Infantry Status
It looks like one photo didn't load properly..I added it to the end...hopefully that is OK.... -
Hi, hopefully this application will come across a little easier to follow. Jeff Leone TK 70701 Oztrooper Southern California Garrison Armor Maker: AP Helmet Maker: AP Blaster Type: THG Props Optional Height: 5' 11" Weight: 180 lbs Boots Maker: TK Boots Canvas Belt: TKBelts (Rob) Hand Plates Type: White Latex (Sonnenschein) Electronics: Aker/IComm Neck Seal Type: Darman Holster Maker: TKBondservant (Vern) Full Body Armor Details Helmet Details Blaster Details Accessory Details This photo did not transfer properly originally so I uploaded it here. Last Action Shot Any other photos needed for submission please let me know... Thanks for your patience, Jeff.
-
Please grant me 501st access....EIB on the way... Jeff Leone TK 70701 Southern California Garrison http://www.501st.com/members/displaymemberdetails.php?userID=16409
-
Jim is a top notch guy...a name you can trust....
-
I am watching this thread with great interest.....Kudos to you Sean !!!! If you're able to get this out in a kit form to the masses out there you're going to get a LOT of orders....
-
Thanks to All !!!! Well deserved accolades !!!
-
The Darkside Life Size Collection on eBay.... WOW!
Oztrooper replied to Haribon72's topic in eBay Armor
Can't imagine what the rest of his house looks like....."Ma, the meatloaf !!!! " -
Here ya go !
-
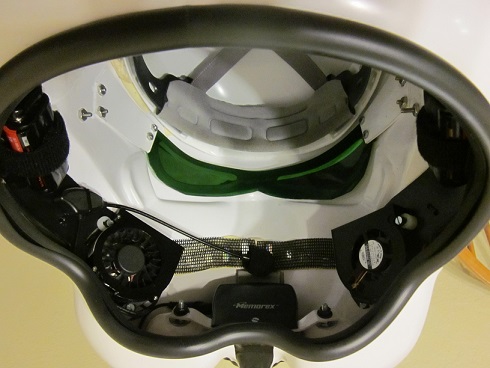
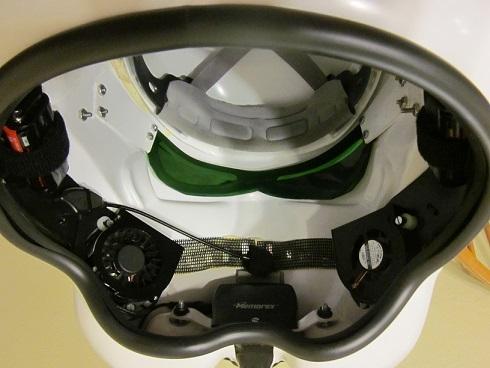
I removed the battery enclosure by dremelling it off which still left a sealed enclosure.....I extended the wires for the 9v and located it elsewhere in the bucket...I was then able to fit the Memorex unit where the vocoder is ....I then fabricated a bracket out of ABS and attached it to the casing of the Memorex unit and the ends of the bracket to where the mic tip threads are at using nuts to secure it... Just an FYI it leaves very little room between your chin and the Memorex unit so this may not work for everyone.....I actually carved a unit out of foam and test fitted it before hacking into the Memorex unit....if I could figure out how to post a pic here of the unit inside my bucket I would....
-
Looks like it had a hard night out at the Death Star...!
-
Always look forward to this...Thanks
-
Newly available E-11 dicussion area.
Oztrooper replied to captsafe66's topic in General Weapons Discussion
-
Eric mate...Go with Glen's info...I used the same decals on my AP and make sure the gap is about the thickness of a pencil so the tube stripes don't directly but up against the crease where the tubes meet the cheeks ...I just cut off the stripes that wouldn't fit ...incidentally one side of the helmet fits more stripes than the other !!!
-
Good Job Vern !!!
-
SDS (Shepperton Design Studio) E-11 Blaster photo report
Oztrooper replied to Ales's topic in General Weapons Discussion
A very poor reproduction..... -
Expert Infantry and Centurion CRL Changes!
Oztrooper replied to Darth Aloha's topic in Announcements
How do I submit photos for EIB and Centurion ??? Can you point me in the right direction ? -
You are truly the master.....
-
Sniper Knee Plate Attachment [AP] Stunt
Oztrooper replied to Tesla Kinetic's topic in Hard Armor (General Discussion)
It requires a LOT of work to get it to look right .... -
New Format for Reviewing EIB and Centurion Applications
Oztrooper replied to Darth Aloha's topic in Announcements
+1 !!! -
+1 !!!!!!