dashrazor
-
Posts
3,109 -
Joined
-
Last visited
Content Type
Profiles
Forums
Gallery
Articles
Everything posted by dashrazor
-
DC-15a build for Sky trooper
dashrazor replied to dashrazor's topic in Build Threads Requireing Maintenance
almost done im pretty happy with it so far.. but man its almost as tall as i am lol i know i like a scruffy nerf herder ive been knee deep in sawdust all day.. -
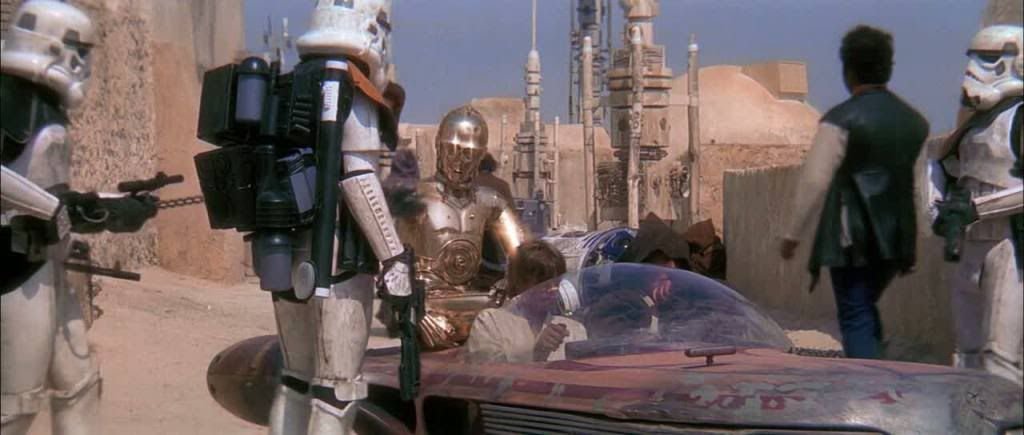
well my skytrooper needs a weapon so i need to knock one out really fast one thing i noticed is a lot of DC-15s look short and stubby so i am making mine 12 feet long! just kidding but it will be around 5 feet when done and packed with electronics of course i am using modified WOF templates as a reference and hope to have this wrapped up in a day to get on to other projects so ill post pics soon.
-
excellent work Lou!!! Approved and a great looking ESB build. the only issue i can see is the visible white velcro attaching the hand plates but that is a minor strapping issue. you may want to change the velcro to black but that is a minor strapping malfunction actually the only thing you need to fix for centurion is the hand plates so i say go for it!!! If rubber gloves are worn the hand plates shall be affixed via an elastic strap over the palm. If silk or satin gloves are worn, the hand plates shall have the correct visible stitching pattern using black cotton, with a five point/star pattern, equally spread out with 2 on each side and 1 in the middle front, and needs to be double stitched at each point.
-
looking for MP-40 ammo pouch pattern
dashrazor replied to Dargas's topic in Boots, Soft Parts, and other Accessories
i made this tutorial and templates if you cant sew for beans like myself ---------- -
i dont think they were resin at all myself. Like most machine guns, the MG 34's barrel is designed to be easily replaced/removed to avoid overheating during sustained fire. if a fully assembled MG-34 the light machine gun version weighs 26.7lbs (there is a heavy machine gun version as well) the inner barrel is solid steel and i am sure weighs at least 10 lbs alone (just a estimate) removing it would bring the weight down to under 20 lbs. since the t-tracks were over the holes in the barrel it is hard to say for sure or they replaced it with a wooded dowel perhaps, but they did do this for the MG-15 as seen below you can clearly see the inner barrel is removed from the MG-15, and since there is no t-tracks you can see right through it this IMO was to clear up cutoms issues as well as reduce the weight of the gun by a substantial amount....

-
weather stripping for edge
dashrazor replied to that954trooper's topic in Build Threads Requireing Maintenance
looks like they have economy shipping on the bay http://cgi.ebay.com/ebaymotors/BAYLINER-1733532-WHITE-3-16-INCH-BOAT-U-MOLDING-FT-_W0QQcmdZViewItemQQhashZitem2eb4110ed0QQitemZ200589512400QQptZBoatQ5fPartsQ5fAccessoriesQ5fGear -
weather stripping for edge
dashrazor replied to that954trooper's topic in Build Threads Requireing Maintenance
i just set it in the sun for an hour then apply with super glue. here is my ROTJ style butt -
weather stripping for edge
dashrazor replied to that954trooper's topic in Build Threads Requireing Maintenance
yep, and its really super durable and conforms to the armor very nicely here is the profile and actual inside measurements (the 3/16" is only the open center gap, the actual total overlap is about 1/4") -
:laugh1: :laugh1: i know i saw them and just had to buy them
-
TK-7936 Requesting ANH Centurion Status[14][RT*]
dashrazor replied to Evolver79's topic in Request Centurion Status
great job on the blending! and great to see this coming together you could take a pair of snips to the belt really quick and add the 45deg angles its a really quick fix for a more accurate look -
that is because the PS3 has far great graphic capabilities than my dated PC <_< i can only run the game on the lowest graphic setting or my PC will freeze. like i said in the PM the skin files are 100% identical (i extracted both the PC and PS3 textures)
-
-
where are the felucian renders? sorry im not sure what you mean???
-
weather stripping for edge
dashrazor replied to that954trooper's topic in Build Threads Requireing Maintenance
Paul, 3/16" is the estimated inner dimensions (its actually a bit larger), the outer dimensions are just a hair over 3/8" close to 7/16" id go with 30 ft. you'll have some extra in case you make a mistake. and yes you can get some from fenix props but it is much more expensive and ships from Argentina -
i just posted a bunch of new reference photos ----- and more coming
-
-
-
i took these from the PS3 with a HD camera
-
if you want exactly 1.5" diameter you can make it by layering 2x 1" thin walled PVC pipes, if you like i can give you the part# and snap a example pic. its a bit more time consuming but it does work
-
the base requirements are pretty much the same (ANH stunt with correct paint markings), it is the EIB and centurion standards that have changed for the most part . for the EI centurion the armor is ROTJ style (any make of armor can be made to this style) like the boss said, its not much more work great to see another TKC in the works!
-
Terry, for basic approval the lines dont have to be 100% exact. like i noted as long as it looks good (not sloppy or deformed) you should be fine for approval. but if going for game accuracy following the screen caps is IMO the best reference.
-
the render was done back in 2009 if you check the thread date -------- and im not saying it is a bad reference, it was just made long before the new screen caps showed the subtle details more clearly. also if the helmet is done correctly to match the artist render and looks good, i wouldn't really see a problem with basic 501st approval. the hi rez screens are from the PC version (they share the same exact skin as the PS3 version) ill upload more detailed screencaps ASAP but like i said it really is best if you have a version of the game on hand. do you have a Ps3 Vern?
-
it helps a lot if you have the game available while painting to get all possible angles. do you need a copy of the game? i can let you use my Ps3 version if you need it another reference form a more forward angle also bear in mind that this is a OK reference it is not 100% accurate. it it a Photoshopped model not taken from the game

-
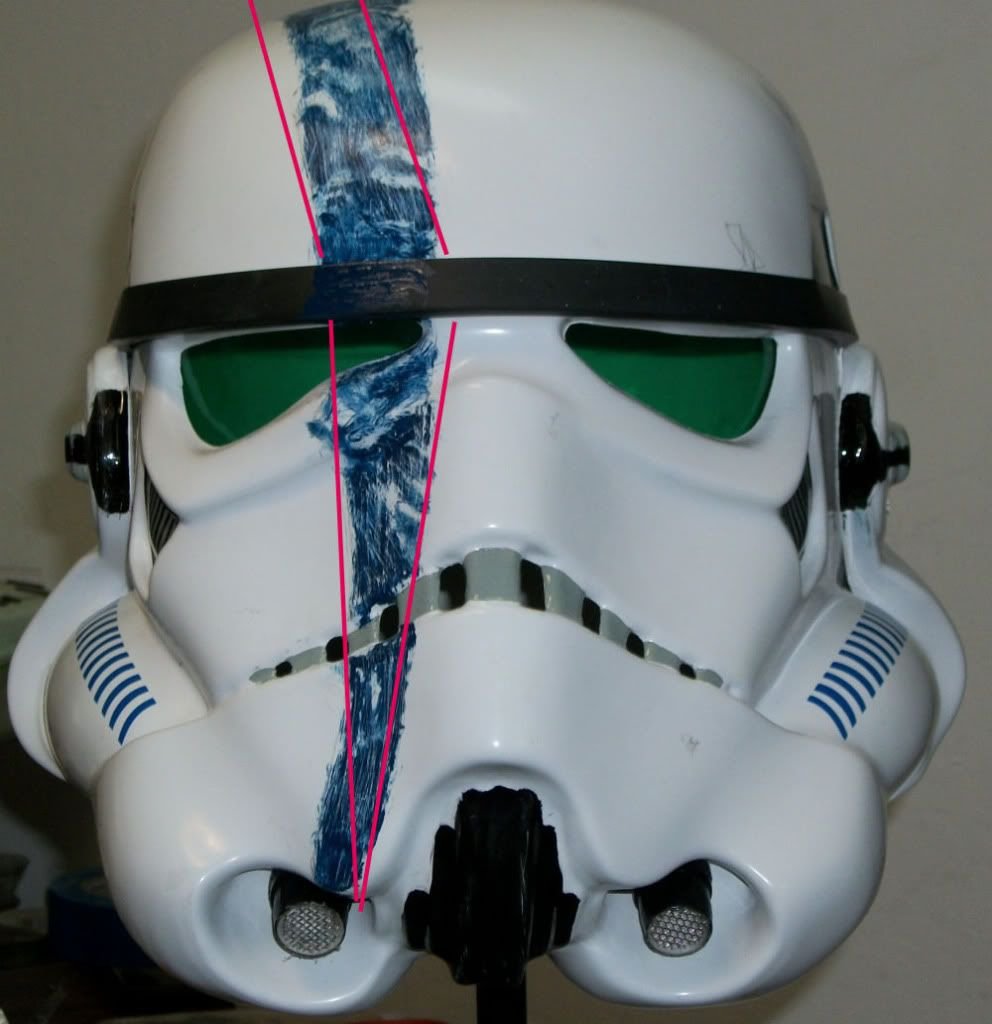
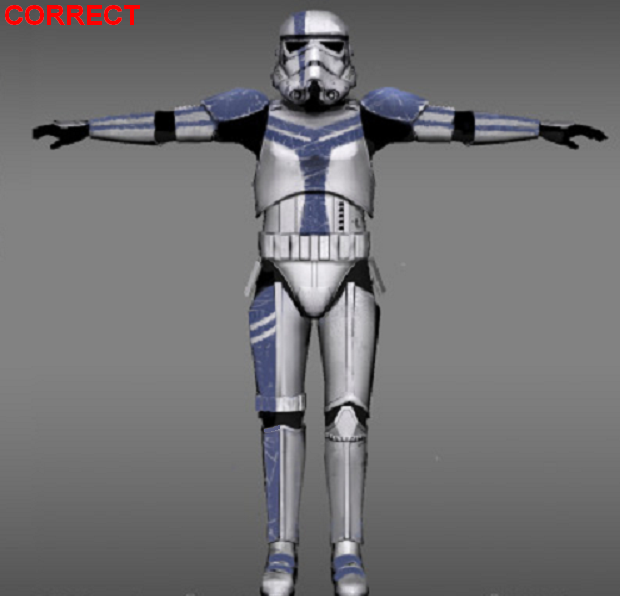
the lines could be tightened up a bit ()the curve is a bit off IMHO). i see where your going with this Vern, but i agree with what the others stated above. paint a solid color first then add the scratch effect. it will yield more authentic looking battle wear here is how the curve of the helmet markings should be from my observations of the screen caps the line on the faceplate is almost a straight arrow pointing down, the cap and back detail almost has a crescent shape starting at the brow here is the reference form the CRL http://www.501st.com/mw501/images/thumb/f/f0/TK_Commander_Helmet.jpg/266px-TK_Commander_Helmet.jpg look here for the current CRL with new photos!! http://www.501st.com...ng:TK_commander

-
weather stripping for edge
dashrazor replied to that954trooper's topic in Build Threads Requireing Maintenance
here http://greatlakesskipper.com/product/791_793-boat-rub-rail-rub-rail-and-gunnel-molding/11770--bayliner-1733532-white-316-inch-boat-u-molding-ft.html this stuff is great and super cheap