Leaderboard


Popular Content
Showing content with the highest reputation on 03/29/2025 in all areas
-
Greetings troopers, It's that time of year where we need to pay our bills. As last year we moved away from the temporary legion hosting and on to our own systems we have an increase in costs to cover. As a stretch goal we have also included a proper backup solution into the costs. Currently this is managed manually and adhoc so a proper solution would be a great addition. The breakdown of costs are as follows: Hosting - $28.80 monthly after taxes Hosting - Backups - $5.76 monthly after taxes (stretch goal) Email - Send Grid - $19.95 monthly after taxes Invision Licence - $75 annual Members owed from previous term - $22.26 We would like cover the next 14 months of costs if possible. This means next years admin team are not thrown in with suddenly having to run a fundraiser. The idea will be from then onwards it will be 12 months at a time. This brings our fundraising goal to $762.90 for the 14 months $865.39 for the 14 months. (value corrected 05 June 2025) We'd like to ask for a $5 donation from members, but any value no matter how small will be appreciated. Please send your donation via PayPal friends and family to [removed] please make sure you add a note saying FISD Forum 2025. All members who donate will also have the 2025 supporter banner added to their profile, as with the earlier email costs fundraiser.1 point
-
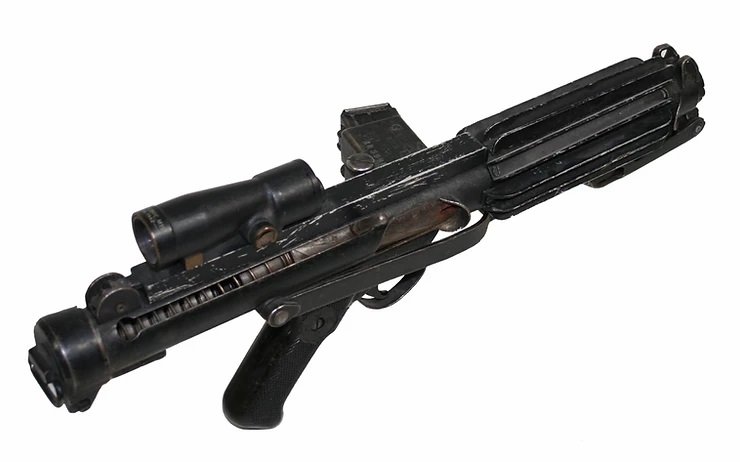
Having another deeper look there are a few other issues with the one you posted Scope is different Screws on U channel should be closer to the ends and countersunk by the looks of the reference U channel should cover all barrel holes Front sight Guide in front of scope Endcap Greebles No cocking lever, Barrel groove only half circle on the end and not correct
 1 point
 -
No CRL as nobody has built the costume, as far as I know1 point
-
For the Empire! Money sent :) 4RM86304Y349200031 point
-
Sent! Transaction number: 0PW32540AH13764081 point
-
I used epoxy putty to fill in the gaps in the joints, then used polyester putty to create an even smoother surface. This was my first experience using putty, and I ended up ordering the wrong type of putty when I ordered it. What arrived at my house was lacquer putty, not polyester putty. I looked up the instruction manual and watched YouTube, and there didn't seem to be much difference in how they were used, so I used them as they were. In other words, this image is of the lacquer putty. I'm very worried about the finished product because I have nothing to compare it to. But I'm going to keep using the file to smooth out the surface. This is an image using epoxy putty. This is Cemedine.CO epoxy putty for plastics. For the lacquer putty, I used Tamiya putty basic type. Starwars Celebration Japan 2025 will be held from April 18th. Are there any of you seniors who will participate? I will participate in the event. It was my dream to participate with armor approved by the 501st Japan Chapter, but unfortunately I will not be able to make it in time. However, I am very excited to be able to exchange SW culture with many people. I have also prepared my first SWAG. Would it be possible to post a link to my SWAG X here?1 point
-
Worked on cod and butt plate. Placed the two snaps in the butt and the one (unpainted) rivet in the cod.1 point
-
and of course...1 point
-
Thanks for the thread bump Tino!! Seeing my bin back in the fresh and unabused state gave me a lot of smiles. It's since trooped around 140 times, 127 of which counted as official events. The bin has flown across the country and back as checked luggage, it sat in my truck for a trip to California and back, and it's put up with a lot of abuse over the years. I thought I'd show how it looks now. That's some miles. Look at the tires. There isn't much left on the tread. I ordered a bucket bag from Wally's Creations on Facebook. I wanted it to match the bin as something my TK might have bought at whatever galactic truck stop or surplus depot would sell the armor bin. Aurebesh only, white on black, with room for patches. I weathered it after receiving it because the clean white perfection didn't look correct to my eyes. I added a few attachment points to my bin. The eye hook lets me clip the bucket bag on easily. There's 4 corner eyelets that let me strap my HWT pack to the top of the bin for transport. And that... sorta works. I usually just have it on my back (in street clothes) while I roll the bin behind me to and from an event. I lost huge patches of white when flying with the bin and a few stickers. I gave it patch repairs to re-white the black plastic. It was then allowed to re-chip and re-weather on its own. The white overspray on some of the stickers really gives it a battle worn look. Everything I do to this thing just makes it look better and more authentic. And it's protected my armor very well.1 point
-
People may disagree here but outside the forearm wrist areas I personally tried to keep around 1/8" or so of a return edge around most of the armor. I find it gives a nice "fullness" effect. While it's not wrong to remove more return edge each movie TK was different and there are definitely examples of TKs with more return edges. Here's how much I had as you can see on the forearm on the left side1 point