Leaderboard


Popular Content
Showing content with the highest reputation on 11/27/2024 in Posts
-
However, I always felt there is something missing to make that Vader look more fearsome and terrifying. So I thought of a Star Wars-styled base… The camera did not get the colors right but in reality there is a clear difference between the amber and the red. Just look at the wall to the left of the base. Anyway, as this is an ANH Vader, I tend to use the white light most of the time. And here is how it all looks during daytime.4 points
-
As part of the work on our web hosting we are moving the domain to a new registrar. This has been requested and when it happens may cause a period of down time. I will update once this is completed.2 points
-
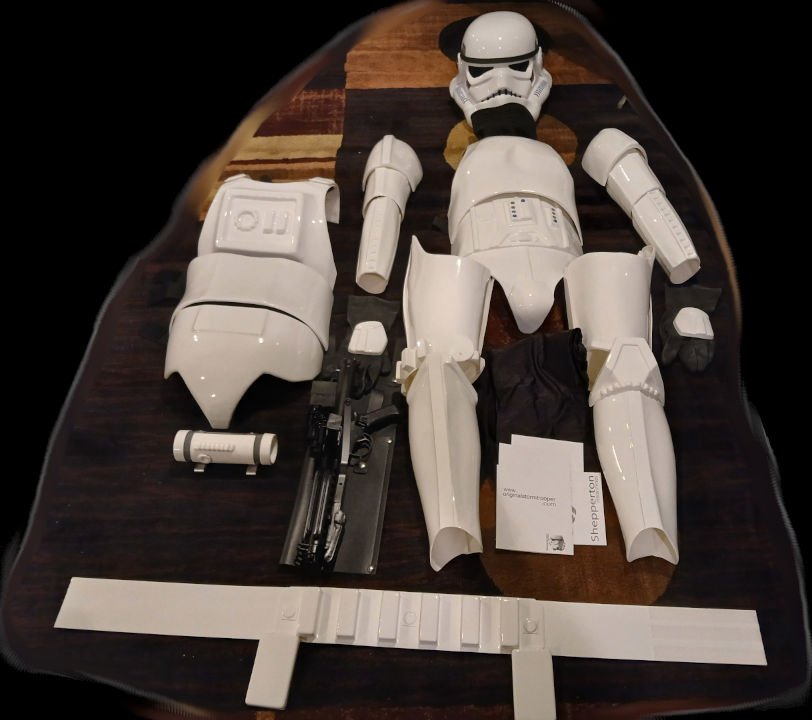
Hi everyone Since a few years I wanted to build a lifesize Darth Vader display for my living room. In May 2020 things got serious and the build was then completed in less than one year (April 2021). Running a WIP thread was not on my list, but I had taken photos of some build stages to do a rough one now. In places it might feel a bit rushed, so here is how it all turned out... Part list: Dome: TM Facemask: TM Armor: 80s ESB/ROTJ Tour Cast Chestbox: Darth Rosso & FenixProps Shin Guards: Korbanth Cod Piece: Dark Shadow Boots: orig. WWII Wehrmacht Offizier Cape Set: KevVader Leather Suit: FenixProps Belt: Paul Walsh Belt Boxes & Buckle: Dark-Side Gloves: Endor Finders Ligthsaber: Parks Sabers Saber Hook: self-made My friend Nick @Darth Niob had an 80‘s ESB/ROTJ Tour armor plus TM dome for me (both already painted) and arranged a suiting TM facemask from Paul Walsh in the UK. Paul had kindly sent that mask straight to Juan Fernandez in Puerto Rico for finishing. I used the meantime to focus on gathering the other parts and the mannequin. From my lifesize Stormtrooper display I already had a good experience with a specific type of mannequin and bought a similar one again. Of course it had to be modified heavily, to match Dave Prowse‘s dimensions. Meanwhile the facemask from Juan had arrived and as I had expected, the colors did not match the chest armor. Both pieces sit too close on the mannequin to oversee that fact. Luckily Juan had told me what colors he used, so I was able to buy them and repaint the chest armor. Now the colors match perfectly. Was quite happy with how Vader now looked and placed the mannequin in the living room. Not on the photos: a tiny bluetooth speaker is located right behind the front mesh of the facemask. When playing the ‘breathing sound‘ it is quite cool to have it coming straight from there.2 points
-
Hi Tom, Thank you for your EIB submission. Once you have posted the requested photos directly into your post and you have done the fixes as fellow Troopers pointed we'll proceed with your review. Take your time and we'll be ready when you're ready .2 points
-
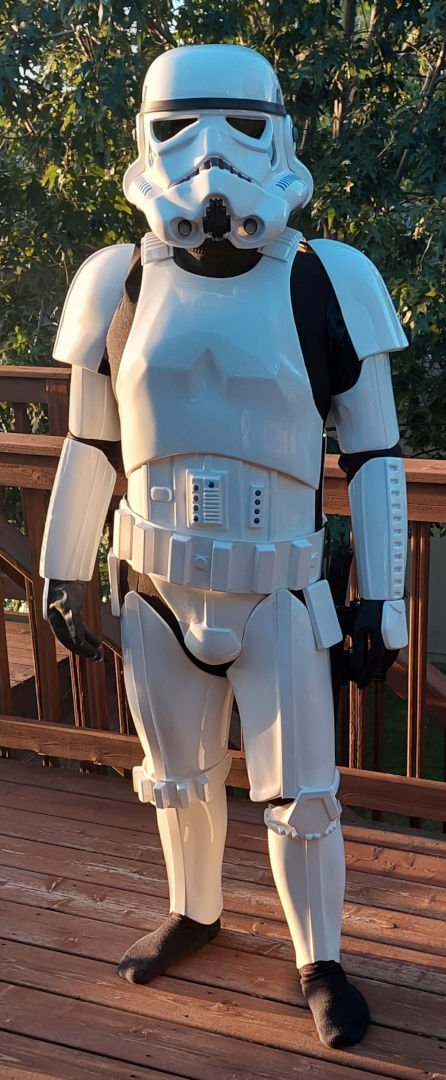
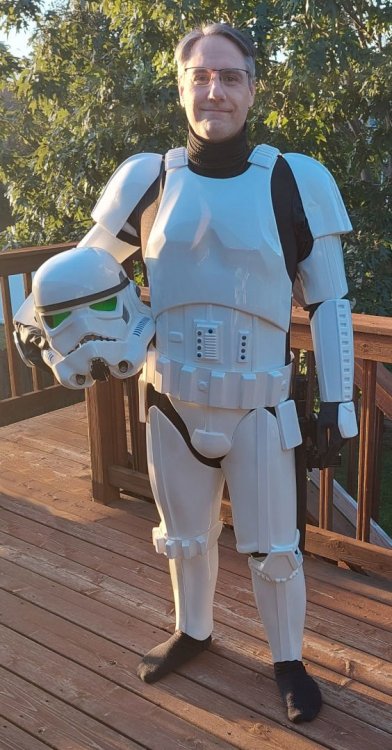
Hello Tom! Awesome to see you apply for Expert Infantry! Great job so far, you look like a Stormtrooper! Some suggestions on what you can do to make it look better! It looks like you've left too much return edge on many of your pieces: The bottom "lip" (return edge) of your chest could use a ltitle more trimming! The button plates could use a trimming, and the buttons could use a touch up as well, making them rounder and cover a little more of the bumps (not all the way down though) The vocoder could use a touch up Cut out one more hole for an additional tooth as per the base requirement for 501st approval: A total of 8 cut outs in the teeth area of the frown are present. I must just say, great attention to detail regarding the teeth paint though! They look awesome! Just extend the pain and cut out one more tooth and you're good there! Dab some white paint on that rim! Correct Aerators/Hovi-MIX tips are present. Screens used shall be of a wide type mesh, with the rim of the mic and the inside white or painted white. Don't forget to close your shins! Looks like your butt plate is sticking out!2 points
-
You will need to add each photo link to your post not just a link to your gallery. You also have quite a few issues with your build, I would suggest comparing with the CRL https://databank.501st.com/databank/Costuming:TK_anh_stunt you can also compare with our gallery section https://www.whitearmor.net/forum/gallery/category/24-anh-tk-reference/. Another good idea is look over other EIB applications and what is approvable and what is not https://www.whitearmor.net/forum/forum/19-request-expert-infantry-status/ Especially your detonator, I dare say you will need to replace those end caps, they should not be stepped. You also need screws not rivets on the brackets, compare with the reference below. You can also check if you are missing any photos https://www.whitearmor.net/forum/topic/49703-ei-photo-checklist-updated-version-2024/
 2 points
 -
TK25097 Reporting for duty Going to start to climb the ranks, next stop Expert Infantry. Look forwards to meeting you all at troops1 point
-
Hello everyone. I've been in contact with the central garrison, so hoping that will go well. Feels like it's already been a roller-coaster ride with my armor, as I ordered from authenticstormtrooper.com before being directed to these forums. Searched and found a thread with speculation on that site. The kit arrived yesterday and I can confirm that they are selling originalstormtrooper.com kits as the paperwork all says originalstormtrooper.com. So, I searched that and found threads saying not to buy from them either, but they aren't on the official "avoid at all costs" list, so I'm not really sure if any of that matters. I'll find out in 6 days when I go to SiouxperCon and meet the people there.

 1 point
 -
What armor kit do you have? Also where are you on your build? Are you still in the trimming phase? If it helps this is my version1.0 of a document I made going over every detail I could on building mine. I have lots of pics of the waist and legs if it helps: https://docs.google.com/document/d/1zDc4mtEDg0A_SfHcZXgXtmkzhSrBwaReTHWvdrcmMJg/edit?usp=sharing1 point
-
But don't get discouraged! There is no stress, and doing it in your own tempo is always the best when it comes to these things. I must just add that I'm not a Deployment Officer either, I just pointed out some things that can help with the look overall! Regarding the painting of your tube stripes, you have done the arches a bit thin! You have painted them the correct distance from the cheek, so that's great! But did you use two pieces of tape (one above the paint area and one below)? The ends of the lines are straight (an effect of removing masking tape from the paint area), and they are usually a teeny tiny bit thicker! It would really help with the look of the helmet! Painting them with masking tape is much easier than without it! So that considered, very well done! The tape (I feel) makes it easier to do more even stripes since you can be a little less careful with it! They lean the wrong way a little bit, see the reference below! The tops of the stripes lean more forwards than the bottoms, the closer you get to the front of the helmet!1 point
-
Wow. That´s an amazing build. Good work. I wish I had more space. He´d fit in my collection very well.1 point
-
Just to have it mentioned: Here is a comparison to your helmet (also an ATA kit), and it looks like your ear sits a little bit low? EIB thread for comparison The bottom of the ear sticks out! It also looks like your trim is a little bit on the round side compared to what we usually see! EIB thread for comparison1 point
-
Thanks for that, Glen - I haven't had much luck tracking down the Testors in Aus. The Dark Admiralty Grey I have now is quite a bit darker than any of the greys shown in the CRL or reference images. The previous paint that was on parts of my kit (started by a previous member) match PERFECTLY to the Dave M Decals I had, so that looks to be the right shade. Might hit up a few garrison members locally to "borrow" some of theirs or trade for some other colours to get those bits done. Cheers1 point
-
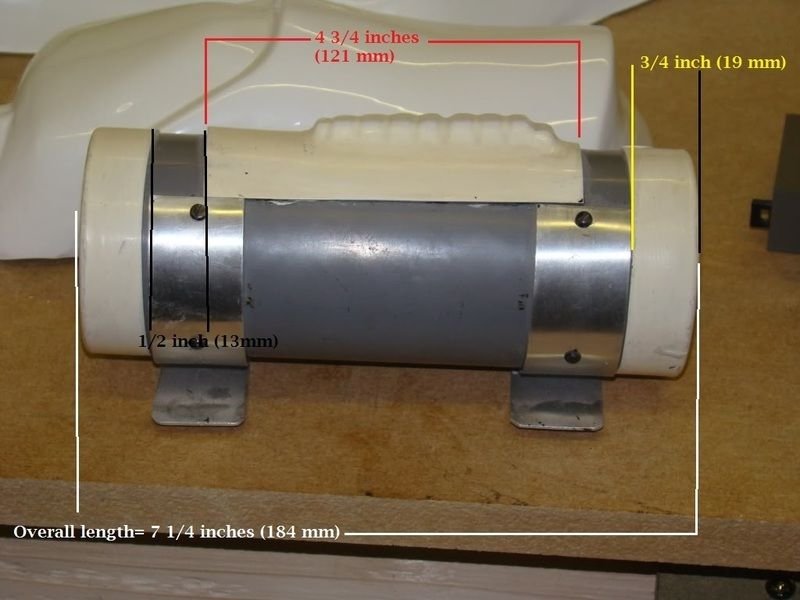
ok. One thing at a time then. I will make the thermal detonator more pretty. I will take pictures with a ruler in the background for reference after adjustments. Thank you for you patience and guidance1 point
-
Here's a Testors conversion sheet, you could try that. I did run across a few threads mentioning that No5 did get lighter @2008 so they may have now gone back to a darker shade now And another from 2008: Got to paint them buttons dude The Humbrol grey colour has changed and is now lighter. I had to dab in a bit of black to correct the colour in my tin We have the Humbrol here in the UK, but I think the guys over the pond have a different brand of paint that is better1 point
-
Sorry, Chris, no idea. I don't know that this thread gets that sort of attention, so maybe there's somewhere else to post that's more appropriate? I Googled a bit and found this as well: https://www.britmodeller.com/forums/index.php?/topic/235135589-we-need-to-talk-about-dark-admiralty-grey/1 point
-
Congratulations Trooper!1 point
-
Great work! Welcome to the ranks!1 point
-
Great news, well done and welcome to the ranks trooper1 point
-
Hi Keith have you reached out to troopers in your local area, you can find them here https://www.501st.com/maps/ A couple of Youtube videos you may find helpful Thigh elastic A few different ways to strap thighs You could also make a build thread, great way to get feedback on your build https://www.whitearmor.net/forum/forum/80-anh-build-threads/ For adding images most use a free online image host, how to here1 point
-
Congratulations Andreas! As a GML of the Spanish Garrison, I can't find anything that would block your approval. Good luck !!!1 point
-
Nice work Very hard to see everything when you are the one in the costume. As a GML I would have no issues with your submission. Good luck with approval1 point
-
Shaped with more of an obvious curve ??1 point
-
I'd like to thank Kat and Merritt for all the info they provided today at SiouxperCon. I picked up some helmet pads to fix my bobble head at ABN on the way home and some E6000 and black screen . I'm just looking for level 1 certification, so after talking with them, I feel more comfortable with the modifications required.1 point