Leaderboard


Popular Content
Showing content with the highest reputation on 07/01/2023 in all areas
-
I’m thinking I’ll probably go with snaps then. If it helps the longevity of the kit and makes it a bit easier to pack/put on them that might be the best bet. If that’s the case are there any recommended strapping pack kits or materials to use?2 points
-
@ukswrath came up with some supports to help take any strain2 points
-
I personally avoided the classic system because of the risk of cracks and wear. What I did was make male side snaps attached to black nylon to glue to the armor and then female side snaps with elastic to hold things together. Similar in idea to the photo previously posted. Here’s some example photos. Sent from my iPad using Tapatalk2 points
-
Oh awesome! That helps a ton! I’m going to read though this then get the materials needed1 point
-
I like using nylon strips, you can make the holes with a solder iron which reduces any snaps pulling out. Nylon also conforms to the armor unlike using plastic bases. Joseph has a nice how to here1 point
-
Hi all, Just a few things I want to check. 1. I’ve already started trimming the sniper knee but please could I get confirmation that my trim line is correct 2. Check on placement of hole for snap fitting on right side of ab 3. Check on placement of holes for the rivets attaching kidney armour/ab armour 4. And as a final question, what drill bit size should I use to make the holes? Thanks everyone, Tim Sent from The Empire1 point
-
Thanks for the feedback, gang. With the supplied info, I think I am going to make a push to get the torso done by the 4th.1 point
-
The screws/brackets are not required at any level Info here if you still wish to add them The bracket screws are 5 mm flat head machine screws Gallery Bracket wire gauge is 1.25mm The bolts that hold the brackets have 5mm wide heads - they are 7mm long and the nut on the other side measures 5.13mm across the flats.The spacing between the holes where the metal brackets are placed was 38mm for the centres of each hole. A great how to thread from @ukswrath on making bracket supports1 point
-
There are many options for interior strapping, and it all comes down to preference as it will not affect approval at any level. Some prefer the bracket system and have been happy with it, but as Glen mentioned there can be issues. The ABS used for a normal set of armor is pretty thin, and although ours doesn't normally go through the rigors of those used on screen (thus the word "stunt") the bracket mounts can pull through the over time. Note in the screen used example below where the screws pulled through the return edge (blue arrows) and had to be re-mounted by the prop crew on the rear using washers. Not pretty, but effective for filming purposes. Not so attractive up close. Some have trooped for years using this method for years with no issues. If you do decide to go this route I would suggest cutting some flat shims from your scrap ABS and gluing them in under the return edges in the areas where the brackets will go for added strength. An alternative would be to mount the screws only (for that classic strapping look) and use the nylon/elastic straps to actually hold the pieced in place. It's a little extra work, but you get the best of both worlds. Note in the above pics from Glen and Kyle that they used the double snap method. Some folks have had success with using one at each join, but a single snap is much more likely to come undone. Having two will help ensure you won't have any "wardrobe malfunctions" during a troop. It's extra work and cost, but for peace of mind it's well worth it IMO. Here is another example:1 point
-
Even at larger size AM armor may still need some help if shins are too big. As long as rear cover strips are straight and not too extreme in size most GMLs I’m sure would be okay with them. The other thing is you could shim the armor and then fill in the seams with abs paste then sand and polish. A process that sounds scarier than it actually is. Just more time and patience required than anything. Sent from my iPad using Tapatalk1 point
-
Definitely mold release Justin, very common practice, even more so on parts that have miner undercuts, like a cap n back of a OTTK bucket. It certainly makes the plastic pop off a mold easier in my experience pulling ABS. Welcome to FISD and our new Valkyries section Tilheyra! As you can see we have members and staff all willing and ready to offer you the best advise in support, to get you approved and trooping in this fantastic kit. A pleasure to have you aboard.1 point
-
I would have preferred to keep the plastic for the spacer, but my greater familiarity with foam led me to think that is the route for these pieces (at least for now). I don't anticipate needing to use any other foam on this project, however! To try and keep the foam spacers looking like the rest of the armor, I plan to "treat" the surface with a heat gun, spray with Plasti Dip, and then spray with the same paint as the rest of the armor.1 point
-
I just wanna circle back super quick btw, if anyone else reads this - I didn't mean to say don't wash your parts. Absolutely wash your parts. It's a good habit and will help help your chances of avoiding paint reactions at a minimum. I literally got some fresh ABS pulled parts in yesterday, and they were covered in a light grease, probably some kind of mold release or something, and I washed everything with a soft sponge and dish soap before doing anything else. I mean specifically that washing a part is not a part of my, and probably does not need to be part of your, regular glue preparation technique. A light scuff will definitely help. E6000 is fantastic when applied correctly for its designed use. Agreed, no need to redo the other ones, but that should help moving forward. Progress looks great. We admittedly don't see the use of a lot of foam over here, as we generally try to stick to the same production techniques as utilized in the sources we replicate... but here's a perfect example of "why not?" and keep us posted with how it works out! Especially after paint, just aim to have it be indistinguishable from the rest of the armor and it should be fine.1 point
-
Leather came in - holster cut, sewn, dyed and fastened.
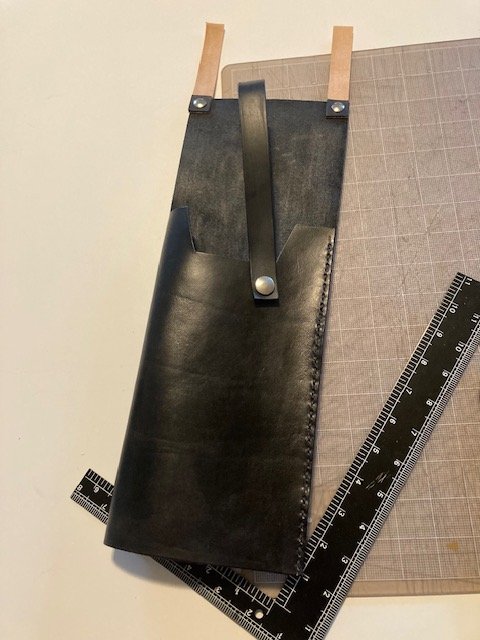 1 point
 -
Some garrisons will allow you to add larger rear covers strips so you should check with your GML. Armor for the larger trooper is AM which you may be better off looking into1 point
-
These two photos show my progress so far. The first photo serves as the "before" image, with the pieces having been laid out just after coming out of the shipping box. The second photo shows the work I have done so far. This work encompasses cutting much of the excess material off the areas of the pieces that will not butt against or overlap other pieces. I am leaving just a little bit of the excess material on with the expectation that this final bit of excess will be removed when I sand the edges with the sanding bits of my Dremel and a sanding block. The excess material in places that may butt up or overlap will remain until I have the opportunity to measure and then fit the pieces, which needs to wait until my friend is available to help me (I imagine this will be way too aggravating if I do this part myself). Anyway, here are the two photos:1 point
-
So I’m at the end of the helmet build road (I think). This has been a lot more difficult than anticipated but enjoyed the challenge. I certainly don’t think this is perfect (but then again where they in the film?) and there are a 101 things I’d change if/when I do this again but I’m pretty pleased with the end result considering I’ve never done anything like this before. FYI, I’ve ordered a spare set of decals as I’m not happy with the left tear. Because of the contours it kept creasing. After multiple attempts the decal started to get more creased so I’ll be replacing that. I welcome your feedback…be gentle [emoji846]1 point