Leaderboard


Popular Content
Showing content with the highest reputation on 05/28/2022 in all areas
-
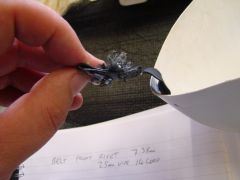
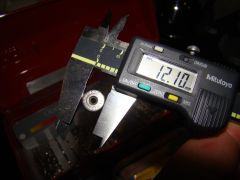
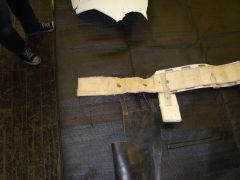
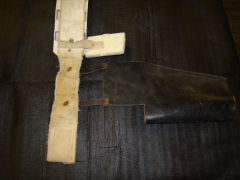
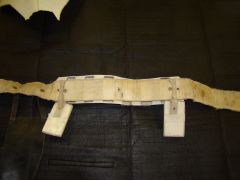
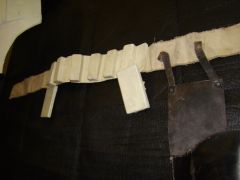
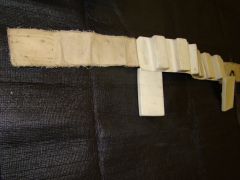
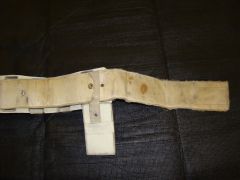
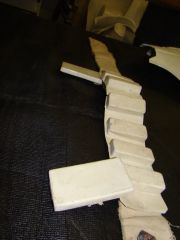
OK, that was easier to fix than I thought. My original thought after my disappointment was it fell into the part of 'should sit at', but it was really resting on the bottom. So the easiest way to fix it was to move the snaps on the belt. Spent most of the time trying to get the exact placement. But overall, much better. Here you can see the snap relocation: Probably didn't need to, but I filled the old holes with Liquid Stitch to prevent fraying.4 points
-
I got a little work done on both calfs this evening, bit of trimming with the shears and fitting the rear coverstrips. I'm going with the velcro closures it seems to give a secure fit.2 points
-
Holy crow, Adam.. looking fantastic! Always great to see a fellow detail freak, and I'm looking forward to watching this build! I still have those "forgotten" greebs if you need them, btw. One thing I noticed was that I'm not overly sure that the pic below is showing scraggly wires. It may be me, but it looks like a flat strip of plastic (like a zip-tie). Apparently they used those to re-attach some of the various pieces on that fell off during production. I also wonder if the missing paint on the front of the power cylinders (as well as the scope greeb missing in a lot of pics) was due to holstering it repeatedly. Hmmmm. I gotta' say that the pic I got the most excited about was this one: FINALLY another pic of that "mystery piece"! Fantastic sleuthing!2 points
-
The Organa Obliterator. The Princess Punisher. The Senator Silencer. The Royalty Reducer. and my personal favorite, The Leia Leveller. My resin QuestDesign broke half of the sight guard randomly on a troop and I found myself on the blasterfactory website buying a metal one to fix the damage. It happened to be during their May 4th sale. They happened to have "ESB E11 kits" on sale with a VERY nice discount, so I ended up with one. I was having a bad day and had the extra cash. A 3rd E-11 became mine. I didn't want another E-11. I'm happy with my Hyperfirm and my QD. But sometimes we just gotta take life as it comes and make space for a new build. Here's the Warmachine after an initial assembly to see how everything fits together. It's just lovely. And surprisingly not too heavy. Fully built, it's about the same weight as my resin QD with the original Stirling stock attached. So anyways, I built this thing and was just smitten. It's such a lovely blaster. I had to build it into something fun, so I started researching and discovered that Mr No-Stripes had an E11 with an M19 scope. A plan formed. The kit came with the M19 scope and T-tracks. I then placed another order for the stuff I was missing - the clip, Hengstler, and power cylinders. I've also got an original Hengstler 400 on the way from @T-Jay. The original counter may get used in another project since I really don't wanna hack it up for the BlastFX, but it'll be really nice to have on hand. And of course I bought the BlastFX kit. I came across a video of a Warmachine E-11 with the kit installed and went completely gaga. No way to not buy it as well. It should be in my hands in 12-16 weeks. So this is gonna be a loooonnnng build. The end is not in sight. Repeat, the end is not in sight. Back to Mr No Stripes. Just look at him. Isn't he heroic? Courageous? A fine figure of a trooper? You can see a lot of details in that above shot thanks to the 4K resolution. His bolt is weathered pretty dark. He's got the chip on top of the scope. There's a shiny rivet on the rear sight. And there are SCRAGGLY WIRES sticking out of his counter and going forward toward the power cylinder. In this shot we can see a bit of key detail - wear on the front power cylinder edges. Very very shiny wear. And also just the bare hint of those scraggly wires. And of course, the hero shot. If the TKs had just stunned Han, Luke, and Chewie in the hanger wouldn't the movie have basically ended right there? But I digress. After sticking my toe into the research and feeling how nice the water was, I went a little deeper. Not much, but into the next scene where Leia is escorted to Vader. Paying careful attention, I was like "oh yes, there's our hero Mr No-Stripes standing behind her right shoulder with his M19 scope." only to be disappointed to see that the trooper in question DID indeed have stripes in about 3 frames of the film. You can just barely see it, but he's a different trooper. Yet it's clearly the same gun. CLEARLY. M19? Check Chip on scope? Check Wear on power cylinders? Check Counter present? Check SCRAGGLY WIRES?!?!?! Check! I did an annotation. The amount of detail that is clearly visible is just outstanding. Love the 4K res screenshots! It even shows that front folding stock greeblie that @justjoseph63 makes. The socket on top of the scope is also really interesting. It looks really tall and if you have a clear enough screen, you can see a bit of separation between the base and the top - I think a chip is actually installed in the socket. So this is the foundation for my entire build - the theory that Mr No Stripes gun and The Escort gun are in fact the same gun. Our hero might not have been carrying it in this particular scene, but it reeeeeaaaaalllllllly looks like the same weapon. It may not be a correct theory, but it sure charges up my imagination and it's the replica blaster that I want to build. And there's a ton of good views of this particular E-11. Combine these pix with the bolt-side view and front view in the hands of Mr No-Stripes and that's about the most complete showing of a prop that a fan can hope for. But that's not all! @PlayfulWolfCub actually created his own replica of this beautiful blaster during his power cylinder production and research. I've borrowed the photos from his PDF. Having this reference from one of the TK Detail Masters is the icing on top. It's gonna be extremely valuable to have as a guide for those slightly blurry parts like the scraggly wires. Anyways, that's my project. I'm excited about this build! (please don't burst my bubble and tell me they're not the same gun)1 point
-
Looking much better. Just remember also that when you have the armor on the belt angle may change a little they tend to angle up towards the rear so make sure you recheck before taking submission photos1 point
-
In case anyone wanted an Imperial Commander Cody concept. (Not perfect) The world seems to be going nuts. However I will try my best to get at least the helmet(to clarify the 501st design) 3D printed this year(hopefully).1 point
-
The shin decals were really bothering me! I took some time and made a small template and used some gaffers tape in place of black vinyl. Hopefully they look a bit better as they now fill that recessed area a lot better! Left Shin=after Right Shin=before1 point
-
Thanks Glen for the honesty. Off to correct it!1 point
-
Had no one else seen that front greeb on the stock in this scene? DID I FIND SOMETHING NEW? lol! I'm beaming. For the wire situation on the blaster, this is my take. I am totally prepared to be wrong and get corrected, but I think this is what's going on. I've spent far too much mental resources on these wires. The easy place to start is this one without a whole lot of detail. It looks like 2 wires to me coming from the Hengstler nose. And then there's all of this. The back view and bottom view match up nicely with the side view to give a good path for that wire (yellow) that seems to be holding the counter onto the rail. It's quite thin. I think it's just black electrical wire. It could be a mega-thin zip tie, but... I mean really really thin. The replica pix from Playfulwolfcub show his wire path (green) and I think it's quite close. I believe the wires are a bit thicker than the ones on his blaster and dip down toward the power cylinders and kinda overlap the red power cyl wires. Maybe. That's my theory right now anyway. And also I noticed that the Leia Leveller has no "OFF" text on the clip.1 point
-
Do one side at a time, wait until completely dry before gluing the other side. Apply downwards pressure on the top of the cover strip, the plastic will flex quite a bit, then wrap tape around tightly. Once you have one piece of tape wrapped around push downwards again then apply tape, your first piece may be a little slack now so you can retighten. You also may want to just clean up the ends of your cover strips, look a little rough and could catch when moving. @ukswrath bicep assembly See how much tape I needed to use on some sections of this build I also have a "how to" in one of my commission build threads, again lots of tap And in case it hasn't been mentioned you need to rough up both armor pieces and coverstrips with some coarse sandpaper, this will help the glue to adhere better1 point
-
I include those (strap and name in Aurebesh) on every order.1 point
-
Very nice and if you want to get really screen accurate you have the outside button covers slightly off center, slightly more towards the ends (note centered is fine all the way to L3 ) And when you come to add your holster1 point
-
Looks like they have gone back to ANH holsters- What looks like a baton is a side view.. as they walk it shows it's width. It's fantastic to see OT troopers, but did anyone notice the cover strips? They look pretty darned thick to me. Among other things it looks like they are using thick soled boots as well... more like FOTK style. And so it begins... the birth of another CRL.1 point
-
Hi Guys, arrived 2 days ago from RS Prop Masters, those guys are Legends, perfect fit, as for the Brian Muir signature helmet !!! its mind blowing. First rushed fit, thigh armour definitely too high. I will upload more when I have chance. Thanks, Eric.

 1 point
 -
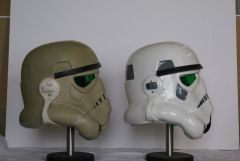
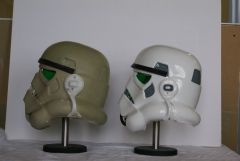
A treasure trove of images of the original suit that RS Props are in possession of. Full credits go to Voice In The Crowd for allowing us to share his pictures, and to RS Props for allowing him to take the pictures.1 point
-